















 Defense
 Vigilance
 Seer
Seer



 How to Craft
 Choose a Crew Skill
 Armormech
 Armstech
 Artifice
 Biochem
 Cybertech
 Synthweaving
 How to Craft Fast
 Gathering Guide
 Rare Materials Guide
 White Materials Guide
 Jawa Junk
 Augments
 Medpacs, Stims and Adrenals
 Synthweaving Crafting Tree




 Crafted Decorations
 Crafted Mounts
 Crafted Dyes
 Crafted Crystals
 Events Calendar
 Galactic Seasons
 PvP Seasons
 Bounty Event
 Double XP Event
 Feast of Prosperity
 Gree Event
 Life Day
 Nightlife Event
 Pirate Incursion Event
 Rakghoul Event
 Spring Abundance Festival
 Swoop Event
 Accessibility HubAll Accessibility guides and info
 DeafPlaying while deaf or hearing-impaired
 BlindPlaying while visually impaired or with low vision
 ColorblindPlaying with colorblindness and settings options
 AnxietyPlaying with general anxiety or social anxiety

 Jedi Knight
 Jedi Consular
 Trooper
 Smuggler
 Sith Warrior
 Sith Inquisitor
 Bounty Hunter
 Imperial Agent
 Bounty Hunter
 Imperial Agent
 Jedi
Jedi Jedi Consular
 Jedi Knight
 Sith
Sith Sith Inquisitor
 Sith Warrior
 Smuggler
 Trooper
 Legacy Gear
 Lightsabers
 Double-Bladed Lightsabers
 Vibroswords
 Double-Bladed Vibroswords
 Blaster Pistols
 Blaster Rifles
 Sniper Rifles
 Blaster Cannons

Blood Hunt is a Flashpoint in Star Wars: The Old Republic that you can run alone, with friends, or with other random players through the groupfinder.
Contents
Blood Hunt

A great threat to the Sith Empire and Galactic Republic has surfaced on the Outer Rim pirate haven Rishi. Working together, Sith Lord Lana Beniko and Republic SIS agent Theron Shan have enlisted help in stopping the Revanite conspiracy before it dismantles both galactic powers from within. The Revanite base on Rishi remains undiscovered, but a clan of Mandalorians with their own island stronghold might provide the coordinates.
How to Start
Battle of Rishi is a Flashpoint meant to be played later in the story, quite a while after your class story is completed. You can encounter it in the story part way through the Shadow of Revan expansion, replay it alone in Story mode, or play it outside of the story with a group in Story, Veteran or Master mode.

Use the tabs above for instructions for how to enter the flashpoint in the story line, and how to enter it in Solo (Story) mode, Veteran mode, and Master mode. The instructions are exactly the same Republic and Imperial side.
- Story: Lvl 55+
- Solo: Lvl 55+
- Veteran: Lvl 15-80
- Veteran Groupfinder: Lvl 53-80
- Master Mode: Lvl 50-80 †
- Master Mode Groupfinder: Lvl 80

Story Instructions


Requirements: To play the Blood Hunt Flashpoint in the story, and receive all the special cutscenes related to the Flashpoint in the story, you will need to be level 55+ and be on the correct quest in the Shadow of Revan chain. If you are below this level, you can not play the story quest or associated quest line for this Flashpoint.

Timeline: In the story, this Flashpoint takes place early on in the Shadow of Revan storyline, on the planet Rishi. It does not make much sense plot-wise to play outside of the story.

Bring a Friend: If you want to bring a friend along for this Flashpoint in Story Mode to do the full story line, you easily can.
If they have not done the Blood Hunt storyline, they can join you in a group and you can follow the exact same steps together as long as they are level 55+.
If they have already run the storyline, they’ll be able to join you in the cutscenes, by walking in the door after you on Rishi. Then after you finish that cutscene with them watching, you’ll be able to enter the Flashpoint, but your friend won’t have any quests so they can’t walk in behind you… tell them to go talk to the nearby Frod Makora alien questgiver and pick up the [Start Story Mode] quest and then they will be able to enter the Flashpoint with you.

They can also use the Solo tab in the Activity Finder to quickly join you once you are already inside the Flashpoint as long as they are level 55+.

Directions to the Story Quest for Blood Hunt: Blood Hunt’s one-time story quest is built in to the Shadow of Revan expansion storyline, once you are on the step called Torch’s Flame.

If you have not yet run through the Shadow of Revans storyline, you can start it from the glowing blue terminal on your ship. You will then run through these missions on the planet of Rishi.
→ Welcome to Rishi
→ A Scoundrel’s Debt
→ Monkey-Lizard Business
→ The Cove Crier
→ In Plain Sight
→ Making a Mark
→ The Slavers
→ Broken Blades
→ Heart of the Aggressor
→ Torch’s Flame
→ Blood Hunt Flashpoint
Once you get to Torch’s Flame, you’ll automatically be on the quest [STORY] Blood Hunt, where you can travel to the Flashpoint entrance and walk in – no need to talk to the questgiver, as you should already be on the quest. The closest quicktravel is Raider’s Cove and run a bit north, then turn east.

If you play in Story Mode, you will also get a Combat Support Droid to help you.

If you lose him, you can re-summon him by left-clicking the blue symbol beside the Blood Hunt quest.

If you can’t see that icon, you can also right-click the item in the Mission Items tab of your inventory.


Story Progress: [STORY] Blood Hunt alone will not progress your storyline – it is simply the repeatable solo version. To work on the overarching story, you also need to be on the quest Torch’s Flame as part of the Shadow of Revan on the step Complete Flashpoint: Blood Hunt and then run the [STORY] Flashpoint: Blood Hunt quest.

Lost the quest? If you lost the Torch’s Flame / Shadow of Revan quest, head back to the terminal on your ship you started at to re-pick up the quest, but keep in mind this story-based introductory quest related to the Shadow of Revan is one-time-per-character. If you lost the ability to walk into the Flashpoint door, or lost the quest with the word Flashpoint in it, you can pick up the [STORY] Flashpoint: Blood Hunt quest from the Frod Makora outside the flashpoint’s entrance.


Solo (Story) Instructions

You can also run this repeatable Flashpoint solo outside of the one-time story quest, at level 55+.

Activity Finder: The FASTEST and EASIEST way to get into the Blood Hunt Flashpoint soo mode is with the Activity Finder. If you are level 55 or higher, click the icon of “three little people” on the bottom right of your screen which will open the Activity Finder Window.
Then choose the Solo tab in the Activity Finder.

On the solo tab, scroll down and find the listing for Blood Hunt on the list under Flashpoints, select it, then click the green Travel button. This will take you right into the Flashpoint!
Bring a Friend: You are allowed to bring friends along for this Flashpoint, you do not have to do it alone even though it is considered soloable. Your friends must also be level 55+, be in a group with you, and then you can all use the Solo Tab of the Activity Finder to get into the Flashpoint, and it will put you together no matter where in the galaxy you started from.
There’s really no need to walk into the Flashpoint manually, but here are the instructions.
Manual Entry: To enter this Flashpoint manually, you must go to the Blood Hunt’s Flashpoint entrance, which is located on the planet of Rishi, which you can fly to on your ship. The Flashpoint questgiver is named Frod Makora. If you don’t see the Solo version it means you are not yet eligible due to being below level 55. The solo, single-player repeatable mode will be called [Start Story Mode] from the questgiver. You can then walk in the nearby door and play the Flashpoint.
Step 1 – Get to Rishi, by flying there with your ship.

Step 2 – Walk to the Blood Hunt entrance in Raider’s Cove. It is in the east. Look for Frod Makora, and choose [Start Story Mode] to start the Flashpoint.
If you play in Story Mode, you will also get a Combat Support Droid to help you.
If you lose him, you can re-summon him by left-clicking the blue symbol beside the Blood Hunt quest.
If you can’t see that icon, you can also right-click the item in the Mission Items tab of your inventory.
Story: [STORY] Flashpoint: Blood Hunt alone will not progress your storyline – it is simply the repeatable solo version. To work on the overarching story, you also need to be on the quest Torch’s Flame on the step Complete Flashpoint: Blood Hunt and then run the [STORY] Flashpoint: Blood Hunt quest. See the Story tab for more info.
Veteran – Republic Instructions

Blood Hunt also has a repeatable 4-player Veteran version. It is meant to be completed by a group with any type of Republic characters in it, you do not necessarily need a tank or healer to complete it. You will likely also have good luck with 2 players and 2 companions, or 3 players and 1 companion.
Group Finder: If you want to queue up and enter Blood Hunt in veteran mode through the group finder, you will need to be level 53-80 and not currently on any Blood Hunt Flashpoint quests or it won’t show up as an option in the group finder. If you are level 53-80, click the icon of “three little people” on the bottom right of your screen which will open the Activity Finder Window. Then choose the Group tab in the Activity Finder.
Filter: If you want to specifically run Blood Hunt and not a random Flashpoint, make sure to choose Veteran Flashpoints, then click the Filter button the right and narrow your choices down to just Blood Hunt before pressing Join Queue. Joining the queue will put you in line to be matched with random players to play Blood Hunt with.
Groupfinder flashpoints do NOT show the cutscenes. To see the cutscenes related to this Flashpoint, you must enter it manually by walking in the door.
Bring a Friend in the Groupfinder: You can queue up with a group of 2, 3, or 4 players in the group finder. If you have a full group of 4, it will bring you straight to the Flashpoint with your full group. If you have 2 or 3 players in your group, the group finder will match you with other random players until you have a full group – but you’ll always be paired with your friends who started off in your group, and will not be split up.
Story: [VETERAN] Blood Hunt will not progress your storyline – it is simply the repeatable group version. If you are a low level, this is the only version that will show up on the actual Flashpoint questgiver in front of the entrance door – so don’t be confused and accidentally enter the group version if you are a low level, as it is not meant to be completed alone.
Veteran Manual Entry (Republic): To enter this Flashpoint manually, you must go to the Blood Hunt’s Flashpoint entrance, which is located on the planet of Rishi, which you can fly to on your ship. The Flashpoint questgiver is named Frod Makora. If you don’t see the Solo version it means you are not yet eligible due to being below level 55. The solo, single-player repeatable mode will be called [Start Veteran Mode] from the questgiver. You can then walk in the nearby door and play the Flashpoint.
Bring a Friend Manually: Veteran Mode Flashpoints are not meant to be completed alone, though highly-skilled, highly-geared, high-level players might be able to. To bring friends along for this Veteran Flashpoint, they’ll need to pick up the Veteran Mode quest from the questgiver – or you can pick up the quest and share it with them, but they’ll still need to walk in the door manually. Characters walking in the door need to be level 15+.
Step 1 – Get to Rishi, by flying there with your ship.
Step 2 – Walk to the Blood Hunt entrance in Raider’s Cove. It is in the east. Look for Frod Makora, and choose [Start Veteran Mode] to start the Flashpoint.
Master – Republic Instructions

Master Mode is the hardest version of Blood Hunt. It is meant to be completed by a high-level high-skilled group at level 80. Most teams will want a Tank, Healer and two Damage characters.
Group Finder: If you want to queue up and enter Blood Hunt in Master Mode through the group finder, you will need to be level 80 and not currently on any Blood Hunt Flashpoint quests or it won’t show up as an option in the group finder. If you are level 80, click the icon of “three little people” on the bottom right of your screen which will open the Activity Finder Window. Then choose the Group tab in the Activity Finder.
Filter: If you want to specifically run Blood Hunt and not a random Flashpoint, make sure to choose Master Flashpoints, then click the Filter button the right and narrow your choices down to just Blood Hunt before pressing Join Queue. Joining the queue will put you in line to be matched with random players to play Blood Hunt with.
Groupfinder flashpoints do NOT show the cutscenes. To see the cutscenes related to this Flashpoint, you must enter it manually by walking in the door.
Bring a Friend in the Groupfinder: You can queue up with a group of 2, 3, or 4 players in the group finder. If you have a full group of 4, it will bring you straight to the Flashpoint with your full group. If you have 2 or 3 players in your group, the group finder will match you with other random players until you have a full group – but you’ll always be paired with your friends who started off in your group, and will not be split up. Your friends all need to be level 80 too.
Story: [MASTER] Blood Hunt will not progress your storyline – it is simply the repeatable difficult group version.
Veteran Manual Entry: To enter this Flashpoint manually, you must go to the Blood Hunt’s Flashpoint entrance, which is located on the planet of Rishi, which you can fly to on your ship. The Flashpoint questgiver is named Frod Makora. If you don’t see the Solo version it means you are not yet eligible due to being below level 55. The solo, single-player repeatable mode will be called [Start Master Mode] from the questgiver. You can then walk in the nearby door and play the Flashpoint.
Bring a Friend Manually: Master Mode Flashpoints are not meant to be completed alone, and are designed for level 80 players who are comfortable with their role and class. To bring friends along for this Master Flashpoint, they’ll need to pick up the Master Mode quest from the questgiver – or you can pick up the quest and share it with them, but they’ll still need to walk in the door manually while you’re in a group. Level 50-80 characters can technically enter Master Mode flashpoints, but all the enemies are level 80, and they will die very quickly.
Step 1 – Get to Rishi, by flying there with your ship.
Step 2 – Walk to the Blood Hunt entrance in Raider’s Cove. It is in the east. Look for Frod Makora, and choose [Start Master Mode] to start the Flashpoint.
Bosses
This Flashpoint has three boss fights and a bunch of mini bosses – the first boss named Kyramla Gemas’rugam aka the Deadly Hairball, then a series of Challenges made of mini-bosses, then Valk and Jos Beroya the Mandalorian couple, and lastly Torch herself.
In story mode, and in Veteran Mode when you have multiple players you can use the medpacs scattered around the bosses. Right-click them to heal yourself.


The following boss info is mainly for story and Veteran mode – Master Mode tactics are not covered in this guide.
Kyramla Gemas’rugam

For the first boss, stay out of the red and blue circles if you can.

The blue spores can be right-clicked and will heal you like a medpac.

When you are done, right-click the triangular door with a skull over it, it will not be glowing blue and is not immediately obvious you can right-click it.

Challenges

After the first boss, you’ll face a randomized set of three challenges, all of which are mini-bosses. There are six potential rooms you will be challenged to fight in, and the other doors will be locked and inaccessible. You may have to look around inside the challenges for the mini-boss, often in the back of the room, or may need to right-click glowing blue objects on the ground until the mini-boss reveals itself.


You might get three of any of these:
- Hodayc Sur’haai <Cunning Eye> Blood Thirsty Raptor
- Dralne Be Te Oya’karir <Strongest of the Hunt> Krakjya
- Adeen Edeemir <Merciless Bite> Klorslug Queen
- Pirun Ut <Water Slime> Skarkla Hunter
- Cerar Be Kyr’am <Mountain of Death> Rancor
- Yustapir Kyramud <River Assassin> Jurgoran
Mandalorian Champions Valk and Jos Beroya

Torch aka She Vizla

Shae Vizla is a surprisingly hard fight, even in solo/story mode, due to her lava mechanics.

She will do one attack where she reveals the lava on the floor, and you will need to step out of the lava squares and safely onto the metal squares. Unfortunately, if you have a companion with you, they are not smart enough to step out of them, and will die if they stay too long on the lava square.

To save them, you need to ‘babysit’ them, and when they are standing in lava, you can run to a safe square yourself, and then set them to “Passive” mode by clicking the icon of a blue man in a shirt crossing his arms in your companion abilities. Even better if you can click it as you run. This will cause them to follow you closely and not attack or heal. When it is safe, and the ground is no longer lava, you can click the icon again to send them back into battle. They keybind for this ability is CONTROL+2 by default.

Shae Vizla will also do a spinning fire attack of doom, and your companion will stand in the center of the ring of fire.

To save them, you need to ‘babysit’ them, and when Shae Vizla starts casting her fire ring you can run safely to the edge of the circle yourself, and then set them to “Passive” mode by clicking the icon of a blue man in a shirt crossing his arms in your companion abilities. Even better if you can click it as you run. This will cause them to follow you closely and not attack or heal. When it is safe, and she’s no longer spinning around on fire, you can click the icon again to send them back into battle. They keybind for this ability is CONTROL+2 by default.

Don’t forget to right-click the glowing blue banner at the end to finish the Flashpoint.
Skips
There is not really any easy way to skip past any enemies in Blood Hunt – the rooms are pretty closely connected, and so many of the enemies in the little rooms pop out of the ground. Luckily there isn’t much trash between boss fights – so don’t worry about skipping around or taking special routes to avoid enemies in this Flashpoint!
Solo Stealth: If you are playing Blood Hunt alone and are on a Stealth character, you can skip some of the enemies, but don’t be surprised you can’t skip a lot of the enemies in the challenge rooms.
Rewards
In addition to the usual rewards of XP, credits, gear and end-game currency, Blood Hunt has the following rewards available.
Decorative Gear Arrangement
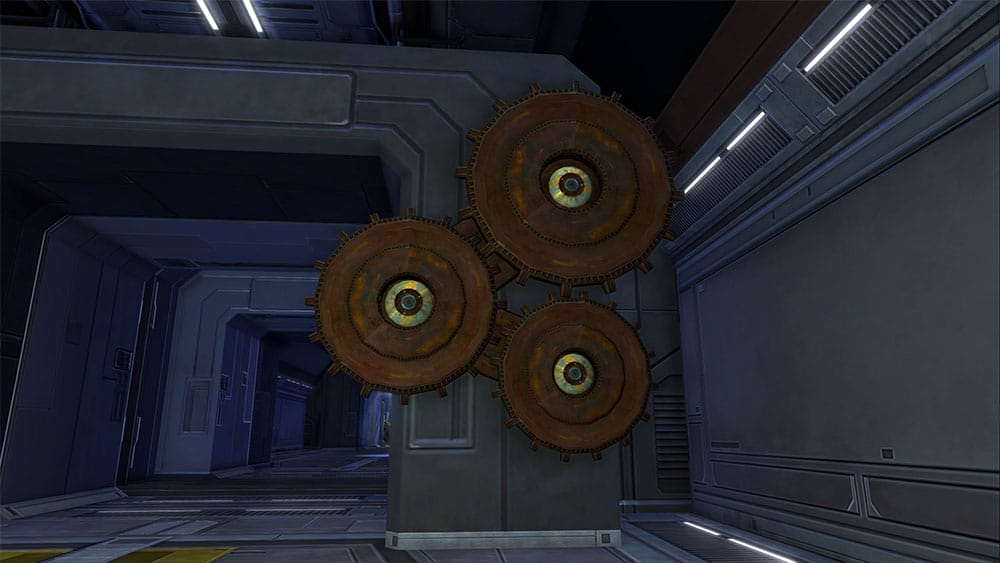
The Decorative Gear Arrangement decoration is an automatic reward for completing the repeatable solo-friendly [STORY] mode, picked up through the Activity Finder. It can also be bought and sold on the GTN.
Stoneray

The Stoneray is a rare drop from the Blood Hunt Flashpoint. The item may actually be called Tamed Stoneray, which is Binds on Equip, so you may be able to find it on the GTN or trade it between characters.
Illumination Probe Crate Decoration
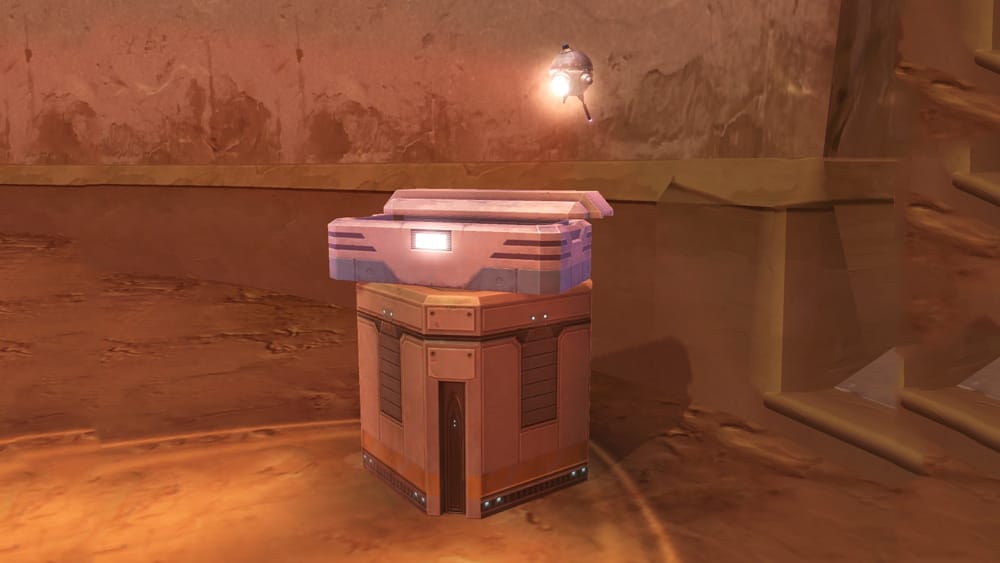
This decoration used to be broken, but as of update 7.5 this decoration has been confirmed to have dropped from Story mode final boss (Shae Vizla). It is still quite rare though.
Objectives
- Search Tracyn Island for Torch
- Defeat Kyramla Gemas’rugam
- Continue Searching for Torch
- Vanquish Challenges
- Confront Torch
- Vanquish Challenges
- Confront Torch
- Defeat the Mandalorian Champions
- Pursue Torch
- Defeat Shae Vizla
- Claim Shae Vizla’s Banner
 Questions or comments? Feel free to send me a message on Twitter






 Discord
  Email swtorista@gmail.com
 Bluesky @swtorista.com
 Reddit /u/swtorista
 Twitch Swtorista
 Youtube
 Patreon
 Twitter @swtorista