Thank you so much for supporting the Swtorista project this month on Patreon! 💚 You're helping keep this amazing project alive and ensuring the future of these guides and resources. ~ Swtorista
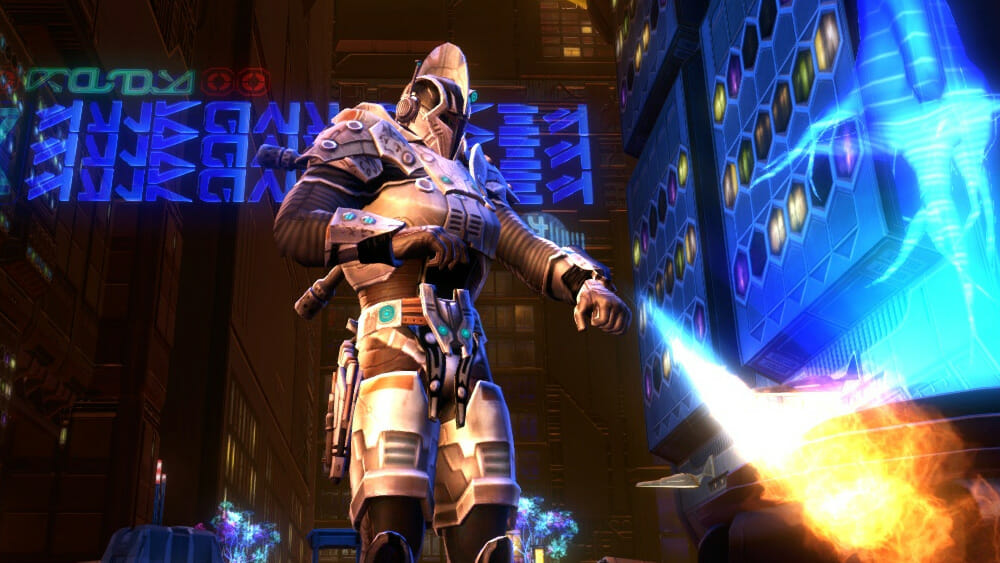
Countless enemies stand in the way of the Sith Empire’s drive for domination. The Empire spares no expense eliminating these threats, offering massive bounties to employ the galaxy’s most lethal hunters. Earning a death mark from the Empire means a life spent in fear, constantly looking over one’s shoulder. It’s never a question if a Bounty Hunter will find you… only when.
Both infamous and anonymous at the same time, Bounty Hunters are far more than mercenaries for hire – they’re heirs to a professional legacy—an ancient brotherhood with a glorious history. Tracking elusive targets across multiple star systems requires expertise, especially when the targets can be prominent, powerful, and often prepared for confrontation. Thrill seekers from all walks of life set out to become Bounty Hunters, but only the most hard-boiled survive in this competitive and deadly business.
The Bounty Hunter’s path lies along the edge – the stakes are always high – and the path only leads two places, to a life of infamous glory… or to a quick and ignominious death.
Bounty Hunter Combat
Whether working for Credits or principle, Bounty Hunters pursue targets with dogged determination and methodical precision. Bounty Hunters are renowned for their versatility on the battlefield and their ability to go toe-to-toe with Force-users. Their legendary abilities in this arena have earned them the nickname “Jedi Killers.” Whoever they must face, Bounty Hunters come armed with the most advanced weaponry on the black market, packing heavy firepower and always keeping a variety of tricks and gadgets at the ready.
Combat Styles Explanation
When creating a Bounty Hunter, you will have the ability to choose between eight tech-user Combat Styles: Commando, Vanguard, Scoundrel, Gunslinger, Mercenary, Powertech, Operative and Sniper, who all fight with blaster weapons, but who each have very different ways of approaching combat. Your Combat Style choice is a permanent choice, so choose wisely.
Second Combat Style: In addition, when you complete Chapter 3 of the Bounty Hunter Origin Story, subscribers will be able to pick up a second Combat Style. This second Combat Style choice is permanent, but you will be able to swap between your first and second choice while playing. You will be able to choose from all eight tech-user Combat Styles. If you are an experienced player and have already completed Chapter 3 of a class story on any of your characters on your server, subscribers will be able to choose your second Combat Style immediately after you create your character, and you won’t have to wait to complete your Bounty Hunter story to pick up your second style.
Disciplines: Once you have chosen your Bounty Hunter’s Combat Style and finished creating your character, you can then choose your Discipline. Your Discipline is your specialized way of fighting, and each Combat Style has three options to choose from. Your Discipline is not a permanent choice, and you can easily switch between the three discipline options tied to your Combat Style. If you are a subscriber who has a second Combat Style chosen, you’ll have six total Disciplines you can choose from at any given time.
Combat Styles
The Bounty Hunter Origin Story can choose between all eight tech-user Combat Styles: Commando, Vanguard, Scoundrel, Gunslinger, Mercenary, Powertech, Operative and Sniper. The “traditional” Combat Styles for the Bounty Hunter are the Powwertech and Mercenary, but all eight of the Combat Styles below are now available for the Bounty Hunter.
Pairs of blasters, deadly heat-seeking missiles, and heavy armor make Mercenaries mobile weapons platforms. There’s no problem extra firepower can’t solve, and no one with any sense gets between Mercenaries and their target.
The Mercenary wields twin blaster pistols and can switch between three different Disciplines: Bodyguard,Arsenal, and Innovative Ordnance. The Mercenary acts as a Damage or Healer role in combat.
Bodyguard
The Bodyguard Mercenary specializes in personal-security services, positioning themselves as the best protection credits can buy. A varied array of kolto dispersement instruments provide the Bodyguard’s targets with protective shells and time-release infusions, offering safe haven in even the most hostile environments.
Arsenal
The Arsenal Mercenary specializes in distance attacks, employing long-range weapons to demolish anyone unlucky enough to be in their sights. Devastating missile-fire combinations and relentless blaster volleys generate a spectacle of explosive brilliance and transform the Bounty Hunter into a virtual artillery platform.
Innovative Ordnance
Taking advantage of chaos they’ve created is what the Innovative Ordnance Mercenary is all about. With an arsenal of explosives and piercing munitions, the I.o. Merc’s barrage of missiles, grenades and weapon blasts cause lasting, destructive damage to all their enemies.
Role: Healer
Weapon: Blaster Pistols
Distance: Long Range
Mirror: Commando – Combat Medic
Role: Damage
Type: Burst Damage
Weapon: Blaster Pistols
Distance: Long Range
Mirror: Commando – Gunnery
Role: Damage
Type: Damage Over Time
Weapon: Blaster Pistols
Distance: Long Range
Mirror: Commando – Assault Specialist
+ Read More
+ Read More
+ Read More
Bodyguard for New Players
Bodyguard is a healer discipline, which makes it harder to learn than a damage class for most new players
Most players recommend to level as a damage discipline, then switch to healer when you are ready for group content
All three healer styles are not too hard to start healing with, just select a player and heal with a green ability
Bodyguard has an easy to use free heal and all the abilities are clickable right away
But it can be harder to learn to keep your energy up compared to other healing disciplines
Arsenal for New Players
Arsenal is long-range, making it easier to hit moving targets compared to melee disciplines for new players
Your main ability requires you stand still while you use it, like a turret, but you can choose to make it activate instantly
Most abilities can simply be used, you don’t need to activate them in any way first
Arsenal is pretty simple to pick up the basics of with a guide
Innovative Ordnance for New Players
Innovative Ordnance is long-range, making it easier to hit moving targets compared to melee disciplines for new players.
Of all the long-range classes, I.O. is the most mobile! You don’t need to stand still for a large majority of your abilities.
If you are able to watch your debuff timers, this discipline is decently easy to learn with a guide, however it is harder to learn than its other Mercenary damage option, Arsenal.
Cool Abilities
Bodyguards are the most flexible type of healer, great for healing groups or single characters.
Kolto Shot, fun easy free heal
Kolto Missile, giant green healing splat on the ground
Responsive Safeguards, reflective super shield with a heal (optional)
Rocket Out, jump backwards quickly
Jet Boost, push enemies back
Concussive Missile, knock an enemy out of the fight
Hydraulic Overrides, fast movement speed and immunity to knockbacks (optional)
Electrodart, short stun (optional)
Stealth Scan, find hidden enemies (optional)
Cool Abilities
Blazing Bolts, flashy blaster fire that changes color based on your weapon’s color crystal IMPERIAL
Heatseeker Missiles, an exploding round that does high damage
Responsive Safeguards, reflective super shield with a heal (optional)
Rocket Out, jump backwards quickly
Jet Boost, push enemies back
Concussive Missile, knock an enemy out of the fight
Hydraulic Overrides, fast movement speed and immunity to knockbacks (optional)
Electrodart, short stun (optional)
Stealth Scan, find hidden enemies (optional)
Cool Abilities
Innovative Ordnance is all about keeping your damage-over-time abilities on your enemy as they are about to run out, rather than button mashing them over and over, and getting free abilities by throwing a bomb then shooting it to blow it up.
Incendiary Missile, what’s not to like about tossing a ball of fire at your opponent?
Serrated Bolt, fires a special round that causes the target to bleed over time
Responsive Safeguards, reflective super shield with a heal (optional)
Rocket Out, jump backwards quickly
Jet Boost, push enemies back
Concussive Missile, knock an enemy out of the fight
Hydraulic Overrides, fast movement speed and immunity to knockbacks (optional)
Electrodart, short stun (optional)
Stealth Scan, find hidden enemies (optional)
Powertech
The best in shielding, defensive tactics, and high-powered flamethrowers combine to make Powertechs impenetrable one-man blockades who get up close and personal to take down enemies of all sizes.
The Powertech wields a single blaster pistol, and can switch between three different Disciplines: Shield Tech,Pyrotech, and Advanced Prototype. The Powertech acts as a Damage or Tank role in combat.
Shield Tech
Launching into the fray with a jetpack-propelled attack and able to withstand powerful offenses, the Powertech trained in the Shield tech specification takes the brunt of the assault while employing a wide range of tech-based attacks to scorch and trip up even the most formidable adversaries.
Pyrotech
Need a light? The Pyrotech-style Powertech add fuel to any firefight with an abundance of vivid, searing flame attacks. From fistfuls of fire to missiles loaded with highly combustible compounds, the Pyrotech’s arsenal allows them to never back down while making sure their enemy burns out in a blaze of destruction.
Advanced Prototype
When stalking dangerous prey, a selection of powerful, high-tech armaments can be a hunter’s best friend. The Advanced Prototype Powertech’s thermal detonators, gauntlet blades and magnetized bracers devastate their intended target while ensuring the Powertech remains on the bleeding edge of any engagement.
Role: Tank
Weapon: Blaster Pistol
Distance: Short Range
Mirror: Vanguard – Shield Specialist
Role: Damage
Type: Damage Over Time
Weapon: Blaster Pistol
Distance: Short Range
Mirror: Vanguard – Plasmatech
Role: Damage
Type: Burst Damage
Weapon: Blaster Pistol
Distance: Short Range
Mirror: Vanguard – Tactics
+ Read More
+ Read More
+ Read More
Shield Tech for New Players
Shield Tech is a tank style, which means it does less damage, but can stay alive more easily
Most players recommend to level as a damage style, then switch to tank when you are ready for group content
In group content, tanks are expected to take a unique leadership role, not just do damage, which can be challenging for new players
Shield Tech is the simplest to learn of the three tanking styles
Powertech tanking is my favorite type of tanking!
Pyrotech for New Players
Pyrotech is very mobile and very easy to jump and move around with while playing.
It is a short-range class, but you can use many of your abilities even if you are farther away, making it easy to hit enemies even if you are not very coordinated when it comes to making your way to your enemy.
All of your abilities can just be used right away, you don’t need to activate them first in any way.
Pyrotech is a DOT or damage-over-time class, which means you set things on fire – then let them burn over time. So to do big damage you need to learn to not simply set your enemy on fire over and over.
Advanced Prototype for New Players
Advanced Prototype is very mobile and very easy to jump and move around with while playing.
It is a short-range class as you need to occasionally be within stabbing distance, but you can use many of your abilities even if you are farther away, making it easy to hit enemies even if you are not very coordinated when it comes to making your way to your enemy.
All but one of your abilities can just be used right away, you don’t need to activate them first in any way.
Advanced Prototype for me was not too hard to learn – it has a few more steps and things to watch for compared to Pyrotech, but wasn’t too bad!
Cool Abilities
Shield Tech focuses on keeping yourself alive with various defensive abilities, self-heals, and shields
Energy Yield, shield that increases as you take damage
Firestorm, blasts a cone of fire at multiple enemies
Deadly Onslaught, hits multiple targets at once with flashy plasma blasts
Shoulder Cannon, fast mini missiles with an optional heal
Taunts, causes enemies to focus on you
Rising Phoenix, leap to an enemy
Hydraulic Overrides, fast movement speed and immunity to knockbacks (optional)
Grapple, pull an enemy to you
Carbonize, stun many enemies around you in carbonite
Electrodart, short stun (optional)
Stealth Scan, find hidden enemies (optional)
Oil Slick, defensive ground oil
Cool Abilities
Pyrotech definitely felt like one of the easiest classes to learn how to play the basics of for me so far with a guide! It’s pretty simple and rotates through key abilities. Even just pressing random buttons worked pretty good, though it didn’t do a ton of damage.
Immolate, deals high fire damage to a target
Thermal Yield, increases both your armor and your damage output
Deadly Onslaught, hits multiple targets at once with flashy plasma blasts
Shoulder Cannon, fast mini missiles
Jet Charge, leap to an enemy (optional)
Hydraulic Overrides, fast movement speed and immunity to knockbacks (optional)
Grapple, pull an enemy to you
Electrodart, short stun (optional)
Stealth Scan, find hidden enemies (optional)
Cool Abilities
Advanced Prototype focuses on stabbing enemies with a knife and using a stacking buff called Power Lode to your advantage.
Energy Burst, unleashes stored energy to deal high damage
Retractable Blade, guts the target with a vibroblade, dealing additional damage over time
Deadly Onslaught, hits multiple targets at once with flashy plasma blasts
Shoulder Cannon, fast mini missiles
Jet Charge, leap to an enemy (optional)
Hydraulic Overrides, fast movement speed and immunity to knockbacks (optional)
Grapple, pull an enemy to you
Electrodart, short stun (optional)
Stealth Scan, find hidden enemies (optional)
Operative
Whether ambushing enemies from stealth or using advanced medical technology to keep colleagues in the fight, Operatives do whatever it takes to advance the agenda of the Empire.
The Operative wields a blaster rifle, and can switch between three different Disciplines: Medicine,Concealment, and Lethality. The Operative acts as a Damage or Healer role in combat.
Medicine
As an accomplished practitioner of the medical arts, the Medicine Operative servers as the preservative backbone of any combat team. Deploying a full complement of sophisticated gadgets to dispense healing kolto and reparative nanotech clouds to one or more targets, the Medicine Operative ensures their allies remain fit for fighting.
Concealment
Striking from the shadows, the Concealment Operative surprises the enemy with a flurry of calculated attacks designed to Stun and debilitate. Then, before the fight gets out of hand, the Concealment Operative can return to a position of stealth, biding their time until the time to strike reveals itself again.
Lethality
The Lethality Operative firmly believes the one true gift that keeps giving is poison. Dispensing potent toxins using a variety of methods, the Lethality Operative’s attacks take a toll over time, corroding the enemy from within until all that’s left is a withered husk that only thinks it still has a chance.
Role: Healer
Weapon: Blaster Rifle
Distance: Long Range
Mirror: Scoundrel – Sawbones
Role: Damage
Type: Burst Damage
Weapon: Blaster Rifle
Distance: Melee Range
Mirror: Scoundrel – Scrapper
Role: Damage
Type: Damage Over Time
Weapon: Blaster Rifle
Distance: Short Range
Mirror: Scoundrel – Ruffian
+ Read More
+ Read More
+ Read More
Medicine for New Players
Medicine is a healer style, which makes it harder to learn than a damage class for most new players
Most players recommend to level as a damage discipline, then switch to healer when you are ready for group content
All three healer styles are not too hard to start healing with, just select a player and heal with a green ability
However Operative Heals has a second resource to manage called Upper Hand, which makes it slightly trickier to start with
Concealment for New Players
Concealment is stabbing range, which means you must be very close to your enemy to attack, but you have a jump ability and roll to help you close the gap between you and your enemy
This style is very mobile and you can easily run and jump around while fighting without any issues!
Most abilities can simply be used, you only need to learn to activate a few of them
Concealment is pretty easy to learn the basics of compared to other disciplines.
Lethality for New Players
Lethality is a damage-over-time discipline which means you need to build up your attacks over time, layering them together, which makes it slightly harder to learn than burst discipline which do damage right away
This style is very mobile and you can easily run and jump around while fighting without any issues!
Most abilities can simply be used, you only need to learn to activate a few of them
Lethality takes slightly longer to learn than other disciplines, but is easier to get really good at compared to many other disciplines
Cool Abilities
Medicine focuses heavily on healing-over-time. Medicine excels at group healing.
Kolto Waves, large group heal
Kolto Probe, heals your target over time and can be used on any number of targets
Recuperative Nanotech, heals your target and additional targets nearby
Stealth, to sneak past enemies, the only healer with stealth available
Infiltrate, group stealth (optional)
Debilitate, short stun (optional)
Scamper, roll forwards quickly
Holotraverse, jump to an enemy (optional)
Flash Bang, group stun/distraction (optional)
Cool Abilities
The Concealment style focuses on knifing enemies, big or small. It’s a fast and fluid discipline.
Stealth, to sneak past enemies, the only healer with stealth available
Infiltrate, group stealth (optional)
Debilitate, short stun (optional)
Scamper, roll forwards quickly
Holotraverse, jump to an enemy (optional)
Flash Bang, group stun/distraction (optional)
Cool Abilities
Stealth, to sneak past enemies, the only healer with stealth available
Infiltrate, group stealth (optional)
Debilitate, short stun (optional)
Scamper, roll forwards quickly
Holotraverse, jump to an enemy (optional)
Flash Bang, group stun/distraction (optional)
Sniper
Identified as the most elite sharpshooters in the galaxy, Snipers use their extensive training to eliminate sensitive targets and turn the tide of battle in the Empire’s favor.
The Sniper is the only class that can wield a Sniper Rifle, and can switch between three different Disciplines: Marksmanship, Engineering, and Virulence. The Sniper acts as a Damage role in combat.
Marksmanship
One perfect shot has the potential to change everything, and no one is more precise than the marksmanship Sniper. From the safety of cover, the Marksmanship Sniper ambushes the enemy and follows up with an encore of penetrating blasts that make extra sure the Sniper’s job is done.
Engineering
Technology – and its application in deploying advanced weaponry – sets the Engineering Sniper apart from the rest. A variety of probes at their disposal allows the Engineering Sniper to attack from a distance with explosions, electrical jolts, and waves of destructive plasma designed to eliminate any target.
Virulence
Some Agents prefer a less direct method of eliminating a target, such as administering poison. Lethal toxins and all-consuming microbes are the domain of the walking biohazard known as the Virulence Sniper, who inflicts lethal shots and lobs corrosive grenades from a safe distance where they can witness the results of their handiwork.
Role: Damage
Type: Burst Damage
Weapon: Sniper Rifle
Distance: Long Range
Mirror: Gunslinger – Sharpshooter
Role: Damage
Type: Damage Over Time
Weapon: Sniper Rifle
Distance: Long Range
Mirror: Gunslinger – Saboteur
Role: Damage
Type: Damage Over Time
Weapon: Sniper Rifle
Distance: Long Range
Mirror: Gunslinger – Dirty Fighting
+ Read More
+ Read More
+ Read More
Marksmanship for New Players
Marksmanship has you take cover and not move. Cover makes Marksmanship a very difficult class for newer gamers to learn, as many fights require moving around – but you can ignore the cover mechanic while learning Marksmanship if you want as all but one ability can still be used out of cover.
Marksmanship is long range – if you can handle the cover mechanic, you can hit targets very, very far away compared to most classes which makes it easier to find targets to hit than short-range classes.
Marksmanship is the simplest of the three Sniper disciplines – using a very basic move set, you can get away with using only five abilities if you aren’t worried about doing max damage.
I was originally intimidated by the number of abilities Marksmanship had, but found it very easy and intuitive to play once I read a guide and it felt there was less to memorize than many other disciplines.
I was originally intimidated by the number of abilities Marksmanship had, but found it very easy and intuitive to play once I read a guide and it felt there was less to memorize than many other disciplines.
Engineering for New Players
Engineering requires that you take cover and not move for many of your abilities to work well. Cover makes Marksmanship a very difficult class for newer gamers to learn, as many fights require moving around.
Engineering is long range – if you can handle the cover mechanic, you can hit targets very, very far away compared to most classes which makes it easier to find targets to hit than short-range classes.
When I was learning Engi, I found it was easy to learn the basics of, but harder to fully learn than the other two Gunslinger disciplines.
Virulence for New Players
Virulence requires that you take cover and not move for many of your abilities to work. Cover makes Marksmanship a very difficult class for newer gamers to learn, as many fights require moving around – but you can ignore the cover mechanic while learning Virulence if you want as all but one ability can still be used out of cover.
Virulence is long range – if you can handle the cover mechanic, you can hit targets very, very far away compared to most classes which makes it easier to find targets to hit than short-range classes.
If you are able to watch your debuff timers, this discipline is decently easy to learn with a guide.
Cool Abilities
Marksmanship focuses on long range pistol attacks, taking advantage of a free attack available after every main attack, and taking advantage of their large number of buffs.
Entrench, become immoveable
Covered Escape, roll and go into cover
Cover Pulse, knock everyone away form you while in cover
Ballistic Shield, large group shield (optional)
Orbital Strike, your ship attacks for you (optional)
Cool Abilities
Entrench, become immoveable
Covered Escape, roll and go into cover
Ballistic Shield, large group shield (optional)
Cover Pulse, knock everyone away form you while in cover
Orbital Strike, your ship attacks for you (optional)
Flash Bang, group stun/distraction (optional)
Cool Abilities
Virulence focuses on making sure you have your Corrosive Dart and Corrosive Grenade debuffs on your current target before using Cull, a channeled ability that is your weakest attack on its own, but generating the biggest hits you can do if supported by your Damage over Time abilities at the right time.
Entrench, become immoveable
Covered Escape, roll and go into cover
Cover Pulse, knock everyone away form you while in cover
Ballistic Shield, large group shield (optional)
Orbital Strike, your ship attacks for you (optional)
Flash Bang, group stun/distraction (optional)
Commando
Trained in advanced assault tactics and weaponry, Commandos charge battlefields with massive blaster cannons, overwhelming their enemies with brute firepower. Whether taking out an enemy bunker with focused fire or driving back an Imperial charge with a hail of concussive bolts, the Commando’s high-powered hardware dominates the scene, laying waste to all unfortunates who fall within its range. Many of the Republic’s greatest military victories can be credited to the decisive actions of a Commando in the field.
The Commando is the only Combat Style that wields an Assault Cannon and can switch between three different Disciplines: Combat Medic,Gunnery, and Assault Specialist. The Commando acts as a Damage or Healer role in combat.
Combat Medic
Just behind the front line, the Combat Medic Commando uses medical know-how and an array of tools to keep their allies in pristine fighting shape. Damage monitoring equipment and advanced kolto delivery systems allow the Combat Medic to maintain the offense’s forward momentum.
Gunnery
The gunnery Commando specializes in ranged cannon attacks, employing long-range weapons to demolish anyone unlucky enough to be in their sights. Devastating blaster round combinations and relentless assault cannon volleys generate a spectacle of explosive brilliance and transform the Commando into a virtual blaster storm.
Assault Specialist
Using the chaos of the battlefield to their advantage is the Assault Specialist Commando’s forte. Loaded to the brim with incendiary ordnance and perforating bolts, the Assault Specialist’s volleys and explosions add to the pandemonium – causing massive damage to their enemies all the while.
Role: Healer
Weapon: Blaster Cannon
Distance: Long Range
Mirror: Mercenary – Bodyguard
Role: Damage
Type: Burst Damage
Weapon: Blaster Cannon
Distance: Long Range
Mirror: Mercenary – Gunnery
Role: Damage
Type: Damage Over Time
Weapon: Blaster Cannon
Distance: Long Range
Mirror: Mercenary – Innovative Ordnance
+ Read More
+ Read More
+ Read More
Combat Medic for New Players
Combat Medic is a healer discipline, which makes it harder to learn than a damage class for most new players
Most players recommend to level as a damage discipline, then switch to healer when you are ready for group content
All three healer styles are not too hard to start healing with, just select a player and heal with a green ability
Combat Medic has an easy to use free heal and all the abilities are clickable right away
But it can be harder to learn to keep your energy up compared to other healing disciplines
Gunnery for New Players
Gunnery is long-range, making it easier to hit moving targets compared to melee disciplines for new players
Your main ability requires you stand still while you use it, like a turret, but you can choose to make it activate instantly
Most abilities can simply be used, you don’t need to activate them in any way first
Gunnery is pretty simple to pick up the basics of with a guide
Assault Specialist for New Players
Assault Specialist is long-range, making it easier to hit moving targets compared to melee disciplines for new players.
Of all the long-range classes, Assault Specialist is the most mobile! You don’t need to stand still for a large majority of your abilities.
If you are able to watch your debuff timers, this discipline is decently easy to learn with a guide, however it is harder to learn than its other Mercenary damage option, Gunnery.
Cool Abilities
Combat Medics are the most flexible type of healer, great for healing groups or single characters.
Med Shot, green beam of love heal, very visible and fun
Kolto Bomb, giant green healing splat on the ground
Echoing Deterrence, reflective super shield with a heal (optional)
Propulsion Round, jump backwards quickly
Concussion Charge, push enemies back
Concussive Round, knock an enemy out of the fight
Hold the Line, fast movement speed and immunity to knockbacks (optional)
Cryo Grenade, short stun (optional)
Stealth Scan, find hidden enemies (optional)
Cool Abilities
Boltstorm, flashy blaster fire that changes color based on your weapon’s color crystal
Demolition Round, an exploding round that does high damage
Electro Net, slows your enemy in a net and makes them take damage when they move
Echoing Deterence, reflective super shield with a heal (optional)
Propulsion Round, jump backwards quickly
Concussion Charge, push enemies back
Concussive Round, knock an enemy out of the fight
Hold the Line, fast movement speed and immunity to knockbacks (optional)
Cryo Grenade, short stun (optional)
Stealth Scan, find hidden enemies (optional)
Cool Abilities
Assault Specialist is all about keeping your damage-over-time abilities on your enemy as they are about to run out, rather than button mashing them over and over, and getting free abilities by throwing a bomb then shooting it to blow it up.
Incendiary Round, what’s not to like about tossing a ball of fire at your opponent?
Serrated Bolt, fires a special round that causes the target to bleed over time
Electro Net, slows your enemy in a net and makes them take damage when they move
Echoing Deterence, reflective super shield with a heal (optional)
Propulsion Round, jump backwards quickly
Concussion Charge, push enemies back
Concussive Round, knock an enemy out of the fight
Hold the Line, fast movement speed and immunity to knockbacks (optional)
Cryo Grenade, short stun (optional)
Stealth Scan, find hidden enemies (optional)
Vanguard
Unstoppable and utterly fearless, Vanguards wade into battle wearing advanced heavy armor. They are the first and best line of defense in the Republic military. These steadfast soldiers ignore personal risk, deliberately stepping into the line of fire to divert danger from allies and innocents. Though their tactical role is inherently dangerous, Vanguards have an uncanny survivability due to their expert defensive tactics and the advanced technology at their disposal.
The Vanguard wields a Blaster Rifle, and can switch between three different Disciplines: Shield Specialist,Plasmatech, and Tactics. The Vanguard acts as a Damage or Tank role in combat.
Shield Specialist
Storming to the front line with a powerful charge, the Shield Specialist Vanguard can withstand any incoming offensive. The Shield Specialist boldly takes the brunt of the attack while employing a wide range of tech-based attacks to gas, blast and jolt their enemies into oblivion.
Plasmatech
Vanguards adamant on burning their way through hostile forces can do so effectively with the latest in weaponized plasma technology. The Plasmatech Vanguard stands their own, striking their enemy with waves and rounds of raw incendiary power that persists in their searing destruction.
Tactics
The Tactics Vanguard is a pro at executing a focused line of attack on a hostile target with great efficiency. From up-close vibroblades in the gut to deadly charges of explosive plastique thrown from a distance, all manner of effective strategies for eliminating enemies are at the Tactics Vanguard’s disposal.
Role: Tank
Weapon: Blaster Rifle
Distance: Short Range
Mirror: Powertech- Shield Tech
Role: Damage
Type: Damage Over Time
Weapon: Blaster Rifle
Distance: Short Range
Mirror: Powertech – Pyrotech
Role: Damage
Type: Burst Damage
Weapon: Blaster Rifle
Distance: Short Range
Mirror: Powertech – Advanced Prototype
+ Read More
+ Read More
+ Read More
Shield Specialist for New Players
Shield Specialist is a tank style, which means it does less damage, but can stay alive more easily
Most players recommend to level as a damage style, then switch to tank when you are ready for group content
In group content, tanks are expected to take a unique leadership role, not just do damage, which can be challenging for new players
Shield Specialist is the simplest to learn of the three tanking styles
Vanguard tanking is my favorite Combat Style and main character!
Plasmatech for New Players
Plasmatech is very mobile and very easy to jump and move around with while playing.
It is a short-range class, but you can use many of your abilities even if you are farther away, making it easy to hit enemies even if you are not very coordinated when it comes to making your way to your enemy.
All of your abilities can just be used right away, you don’t need to activate them first in any way.
Plasmatech is a DOT or damage-over-time class, which means you set things on fire – then let them burn over time. So to do big damage you need to learn to not simply set your enemy on fire over and over.
Tactics for New Players
Tactics is very mobile and very easy to jump and move around with while playing.
It is a short-range class as you need to occasionally be within stabbing distance, but you can use many of your abilities even if you are farther away, making it easy to hit enemies even if you are not very coordinated when it comes to making your way to your enemy.
All but one of your abilities can just be used right away, you don’t need to activate them first in any way.
Tactics for me was not too hard to learn – it has a few more steps and things to watch for compared to Plasmatech, but wasn’t too bad!
Cool Abilities
Shield Specialist focuses on keeping yourself alive with various defensive abilities, self-heals, and shields
Infused Kolto Packs, shield that increases as you take damage
Ion Storm, blasts a cone of ionizing energy at multiple enemies
Artillery Blitz, hits multiple targets at once with flashy plasma blasts
Shoulder Cannon, fast mini missiles with an optional heal
Taunts, causes enemies to focus on you
Impact Charge, leap to an enemy
Hold the Line, fast movement speed and immunity to knockbacks (optional)
Harpoon, pull an enemy to you
Neural Surge, stun many enemies around you in carbonite
Cryo Grenade, short stun (optional)
Stealth Scan, find hidden enemies (optional)
Riot Gas, defensive gas cannister
Cool Abilities
Plasmatech definitely felt like one of the easiest classes to learn how to play the basics of for me so far with a guide! It’s pretty simple and rotates through key abilities. Even just pressing random buttons worked pretty good, though it didn’t do a ton of damage.,
Durasteel Armor, increases both your armor and your damage output
Plasma Flare, deals high plasma damage to a target
Artillery Blitz, hits multiple targets at once with flashy plasma blasts
Shoulder Cannon, fast mini missiles
Storm, leap to an enemy (optional)
Hold the Line, fast movement speed and immunity to knockbacks (optional)
Harpoon, pull an enemy to you
Cryo Grenade, short stun (optional)
Stealth Scan, find hidden enemies (optional)
Cool Abilities
Tactics focuses on stabbing enemies with a knife and using a stacking buff called Power Lode to your advantage.
Cell Burst, unleashes stored energy to deal high damage
Gut, guts the target with a vibroblade, dealing additional damage over time
Artillery Blitz, hits multiple targets at once with flashy plasma blasts
Shoulder Cannon, fast mini missiles
Storm, leap to an enemy (optional)
Hold the Line, fast movement speed and immunity to knockbacks (optional)
Harpoon, pull an enemy to you
Cryo Grenade, short stun (optional)
Stealth Scan, find hidden enemies (optional)
Scoundrel
The Scoundrel doesn’t have time for politeness or a fair fight. In addition to their trusty blaster, the Scoundrel packs a stealth belt, a scattergun and a med pack–everything they needs to get in, knock the enemy for a loop and get out alive. Being invisible works best, but even when Sith fly through the air waving Lightsabers all they get to do is look surprised as the Scoundrel’s scattergun sends them back the way they came. The Scoundrel always shoots first. In addition to their trusty blaster, Scoundrels pack a stealth belt, scattergun, and med pack—everything needed to get in, knock the enemy for a loop, and get out alive.
The Scoundrel wields a Blaster Pistol and a scattergun, and can switch between three different Disciplines: Sawbones,Scrapper, and Ruffian. The Scoundrel acts as a Damage or Healer role in combat.
Sawbones
As an Underworld figure armored with the latest advances in medical technology, the Sawbones Scoundrel is a crucial ally. From healing a single target to many at once, distributing emergency medpacs and clouds of healing kolto, the Sawbones ensures that their crew will endure throughout the heat of battle.
Scrapper
Holding no punches, the Scrapper Scoundrel never backs down from a fight – so long as said fight is on their terms. Able to hide from the fray, the Scrapper can sucker punch and bludgeon their adversary, ducking back out before things get too hairy and biding their time until the moment is right to scrap once more.
Ruffian
Never shy about taking advantage of any opportunity, the Ruffian is a rough-and-tumble Scoundrel able to handle any fight, big or small. Inciting chaos with a shrapnel bomb and then coming in close for a shot at point-blank range, the Ruffian Scoundrel makes devious moves that keep their enemies reeling.
Role: Healer
Weapon: Blaster Pistol
Distance: Long Range
Mirror: Operative – Medicine
Role: Damage
Type: Burst Damage
Weapon: Blaster Pistol
Distance: Melee Range
Mirror: Operative – Concealment
Role: Damage
Type: Damage Over Time
Weapon: Blaster Pistol
Distance: Short Range
Mirror: Operative – Lethality
+ Read More
+ Read More
+ Read More
Sawbones for New Players
Sawbones is a healer style, which makes it harder to learn than a damage class for most new players
Most players recommend to level as a damage discipline, then switch to healer when you are ready for group content
All three healer styles are not too hard to start healing with, just select a player and heal with a green ability
However Scoundrel Heals has a second resource to manage called Upper Hand, which makes it slightly trickier to start with
Scrapper for New Players
Scrapper is punching range, which means you must be very close to your enemy to attack, but you have a jump ability and roll to help you close the gap between you and your enemy
This style is very mobile and you can easily run and jump around while fighting without any issues!
Most abilities can simply be used, you only need to learn to activate a few of them
Scrapper is pretty easy to learn the basics of compared to other disciplines.
Ruffian for New Players
Ruffian is a damage-over-time discipline which means you need to build up your attacks over time, layering them together, which makes it slightly harder to learn than burst discipline which do damage right away
This style is very mobile and you can easily run and jump around while fighting without any issues!
Most abilities can simply be used, you only need to learn to activate a few of them
Scrapper takes slightly longer to learn than other disciplines, but is easier to get really good at compared to many other disciplines
Cool Abilities
Sawbones focuses heavily on healing-over-time. Sawbones excel at group healing.
Kolto Waves, large group heal
Slow-release Medpack, heals your target over time and can be used on any number of targets
Kolto Cloud, heals your target and additional targets nearby
Stealth, to sneak past enemies, the only healer with stealth available
Smuggle, group stealth (optional)
Dirty Kick, short stun (optional)
Scamper, roll forwards quickly
Trick Move, jump to an enemy (optional)
Flash Grenade, group stun/distraction (optional)
Surrender, drop all your money and lose enemies’ attention
Cool Abilities
The Scrapper style focuses on punching enemies in the face, big or small. It’s a fast and fluid discipline.
Stealth, to sneak past enemies
Smuggle, group stealth (optional)
Dirty Kick, short stun (optional)
Scamper, roll forwards quickly
Trick Move, jump to an enemy (optional)
Flash Grenade, group stun/distraction (optional)
Surrender, drop all your money and lose enemies’ attention
Cool Abilities
Stealth, to sneak past enemies
Smuggle, group stealth (optional)
Dirty Kick, short stun (optional)
Scamper, roll forwards quickly
Trick Move, jump to an enemy (optional)
Flash Grenade, group stun/distraction (optional)
Surrender, drop all your money and lose enemies’ attention
Gunslinger
Master of the trick shot, the first to dive for cover and willing to take advantage of every opportunity, the Gunslinger and his dual blasters are the perfect team. The Gunslinger can shoot out a man’s legs to keep him from charging, blind him so he can’t get to his weapons or inflict serious injuries for maximum distraction. There’s a right target for ending every disagreement and the Gunslinger knows them like the inside of his ship.
The Gunslinger wields dual blaster pistols, and can switch between three different Disciplines: Sharpshooter, Saboteur, and Dirty Fighting. The Gunslinger acts as a Damage role in combat.
Sharpshooter
Armed with the steely fortitude required to set up the perfect shot, the Sharpshooter is the Gunslinger at its most devious. Aiming from distant cover, the Sharpshooter goes for a devestating opening salvo, following up with vicious trick shots and penetrating rounds, putting a definitive end to the fight they started.
Saboteur
One of the perks of being a Saboteur is access to all the latest tools of any trade – including the many high-tech charges and grenades in the Saboteur Gunslinger’s arsenal. Able to wreak havoc on their intended target from a safe distance, the Saboteur is a craft, resourceful and incendiary master of mayhem.
Dirty Fighting
As a Gunslinger who finds nothing honorable about losing in a scrap, the Dirty Fighting Gunslinger doesn’t pull punches. Lobbed bombs and cheap shots are just a sampling of the Dirty Fighting Gunslinger’s bag of cruel tricks that can cause their target untold continuous suffering while the Gunslinger stands back with a satisfied smile.
Role: Damage
Type: Burst Damage
Weapon: Double Blaster Pistols
Distance: Long Range
Mirror: Sniper – Marksmanship
Role: Damage
Type: Damage Over Time
Weapon: Double Blaster Pistols
Distance: Long Range
Mirror: Sniper – Engineering
Role: Damage
Type: Damage Over Time
Weapon: Double Blaster Pistols
Distance: Long Range
Mirror: Sniper – Virulence
+ Read More
+ Read More
+ Read More
Sharpshooter for New Players
Sharpshooter has you take cover and not move. Cover makes Sharpshooter a very difficult class for newer gamers to learn, as many fights require moving around – but you can ignore the cover mechanic while learning Sharpshooter if you want.
Sharpshooter is long range – if you can handle the cover mechanic, you can hit targets very, very far away compared to most classes which makes it easier to find targets to hit than short-range classes.
Sharpshooter is the simplest of the three Gunslinger disciplines – using a very basic move set, you can get away with using only 4 abilities if you aren’t worried about doing max damage.
I was originally intimidated by the number of abilities Sharpshooter had, but found it very easy and intuitive to play once I read a guide and it felt there was less to memorize than many other disciplines.
Saboteur for New Players
Saboteur requires that you take cover and not move for many of your abilities to work well. Cover makes Sharpshooter a very difficult class for newer gamers to learn, as many fights require moving around.
Saboteur is long range – if you can handle the cover mechanic, you can hit targets very, very far away compared to most classes which makes it easier to find targets to hit than short-range classes.
When I was learning Saboteur, I found it was easy to learn the basics of, but harder to fully learn than the other two Gunslinger disciplines.
Dirty Fighting for New Players
Dirty Fighting requires that you take cover and not move for many of your abilities to work. Cover makes Sharpshooter a very difficult class for newer gamers to learn, as many fights require moving around – but you can ignore the cover mechanic while learning Dirty Fighting if you want as all but one ability can still be used out of cover.
Dirty Fighting is long range – if you can handle the cover mechanic, you can hit targets very, very far away compared to most classes which makes it easier to find targets to hit than short-range classes.
If you are able to watch your debuff timers, this discipline is decently easy to learn with a guide.
Cool Abilities
Sharpshooter focuses on long range pistol attacks, taking advantage of a free attack available after every main attack, and taking advantage of their large number of buffs.
Hunker Down, become immoveable
Hightail It, roll and go into cover
Scrambling Shield, large group shield (optional)
Bombing Run, your ship attacks for you (optional)
Flash Grenade, group stun/distraction (optional)
Cool Abilities
Saboteur is all about shooting things, throwing grenades, and setting things on fire!
Hunker Down, become immoveable
Hightail It, roll and go into cover
Scrambling Shield, large group shield (optional)
Bombing Run, your ship attacks for you (optional)
Flash Grenade, group stun/distraction (optional)
Cool Abilities
Dirty Fighting focuses on making sure you have Vital Shot and Shrap Bomb debuffs on your current target before using Wounding Shots, a channeled ability that is your weakest attack on its own, but generating the biggest hits you can do if supported by your Damage over Time abilities at the right time.
Hunker Down, become immoveable
Hightail It, roll and go into cover
Scrambling Shield, large group shield (optional)
Bombing Run, your ship attacks for you (optional)
Flash Grenade, group stun/distraction (optional)
Bounty Hunter Story
The Bounty Hunter storyline focuses on the Great Hunt, a competition between the best Bounty Hunters in the galaxy, which will eventually lead them to parlay with one of the most fearsome groups in the galaxy: the Mandalorians.
Players interested in the Bounty Hunter storyline can expect what is probably the most straightforward storyline in SWTOR: Hunting Bounties. Highlighted storybeats include competing for honor and glory in a galaxy-wide hunting competition, and retaliating after becoming the republics most wanted criminal. Unlike the other Imperial stories, the Bounty Hunter feels most similar to the Republic Smuggler, as you are not technically Imperial but take many jobs from the Criminal Cartels and the Empire throughout the story (Bounty Hunting is illegal in Republic Space during the cold-war). If simple carbonite-or-dead bounties aren’t enough, be assured there is also plenty of Mandalorian lore to be found in the Hunter storyline as well, from Beskar to current powerful clans to even learning some of the Mando’a language yourself. Whether players want to emulate a tough, ruthless bounty hunter like Bossk or Cad Bane only in it for the credits, or an honorable and proud Mandolorian like Clan Viszla, Kryze, or even Fett, the Bounty Hunter storyline has room for (and inspiration from) both.
Finding and following the Bounty Hunter story is easy – just follow the purple quests after you create your character. In addition to your class quest, there are thousands of other quests and storylines that are optional to complete. You can learn more about these quests in the Story Order Guide.
Species
The Bounty Hunter origin story is normally restricted to Humans, Cyborgs and Zabraks for free-to-play players, and Chiss, Rattataki, Humans, Cyborgs and Zabraks for subscribers. However, all species can be unlocked for all classes through various different methods, so if you want to play a different species, you can make it happen. Learn more about unlocking species.
Species
Species Name
Free-to-Play
Subscribed
Unlocks
Human
Yes
Yes
Automatically unlocked
Cyborg
Yes
Yes
Automatically unlocked
Zabrak (Neutral)
Yes
Yes
Can be unlocked
Chiss
No
Yes
Can be unlocked
Rattataki
No
Yes
Can be unlocked
Mirialan
No
No
Can be unlocked
Twi'lek
No
No
Can be unlocked
Miraluka
No
No
Can be unlocked
Zabrak (Red)
No
No
Can be unlocked
Sith Pureblood
No
No
Can be unlocked
Nautolan
No
No
Can be unlocked
Togruta
No
No
Can be unlocked
Cathar
No
No
Can be unlocked
Armor & Weapons
The Bounty Hunter wears the heaviest armor in the game, with each set custom tailored for each Bounty Hunter’s particular style. However, the player can use the Outfit Designer system to wear whatever armor they want – they are not confined to the traditional Bounty Hunter styles. While high-level Bounty Hunters will need to focus on specific types of equipment to be effective with their Combat Class, they can have the appearance of any armor they choose using the Outfitter system.
Each Bounty Hunter Combat Style focuses on wielding a different type of blaster style, and your Bounty Hunter’s weapon will be restricted to the weapon of that Combat Style. As a Bounty Hunter, you’ll start out with a useful weapon from level 1.
Bounty Hunter Companions
The Bounty Hunter will receive five unique companions as they play their Origin Story, who can accompany them in the story or in to combat. Later in the story, you can recruit additional companions to your cause. There are many romance options available, including with some of Origin Story companions.
🛑 Story Spoilers Ahead!
Mako
Nobody on Nar Shaddaa knows quite where Mako came from but everyone agrees she was born to be a slicer. By the time she was seven it was clear she had an unnatural affinity for all things computer-related and she quickly taught herself all known programming languages. At eight, Mako crashed the accounts of a Red Light Sector orphanage that was attempting to sell her to the highest bidder. With credits in hand and marketable skills she soon found herself running with some of the more notorious slicer gangs on Nar Shaddaa.
Years later Mako was found wounded in an alley by an aging bounty hunter named Braden. He needed a tech specialist for his crew and she needed to get off the moon until the job her “friends” had so spectacularly blown faded a bit from memory. With Braden and his crew, Mako discovered a love of underground bounty hunter culture, a code of honor that gave her life structure and most importantly, her first real family.
Gault Renow
As an unknown mercenary living under the radar of both the Republic and Empire, Gault Rennow has enjoyed a relatively quiet existence as a gun-for-hire. But before he took on the name of “Gault Rennow”, the smooth-talking Devaronian was known throughout the criminal underworld as Tyresius Lokai, a notorious smuggler and con artist, whose talents for separating the wealthy and powerful with their credits and cargo quickly made him one of the most infamous grifters in the galaxy.
Lokai was able to amass a small fortune, but he also amassed a sizeable debt and made many enemies across the galaxy. Many times over, it seemed that Lokai was backed into a corner for which there seemed to be no escape, only to slip away at the last moment.
As his bounties mounted, so did his paranoia. Constantly having to look over his shoulder to make sure he wasn’t met with the barrel of a blaster pistol, Lokai began to look for a way out of his predicament while not having to give up his lifestyle. When the opportunity for a fresh beginning finally presented itself, “Tyresius Lokai” was no more – and “Gault Rennow” was born.
Torian Cadera
Torian Cadera has devoted his life to following Mandalorian traditions, honoring the codes of honor and discipline with an unwavering dedication. His devotion is born from far more than a simple desire to gain acceptance among his people, however; he works tirelessly to erase a stain left on his honor and overcome a stigma that has left him an outcast in the eyes of his own clansmen.
As a child, Torian’s father was the leader of a respected Mandalorian clan. When the title of Mandalore was passed to the warrior Artus, the clans were called on to unite and fight alongside the Sith Empire. When Torian’s father refused, a schism was formed which divided the clan. Many rallied to Cadera’s cause, seeing servitude to the Empire as the mirror opposite of what their honor demanded of them, while others swore allegiance to their Mandalore.
Mandalore was ultimately victorious over the elder Cadera and his rebels. Now Torian, the son, travels the galaxy in search of his father so that he may finally rid himself of the stain on his honor, and be accepted fully into Mandalorian society once more.
Blizz
A mechanical genius with an infinite curiosity about the universe around him, Blizz is one of only a small number of Jawas to ever explore beyond his homeworld of Tatooine. From a young age Blizz would feed his curiosity by tinkering with the random scrap that would be salvaged by his clan. As his knowledge of technology grew, so did his ingenuity, and soon Blizz was able to fix almost anything.
As he grew older, Blizz started to bore of toying with the limited selection of outdated scrap that he would come across and longed for something new. One day a traveling salvager came to his clan, looking for “junk rats” that could be sent into dangerous areas to hunt for valuable tech or other salvageable items. When Blizz heard about this opportunity to see the galaxy beyond the endless sand dunes of his home, he jumped at the opportunity.
Blizz spent the next several years working for the salvager, exploring countless worlds and having the opportunity to play with new technologies that he had never seen while on Tatooine. Always out to please those around him, Blizz is only too eager to rush into almost any situation that will allow him the chance to tinker with new tech.
Skadge
Throughout his life, Skadge excelled at muscling his way to the top. As his crimes mounted, Skadge earned a reputation as being utterly ruthless. It did not take long before the mere mention of his name struck fear into the most hardened criminals across the galaxy. But his violent and uncontrolled behavior eventually caught up with him, and soon Skadge found himself banished from his homeworld.
For the next few years Skadge worked as hired muscle for the Hutts, making examples of whoever had the misfortune of missing a payment or owing them money. Although he was effective, the Hutts saw his brutality affecting their bottom line and attempted to end their contract with Skadge from the end of a rifle.
They failed, and once he learned who was responsible for the attempt on his life, Skadge blazed a path of death and destruction throughout the Hutt Cartel, leaving the bodies of whoever he could grab in his wake. He fled to Coruscant, wreaking mayhem and destruction across the undercity of Coruscant until a combined force of Coruscant, Republic and SIS forces. brought him down and shipped him off to one of the most secure prisons in the galaxy where he would spend the next three years in solitary confinement.
Now free, Skadge hasn’t forgiven those who have crossed him, and he certainly has not forgotten them.
Thank you...
Thank you to these players who have submitted cool screenshots of their Imperial Agent characters:
Thank you to Zahk for writing the initial round of 5-button rotations, Merlyn for providing first-look feedback, and Mark Biggs for giving a final lookover of the rotations.
And finally thank you to Zahk who helped type up all the 1,000+ abilities in the game for each class so we could make the summaries and the basic class guides for each discipline, and helped with testing and formatting for this page!


 Arsenal is pretty simple to pick up the basics of with a guide
 Bodyguards are the most flexible type of healer, great for healing groups or single characters.
 Concussive Missile, knock an enemy out of the fight
 Stealth Scan, find hidden enemies (optional)
 Blazing Bolts, flashy blaster fire that changes color based on your weapon’s color crystal IMPERIAL


 Shield Tech is the simplest to learn of the three tanking styles
 Shoulder Cannon, fast mini missiles with an optional heal
 Grapple, pull an enemy to you
 Pyrotech definitely felt like one of the easiest classes to learn how to play the basics of for me so far with a guide! It’s pretty simple and rotates through key abilities. Even just pressing random buttons worked pretty good, though it didn’t do a ton of damage.
 Retractable Blade, guts the target with a vibroblade, dealing additional damage over time


 All three healer styles are not too hard to start healing with, just select a player and heal with a green ability
 Concealment is stabbing range, which means you must be very close to your enemy to attack, but you have a jump ability and roll to help you close the gap between you and your enemy
 This style is very mobile and you can easily run and jump around while fighting without any issues!
 Most abilities can simply be used, you only need to learn to activate a few of them
 Concealment is pretty easy to learn the basics of compared to other disciplines.
 Medicine focuses heavily on healing-over-time. Medicine excels at group healing.
 Recuperative Nanotech, heals your target and additional targets nearby
 Stealth, to sneak past enemies, the only healer with stealth available
 The Concealment style focuses on knifing enemies, big or small. It’s a fast and fluid discipline.


 Marksmanship has you take cover and not move. Cover makes Marksmanship a very difficult class for newer gamers to learn, as many fights require moving around – but you can ignore the cover mechanic while learning Marksmanship if you want as all but one ability can still be used out of cover.
 Marksmanship is the simplest of the three Sniper disciplines – using a very basic move set, you can get away with using only five abilities if you aren’t worried about doing max damage.
 Entrench, become immoveable
 Cover Pulse, knock everyone away form you while in cover


 Combat Medic is a healer discipline, which makes it harder to learn than a damage class for most new players
 Most players recommend to level as a damage discipline, then switch to healer when you are ready for group content
 Combat Medic has an easy to use free heal and all the abilities are clickable right away
 But it can be harder to learn to keep your energy up compared to other healing disciplines
 Gunnery is long-range, making it easier to hit moving targets compared to melee disciplines for new players
 Your main ability requires you stand still while you use it, like a turret, but you can choose to make it activate instantly
 Most abilities can simply be used, you don’t need to activate them in any way first
 Gunnery is pretty simple to pick up the basics of with a guide
 Assault Specialist is long-range, making it easier to hit moving targets compared to melee disciplines for new players.
 Combat Medics are the most flexible type of healer, great for healing groups or single characters.
 Med Shot, green beam of love heal, very visible and fun
 Kolto Bomb, giant green healing splat on the ground
 Echoing Deterrence, reflective super shield with a heal (optional)
 Propulsion Round, jump backwards quickly
 Concussion Charge, push enemies back
 Hold the Line, fast movement speed and immunity to knockbacks (optional)
 Cryo Grenade, short stun (optional)
 Assault Specialist is all about keeping your damage-over-time abilities on your enemy as they are about to run out, rather than button mashing them over and over, and getting free abilities by throwing a bomb then shooting it to blow it up.


 Shield Specialist is a tank style, which means it does less damage, but can stay alive more easily
 Most players recommend to level as a damage style, then switch to tank when you are ready for group content
 Vanguard tanking is my favorite Combat Style and main character!
 Plasmatech is very mobile and very easy to jump and move around with while playing.
 It is a short-range class, but you can use many of your abilities even if you are farther away, making it easy to hit enemies even if you are not very coordinated when it comes to making your way to your enemy.
 All of your abilities can just be used right away, you don’t need to activate them first in any way.
 Plasmatech is a DOT or damage-over-time class, which means you set things on fire – then let them burn over time. So to do big damage you need to learn to not simply set your enemy on fire over and over.
 Tactics is very mobile and very easy to jump and move around with while playing.
 All but one of your abilities can just be used right away, you don’t need to activate them first in any way.
 Tactics for me was not too hard to learn – it has a few more steps and things to watch for compared to Plasmatech, but wasn’t too bad!
 Taunts, causes enemies to focus on you
 Impact Charge, leap to an enemy
 Riot Gas, defensive gas cannister
 Plasmatech definitely felt like one of the easiest classes to learn how to play the basics of for me so far with a guide! It’s pretty simple and rotates through key abilities. Even just pressing random buttons worked pretty good, though it didn’t do a ton of damage.,


 Sawbones is a healer style, which makes it harder to learn than a damage class for most new players
 Most players recommend to level as a damage discipline, then switch to healer when you are ready for group content
 However Scoundrel Heals has a second resource to manage called Upper Hand, which makes it slightly trickier to start with
 Scrapper is punching range, which means you must be very close to your enemy to attack, but you have a jump ability and roll to help you close the gap between you and your enemy
 This style is very mobile and you can easily run and jump around while fighting without any issues!
 Most abilities can simply be used, you only need to learn to activate a few of them
 Scrapper is pretty easy to learn the basics of compared to other disciplines.
 Ruffian is a damage-over-time discipline which means you need to build up your attacks over time, layering them together, which makes it slightly harder to learn than burst discipline which do damage right away
 This style is very mobile and you can easily run and jump around while fighting without any issues!
 Most abilities can simply be used, you only need to learn to activate a few of them
 Kolto Waves, large group heal
 Slow-release Medpack, heals your target over time and can be used on any number of targets
 Smuggle, group stealth (optional)
 Dirty Kick, short stun (optional)
 Scamper, roll forwards quickly
 Trick Move, jump to an enemy (optional)
 Flash Grenade, group stun/distraction (optional)
 Surrender, drop all your money and lose enemies’ attention
 The Scrapper style focuses on punching enemies in the face, big or small. It’s a fast and fluid discipline.


 Sharpshooter is long range – if you can handle the cover mechanic, you can hit targets very, very far away compared to most classes which makes it easier to find targets to hit than short-range classes.
 I was originally intimidated by the number of abilities Sharpshooter had, but found it very easy and intuitive to play once I read a guide and it felt there was less to memorize than many other disciplines.
 Saboteur is long range – if you can handle the cover mechanic, you can hit targets very, very far away compared to most classes which makes it easier to find targets to hit than short-range classes.
 Dirty Fighting is long range – if you can handle the cover mechanic, you can hit targets very, very far away compared to most classes which makes it easier to find targets to hit than short-range classes.
 Sharpshooter focuses on long range pistol attacks, taking advantage of a free attack available after every main attack, and taking advantage of their large number of buffs.
 Hightail It, roll and go into cover
 Scrambling Shield, large group shield (optional)
 Bombing Run, your ship attacks for you (optional)
 Saboteur is all about shooting things, throwing grenades, and setting things on fire!
 Dirty Fighting focuses on making sure you have Vital Shot and Shrap Bomb debuffs on your current target before using Wounding Shots, a channeled ability that is your weakest attack on its own, but generating the biggest hits you can do if supported by your Damage over Time abilities at the right time.


 Yes
Yes


 No
No


 And finally thank you to Zahk who helped type up all the 1,000+ abilities in the game for each class so we could make the summaries and the basic class guides for each discipline, and helped with testing and formatting for this page!


 The Trooper
 The Sith Warrior
 The Imperial Agent
 The Smuggler
 The Sith Inquisitor
 The Jedi Knight
 The Jedi Consular

 Twitter @swtorista
 Reddit /u/swtorista
 Discord Swtorista#0153
 Email swtorista@gmail.com
 Youtube Swtorista
 Twitch Swtorista
 Patreon