


 How to Craft
 Choose a Crew Skill
 Armormech
 Armstech
 Artifice
 Biochem
 Cybertech
 Synthweaving

 Gathering Guide
 Rare Materials Guide
 White Materials Guide
 Jawa Junk
 Augments
 Medpacs, Stims and Adrenals
 Synthweaving Crafting Tree


 Crafted Decorations
 Crafted Mounts
 Crafted Dyes
 Crafted Crystals
 Events Calendar
 Galactic Seasons
 PvP Seasons
 Bounty Event
 Double XP Event
 Feast of Prosperity
 Gree Event
 Life Day
 Nightlife Event
 Pirate Incursion Event
 Rakghoul Event
 Spring Abundance Festival
 Swoop Event

 Jedi Knight
 Jedi Consular
 Trooper
 Smuggler
 Sith Warrior
 Sith Inquisitor
 Bounty Hunter
 Imperial Agent
 Bounty Hunter
 Imperial Agent
 Jedi Consular
 Jedi Knight
 Sith Inquisitor
 Sith Warrior
 Smuggler
 Trooper
 Legacy Gear
 Lightsabers
 Double-Bladed Lightsabers
 Vibroswords
 Double-Bladed Vibroswords
 Blaster Pistols
 Blaster Rifles
 Sniper Rifles
 Blaster Cannons

Guild Perks are a way of offering members in a Star Wars: The Old Republic small bonuses in the game for contributing and being a member of a guild.
Contents
Creating a Guild
If you are not joining a guild, and instead want to make one from scratch, you will need to create a guild, open a guild bank, and purchase a flagship. In total, you will need:
- 4 total un-guilded players in a group with you on the same faction
- 8 characters total in the guild (characters, no players)
- About 10 million Credits
- Be subscribed
Guild Creation
To create a guild so you can unlock perks, you will need:
- 4 total un-guided players in a group with you on the same faction
- 5,000 Credits
- to choose a guild name that isn’t already taken
Once you have these head to the Guild Registrar in the Strongholds & Crew Skills section of the Fleet.
Choosing a name can be tricky. There are a lot of hidden rules, and the game will often tell you a name is “taken”, when it actually means that the name isn’t allowed. There’s also a 24 character length limit.
Unlocking the Guild Bank
To get a Guild Bank for your guild, you need 8 characters in the guild. You will need at least one person online to invite, and one person to accept the invitation to add characters – so you can’t do it alone or invite your own characters.
To unlock a Guild Bank, use the purple cargo bay near the Guild Registrar while you are logged into the character who is the owner of the guild. Unlocking the Guild Bank costs 600,000 credits on hand in your inventory.
Unlocking the Flagship
To get a Flagship, you need a Guild Bank unlocked and 8 million credits in your Guild bank.
To unlock a Flagship, use the Guild Flagship Terminal near the Guild Registrar while you are logged into the character who is the owner of the guild.
Guild Perks Slots and Flagship Rooms
Once you have a Guild Flagship unlocked, you can start using Guild Perks in the “Perks” tab of the Guild menu. However, not all guild perk slots are available right away.

By default, you have two Perks slots available, they’re the two boxes that do not have a lock symbol on them. These are the Bridge and the Docking Bay that come “free” with the purchase of your Flagship.
- The Command Deck must be unlocked to access three of the perk slots. The Command Deck costs 5 Command Frameworks (which is 250 Command Encryptions) in the guild bank and 5 million credits from guild funds, but does not immediately give any perks. Inside the Command Room on your Flagship you can unlock the:
- Starboard Command Room + Perk: Costs 5 Command Frameworks (which is 250 Command Encryptions) in the guild bank and 5 million credits from guild funds.
- Port Command Room: Costs 5 Command Frameworks (which is 250 Command Encryptions) in the guild bank and 5 million credits from guild funds.
- Forward Command Room: Costs 5 Command Frameworks (which is 250 Command Encryptions) in the guild bank and 5 million credits from guild funds.
- Engine Room: Costs 5 Engineering Frameworks (which is 250 Engineering Encryptions) in the guild bank and 5 million credits from guild funds.
- The Flagship also has a Crew Deck and a Hangar Deck but they are unrelated to Guild Perks.
If you are starting from scratch, and want to unlock every perk slot, once you have unlocked your Flagship you will require these items in the guild bank:
- 20 Command Frameworks (which is 1,000 Command Encryptions)
- 5 Engineering Frameworks (which is 250 Engineering Encryptions)
- 20 million credits
![]() Encryptions can be earned by completing your personal conquest on a character who is also in a guild that reaches their conquest goal, dropped from Conquest Commanders, and bought for one Dark Project (crafted item) each in the Strongholds section of the fleet. They can also be “crafted” – you can trade in one Dark Project for one Encryption.
Encryptions can be earned by completing your personal conquest on a character who is also in a guild that reaches their conquest goal, dropped from Conquest Commanders, and bought for one Dark Project (crafted item) each in the Strongholds section of the fleet. They can also be “crafted” – you can trade in one Dark Project for one Encryption.
![]() Frameworks can be dropped from named Conquest Commanders, strong enemies spread around the galaxy. They can also be purchased with 50 matching Encryptions in the Strongholds section of the fleet.
Frameworks can be dropped from named Conquest Commanders, strong enemies spread around the galaxy. They can also be purchased with 50 matching Encryptions in the Strongholds section of the fleet.
Transferring Encryptions/Frameworks
If you are starting a new guild, you will find that only the Guild Owner can access the guild bank, even with the permissions turned on for other members. This is due to a restriction added by the developers to combat inflation – new characters to a guild can not add or remove items from a Guild Bank until they have been in the guild for 1 month. You could have members trade the encryptions to the Guild Owner who could then deposit them into the guild bank – but with the new trading tax, encryptions cost 551,200 credits each to trade, so that would add up fast.
The only way to transfer these items for free for now is if a member and the Guild Owner happen to have already been in a different guild together for over a month each. Then the member could put those encryptions in that guild bank for free, the Guild Owner could take them out for free, then they could put them into the new guild’s guild bank. Convoluted but it works. If those two people do NOT share a guild each other, but a third friend does, you could then ferry the encryptions around through multiple guilds in a chain until they get back to the Guild Owner. The other option is just wait a month until the member can deposit them directly into the new guild’s guild bank.
In addition, free-to-play players have no access to a guild bank or trading at all. Preferred players can purchase an unlock that gives them access to the guild bank, but otherwise can’t – they could trade the items to a guild member who is subscribed with access to the guild bank but it would be very expensive at 551,200 credits tax each to trade.
Guild Perks
For each Guild Perk slot, you can choose one Guild Perk from the menu on the right. Some perks only cost credits, while others have Guild Level requirements (earned through Conquest) , Guild Currency requirements (earned through Conquest) or Reinforcement Modules (also earned through Conquest). Each perk gives a different temporary boost to the guild. Some perks have no limitations while others you can only choose one of that type – for example you can’t choose both Efficient Crafting I and Efficient Crafting II. Some perks last 2 weeks while others last 4 weeks.
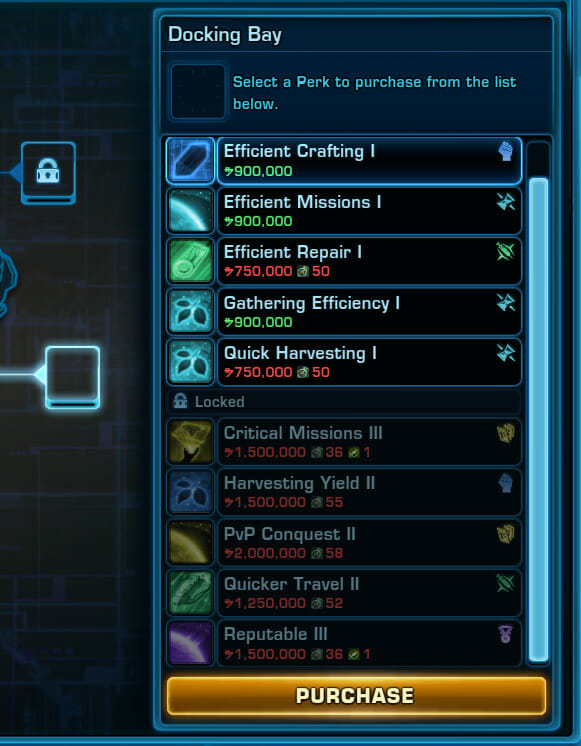
Rolling over a perk will tell you more about it and what requirements or restrictions it has.

To choose a perk, you can select it in the list then click Purchase a the bottom. You can remove it with the X symbol beside your chosen perk at the top and choose a new one at any time – but you won’t get a refund for the original.
Guild Perks Set Bonus
Each Guild Perk also belongs to one of five types of Set Bonuses – you can see which one by the little icon on the right of the perk. If you choose four or more perks in the same set bonus category, you get a bonus perk.

 Glory Set Bonus: Increases CXP, XP, and Reputation earned by 1%. Every heal or attack has a 1% chance to grant a +50% Mastery Boost for 30 seconds. This effect can only occur every 30 minutes and will not be triggered in PvP or Master Mode Operations.
 Might Set Bonus: Your basic attack does 10% more damage and whenever you use an adrenal, your companions get a 20% bonus to damage and healing for 15s. In addition, grants a 0.1% chance of summoning a 100k-200k AoE attack whenever you deal or take damage, which can only occur once every 30 minutes. This effect is not applied in PvP or Master Mode Operations.
 Vitality Set Bonus: Increases healing received by 5% and reduces the cooldowns of all in-combat revival abilities by one minute and the Group Resuscitation guild perk by 50%. In addition, there is a 1% chance when you take damage while below 20% health to trigger a 5s Defense Bubble which absorbs a large amount of damage. These effects are not applied in PvP or Master Mode Operations.
 Zeal Set Bonus: Increases alacrity by 5% and on each damage taken, has a 1% chance to grant +25% alacrity for 30 seconds. Can happen once every 30 minutes. In addition, grants your companion +25% alacrity for 15s whenever you use an adrenal. This effect is not applied in PvP or Master Mode Operations.
 Fortune Set Bonus: Increases critical chance by 5%. This effect is not applied in PvP or Master Mode Operations. In addition, increases Time efficiency and Critical rate for all Crew Skills by 2%.
Guild Perks Rotation
Every two weeks, the available perks rotate – there are five different sets that the rotation cycles through. Some perks are only available during certain cycles, while others are available multiple cycles but may change which room they are attached to.
Guild Perks reset is aligned with the Weekly Reset, on Tuesdays at 12:00 UTC.
Guild Levels

When you earn Conquest Points on your character while in the guild, for every 1 conquest point you earn, your guild also earns 2 Guild XP.
Guild Levels grant special rewards at these levels:
- Guild Level 12: Unlock Tier II Guild Perk Options
- Guild Level 32: Unlock Tier III Guild Perk Options
- Guild Level 40: Max XP and Reputation bonus of 15%
- Guild Level 49: Unlock Tier IV Guild Perk Options
- Guild Level 64: Unlock Tier V Guild Perk Options
- Guild Level 600: No reward, max-level.
To unlock all the Guild Perk options, you need to reach Guild Level 64, in addition to unlocking the required Guild Flagship rooms.
New characters to the guild can not contribute any points towards Guild XP until the next week (reset is Tuesday.) You can see if you are contributing points or not in the Guild Roster – greyed-out names can not contribute Guild XP or Conquest Points to the guild till the next week.
Your guild can earn up to 10 million Guild XP per week. This is about 100 characters worth of conquest if each character gets their personal goal of 100,000 points. Conquest Points earned over the personal goal still contribute to the guild xp points.
- Guild Level 1: 1,000,000 Guild XP
- Guild Level 2: 2,010,000 Guild XP
- Guild Level 3: 3,030,000 Guild XP
- …
- Guild Level 600: 2,390,010,000 Guild XP
- Full Spreadsheet of Guild XP, Guild Levels, and Guild Level Rewards
If you have a Stronghold Bonus for conquest of 150%, the bonus from that does not apply to your guild xp – so you’ll notice whenever you get 1 conquest point, your guild will get 1 guild xp point. Personal Conquest Requisitions do apply.
Important Note: The Guild XP bar doesn’t go up until you transition areas. So if you complete a conquest goal, or use a Personal Conquest Requisition, try travelling to a stronghold or different planet to see it apply.
Guild Commendations

Guild Commendations are needed to purchase Tier II-V Guild Perks.
Every time your guild levels up, you get 5 Guild Commendations. You get an extra 5 Guild Commendations each time you hit a Guild Level that ends in a zero (Guild Level 10, 20, 30, etc.)
Guilds also receive Guild Commendations for invading planets during Conquest and reaching their guild conquest goal:
- 100 Guild Commendations for completing a Large Yield planet (5 million Conquest Points)
- 90 Guild Commendations for completing a Medium Yield planet (2 million Conquest Points)
- 80 Guild Commendations for completing a Small Yield planet (500,000 Conquest Points)
You can see your Guild Commendations at the very bottom right of the Guild Pane or Guild Bank.
Reinforcement Modules

A few of the highest tier Guild Perks also require a Reinforcement Module to activate them.
You can earn Reinforcement Modules three different ways, though the main way is by members completing conquest over time.
Conquest: When a character in a guild completes their personal conquest goal, and their guild also completes their guild conquest goal (Small, Medium or Large yield), then when that week’s conquest ends, they’ll receive a Reinforcement Module as a reward. If a player collects ten, they can turn them into a Reinforcement Module.
 x10 =
x10 =
Reinforcement Components are bound to the character who earned them through conquest, so players will need to earn 10 on one character before they can turn them into a Reinforcement Module. The Reinforcement Module itself once made is not bound and can be traded, mailed or put into a Guild Bank. Reinforcement Components can not be bought or sold on the GTN.
Ossus Guild Perk: There is also a special Guild Perk available at Guild Level 12 that allows members to get a Reinforcement Component for completing the [HEROIC] Hold the Line or [HEROIC] Supply Heist quests on Ossus. The entire group must be in the same guild, but you can do it with 2 players and 2 companions. This perk is not available all the time.
Harvesting: There’s also a chance of getting a Reinforcement Module any time you harvest something off the ground while your guild has any of the Harvesting Yield perks active.
Reinforcement Modules for Guild Perks should be safely stored in the Guild Bank in a tab where normal members won’t accidentally take them, and need to be in the Guild bank to be available for perks.. It’s recommend to make a tab where players can deposit items but not withdraw them, and instruct players to donate their Reinforcement Modules to that tab.
Perks List
This is a list of every Guild Perk available as of Update 7.3. Not all perks are available at the same time – they rotate in and out. See the written list below to learn more about each perk!
- A/B/C/D/E Columns – Rotating weekly Cycles
- D = Docking Bay
- B = Bridge
- S = Starboard Command Room
- P = Port Command Room
- F = Forward Command Room
- E = Engine Room
| Set | Perk | Lvl | Cost | Comms | RM | Weeks | A | B | C | D | E |
|---|---|---|---|---|---|---|---|---|---|---|---|
| Critical Boost | 12 | 1.25m | 52 | 2 | F | F | ||||
| Critical Crafting I | 12 | 1.25m | 52 | 2 | D | |||||
| Critical Crafting II | 49 | 2m | 58 | 2 | E | B | ||||
| Critical Crafting III | 64 | 1.5m | 36 | | 1 | E | D | B | ||
| Critical Gathering I | 12 | 1.25m | 52 | 2 | B | |||||
| Critical Gathering II | 49 | 2m | 58 | 2 | B | |||||
| Critical Gathering III | 64 | 1.5m | 36 | | 1 | B | E | E | D | |
| Critical Missions I | 12 | 1.25m | 52 | 2 | B | E | ||||
| Critical Missions II | 49 | 2m | 58 | 2 | D | |||||
| Critical Missions III | 64 | 1.5m | 36 | | 1 | B | D | |||
| Distance Looter | 1 | 750k | 50 | 2 | B | |||||
| Flashpoint Looter I | 1 | 750k | 50 | 2 | P | E | P | |||
| Flashpoint Looter II | 32 | 1.5m | 55 | 2 | S | P | ||||
| Flashpoint Looter III | 64 | 2.5m | 60 | | 2 | S | E | |||
| Major Critical Boost | 49 | 1.2m | 35 | 1 | F | F | ||||
| Operations Looter I | 1 | 750k | 50 | 2 | S | E | S | P | ||
| Operations Looter II | 32 | 1.5m | 55 | 2 | E | S | P | E | ||
| Operations Looter III | 64 | 2.5m | 60 | | 2 | P | E | |||
| Operations Smuggling | 64 | 1.5m | 36 | | 2 | P | E | S | E | S |
| Professional Efficacy | 1 | 750k | 50 | 2 | F | |||||
| Professional Training | 1 | 900k | 2 | F | F | F | F | F | ||
| PvP Conquest I | 1 | 750k | 50 | 2 | D | E | ||||
| PvP Conquest II | 49 | 2m | 58 | 2 | E | D | ||||
| Receptive Healing | 12 | 1.25m | 52 | 2 | F | |||||
| Starfighter Conquest I | 1 | 750k | 50 | 2 | B | |||||
| Starfighter Conquest II | 49 | 2m | 58 | 2 | D | |||||
| Summon Guild Bank | 1 | 900k | 2 | F | F | F | F | F | ||
| Crafting Conquest I | 1 | 750k | 50 | 2 | D | E | ||||
| Crafting Conquest II | 49 | 2m | 58 | 2 | D | E | ||||
| Experience Focus | 1 | 750k | 50 | 2 | F | F | ||||
| Guild Recharge Drones | 32 | 900k | 33 | 1 | F | F | ||||
| Major Mastery Realization | 49 | 1.2m | 35 | 1 | F | F | ||||
| Mastery Realization | 12 | 1.25m | 52 | 2 | F | |||||
| Omnimagnification | 64 | 2.5m | 60 | | 2 | F | F | |||
| Ossus Reinforcement | 12 | 1.25m | 52 | 2 | B | E | D | |||
| PvP Profiteer I | 1 | 750k | 50 | 2 | S | P | E | E | ||
| PvP Profiteer II | 12 | 1.25m | 52 | 2 | E | S | ||||
| PvP Profiteer III | 32 | 1.5m | 55 | 2 | E | S | ||||
| Reputable I | 1 | 900k | 2 | B | B | B | B | B | ||
| Reputable II | 32 | 1.5m | 55 | 2 | D | |||||
| Reputable III | 64 | 1.5m | 36 | | 1 | E | B | D | ||
| Space Pirate I | 1 | 900k | 2 | P | S | P | ||||
| Space Pirate II | 12 | 1.25m | 52 | 2 | P | E | P | S | ||
| Space Pirate III | 32 | 1.5m | 55 | 2 | S | E | P | |||
| Conqueror I | 1 | 750k | 50 | 2 | B | E | D | |||
| Conqueror II | 49 | 1.2m | 35 | 1 | B | |||||
| Efficient Crafting I | 1 | 900k | 2 | D | D | D | D | D | ||
| Efficient Crafting II | 12 | 1.25m | 52 | 2 | E | B | ||||
| Efficient Crafting III | 32 | 1.5m | 55 | 2 | D | |||||
| Flashpoint Mastery I | 1 | 900k | 2 | S | S | S | S | S | ||
| Flashpoint Mastery II | 49 | 2m | 58 | 2 | S | S | S | |||
| Flashpoint Mastery III | 64 | 1.5m | 36 | 1 | S | S | S | |||
| Fortified Stagger I | 12 | 1.25m | 52 | 2 | E | B | ||||
| Fortified Stagger II | 49 | 2m | 58 | 2 | B | |||||
| Harvesting Yield I | 1 | 750k | 50 | 2 | B | |||||
| Harvesting Yield II | 32 | 1.5m | 55 | 2 | D | |||||
| Harvesting Yield III | 64 | 2.5m | 60 | | 2 | B | D | |||
| Major Power Amplification | 64 | 1.5m | 36 | | 1 | F | F | |||
| Mount Burst | 49 | 1.2m | 35 | 1 | F | |||||
| Mount Shield | 12 | 1.25m | 52 | 2 | F | |||||
| Operations Conquest I | 1 | 750k | 50 | 2 | B | E | ||||
| Operations Conquest II | 49 | 2m | 58 | 2 | B | |||||
| Operations Mastery I | 1 | 900k | 2 | P | P | P | P | P | ||
| Operations Mastery II | 49 | 2m | 58 | 2 | P | P | P | |||
| Operations Mastery III | 64 | 1.5m | 36 | 1 | P | P | P | |||
| Power Amplification | 32 | 1.5m | 55 | 2 | F | F | ||||
| PvP Valor I | 1 | 750k | 50 | 2 | S | S | E | |||
| PvP Valor II | 32 | 1.5m | 55 | 2 | S | |||||
| PvP Valor III | 49 | 2m | 58 | 2 | E | E | S | P | ||
| Starfight Commandeering I | 1 | 750k | 50 | 2 | P | P | S | |||
| Starfight Commandeering II | 32 | 1.5m | 55 | 2 | P | E | ||||
| Starfight Commandeering III | 49 | 2m | 58 | 2 | P | |||||
| Cleanse | 12 | 750k | 31 | 1 | F | |||||
| Efficient Repair I | 1 | 750k | 50 | 2 | E | D | ||||
| Efficient Repair II | 12 | 1.25m | 52 | 2 | E | D | ||||
| Efficient Repair III | 32 | 1.5m | 55 | 2 | D | |||||
| Endurance Supplement | 1 | 900k | 2 | F | F | F | F | F | ||
| Flashpoint Biochemist I | 12 | 1.25m | 52 | 2 | P | P | ||||
| Flashpoint Biochemist II | 49 | 2m | 58 | 2 | S | |||||
| Flashpoint Biochemist III | 64 | 2.5m | 60 | | 2 | S | ||||
| Flashpoint Conquest I | 1 | 750k | 50 | 2 | E | D | B | |||
| Flashpoint Conquest II | 49 | 2m | 58 | 2 | B | |||||
| Flashpoint Fortitude I | 1 | 900k | 2 | S | S | S | S | S | ||
| Flashpoint Fortitude II | 49 | 2m | 58 | 2 | S | S | S | |||
| Flashpoint Fortitude III | 64 | 1.5m | 36 | 1 | S | S | S | |||
| Group Resuscitation | 64 | 1.5m | 36 | | 1 | F | F | |||
| Major Endurance Supplement | 32 | 900k | 33 | 1 | F | |||||
| Operations Biochemist I | 12 | 1.25m | 52 | 2 | P | S | ||||
| Operations Biochemist II | 49 | 2m | 58 | 2 | P | E | ||||
| Operations Biochemist III | 64 | 2.5m | 60 | | 2 | E | P | |||
| Operations Fortitude I | 1 | 900k | 2 | P | P | P | P | P | ||
| Operations Fortitude II | 49 | 2m | 58 | 2 | P | P | P | |||
| Operations Fortitude III | 64 | 1.5m | 36 | 1 | P | P | P | |||
| Quicker Travel I | 1 | 750k | 50 | 2 | B | D | ||||
| Quicker Travel II | 12 | 1.25m | 52 | 2 | D | |||||
| Quicker Travel III | 32 | 1.5m | 55 | 2 | B | |||||
| Reputation Focus | 1 | 750k | 50 | 2 | F | F | ||||
| Efficient Missions I | 1 | 900k | 2 | D | D | D | D | D | ||
| Efficient Missions II | 12 | 1.25m | 52 | 2 | D | D | ||||
| Efficient Missions III | 32 | 1.5m | 55 | 2 | B | |||||
| Energized Regeneration | 32 | 1.5m | 55 | 2 | F | |||||
| Experience Powerhouse I | 1 | 900k | 2 | B | B | B | B | B | ||
| Experience Powerhouse II | 32 | 1.5m | 55 | 2 | B | |||||
| Experience Powerhouse III | 64 | 1.5m | 36 | | 1 | D | E | E | B | |
| Flashpoint Profiteer I | 1 | 750k | 50 | 2 | P | E | S | |||
| Flashpoint Profiteer II | 12 | 1.25m | 52 | 2 | S | P | ||||
| Flashpoint Profiteer III | 32 | 1.5m | 55 | 2 | S | |||||
| Gathering Efficiency I | 1 | 900k | 2 | D | D | D | D | D | ||
| Gathering Efficiency II | 12 | 1.25m | 52 | 2 | B | |||||
| Gathering Efficiency III | 32 | 1.5m | 55 | 2 | D | |||||
| Hasten | 1 | 750k | 50 | 2 | F | F | ||||
| Major Hasten | 12 | 750k | 31 | 1 | F | |||||
| Mount Improvements I | 1 | 750k | 50 | 2 | E | B | ||||
| Mount Improvements II | 12 | 1.25m | 52 | 2 | E | D | ||||
| Mount Improvements III | 32 | 900k | 33 | 1 | B | |||||
| Mount Speed Boost | 1 | 450k | 30 | 1 | F | F | ||||
| Mount Stealth | 32 | 1.5m | 50 | 2 | F | |||||
| Operations Profiteer I | 1 | 750k | 50 | 2 | S | E | P | S | ||
| Operations Profiteer II | 12 | 1.25m | 52 | 2 | S | E | ||||
| Operations Profiteer III | 32 | 1.5m | 55 | 2 | E | P | P | S | ||
| Quick Harvesting I | 1 | 750k | 50 | 2 | D | |||||
| Quick Harvesting II | 12 | 1.25m | 52 | 2 | D | |||||
| Quick Harvesting III | 49 | 1.2m | 35 | 1 | B | |||||
| Sprinter I | 1 | 750k | 50 | 2 | E | B | ||||
| Sprinter II | 12 | 1.25m | 52 | 2 | B | E | ||||
| Sprinter III | 32 | 900k | 33 | 1 | D |
SWTOR Jedipedia has a great list of the perks and their cycles from 5.10, as well as highlights what cycle we are on, which is where this updated information is from.
Fortune Perks
 Critical Boost
Set Bonus: Fortune
Description: Increases critical hit chance by 3% for 60 minutes. Does not stack with other similar effects.
Guild Level Required: 12 (Tier II)
Length: 2 Weeks
Cost: 52 Guild Commendations + No Reinforcement Module +1,250,000 Credits
Limits:
Available: Forward Command Room during Cycle D, Forward Command Room during Cycle E
 Critical Crafting I
Set Bonus: Fortune
Description: Increases Critical rate for all Crafting skills by 1%.
Guild Level Required: 12 (Tier II)
Length: 2 Weeks
Cost: Guild Commendations + No Reinforcement Module +1,250,000 Credits
Limits: Crafting Critical
Available: Docking Bay during Cycle B
Critical Crafting II
Set Bonus: Fortune
Description: Increases Critical rate for all Crafting skills by 2%.
Guild Level Required: 49 (Tier IV)
Length: 2 Weeks
Cost: 50 Guild Commendations + No Reinforcement Module +2,000,000 Credits
Limits: Crafting Critical
Available: Engine Room during Cycle B, Bridge during Cycle D
Critical Crafting III
Set Bonus: Fortune
Description: Increases Critical rate for all Crafting skills by 3%.
Guild Level Required: 64 (Tier V)
Length: 1 Week Weeks
Cost: 33 Guild Commendations + RM+1,500,000 Credits
Limits: Crafting Critical
Available: Engine Room during Cycle A, Docking Bay during Cycle C, Bridge during Cycle D
 Critical Gathering I
Set Bonus: Fortune
Description: Increases Critical rate for all Gathering skills by 1%
Guild Level Required: 12 (Tier II)
Length: 2 Weeks
Cost: 31 Guild Commendations + No Reinforcement Module +1,250,000 Credits
Limits: Gathering Critical
Available: Bridge during Cycle D
Critical Gathering II
Set Bonus: Fortune
Description: Increases Critical rate for all Gathering skills by 2%
Guild Level Required: 49 (Tier IV)
Length: 2 Weeks
Cost: 35 Guild Commendations + No Reinforcement Module +2,000,000 Credits
Limits: Gathering Critical
Available: Bridge during Cycle A
Critical Gathering III
Set Bonus: Fortune
Description: Increases Critical rate for all Gathering skills by 3%
Guild Level Required: 64 (Tier V)
Length: 1 Week Weeks
Cost: 60 Guild Commendations + RM+1,500,000 Credits
Limits: Gathering Critical
Available: Bridge during Cycle B, Engine Room during Cycle C, Engine Room during Cycle D, Docking Bay during Cycle E
 Critical Missions I
Set Bonus: Fortune
Description: Increases Critical rate for all Mission skills by 1%.
Guild Level Required: 12 (Tier II)
Length: 2 Weeks
Cost: Guild Commendations + No Reinforcement Module +1,250,000 Credits
Limits: Mission Critical
Available: Bridge during Cycle A, and Engine Room during Cycle D
Critical Missions II
Set Bonus: Fortune
Description: Increases Critical rate for all Mission skills by 2%.
Guild Level Required: 49 (Tier IV)
Length: 2 Weeks
Cost: 50 Guild Commendations + No Reinforcement Module +2,000,000 Credits
Limits: Mission Critical
Available: Docking Bay during Cycle C
Critical Missions III
Set Bonus: Fortune
Description: Increases Critical rate for all Mission skills by 3%.
Guild Level Required: 64 (Tier V)
Length: 1 Week Weeks
Cost: Guild Commendations + RM+1,500,000 Credits
Limits: Mission Critical
Available: Bridge during Cycle A, and Docking Bay during Cycle D
 Distance Looter
Set Bonus: Fortune
Description: Increases the range in which you pick up additional loot while looting.
Guild Level Required: 1 (Tier I)
Length: 2 Weeks
Cost: Guild Commendations + No Reinforcement Module +750,000 Credits
Limits:
Available: Bridge during Cycle C
 Flashpoint Looter I
Set Bonus: Fortune
Description: Grants a chance to drop a Small Satchel of Crafting Materials from Flashpoint bosses while in a Guild Group.
Guild Level Required: 1 (Tier I)
Length: 2 Weeks
Cost: 58 Guild Commendations + No Reinforcement Module +750,000 Credits
Limits: Flashpoint Drop Rates
Available: Port Command Room during Cycle A, Engine Room during Cycle B, Port Command Room during Cycle D
Flashpoint Looter II
Set Bonus: Fortune
Description: Grants a chance to drop a Medium Satchel of Crafting Materials from Flashpoint bosses while in a Guild Group.
Guild Level Required: 32 (Tier III)
Length: 2 Weeks
Cost: 36 Guild Commendations + No Reinforcement Module +1,500,000 Credits
Limits: Flashpoint Drop Rates
Available: Starboard Command Room during Cycle D, Port Command Room during Cycle E
Flashpoint Looter III
Set Bonus: Fortune
Description: Grants a chance to drop a Large Satchel of Crafting Materials from Flashpoint bosses while in a Guild Group.
Guild Level Required: 64 (Tier V)
Length: 2 Weeks
Cost: Guild Commendations + RM+2,500,000 Credits
Limits: Flashpoint Drop Rates
Available: Starboard Command Room during Cycle A, and Engine Room during Cycle D
 Major Critical Boost
Set Bonus: Fortune
Description: Increases critical hit chance by 5% for 60 minutes. Does not stack with other similar effects.
Guild Level Required: 49 (Tier IV)
Length: 1 Week Weeks
Cost: 58 Guild Commendations + No Reinforcement Module +1,200,000 Credits
Limits:
Available: Forward Command Room during Cycle A, and Forward Command Room during Cycle D
 Operations Looter I
Set Bonus: Fortune
Description: Grants a chance to drop a Small Satchel of Crafting Materials from Operations bosses while in a Guild Group.
Guild Level Required: 1 (Tier I)
Length: 2 Weeks
Cost: 36 Guild Commendations + No Reinforcement Module +750,000 Credits
Limits: Operation Drop Rates
Available: Starboard Command Room during Cycle B, Engine Room during Cycle C, Starboard Command Room during Cycle D, Port Command Room during Cycle E
Operations Looter II
Set Bonus: Fortune
Description: Grants a chance to drop a Medium Satchel of Crafting Materials from Operations bosses while in a Guild Group.
Guild Level Required: 32 (Tier III)
Length: 2 Weeks
Cost: 36 Guild Commendations + No Reinforcement Module +1,500,000 Credits
Limits: Operation Drop Rates
Available: Engine Room during Cycle A, Starboard Command Room during Cycle B, Port Command Room during Cycle D, Engine Room during Cycle E
Operations Looter III
Set Bonus: Fortune
Description: Grants a chance to drop a Large Satchel of Crafting Materials from Operations bosses while in a Guild Group.
Guild Level Required: 64 (Tier V)
Length: 2 Weeks
Cost: 50 Guild Commendations + RM+2,500,000 Credits
Limits: Operation Drop Rates
Available: Port Command Room during Cycle B, and Engine Room during Cycle E
 Operations Profiteer
Set Bonus: Fortune
Description: Final Bosses in Operations have a chance to drop a Grand Chance Cube on death. [This is not connected to the other Operation Profiteer perks.]
Guild Level Required: 64 (Tier V)
Length: 2 Weeks
Cost: 52 Guild Commendations + RM+1,500,000 Credits
Limits:
Available: Port Command Room during Cycle A, Engine Room during Cycle B, Starboard Command Room during Cycle C, Engine Room during Cycle D, Starboard Command Room during Cycle E
 Professional Efficacy
Set Bonus: Fortune
Description: Increases Time efficiency for all Professions by 5% for 1 hour.
Guild Level Required: 1 (Tier I)
Length: 2 Weeks
Cost: 50 Guild Commendations + No Reinforcement Module +750,000 Credits
Limits:
Available: Forward Command Room during Cycle C
Professional Training
Set Bonus: Fortune
Description: Increases Critical rate for all Crew Skills by 5% for 1 hour.
Guild Level Required: 1 (Tier I)
Length: 2 Weeks
Cost: 52 Guild Commendations + No Reinforcement Module +900,000 Credits
Limits:
Available: Forward Command Room during Cycle A, Forward Command Room during Cycle B, Forward Command Room during Cycle C, Forward Command Room during Cycle D, Forward Command Room during Cycle E
 Receptive Healing
Set Bonus: Fortune
Description: Increases healing received by 10% for 15 minutes. Cannot be used in PvP or Master Mode Operations.
Guild Level Required: 12 (Tier II)
Length: 2 Weeks
Cost: Guild Commendations + No Reinforcement Module +1,250,000 Credits
Limits:
Available: Forward Command Room during Cycle B
 Starfighter Conquest I
Set Bonus: Fortune
Description: Grants access to the Starfighter based Conquest Objective “Starfighter: Rally – Part 1”.
Starfighter: Rally – Part I (Conquest Objective): Complete 3 Starfighter matches. [Unlike the other rally objectives, your team does not need to be in the same guild as you.]
Guild Level Required: 1 (Tier I)
Length: 2 Weeks
Cost: 36 Guild Commendations + No Reinforcement Module +750,000 Credits
Limits:
Available: Bridge during Cycle B
Starfighter Conquest II
Set Bonus: Fortune
Description: Grants access to the Starfighter based Conquest Objective “Starfighter: Rally – Part 2”.
Starfighter: Rally – Part 2 (Conquest Objective): Win 3 Starfighter matches. [Unlike the other rally objectives, your team does not need to be in the same guild as you.]
Guild Level Required: 49 (Tier IV)
Length: 2 Weeks
Cost: 50 Guild Commendations + No Reinforcement Module +2,000,000 Credits
Limits:
Available: Docking Bay during Cycle A
 Summon Guild Bank
Set Bonus: Fortune
Description: Summons your Guild Bank. Lasts 3 minutes.
Guild Level Required: 1 (Tier I)
Length: 2 Weeks
Cost: 58 Guild Commendations + No Reinforcement Module +900,000 Credits
Limits:
Available: Forward Command Room during Cycle A, Forward Command Room during Cycle B, Forward Command Room during Cycle C, Forward Command Room during Cycle D, Forward Command Room during Cycle E
 PvP Conquest I
Set Bonus: Fortune
Description: Grants access to the PvP based Conquest Objective “PvP: Rally – Part 1”.
PvP: Rally – Part 1 (Conquest Objective): Complete any Warzone or Arena match while in a Guild Group. [The entire group must be in the same guild. For Arenas, this means you must queue up for a group of four and it is guranteed, for Warzones you will need to queue in two groups of four and hope you wind up on the same team. Daily repeatable objective that can be done in addition to any other PvP objectives on the Conquest objectives list.]
Guild Level Required: 1 (Tier I)
Length: 2 Weeks
Cost: 33 Guild Commendations + No Reinforcement Module +750,000 Credits
Limits:
Available: Docking Bay during Cycle B, and Engine Room during Cycle E
PvP Conquest II
Set Bonus: Fortune
Description: Grants access to the PvP based Conquest Objective “PvP: Rally – Part 2”.
PvP: Rally – Part 2 (Conquest Objective): Complete 3 Warzone or Arena matches while in a Guild Group. [The entire group must be in the same guild. For Arenas, this means you must queue up for a group of four and it is guranteed, for Warzones you will need to queue in two groups of four and hope you wind up on the same team. Daily repeatable objective that can be done in addition to any other PvP objectives on the Conquest objectives list.]
Guild Level Required: 49 (Tier IV)
Length: 2 Weeks
Cost: Guild Commendations + No Reinforcement Module +2,000,000 Credits
Limits:
Available: Engine Room during Cycle B, Docking Bay during Cycle D
Glory Perks
 Crafting Conquest I
Set Bonus: Glory
Description: Grants access to the crafting based Conquest Objective “Crafting: Rally – Part 1”.
Guild Level Required: 1 (Tier I)
Length: 2 Weeks
Cost: 58 Guild Commendations + No Reinforcement Module +750,000 Credits
Limits:
Available: Docking Bay during Cycle A, and Engine Room during Cycle D
Crafting Conquest II
Set Bonus: Glory
Description: Grants access to the crafting based Conquest Objective “Crafting: Rally – Part 2”.
Guild Level Required: 49 (Tier IV)
Length: 2 Weeks
Cost: 58 Guild Commendations + No Reinforcement Module +2,000,000 Credits
Limits:
Available: Docking Bay during Cycle B, and Engine Room during Cycle E
 Experience Focus
Set Bonus: Glory
Description: Increases all experience gained by 15% for 1 hour.
Guild Level Required: 1 (Tier I)
Length: 2 Weeks
Cost: 50 Guild Commendations + No Reinforcement Module +750,000 Credits
Limits:
Available: Forward Command Room during Cycle C, Forward Command Room during Cycle E
 Guild Recharge Drones
Set Bonus: Glory
Description: Calls on Guild Recharge Drones, allowing you to pause to prepare for the coming fight, restoring your health and your combat resources. Faster than typical Rest and Recharge. Cannot be used during combat.
Guild Level Required: 32 (Tier III)
Length: 1 Week Weeks
Cost: 55 Guild Commendations + No Reinforcement Module +900,000 Credits
Limits:
Available: Forward Command Room during Cycle B, and Forward Command Room during Cycle E
 Major Mastery Realization
Set Bonus: Glory
Description: Increases mastery by 5% and internal and elemental damage reduction by 10% for 60 minutes. Does not stack with other similar effects.
Guild Level Required: 49 (Tier IV)
Length: 1 Week Weeks
Cost: 60 Guild Commendations + No Reinforcement Module +1,200,000 Credits
Limits:
Available: Forward Command Room during Cycle B, Forward Command Room during Cycle D
 Mastery Realization
Set Bonus: Glory
Description: Increases mastery by 3% and internal and elemental damage reduction by 5% for 60 minutes. Does not stack with other similar effects.
Guild Level Required: 12 (Tier II)
Length: 2 Weeks
Cost: 52 Guild Commendations + No Reinforcement Module +1,250,000 Credits
Limits:
Available: Forward Command Room during Cycle A
 Omnimagnification
Set Bonus: Glory
Description: Applies the effects of all class buffs to you for 60 minutes. Does not stack with other similar effects.
Guild Level Required: 64 (Tier V)
Length: 2 Weeks
Cost: 52 Guild Commendations + RM+2,500,000 Credits
Limits:
Available: Forward Command Room during Cycle C, Forward Command Room during Cycle E
 Ossus Reinforcement
Set Bonus: Glory
Description: Adds a Reinforcement Component as a reward for [HEROIC] Hold the Line or [HEROIC] Supply Heist if completed while in a guild group.
Guild Level Required: 12 (Tier II)
Length: 2 Weeks
Cost: 50 Guild Commendations + No Reinforcement Module +1,250,000 Credits
Limits:
Available: Bridge during Cycle B, Engine Room during Cycle C, Docking Bay during Cycle E
 Reputable I
Set Bonus: Glory
Description: Increases Reputation earned from all sources by 5%.
Guild Level Required: 1 (Tier I)
Length: 2 Weeks
Cost: 50 Guild Commendations + No Reinforcement Module +900,000 Credits
Limits: Rep
Available: Bridge during Cycle A, Bridge during Cycle B, Bridge during Cycle C, Bridge during Cycle D, Bridge during Cycle E
Reputable II
Set Bonus: Glory
Description: Increases Reputation earned from all sources by 10%.
Guild Level Required: 32 (Tier III)
Length: 2 Weeks
Cost: 50 Guild Commendations + No Reinforcement Module +1,500,000 Credits
Limits: Rep
Available: Docking Bay during Cycle C
Reputable III
Set Bonus: Glory
Description: Increases Reputation earned from all sources by 15%.
Guild Level Required: 64 (Tier V)
Length: 1 Week Weeks
Cost: 50 Guild Commendations + RM+1,500,000 Credits
Limits: Rep
Available: Engine Room during Cycle A, Bridge during Cycle C, Docking Bay during Cycle D
 Space Pirate I
Set Bonus: Glory
Description: Increases XP, Command XP, and Reputation rewards from GSF by 5%.
Guild Level Required: 1 (Tier I)
Length: 2 Weeks
Cost: 36 Guild Commendations + No Reinforcement Module +900,000 Credits
Limits: Gsf Rewards
Available: Port Command Room during Cycle B, Starboard Command Room during Cycle C, Port Command Room during Cycle E
Space Pirate II
Set Bonus: Glory
Description: Increases XP, Command XP, and Reputation rewards from GSF by 7%.
Guild Level Required: 12 (Tier II)
Length: 2 Weeks
Cost: Guild Commendations + No Reinforcement Module +1,250,000 Credits
Limits: Gsf Rewards
Available: Port Command Room during Cycle A, Engine Room during Cycle B, Port Command Room during Cycle C, Starboard Command Room during Cycle E
Space Pirate III
Set Bonus: Glory
Description: Increases XP, Command XP, and Reputation rewards from GSF by 9%.
Guild Level Required: 32 (Tier III)
Length: 2 Weeks
Cost: Guild Commendations + No Reinforcement Module +1,500,000 Credits
Limits: Gsf Rewards
Available: Starboard Command Room during Cycle B, Engine Room during Cycle C, Port Command Room during Cycle D
 PvP Profiteer I
Set Bonus: Glory
Description: Increases XP, Command XP, and Reputation rewards from Warzones and Arenas by 5%.
Guild Level Required: 1 (Tier I)
Length: 2 Weeks
Cost: 52 Guild Commendations + No Reinforcement Module +750,000 Credits
Limits: PvP Rewards
Available: Starboard Command Room during Cycle A, Port Command Room during Cycle C, Engine Room during Cycle D, Engine Room during Cycle E
PvP Profiteer II
Set Bonus: Glory
Description: Increases XP, Command XP, and Reputation rewards from Warzones and Arenas by 7%.
Guild Level Required: 12 (Tier II)
Length: 2 Weeks
Cost: 52 Guild Commendations + No Reinforcement Module +1,250,000 Credits
Limits: PvP Rewards
Available: Engine Room during Cycle A, Starboard Command Room during Cycle C
PvP Profiteer III
Set Bonus: Glory
Description: Increases XP, Command XP, and Reputation rewards from Warzones and Arenas by 9%.
Guild Level Required: 32 (Tier III)
Length: 2 Weeks
Cost: Guild Commendations + No Reinforcement Module +1,500,000 Credits
Limits: PvP Rewards
Available: Engine Room during Cycle B, Starboard Command Room during Cycle D
Might Perks
 Conqueror I
Set Bonus: Might
Description: Increases points earned from Conquests by 10%.
Guild Level Required: 1 (Tier I)
Length: 2 Weeks
Cost: 60 Guild Commendations + No Reinforcement Module +750,000 Credits
Limits: Conquest Increase
Available: Bridge during Cycle A, and Engine Room during Cycle D, Docking Bay during Cycle E
 Conqueror II
Set Bonus: Might
Description: Increases points earned from Conquests by 20%.
Guild Level Required: 49 (Tier IV)
Length: 1 Week Weeks
Cost: 52 Guild Commendations + No Reinforcement Module +1,200,000 Credits
Limits: Conquest Increase
Available: Bridge during Cycle C
 Efficient Crafting I
Set Bonus: Might
Description: Increases Time efficiency for all Crafting skills by 3%
Guild Level Required: 1 (Tier I)
Length: 2 Weeks
Cost: 55 Guild Commendations + No Reinforcement Module +900,000 Credits
Limits: Crafting Efficiency
Available: Docking Bay during Cycle A, Docking Bay during Cycle B, Docking Bay during Cycle C, Docking Bay during Cycle D, Docking Bay during Cycle E
Efficient Crafting II
Set Bonus: Might
Description: Increases Time efficiency for all Crafting skills by 5%
Guild Level Required: 12 (Tier II)
Length: 2 Weeks
Cost: 52 Guild Commendations + No Reinforcement Module +1,250,000 Credits
Limits: Crafting Efficiency
Available: Engine Room during Cycle C, Bridge during Cycle E
Efficient Crafting III
Set Bonus: Might
Description: Increases Time efficiency for all Crafting skills by 7%
Guild Level Required: 32 (Tier III)
Length: 2 Weeks
Cost: 60 Guild Commendations + No Reinforcement Module +1,500,000 Credits
Limits: Crafting Efficiency
Available: Docking Bay during Cycle B
 Flashpoint Mastery I
Set Bonus: Might
Description: Increases Mastery when in Flashpoints by 4%.
Guild Level Required: 1 (Tier I)
Length: 2 Weeks
Cost: Guild Commendations + No Reinforcement Module +900,000 Credits
Limits: Flashpoint Mastery
Available: Starboard Command Room during Cycle A, Starboard Command Room during Cycle B, Starboard Command Room during Cycle C, Starboard Command Room during Cycle D, Starboard Command Room during Cycle E
Flashpoint Mastery II
Set Bonus: Might
Description: Increases Mastery when in Flashpoints by 6%.
Guild Level Required: 49 (Tier IV)
Length: 2 Weeks
Cost: 58 Guild Commendations + No Reinforcement Module +2,000,000 Credits
Limits: Flashpoint Mastery
Available: Starboard Command Room during Cycle B, Starboard Command Room during Cycle C, Starboard Command Room during Cycle E
Flashpoint Mastery III
Set Bonus: Might
Description: Increases Mastery when in Flashpoints by 8%.
Guild Level Required: 64 (Tier V)
Length: 1 Week Weeks
Cost: 50 Guild Commendations + No Reinforcement Module +1,500,000 Credits
Limits: Flashpoint Mastery
Available: Starboard Command Room during Cycle A, and Starboard Command Room during Cycle D, Starboard Command Room during Cycle E
 Fortified Stagger I
Set Bonus: Might
Description: Reduces damage taken while stunned by 5%. This effect is not applied in PvP or Master Mode Operations.
Guild Level Required: 12 (Tier II)
Length: 2 Weeks
Cost: Guild Commendations + No Reinforcement Module +1,250,000 Credits
Limits: Stunned Damage Reduction
Available: Engine Room during Cycle A, Bridge during Cycle C
Fortified Stagger II
Set Bonus: Might
Description: Reduces damage taken while stunned by 10%. This effect is not applied in PvP or Master Mode Operations.
Guild Level Required: 49 (Tier IV)
Length: 2 Weeks
Cost: 58 Guild Commendations + No Reinforcement Module +2,000,000 Credits
Limits: Stunned Damage Reduction
Available: Bridge during Cycle E
 Harvesting Yield I
Set Bonus: Might
Description: Increases harvesting yield slightly.
Guild Level Required: 1 (Tier I)
Length: 2 Weeks
Cost: Guild Commendations + No Reinforcement Module +750,000 Credits
Limits: Harvesting Yield
Available: Bridge during Cycle D
Harvesting Yield II
Set Bonus: Might
Description: Increases harvesting yield moderately
Guild Level Required: 32 (Tier III)
Length: 2 Weeks
Cost: 58 Guild Commendations + No Reinforcement Module +1,500,000 Credits
Limits: Harvesting Yield
Available: Docking Bay during Cycle D
Harvesting Yield III
Set Bonus: Might
Description: Increases harvesting yield significantly.
Guild Level Required: 64 (Tier V)
Length: 2 Weeks
Cost: 31 Guild Commendations + RM+2,500,000 Credits
Limits: Harvesting Yield
Available: Bridge during Cycle D, Docking Bay during Cycle E
 Major Power Amplification
Set Bonus: Might
Description: Increases all melee, ranged, Force and tech bonus damage and healing by 5% for 60 minutes. Does not stack with other similar effects.
Guild Level Required: 64 (Tier V)
Length: 1 Week Weeks
Cost: 55 Guild Commendations + RM+1,500,000 Credits
Limits:
Available: Forward Command Room during Cycle A, and Forward Command Room during Cycle D
 Mount Burst
Set Bonus: Might
Description: Knocks back up to 8 enemies within a 15-meter cone in front of you. Standard and weak enemies are additionally knocked down for 3 seconds. Must be mounted to use.
Guild Level Required: 49 (Tier IV)
Length: 1 Week Weeks
Cost: 36 Guild Commendations + No Reinforcement Module +1,200,000 Credits
Limits:
Available: Forward Command Room during Cycle E
Mount Shield
Set Bonus: Might
Description: Summons a probe droid that projects a shield around the user, absorbing a moderate amount of incoming damage for <<1[%d/%d/%d]>> seconds. Does not break stealth. Must be mounted to use.
Guild Level Required: 12 (Tier II)
Length: 2 Weeks
Cost: 50 Guild Commendations + No Reinforcement Module +1,250,000 Credits
Limits:
Available: Forward Command Room during Cycle B
 Operations Conquest I
Set Bonus: Might
Description: Grants access to the Operations based Conquest Objective “Operation: Rally – Part 1”.
Guild Level Required: 1 (Tier I)
Length: 2 Weeks
Cost: 35 Guild Commendations + No Reinforcement Module +750,000 Credits
Limits:
Available: Bridge during Cycle B, and Engine Room during Cycle E
Operations Conquest II
Set Bonus: Might
Description: Grants access to the Operations based Conquest Objective “Operation: Rally – Part 2”.
Guild Level Required: 49 (Tier IV)
Length: 2 Weeks
Cost: 33 Guild Commendations + No Reinforcement Module +2,000,000 Credits
Limits:
Available: Bridge during Cycle B
 Operations Mastery I
Set Bonus: Might
Description: Increases Mastery when in Operations by 4%. Does not apply in Master Mode.
Guild Level Required: 1 (Tier I)
Length: 2 Weeks
Cost: 35 Guild Commendations + No Reinforcement Module +900,000 Credits
Limits: Operation Mastery
Available: Port Command Room during Cycle A, Port Command Room during Cycle B, Port Command Room during Cycle C, Port Command Room during Cycle D, Port Command Room during Cycle E
Operations Mastery II
Set Bonus: Might
Description: Increases Mastery when in Operations by 6%. Does not apply in Master Mode.
Guild Level Required: 49 (Tier IV)
Length: 2 Weeks
Cost: 36 Guild Commendations + No Reinforcement Module +2,000,000 Credits
Limits: Operation Mastery
Available: Port Command Room during Cycle B, Port Command Room during Cycle C, Port Command Room during Cycle E
Operations Mastery III
Set Bonus: Might
Description: Increases Mastery when in Operations by 8%. Does not apply in Master Mode.
Guild Level Required: 64 (Tier V)
Length: 1 Week Weeks
Cost: 52 Guild Commendations + No Reinforcement Module +1,500,000 Credits
Limits: Operation Mastery
Available: Port Command Room during Cycle A, Port Command Room during Cycle C, Port Command Room during Cycle D
 Power Amplification
Set Bonus: Might
Description: Increases all melee, ranged, Force and tech bonus damage and healing by 3% for 60 minutes. Does not stack with other similar effects.
Guild Level Required: 32 (Tier III)
Length: 2 Weeks
Cost: 52 Guild Commendations + No Reinforcement Module +1,500,000 Credits
Limits:
Available: Forward Command Room during Cycle A, Forward Command Room during Cycle C
 Starfight Commandeering I
Set Bonus: Might
Description: Increases Requisition gained from Galactic Starfighter by 5%.
Guild Level Required: 1 (Tier I)
Length: 2 Weeks
Cost: 30 Guild Commendations + No Reinforcement Module +750,000 Credits
Limits: Gsf Requisition
Available: Port Command Room during Cycle B, Port Command Room during Cycle C, Starboard Command Room during Cycle E
Starfight Commandeering II
Set Bonus: Might
Description: Increases Requisition gained from Galactic Starfighter by 7%.
Guild Level Required: 32 (Tier III)
Length: 2 Weeks
Cost: 50 Guild Commendations + No Reinforcement Module +1,500,000 Credits
Limits: Gsf Requisition
Available: Port Command Room during Cycle A, and Engine Room during Cycle D
Starfight Commandeering III
Set Bonus: Might
Description: Increases Requisition gained from Galactic Starfighter by 9%.
Guild Level Required: 49 (Tier IV)
Length: 2 Weeks
Cost: 55 Guild Commendations + No Reinforcement Module +2,000,000 Credits
Limits: Gsf Requisition
Available: Port Command Room during Cycle D
 PvP Valor I
Set Bonus: Might
Description: Increases Valor rewards from Warzones and Arenas by 5%.
Guild Level Required: 1 (Tier I)
Length: 2 Weeks
Cost: 50 Guild Commendations + No Reinforcement Module +750,000 Credits
Limits: PvP Valor
Available: Starboard Command Room during Cycle A, Starboard Command Room during Cycle C, Engine Room during Cycle E
PvP Valor II
Set Bonus: Might
Description: Increases Valor rewards from Warzones and Arenas by 7%.
Guild Level Required: 32 (Tier III)
Length: 2 Weeks
Cost: 52 Guild Commendations + No Reinforcement Module +1,500,000 Credits
Limits: PvP Valor
Available: Starboard Command Room during Cycle A
PvP Valor III
Set Bonus: Might
Description: Increases Valor rewards from Warzones and Arenas by 9%.
Guild Level Required: 49 (Tier IV)
Length: 2 Weeks
Cost: 35 Guild Commendations + No Reinforcement Module +2,000,000 Credits
Limits: PvP Valor
Available: Engine Room during Cycle A, Engine Room during Cycle B, Starboard Command Room during Cycle C, Port Command Room during Cycle E
Vitality Perks
 Cleanse
Set Bonus: Vitality
Description: Cleanses you of up to 2 negative effects. Cannot be used in PvP or Master Mode Operations.
Guild Level Required: 12 (Tier II)
Length: 1 Week Weeks
Cost: 50 Guild Commendations + No Reinforcement Module +750,000 Credits
Limits:
Available: Forward Command Room during Cycle A
 Efficient Repair I
Set Bonus: Vitality
Description: Slightly reduces the cost to repair items.
Guild Level Required: 1 (Tier I)
Length: 2 Weeks
Cost: 52 Guild Commendations + No Reinforcement Module +750,000 Credits
Limits: Repair Cost
Available: Engine Room during Cycle B, Docking Bay during Cycle D
 Efficient Repair II
Set Bonus: Vitality
Description: Moderately reduces the cost to repair items.
Guild Level Required: 12 (Tier II)
Length: 2 Weeks
Cost: 58 Guild Commendations + No Reinforcement Module +1,250,000 Credits
Limits: Repair Cost
Available: Engine Room during Cycle C, Docking Bay during Cycle E
 Efficient Repair III
Set Bonus: Vitality
Description: Significantly reduces the cost to repair items.
Guild Level Required: 32 (Tier III)
Length: 2 Weeks
Cost: 36 Guild Commendations + No Reinforcement Module +1,500,000 Credits
Limits: Repair Cost
Available: Docking Bay during Cycle C
 Endurance Supplement
Set Bonus: Vitality
Description: Increase Endurance by 3% for 60 minutes. Does not stack with other similar effects.
Guild Level Required: 1 (Tier I)
Length: 2 Weeks
Cost: 52 Guild Commendations + No Reinforcement Module +900,000 Credits
Limits:
Available: Forward Command Room during Cycle A, Forward Command Room during Cycle B, Forward Command Room during Cycle C, Forward Command Room during Cycle D, Forward Command Room during Cycle E
 Flashpoint Biochemist I
Set Bonus: Vitality
Description: Increases the duration of Adrenals in Flashpoints by 10%.
Guild Level Required: 12 (Tier II)
Length: 2 Weeks
Cost: 58 Guild Commendations + No Reinforcement Module +1,250,000 Credits
Limits: Flashpoint Adrenal
Available: Port Command Room during Cycle A, and Port Command Room during Cycle D
Flashpoint Biochemist II
Set Bonus: Vitality
Description: Increases the duration of Adrenals in Flashpoints by 20%.
Guild Level Required: 49 (Tier IV)
Length: 2 Weeks
Cost: 52 Guild Commendations + No Reinforcement Module +2,000,000 Credits
Limits: Flashpoint Adrenal
Available: Starboard Command Room during Cycle A
Flashpoint Biochemist III
Set Bonus: Vitality
Description: Increases the duration of Adrenals in Flashpoints by 30%.
Guild Level Required: 64 (Tier V)
Length: 2 Weeks
Cost: 58 Guild Commendations + RM+2,500,000 Credits
Limits: Flashpoint Adrenal
Available: Starboard Command Room during Cycle B
 Flashpoint Conquest I
Set Bonus: Vitality
Description: Grants access to the Flashpoint based Conquest Objective “Flashpoint: Rally – Part 1”.
Guild Level Required: 1 (Tier I)
Length: 2 Weeks
Cost: 36 Guild Commendations + No Reinforcement Module +750,000 Credits
Limits:
Available: Engine Room during Cycle A, Docking Bay during Cycle B, and Bridge during Cycle E
Flashpoint Conquest II
Set Bonus: Vitality
Description: Grants access to the Flashpoint based Conquest Objective “Flashpoint: Rally – Part 2”.
Guild Level Required: 49 (Tier IV)
Length: 2 Weeks
Cost: 50 Guild Commendations + No Reinforcement Module +2,000,000 Credits
Limits:
Available: Bridge during Cycle B
 Flashpoint Fortitude I
Set Bonus: Vitality
Description: Increases Endurance when in Flashpoints by 6%.
Guild Level Required: 1 (Tier I)
Length: 2 Weeks
Cost: 55 Guild Commendations + No Reinforcement Module +900,000 Credits
Limits: Flashpoint Endurance
Available: Starboard Command Room during Cycle A, Starboard Command Room during Cycle B, Starboard Command Room during Cycle C, Starboard Command Room during Cycle D, Starboard Command Room during Cycle E
Flashpoint Fortitude II
Set Bonus: Vitality
Description: Increases Endurance when in Flashpoints by 9%.
Guild Level Required: 49 (Tier IV)
Length: 2 Weeks
Cost: 55 Guild Commendations + No Reinforcement Module +2,000,000 Credits
Limits: Flashpoint Endurance
Available: Starboard Command Room during Cycle A, Starboard Command Room during Cycle C, Starboard Command Room during Cycle E
Flashpoint Fortitude III
Set Bonus: Vitality
Description: Increases Endurance when in Flashpoints by 12%.
Guild Level Required: 64 (Tier V)
Length: 1 Week Weeks
Cost: 50 Guild Commendations + No Reinforcement Module +1,500,000 Credits
Limits: Flashpoint Endurance
Available: Starboard Command Room during Cycle B, Starboard Command Room during Cycle D, Starboard Command Room during Cycle E
 Group Resuscitation
Set Bonus: Vitality
Description: Summons droids to revive all incapacitated allies in range.
Guild Level Required: 64 (Tier V)
Length: 1 Week Weeks
Cost: 55 Guild Commendations + RM+1,500,000 Credits
Limits:
Available: Forward Command Room during Cycle B, Forward Command Room during Cycle C
Major Endurance Supplement
Set Bonus: Vitality
Description: Increase Endurance by 5% for 60 minutes. Does not stack with other similar effects.
Guild Level Required: 32 (Tier III)
Length: 1 Week Weeks
Cost: 55 Guild Commendations + No Reinforcement Module +900,000 Credits
Limits:
Available: Forward Command Room during Cycle D
 Operations Biochemist I
Set Bonus: Vitality
Description: Increases the duration of Adrenals in Operations by 10%. Does not apply in Master Mode.
Guild Level Required: 12 (Tier II)
Length: 2 Weeks
Cost: 52 Guild Commendations + No Reinforcement Module +1,250,000 Credits
Limits: Operation Adrenal
Available: Port Command Room during Cycle B, Starboard Command Room during Cycle D
Operations Biochemist II
Set Bonus: Vitality
Description: Increases the duration of Adrenals in Operations by 20%. Does not apply in Master Mode.
Guild Level Required: 49 (Tier IV)
Length: 2 Weeks
Cost: 58 Guild Commendations + No Reinforcement Module +2,000,000 Credits
Limits: Operation Adrenal
Available: Port Command Room during Cycle B, and Engine Room during Cycle E
Operations Biochemist III
Set Bonus: Vitality
Description: Increases the duration of Adrenals in Operations by 30%. Does not apply in Master Mode.
Guild Level Required: 64 (Tier V)
Length: 2 Weeks
Cost: 60 Guild Commendations + RM+2,500,000 Credits
Limits: Operation Adrenal
Available: Engine Room during Cycle C, Port Command Room during Cycle E
 Operations Fortitude I
Set Bonus: Vitality
Description: Increases Endurance when in Operations by 6%. Does not apply in Master Mode.
Guild Level Required: 1 (Tier I)
Length: 2 Weeks
Cost: 58 Guild Commendations + No Reinforcement Module +900,000 Credits
Limits: Operation Endurance
Available: Port Command Room during Cycle A, Port Command Room during Cycle B, Port Command Room during Cycle C, Port Command Room during Cycle D, Port Command Room during Cycle E
Operations Fortitude II
Set Bonus: Vitality
Description: Increases Endurance when in Operations by 9%. Does not apply in Master Mode.
Guild Level Required: 49 (Tier IV)
Length: 2 Weeks
Cost: 50 Guild Commendations + No Reinforcement Module +2,000,000 Credits
Limits: Operation Endurance
Available: Port Command Room during Cycle A, Port Command Room during Cycle C, Port Command Room during Cycle E
Operations Fortitude III
Set Bonus: Vitality
Description: Increases Endurance when in Operations by 12%. Does not apply in Master Mode.
Guild Level Required: 64 (Tier V)
Length: 1 Week Weeks
Cost: 60 Guild Commendations + No Reinforcement Module +1,500,000 Credits
Limits: Operation Endurance
Available: Port Command Room during Cycle B, Port Command Room during Cycle C, Port Command Room during Cycle D
 Quicker Travel I
Set Bonus: Vitality
Description: Decreases the cooldown of Quick Travel by 60 seconds.
Guild Level Required: 1 (Tier I)
Length: 2 Weeks
Cost: 50 Guild Commendations + No Reinforcement Module +750,000 Credits
Limits: Quick Travel Cooldown
Available: Bridge during Cycle A, Docking Bay during Cycle C
 Quicker Travel II
Set Bonus: Vitality
Description: Decreases the cooldown of Quick Travel by 90 seconds.
Guild Level Required: 12 (Tier II)
Length: 2 Weeks
Cost: 55 Guild Commendations + No Reinforcement Module +1,250,000 Credits
Limits: Quick Travel Cooldown
Available: Docking Bay during Cycle D
 Quicker Travel III
Set Bonus: Vitality
Description: Decreases the cooldown of Quick Travel by 120 seconds.
Guild Level Required: 32 (Tier III)
Length: 2 Weeks
Cost: 52 Guild Commendations + No Reinforcement Module +1,500,000 Credits
Limits: Quick Travel Cooldown
Available: Bridge during Cycle D
 Reputation Focus
Set Bonus: Vitality
Description: Increases all reputation gained by 15% for 1 hour.
Guild Level Required: 1 (Tier I)
Length: 2 Weeks
Cost: 52 Guild Commendations + No Reinforcement Module +750,000 Credits
Limits:
Available: Forward Command Room during Cycle A, and , Forward Command Room during Cycle E
Zeal Perks
 Efficient Missions I
Set Bonus: Zeal
Description: Increases Time efficiency for all Mission skills by 3%.
Guild Level Required: 1 (Tier I)
Length: 2 Weeks
Cost: 55 Guild Commendations + No Reinforcement Module +900,000 Credits
Limits: Mission Efficiency
Available: Docking Bay during Cycle A, Docking Bay during Cycle B, Docking Bay during Cycle C, Docking Bay during Cycle D, Docking Bay during Cycle E
Efficient Missions II
Set Bonus: Zeal
Description: Increases Time efficiency for all Mission skills by 5%.
Guild Level Required: 12 (Tier II)
Length: 2 Weeks
Cost: 50 Guild Commendations + No Reinforcement Module +1,250,000 Credits
Limits: Mission Efficiency
Available: Docking Bay during Cycle B, and Docking Bay during Cycle E
Efficient Missions III
Set Bonus: Zeal
Description: Increases Time efficiency for all Mission skills by 7%.
Guild Level Required: 32 (Tier III)
Length: 2 Weeks
Cost: 55 Guild Commendations + No Reinforcement Module +1,500,000 Credits
Limits: Mission Efficiency
Available: Bridge during Cycle A
 Energized Regeneration
Set Bonus: Zeal
Description: Restores or generates your primary combat resource over <<1[%d seconds/%d second/%d seconds]>>. Cannot be used in PvP or Master Mode Operations.
Guild Level Required: 32 (Tier III)
Length: 2 Weeks
Cost: 50 Guild Commendations + No Reinforcement Module +1,500,000 Credits
Limits:
Available: Forward Command Room during Cycle B
 Experience Powerhouse I
Set Bonus: Zeal
Description: Increases Experience earned from all sources by 3%.
Guild Level Required: 1 (Tier I)
Length: 2 Weeks
Cost: 52 Guild Commendations + No Reinforcement Module +900,000 Credits
Limits: Xp
Available: Bridge during Cycle A, Bridge during Cycle B, Bridge during Cycle C, Bridge during Cycle D, Bridge during Cycle E
 Experience Powerhouse II
Set Bonus: Zeal
Description: Increases Experience earned from all sources by 5%.
Guild Level Required: 32 (Tier III)
Length: 2 Weeks
Cost: 52 Guild Commendations + No Reinforcement Module +1,500,000 Credits
Limits: Xp
Available: Bridge during Cycle C
 Experience Powerhouse III
Set Bonus: Zeal
Description: Increases Experience earned from all sources by 7%.
Guild Level Required: 64 (Tier V)
Length: 1 Week Weeks
Cost: 58 Guild Commendations + RM+1,500,000 Credits
Limits: Xp
Available: Docking Bay during Cycle A, Engine Room during Cycle C, Engine Room during Cycle D, Bridge during Cycle E
 Flashpoint Profiteer I
Set Bonus: Zeal
Description: Increases XP, Command XP, and Reputation rewards from Flashpoints by 5%.
Guild Level Required: 1 (Tier I)
Length: 2 Weeks
Cost: 36 Guild Commendations + No Reinforcement Module +750,000 Credits
Limits: Flashpoint Rewards
Available: Port Command Room during Cycle A, Engine Room during Cycle B, Starboard Command Room during Cycle D
Flashpoint Profiteer II
Set Bonus: Zeal
Description: Increases XP, Command XP, and Reputation rewards from Flashpoints by 7%.
Guild Level Required: 12 (Tier II)
Length: 2 Weeks
Cost: 36 Guild Commendations + No Reinforcement Module +1,250,000 Credits
Limits: Flashpoint Rewards
Available: Starboard Command Room during Cycle A, and , Port Command Room during Cycle E
Flashpoint Profiteer III
Set Bonus: Zeal
Description: Increases XP, Command XP, and Reputation rewards from Flashpoints by 9%.
Guild Level Required: 32 (Tier III)
Length: 2 Weeks
Cost: 55 Guild Commendations + No Reinforcement Module +1,500,000 Credits
Limits: Flashpoint Rewards
Available: Starboard Command Room during Cycle C
 Gathering Efficiency I
Set Bonus: Zeal
Description: Increases Time efficiency for all Gathering skills by 3%
Guild Level Required: 1 (Tier I)
Length: 2 Weeks
Cost: 50 Guild Commendations + No Reinforcement Module +900,000 Credits
Limits: Gathering Efficiency
Available: Docking Bay during Cycle A, Docking Bay during Cycle B, Docking Bay during Cycle C, Docking Bay during Cycle D, Docking Bay during Cycle E
Gathering Efficiency II
Set Bonus: Zeal
Description: Increases Time efficiency for all Gathering skills by 5%
Guild Level Required: 12 (Tier II)
Length: 2 Weeks
Cost: 52 Guild Commendations + No Reinforcement Module +1,250,000 Credits
Limits: Gathering Efficiency
Available: Bridge during Cycle A
Gathering Efficiency III
Set Bonus: Zeal
Description: Increases Time efficiency for all Gathering skills by 7%
Guild Level Required: 32 (Tier III)
Length: 2 Weeks
Cost: 35 Guild Commendations + No Reinforcement Module +1,500,000 Credits
Limits: Gathering Efficiency
Available: Docking Bay during Cycle A
 Hasten
Set Bonus: Zeal
Description: Increases movement speed by 90% for 6 seconds. Cannot be used in PvP or Master Mode Operations.
Guild Level Required: 1 (Tier I)
Length: 2 Weeks
Cost: 50 Guild Commendations + No Reinforcement Module +750,000 Credits
Limits:
Available: Forward Command Room during Cycle A, and Forward Command Room during Cycle D
Major Hasten
Set Bonus: Zeal
Description: Increases movement speed by 120% for 6 seconds. Cannot be used in PvP or Master Mode Operations.
Guild Level Required: 12 (Tier II)
Length: 1 Week Weeks
Cost: 52 Guild Commendations + No Reinforcement Module +750,000 Credits
Limits:
Available: Forward Command Room during Cycle E
 Mount Improvements I
Set Bonus: Zeal
Description: Increases Mounted Speed by 10%.
Guild Level Required: 1 (Tier I)
Length: 2 Weeks
Cost: 55 Guild Commendations + No Reinforcement Module +750,000 Credits
Limits: Mount Speed
Available: Engine Room during Cycle A, Bridge during Cycle C
Mount Improvements II
Set Bonus: Zeal
Description: Increases Mounted Speed by 15%.
Guild Level Required: 12 (Tier II)
Length: 2 Weeks
Cost: 55 Guild Commendations + No Reinforcement Module +1,250,000 Credits
Limits: Mount Speed
Available: Engine Room during Cycle A, Docking Bay during Cycle C
 Mount Improvements III
Set Bonus: Zeal
Description: Increases Mounted Speed by 20%.
Guild Level Required: 32 (Tier III)
Length: 1 Week Weeks
Cost: 36 Guild Commendations + No Reinforcement Module +900,000 Credits
Limits: Mount Speed
Available: Bridge during Cycle E
 Mount Speed Boost
Set Bonus: Zeal
Description: Increases your mount speed for 10 seconds. Must be mounted to use.
Guild Level Required: 1 (Tier I)
Length: 1 Week Weeks
Cost: 55 Guild Commendations + No Reinforcement Module +450,000 Credits
Limits:
Available: Forward Command Room during Cycle B, Forward Command Room during Cycle C
 Mount Stealth
Set Bonus: Zeal
Description: Activates a stealth generator while mounted, increasing your stealth level by 15 and making you and your companion difficult to detect. Your companion will not react to enemy attacks while in stealth. Lasts for 30 seconds. Must be mounted to use.
Guild Level Required: 32 (Tier III)
Length: 2 Weeks
Cost: 50 Guild Commendations + No Reinforcement Module +1,500,000 Credits
Limits:
Available: Forward Command Room during Cycle C
 Operations Profiteer I
Set Bonus: Zeal
Description: Increases Reputation rewards from Operations by 5%.
Guild Level Required: 1 (Tier I)
Length: 2 Weeks
Cost: 33 Guild Commendations + No Reinforcement Module +750,000 Credits
Limits: Operation Rewards
Available: Starboard Command Room during Cycle B, Engine Room during Cycle C, Port Command Room during Cycle D, Starboard Command Room during Cycle E
Operations Profiteer II
Set Bonus: Zeal
Description:Increases Reputation rewards from Operations by 7%.
Guild Level Required: 12 (Tier II)
Length: 2 Weeks
Cost: 55 Guild Commendations + No Reinforcement Module +1,250,000 Credits
Limits: Operation Rewards
Available: Starboard Command Room during Cycle B, and Engine Room during Cycle E
Operations Profiteer III
Set Bonus: Zeal
Description: Increases Reputation rewards from Operations by 9%.
Guild Level Required: 32 (Tier III)
Length: 2 Weeks
Cost: 58 Guild Commendations + No Reinforcement Module +1,500,000 Credits
Limits: Operation Rewards
Available: Engine Room during Cycle A, Port Command Room during Cycle B, Port Command Room during Cycle C, Starboard Command Room during Cycle D
Quick Harvesting I
Set Bonus: Zeal
Description: Reduces harvesting time by 15%.
Guild Level Required: 1 (Tier I)
Length: 2 Weeks
Cost: 50 Guild Commendations + No Reinforcement Module +750,000 Credits
Limits: Reduced Harvest Time
Available: Docking Bay during Cycle D
Quick Harvesting II
Set Bonus: Zeal
Description: Reduces harvesting time by 30%.
Guild Level Required: 12 (Tier II)
Length: 2 Weeks
Cost: 58 Guild Commendations + No Reinforcement Module +1,250,000 Credits
Limits: Reduced Harvest Time
Available: Docking Bay during Cycle A
Quick Harvesting III
Set Bonus: Zeal
Description: Reduces harvesting time by 45%.
Guild Level Required: 49 (Tier IV)
Length: 1 Week Weeks
Cost: 58 Guild Commendations + No Reinforcement Module +1,200,000 Credits
Limits: Reduced Harvest Time
Available: Bridge during Cycle C
 Sprinter I
Set Bonus: Zeal
Description: Slightly increases movement speed granted by the Sprint ability. Does not work in PvP areas.
Guild Level Required: 1 (Tier I)
Length: 2 Weeks
Cost: 52 Guild Commendations + No Reinforcement Module +750,000 Credits
Limits: Sprint Speed
Available: Engine Room during Cycle B, Bridge during Cycle D
Sprinter II
Set Bonus: Zeal
Description: Moderately increases movement speed granted by the Sprint ability. Does not work in PvP areas.
Guild Level Required: 12 (Tier II)
Length: 2 Weeks
Cost: 55 Guild Commendations + No Reinforcement Module +1,250,000 Credits
Limits: Sprint Speed
Available: Bridge during Cycle B, and Engine Room during Cycle E
 Sprinter III
Set Bonus: Zeal
Description: Significantly increases movement speed granted by the Sprint ability. Does not work in PvP areas.
Guild Level Required: 32 (Tier III)
Length: 1 Week Weeks
Cost: 55 Guild Commendations + No Reinforcement Module +900,000 Credits
Limits: Sprint Speed
Available: Docking Bay during Cycle B
Old Perks
These perks are no longer available:

 Commander I: Increases Command Experience earned from all sources by 3%.
- Tax Evasion II: Moderately reduces Galactic Trade Network commission charges.
- Tax Evasion III: Significantly reduces Galactic Trade Network commission charges.
- Command Focus: Increases all command experience gained by 15% for 1 hour.
- Commander II: Increases Command Experience earned from all sources by 5%.
- Commander III: Increases Command Experience earned from all sources by 7%.
- Tax Evasion I: Slightly reduces Galactic Trade Network commission charges.
 Commander I: Increases Command Experience earned from all sources by 3%.
 Tax Evasion II: Moderately reduces Galactic Trade Network commission charges.
 Commander II: Increases Command Experience earned from all sources by 5%.
 Commander III: Increases Command Experience earned from all sources by 7%.
These perks seem to have been in the files but were never actually added to the game:
- Auto Loot Ability: Loot any nearby drop.
- Instant Guild Mail: Send mail to your guildmates instantly!
- Guild Mount: No description.
- Warzone Looter: Chance to loot items from dead players in Warzones.
- VIP Room Access: Receive access to the guild VIP room.
 Questions or comments? Feel free to send me a message on Twitter


 Discord
  Email swtorista@gmail.com
 Bluesky @swtorista.com
 Reddit /u/swtorista
 Twitch Swtorista
 Youtube
 Patreon
 Twitter @swtorista