























 Defense
 Vigilance
 Seer
Seer



 How to Craft
 Choose a Crew Skill
 Armormech
 Armstech
 Artifice
 Biochem
 Cybertech
 Synthweaving
 How to Craft Fast
 Gathering Guide
 Rare Materials Guide
 White Materials Guide
 Jawa Junk
 Augments
 Medpacs, Stims and Adrenals
 Synthweaving Crafting Tree




 Crafted Decorations
 Crafted Mounts
 Crafted Dyes
 Crafted Crystals
 Events Calendar
 Galactic Seasons
 PvP Seasons
 Bounty Event
 Double XP Event
 Feast of Prosperity
 Gree Event
 Life Day
 Nightlife Event
 Pirate Incursion Event
 Rakghoul Event
 Spring Abundance Festival
 Swoop Event
 Accessibility HubAll Accessibility guides and info
 DeafPlaying while deaf or hearing-impaired
 BlindPlaying while visually impaired or with low vision
 ColorblindPlaying with colorblindness and settings options
 AnxietyPlaying with general anxiety or social anxiety

 Jedi Knight
 Jedi Consular
 Trooper
 Smuggler
 Sith Warrior
 Sith Inquisitor
 Bounty Hunter
 Imperial Agent
 Bounty Hunter
 Imperial Agent
 Jedi
Jedi Jedi Consular
 Jedi Knight
 Sith
Sith Sith Inquisitor
 Sith Warrior
 Smuggler
 Trooper
 Legacy Gear
 Lightsabers
 Double-Bladed Lightsabers
 Vibroswords
 Double-Bladed Vibroswords
 Blaster Pistols
 Blaster Rifles
 Sniper Rifles
 Blaster Cannons

The Shrine of Silence Flashpoint in Star Wars: The Old Republic is a repeatable piece of content that can be played alone or with a group, and in the storyline takes place was part of the Update 7.3 Old Wounds storyline, in the Interpreter’s Retreat area.
Contents
Shrine of Silence

Many Voss Interpreters have said that their time in the Shrine of Silence was a blessing. Others, including those who did not pass this last trial, claim that the practice was torture. Left alone, with nothing but deafening silence and glaring light, their thoughts turned sinister and malevolent.
How to Start
The Shrine of Silence is a Flashpoint meant to be played late in the Legacy of the Sith expansion storyline, but is considered a stand alone Flashpoint not directly a part of the main storyline. You can encounter it naturally partway through the Legacy of the Sith expansion, replay it alone in Story mode, or play it outside of the story with a group in Story, Veteran or Master mode.
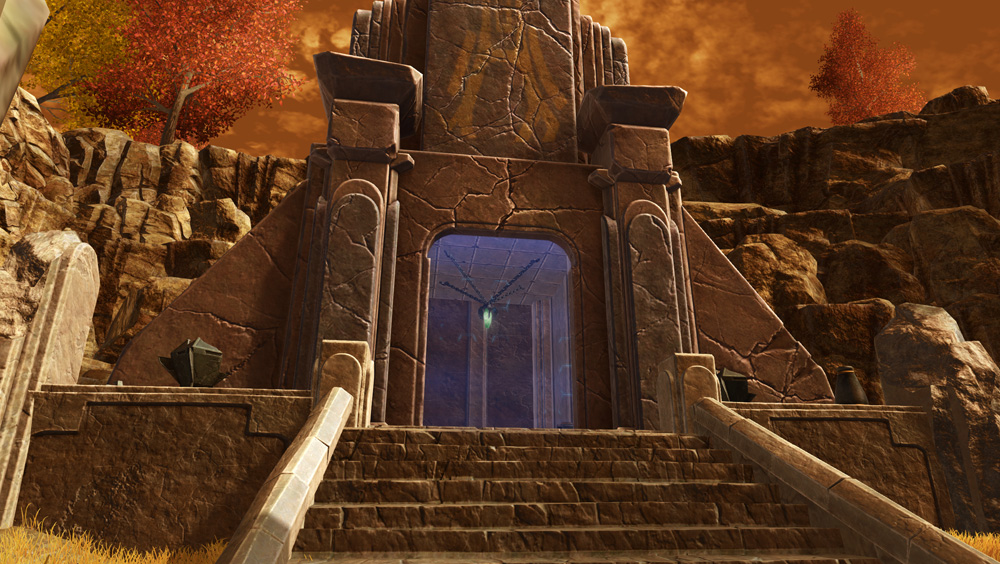
Use the tabs above for instructions for how to enter the flashpoint in the story line, and how to enter it in Solo (Story) mode, Veteran mode, and Master mode by faction. The instructions are exactly the same Republic and Imperial side.
- Story: Lvl 80
- Solo: Lvl 80
- Veteran: Lvl 15-80
- Veteran Groupfinder: Lvl 80
- Master Mode: Lvl 80
- Master Mode Groupfinder: Lvl 80

Story


Requirements: If you want to play the extra story associated with this Flashpoint, you must pick up the story quest from the Help Wanted: Reconstruction Efforts board. You will need to be LEVEL 80 AND completed the story up to Ruhnuk (you do not need to have finished the Voss storyline).

Timeline: In the story, this Flashpoint takes place as part of the Legacy of the Sith expansion, after the step called Interpreter’s Retreat and before you start Kessan’s Landing on Ord Mantell (quest name Chains in the Dark / Road to Nowhere). However, it is not directly tied into the main storyline, and you can easily come back later and run it.

Bring a Friend: If you want to bring a friend along for this Flashpoint in Story Mode to do the full story line, you easily can.
If they have not done the Helped Wanted step but have done the Voss Interpreter’s Retreat storyline, they can join you in a group and you can follow the exact same steps together.
If they have already run the storyline OR have not even started Interpreter’s Retreat yet, they won’t be able to join you for the introductory storyline, but can run the actual Flashpoint with you. You’ll get the Flashpoint quest automatically as part of the Help Wanted quest chain, but your friend won’t have it – so you’ll either need to try sharing the [STORY] Flashpoint: Shrine of Silence quest from your quest log, or have them walk to the terminal and pick up the story quest, or they can also use the Solo tab in the Activity Finder to quickly join you once you are already inside the Flashpoint. They will need to be level 80 to join you though.


Directions to the Story Quest for Shrine of Silence: If you want to play the extra story associated with this Flashpoint, you must pick up the story quest from the Help Wanted: Reconstruction Efforts board. You will need to be LEVEL 80 AND completed the story up to Ruhnuk (you do not need to have finished the Voss storyline).

You will get a brief cutscene in the Interpreter’s Retreat area with a Voss named Jiri-Su, and then it will also automatically grant you the Story Mode version of the Flashpoint.

If you want, you can drop the [Story] quest, and pick up either [Veteran] or [Master] instead from the quest terminal – you don’t have to run the [Story] version. Once done, return to the Interpreter’s Retreat area to complete the Help Wanted “Shrine of Silence” quest and get a free random Voss decoration. If you are below this level, or not on the correct quest step, you can not play the small story quest for this Flashpoint.
Shrine of Silence’s one-time story quest is a side quest in the post-Legacy of the Sith expansion storyline.

If you have not yet run through the Legacy of the Sith-related storylines, you can start it from the glowing blue terminal on your ship. To start this questline, you can start with the Ossus quest called Inflection Point at level 75+. You’ll be going through a lot of content – Ossus is like the prelude to the Legacy of the Sith expansion, then you have to run through the entire Legacy of the Sith expansion, then its flashpoint finale Objective Meridian, then the Echoes of Oblivion storyline, then finally you would get to the Shrine of Silence quest. Ideally, for the most story comprehension, you’d also have run all of the expansion stories that come before Ossus, but the game allows you to skip past them if you are level 75 – just be aware you can not go back and do them later in the story.
→ Ossus (Inflection Point quest)
→ Onslaught Expansion (Onderon & Mek-Sha)
→ Objective Meridian Flashpoint
→ Echoes of Oblivion
→ Spirit of Vengeance
→ Conflicting Priorities (short quest)
→ Secrets of the Enclave
→ Legacy of the Sith Expansion (Manaan)
→ Ruhnuk
→ Interpreter’s Retreat
→ Shrine of Silence

Story Progress: [STORY] Shrine of Silence alone will not progress your storyline – it is simply the repeatable solo version. To work on the overarching story, you also need to be on the quest Shrine of Silence on the step Complete the “Shrine of Silence” Flashpoint and then run the Flashpoint: Shrine of Silence quest in any mode.


Lost the quest? If you lost the Legacy of the Sith expansion quest called Shrine of Silence, for example if you abandoned it, you can go back to the Help Wanted sign and then go back and talk to the voss Jiri-Su. If you lost the acutal quest to enter the flashpoint, for example [STORY] Shrine of Silence, go to the quest terminal and pick it up and then you will be able to enter the Flashpoint.

Solo (Story) Instructions

You can also run this repeatable Flashpoint solo outside of the one-time story quest, at level 80+.

Activity Finder: The FASTEST and EASIEST way to get into the Shrine of Silence Flashpoint soo mode is with the Activity Finder. If you are level 90 or higher, click the icon of “three little people” on the bottom right of your screen which will open the Activity Finder Window.
Then choose the Solo tab in the Activity Finder.

On the solo tab, scroll down and find the listing for Shrine of Silence on the list under Flashpoints, select it, then click the green Travel button. This will take you right into the Flashpoint!
Bring a Friend: You are allowed to bring friends along for this Flashpoint, you do not have to do it alone even though it is considered soloable. Your friends must also be level 80+, be in a group with you, and then you can all use the Solo Tab of the Activity Finder to get into the Flashpoint, and it will put you together no matter where in the galaxy you started from.
There’s really no need to walk into the Flashpoint manually, but here are the instructions.
Manual Entry: To enter this Flashpoint manually, you must go to the Shrine of Silence’s Flashpoint Quest Terminal, which is located on the planet of Voss Interpreter’s Retreat.
Choose [STORY] mode to start the Flashpoint, then run on in the entrance door in the northern map.
Story Progress: [STORY] Shrine of Silence alone will not progress your storyline – it is simply the repeatable solo version. To work on the overarching story, you also need to be on the quest Shrine of Silence on the step Complete the “Shrine of Silence” Flashpoint and then run the Flashpoint: Shrine of Silence quest in any mode.
Veteran Instructions

Shrine of Silence also has a repeatable 4-player Veteran version. It is meant to be completed by a group with any type of Republic characters in it, you do not necessarily need a tank or healer to complete it. You will likely also have good luck with 2 players and 2 companions, or 3 players and 1 companion.
Group Finder: If you want to queue up and enter Shrine of Silence in veteran mode through the group finder, you will need to be level 80 and not currently on any Shrine of Silence Flashpoint quests or it won’t show up as an option in the group finder. If you are level 80, click the icon of “three little people” on the bottom right of your screen which will open the Activity Finder Window. Then choose the Group tab in the Activity Finder.
Filter: If you want to specifically run Shrine of Silence and not a random Flashpoint, make sure to choose Veteran Flashpoints, then click the Filter button the right and narrow your choices down to just Shrine of Silence before pressing Join Queue. Joining the queue will put you in line to be matched with random players to play Shrine of Silence with.
Groupfinder flashpoints do NOT show the cutscenes in general, but Shrine of Silence has no cutscenes so it makes no difference.
Bring a Friend in the Groupfinder: You can queue up with a group of 2, 3, or 4 players in the group finder. If you have a full group of 4, it will bring you straight to the Flashpoint with your full group. If you have 2 or 3 players in your group, the group finder will match you with other random players until you have a full group – but you’ll always be paired with your friends who started off in your group, and will not be split up.
Story: [VETERAN] Shrine of Silence will not progress your storyline – it is simply the repeatable group version. If you are a low level, this is the only version that will show up on the actual Flashpoint questgiver in front of the entrance door – so don’t be confused and accidentally enter the group version if you are a low level, as it is not meant to be completed alone.
Manual Entry: To enter this Flashpoint manually, you must go to the Shrine of Silence’s Flashpoint Quest Terminal, which is located on the planet of Voss Interpreter’s Retreat.
Choose [Veteran] mode to start the Flashpoint, then run on in the entrance door in the northern map.
Bring a Friend Manually: Veteran Mode Flashpoints are not meant to be completed alone, though highly-skilled, highly-geared, high-level players might be able to. To bring friends along for this Veteran Flashpoint, they’ll need to pick up the Veteran Mode quest from the blue terminal – or you can pick up the quest and share it with them, but they’ll still need to walk in the door manually. Characters walking in the door need to be level 15+.
Master Instructions

Master Mode is the hardest version of Shrine of Silence. It is meant to be completed by a high-level high-skilled group at level 80. Most teams will want a Tank, Healer and two Damage characters. It’s recommended players are familiar with their class and role and have a good set of gear before entering this Flashpoint in Master Mode through the Group Finder or by walking in the door. It’s recommended that you especially have a healer comfortable with their role as the final boss has some auto-kill tactics if you are at low health!
Group Finder: If you want to queue up and enter Shrine of Silence in Master Mode through the group finder, you will need to be level 80 and not currently on any Shrine of Silence Flashpoint quests or it won’t show up as an option in the group finder. If you are level 80, click the icon of “three little people” on the bottom right of your screen which will open the Activity Finder Window. Then choose the Group tab in the Activity Finder.
Filter: If you want to specifically run Shrine of Silence and not a random Flashpoint, make sure to choose Master Flashpoints, then click the Filter button the right and narrow your choices down to just Shrine of Silence before pressing Join Queue. Joining the queue will put you in line to be matched with random players to play Shrine of Silence with.
Groupfinder flashpoints do NOT show the cutscenes in general, but Shrine of Silence has no cutscenes so it makes no difference.
Bring a Friend in the Groupfinder: You can queue up with a group of 2, 3, or 4 players in the group finder. If you have a full group of 4, it will bring you straight to the Flashpoint with your full group. If you have 2 or 3 players in your group, the group finder will match you with other random players until you have a full group – but you’ll always be paired with your friends who started off in your group, and will not be split up. Your friends all need to be level 80 too.
Story: [MASTER] Shrine of Silence will not progress your storyline – it is simply the repeatable difficult group version.
Manual Entry: To enter this Flashpoint manually, you must go to the Shrine of Silence’s Flashpoint Quest Terminal, which is located on the planet of Voss Interpreter’s Retreat.
Choose [MASTER] mode to start the Flashpoint, then run on in the entrance door in the northern map.
Bring a Friend Manually: Master Mode Flashpoints are not meant to be completed alone, and are designed for level 80 players who are comfortable with their role and class. To bring friends along for this Master Flashpoint, they’ll need to pick up the Master Mode quest from the blue terminal – or you can pick up the quest and share it with them, but they’ll still need to walk in the door manually while you’re in a group.
Map
This is a map of the Shrine of Silence flashpoint, including its bosses, secret bonus quest locations, bonus bosses and mini bosses. Click it to open to larger, or click this link to open it as a new tab/ image.

Bosses
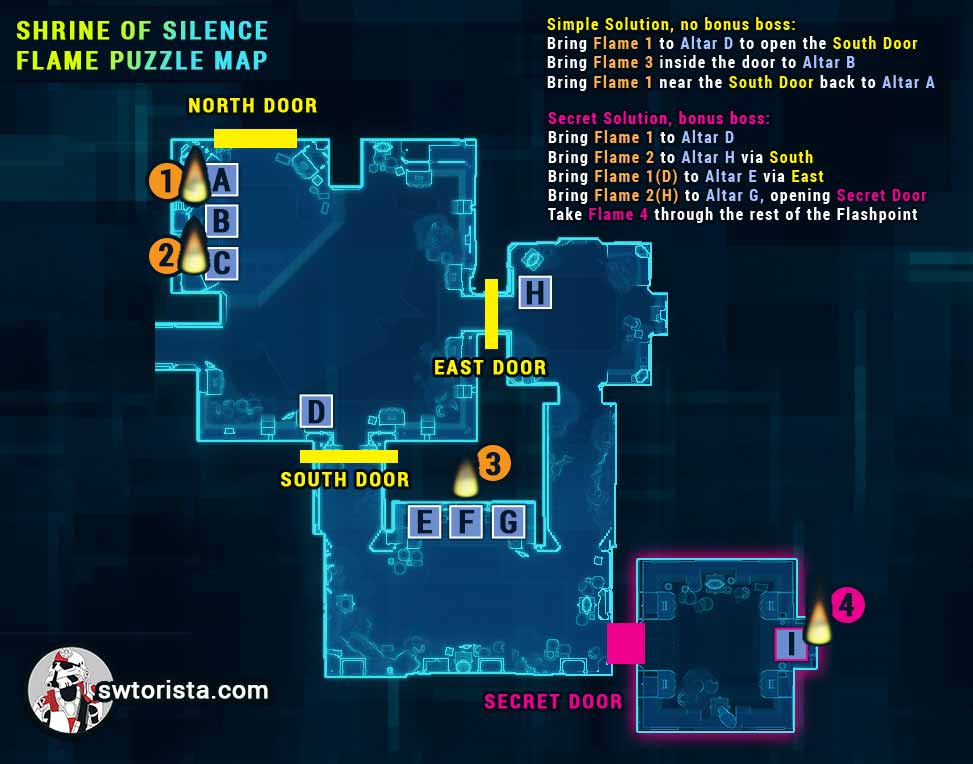
Flame Puzzle – Hall of Luminescence

Quest Step: Open the Door to the Shrine
There are two ways to solve this puzzle and open the door. The simple version just opens the door, and the slightly more complicated version opens up a secret door, which is required to eventually access and fight the Bonus Boss.
Simple Solution, no bonus boss:
- Bring Flame 1 to Altar D to open the South Door
- Bring Flame 3 inside the door to Altar B
- Bring Flame 1 near the South Door back to Altar A
Secret Solution, unlocks bonus boss:
- Bring Flame 1 to Altar D
- Bring Flame 2 to Altar H via South Door
- Bring Flame 1(D) to Altar E via East Door
- Bring Flame 2(H) to Altar G, opening Secret Door
- Take Flame 4 through the rest of the Flashpoint

First Boss – Corrupted Vorantikus
The Corrupted Vorantikus is the first boss of the Shrine of Silence and has a fun mechanic called “tantrum” that will force you to move around to stay safe.

Cleaving Strike: Stay out of the red cone by stepping out of it to the left or right. Your tank can face the Vorantikus away form the group so they don’t have to deal with the cone.
Do not accidentally run backwards out the door you came in, or get pushed out the door by the red cone, or it will reset the fight.

Tantrum: Tantrum is the red and blue “circles” you will see on the ground. Red is bad, blue/white is good. The story mode pattern goes:


- Step away from the boss, outside the small red circle around the boss
- Step close to the boss, inside the blue/white circle, and stay out of the red donut shape
- Stay still, inside the big blue/white circle, and stay out of the red donut shape
- Step into and stay in the small blue/white circle, or bring it to your companion if it is following you.

Stay out of the red circle.

Stay out of the red donut circle.

Stay out of the big red donut circle.

Do go into the safety blue circle.
Veteran Mode: In Veteran mode, the fight is roughly the same as story (see above), but you’ll especially want whoever has the attention of the boss to take their blue circle into the group.
Veteran Mode: The final blue/white circle will follow whatever player it is on. The player who has been chosen to receive it should go stand with their group, and any group members should go to them to stand safely in the blue circle.
Master-Mode Tantrum: In Master Mode, everything is faster and hurts more. In a Master Mode, red is still bad and blue is good, but the pattern is longer and faster:
- Step away from the boss, outside the small red circle around the boss
- Step close to the boss, inside the blue/white circle, and stay out of the red donut shape
- Stay still, inside the big blue/white circle, and stay out of the red donut shape
- Step close to the boss, inside the blue/white circle, and stay out of the red donut shape
- Step away from the boss, outside the small red circle around the boss
- Stay still, inside the big blue/white circle, and stay out of the red donut shape
- Step into and stay in the small blue/white circle. The final blue/white circle will follow whatever player it is on. The player who has been chosen to receive it should go stand with their group or companion, and any group members should go to them to stand safely in the blue circle.
Second Boss – The Twins
You may want to kill Rada-Ki first, as she has the Lightning Blast that goes all over the floor, while Tem-Su only has the Light Beam laser.


Light Beam: Don’t stand in the red laser beam.

Lightning Blast: Don’t stand in the lightning on the floor.

Force Push: Don’t stand in the red cone or you’ll get pushed back.

Corrupted Spirit: A ghost will appear. Defeat the ghost, as it does an attack called Spirit Burn that hurts everyone around it until it dies.
Veteran Mode: In Veteran Mode, once you kill one, the other will heal to full health. So focus on killing one at a time.
Veteran Mode: Veteran Mode is mostly the same as story mode, but with more team members, so you have to try not to hurt each other with all the stuff on the ground. If you have the attention of the enemies, try and turn them away from your group so they don’t get hit by the Force Push or laser beam.

Veteran Mode: In Veteran Mode, if you have the attention of the bosses, you can walk them over to the ghost, and work on killing all three enemies together.

Master Mode: In Master Mode, both twins will randomly select a player to push back with their red conal AOE – and the pushback is very far, and will knock you off the cliff unless you have your back to the small crystal wall or have a large area of floor behind you. Everyone needs to be prepared to be randomly selected, and make sure their back is facing somewhere safe as often as possible. The red triangles do not move with you, so you can step out of them to the left or the right – the closer you are to the boss, the easier it is to step left or right of the conal because it is more narrow near the beginning.

Master Mode: The Tank can put their back to the rock wall with the glowing green crystals. With good gear and a good healer, the tank can stand in the lightning and heal through it, allowing them to consistently simply get knocked back against the wall, keeping the bosses in one spot. The DPS can then chase down the spirits and return to that spot after. Ranged DPS can stack and stay away from the boss to prevent lightning going all over the battle area, but they still need to be ready for those red conal pushbacks.

Final Boss – The Curse

The Final boss of Shrine of Silence, The Curse itself, is a very fun and interesting fight, which drags you from the real world into the spirit world.

Forceful Slam: Step left or right out of the red cone.

Summon Tentacle: The boss will summon tentacles around the room, step to the left or right out of their red beam. You can’t attack them, just leave them alone.

Summon Spirits: Kill the smaller enemies attacking you.

Portal: At 50% health, the boss will drag you into the spirit world.

Veteran Mode: Veteran is mostly the same as a story mode, but you can ask your team that if they have the smaller enemies attacking them, to bring them to the boss in the center, so they can be attacked at the same time as the boss.

Veteran Mode: If you have a tank, have them face the boss away from the group.
Master Mode: The Master Mode version of this final fight is really fun and exciting, as it has a major difference compared to the other modes.

Master Mode – Corrupt the Weak: When the boss casts Corrupt the Weak, if any of your team mates have less than 25% health, they will be auto-killed. So make sure your healer keeps everyone’s health up! This happens every few minutes.

Master Mode – Rada-Ki’s Lightning Storm: A boss from the previous fight will return in the form of a ghostly spirit. She can not be attacked, but will be casting lightning all over the floor, and you’ll simply need to avoid the lightning while killing the boss, avoiding the tentacles, and dealing with the Mewvorrs!

Master Mode – Mawvorrs: The Corrupted Mawvorr enemies in the final fight in Master Mode are quite rough – they will often run straight towards the healer and quickly kill them, even with the tank trying to pick them up. Between the purple lightning everywhere, and the deadly mawvorrs, this fight is quite hard even for an experienced group.
Bonus Boss – Kirba, The Forgotten

You can only unlock the Bonus Boss if you complete the flame puzzle the “secret” way, otherwise it is too late to unlock the pathway to him later, and the path to his lair will appear to be an impassable chasm. If you unlock the bonus boss, a path will appear there instead.

Forceful Presence (small): Stay out of the small red circle around the boss.
Forceful Presence (big): Move all the way out of the red donut shape, unless you have the attention of the boss, in that case go close to him. If you have the attention of the boss you can run him to the far side of the room, giving your ranged team mates space to stand safely at the other end of the room.

Enraged Stomp: Near the end of the fight he will drop small red circles on the ground to avoid in addition to everything else!

Veteran/Master Mode Blue Button – Reality Disruption Instigator: In Veteran or Master Mode, a blue button will appear on the north wall of the room. If you right-click it, Corrupted Commando Voss will appear from yellow spirit portals around the room, who will also start fighting you. This button is mainly only for the secret achievement, there’s really no other reason to click the alarm on the wall other than to make the fight harder for no reason!

Master Mode: This fight is the same in Master Mode, except the boss is a lot stronger: the longer the fight goes, the more stacks of Ancient’s Rage the boss will get, and the harder he’ll hit. The trick is just to kill him before he kills you.
Mini Bosses – Nil-Uu and Soul Coil
These two mini-bosses are really cool. In story mode, they are not very interesting and are just some bonus stronger enemies you can fight, but in Veteran and Master Mode, they can be a fun and challenging combat puzzle to solve, and their fights change depending on what order you complete them in. In addition, there is an achievement for fighting them in both orders!

If you choose to fight the Soul Coil first, it’s a simple fight, just kill what you see in front of you.
If you fought the Soul Coil first, your team mates will then have red circles around them and give off purple puffs of smoke corruption, which is the Unstable Soul debuff.
 Unstable Soul: Internal corruption is periodically exploding outward, damaging neaby allies. Don’t stack on your friends and hope your healer heals you – or that you kill Nil-Uu quickly, which will cure you.
If you are fighting Nil-Uu with Unstable Soul on your team, the boss has an ability where he pulls everyone in… so make sure your team mates know to run away from eachother when that happens or you’ll overlap all your corruption!

If you choose to fight Nil-Uu first, it’s a simple fight, just kill what you see in front of you.
If you fought Nil-Uu first, one of your team mates will have gotten the Mangled Spirit debuff, which turns their character’s body orange and purple and can be passed between team mates through touch. If you do not pass it around, the debuff will slow down your team mate and eventually kill them.
 Mangled Spirit: Taking damage and becoming progressively slower. Transfers to allies brave enough to approach. Unstable spirit realm energy may disrupt protective barriers.
When you reach the Soul Coil with the Mangled Spirit debuff, you will only be able to break its Transliminal Coating shield by having the player with the debuff stand on the big tentacle. You should take turns standing there and passing off the buff so your team mate doesn’t die.
Master Mode

Master Mode Shrine of Silence is quite a bit harder than Story and Veteran due to new mechanics for every boss:
- For the Vorantikus first boss, red is still bad and blue is good, but the pattern is longer and faster. The player who has been chosen to receive the light blue circle should go stand with their group or companion, and any group members should go to them to stand safely in the blue circle.
- Both twins will randomly select a player to push back with their red conal AOE – have your back against a wall or step out of the conal quickly.
- On the final boss, when the boss casts Corrupt the Weak, if any of your team mates have less than 25% health, they will be auto-killed. Lightning will be all over the floor, and the mawvorrs hit like a truck.
Skips
What follows are a quick gallery of images depicting specific walking routes that may save you some time by avoiding enemies during the flashpoint – certain routes will be highlited as the main “community routes” that you’ll probably see players in random activity-finder groups try to do – if you only practice one skip out of all of these, make it the community one! All of the following images are done without stealth or without a sleep dart/mind maze from a stealth character, so anyone can attempt them. If you fail to slip by unnoticed or see your team has attacked the enemies – always pull back from these routes and go back to help them defeat them! These may save time if everyone does them, but nothing makes a flashpoint slower than running ahead and not helping others to get out of combat again.
Solo Stealth: In general, most enemies will kick you out of Stealth in Shine of Silence, so it’s not a very fun Flashpoint to “sneak” through.

Skip #1

Though shrine really doesn’t have a lot of skips, this one is an easy 1-pack skip. Right after the mission-objective vorantikus you can stick to the left side of the crypt to get around and head up the hill.
Skip #2 – Hyper Advanced Do Not Attempt

You can technically leap onto this green crystal once the cavern of nightmares first opens up into a chasm. From here you can climb around the outside and skip a pack. Not worth the time it takes to hop up. Don’t bother. But it technically can be done!
Skip #3 – Community Skip

There’s two bonus bosses down the hallways in this room. They drop Fire Urn decorations. I find a lot of groups don’t mind skipping them entirely on their way to the last boss.
Rewards
Decorations
There are at least 15 decorations associated with the Shrine of Silence Flashpoint – you get one random one guaranteed the first time you run the Flashpoint through the story on the Help Wanted board.
Chained Crystal Light

How to Get: A random drop from the Flashpoint.
Voss Temple Firebowl

How to Get: Likely a random drop from the Flashpoint. Ours dropped from the two mini-bosses Nil-Uu and/or Soul Coil
Corrupted Vorantikus Holo

How to Get: Possible Drop from the Corrupted Vorantikus boss in the Shrine of Silence Flashpoint.
The Curse Holo

How to Get: Possible Drop from the Curse boss in the Shrine of Silence Flashpoint. Can be sold and traded with other players.
Tem-Su Holo

How to Get: Possible Drop from the Rada-Ki and Tem-su duo boss fight in the Shrine of Silence Flashpoint. Can be sold and traded with other players.
Rada-Ki Holo

How to Get: Possible Drop from the Rada-Ki and Tem-su duo boss fight in the Shrine of Silence Flashpoint. Can be sold and traded with other players.
Kirba, the Forgotten Holo

How to Get: Possible Drop from Kirba, the bonus boss in the Shrine of Silence Flashpoint. Can be sold and traded with other players.
Soul Coil

Reward from the achievement Share the Burden in the Shrine of Silence Flashpoint. Once the achievement is completed, Specialty Nutrient Vendor in the Voss Interpreter’s Retreat area – 400 Tech Fragments plus 120,000 credits each. This decoration is NOT at the vendor by default, it only becomes visible once you have done the achievement. Bind-on-pickup, can’t be bought/sold/traded.
Voss Tomb Altar

Reward from the achievement Nightmare Stack in the Shrine of Silence Flashpoint. Once the achievement is completed, Specialty Nutrient Vendor in the Voss Interpreter’s Retreat area – 300 Tech Fragments plus 90,000 credits each. This decoration is NOT at the vendor by default, it only becomes visible once you have done the achievement. Bind-on-pickup, can’t be bought/sold/traded.
Altar of Pure Light

Reward from the achievement Intentional Complications in the Shrine of Silence Flashpoint. Once the achievement is completed, Specialty Nutrient Vendor in the Voss Interpreter’s Retreat area – 500 Tech Fragments plus 150,000 credits each. This decoration is NOT at the vendor by default, it only becomes visible once you have done the achievement. Bind-on-pickup, can’t be bought/sold/traded.
Armor
You can get these special Voss-themed cosmetic armor sets in two different ways:
- A full armor set drop in a lockbox from the Shrine of Silence flashpoint as a random, and uncommon drop. This Armor Lockbox can not be bought/sold on the GTN, BUT it can be traded/given to a friend via the Mail or Trade system!
- Purchased piece-by-piece with Tech Fragments and Credits from the “Flashpoint Gear Vendor” on Voss in the Pilgrim’s Retreat landing zone, for 1,750 Tech Fragments plus 250,000 Credits per piece
The individual armor pieces are Bound-to-Legacy, but the Armor Lockboxes from the Flashpoint can be traded/mailed (but the individual pieces, after they are opened). View All Armors


Achievements
Shrine of Silence has a ton of fun and secret achievements!
Tantrum Two-Step: Defeat the Corrupted Vorantikus without taking damage from Tantrum. Stay out of the red while fighting the Corrupted Vorantikus. You can do this in Story, Veteran, or Master Mode.
Good Exorcise: Defeat the Corrupted Mystics without allowing a Corrupted Spirit to survive more than ten seconds. Kill the Corrupted Spirits quickly when they appear in The Twins fight. You can do this in Story, Veteran, or Master Mode.
Hard to Handle
Defeat The Curse while three Corrupted Mawvorr Maulers are alive.
The Mawvorrs spawn, don’t hurt them during the final round of them in the Spirit World! You may have to have one player kite them away from the boss to avoid splash damage.
* We couldn’t get this one to work on Story Mode or Veteran Mode. Unsure how to do it otherwise.
Wonder What This Does….: Defeat six Cursed Commandos during the Kirba, the Forgotten encounter. There will be a blue button when fighting the bonus boss Kirba in Veteran Mode or Master Mode on the side of the room. Clicking it will spawn some smaller enemies to kill. You can keep pressing it, but only need to kill 6 spawned enemies. It will not inform you that you have this achievement until the boss is dead, so don’t keep clicking it after you’ve gotten six.

You Smell Amazing
Hidden Achievement: Completed the purification ritual in the Shrine of Silence.
Is this one working?: [[ Thanks to Kal from Today in TOR for sharing about the You Smell Amazing achievement! I was unable to get it to work on Veteran Mode on the live server even while following the steps, I am unsure if it is currently working.]]
This achievement is not related to the incense bowl on the ground.
To get this achievement, you must solve the “secret” part of the flame puzzle.
Then, instead of bringing it to the fourth flame altar later in the Flashpoint which unlocks the bonus boss, take your flame all the way to the end of the Flashpoint and fight the final boss with it on.
To keep the flame, you must complete the flashpointwithout losing the buff.
- If you die you will lose the buff.
- You must perform the Vorantikus Tantrum dance perfectly, without being caught in the red AOEs at all.
- For the Voss twins you simply need to never be caught in the cleave
- On the last boss you can’t be caught in the large triangle radials either.

Nightmare Stack: Defeat Nil-Uu while under the effects of Unstable Soul on Veteran or Master Mode. – Kill the Soul Coil mini-boss, then kill the Nil-Uu mini-boss, in that order. Does not work in story mode. Reward: Voss Tomb Altar decoration unlocks from the Specialty Nutrient Vendor in the Voss Interpreter’s Retreat area – 400 Tech Fragments plus 120,000 credits each. This decoration is NOT at the vendor by default, it only becomes visible once you have done the achievement. Bind-on-pickup, can’t be bought/sold/traded.

Share the Burden: Defeat the Soul Coil while a member of your party is under the effects of Mangled Spirit on Veteran or Master Mode. – Kill the Nil-Uu mini-boss, then kill the Soul Coil mini-boss, in that order. Does not work in story mode. Reward: Soul Coil decoration unlocks from the Specialty Nutrient Vendor in the Voss Interpreter’s Retreat area – 300 Tech Fragments plus 90,000 credits each. This decoration is NOT at the vendor by default, it only becomes visible once you have done the achievement. Bind-on-pickup, can’t be bought/sold/traded.

Intentional Complications: Complete the Nightmare Stack and Share the Burden achievements while in Veteran or Master Mode. – Do both above! Reward: Altar of Pure Light decoration unlocks from the Specialty Nutrient Vendor in the Voss Interpreter’s Retreat area – 500 Tech Fragments plus 150,000 credits each. This decoration is NOT at the vendor by default, it only becomes visible once you have done the achievement. Bind-on-pickup, can’t be bought/sold/traded.
Crushing the Corrupted: Defeat 50 corrupted enemies in the “Shrine of Silence” Flashpoint.
Veteran Mode
- Silence in the Shrine: Complete the “Shrine of Silence” Flashpoint on Story or Veteran difficulty. (1 time / 10 times / 25 times)
- Purifying the Corruption: Defeat the Corrupted Vorantikus in the “Shrine of Silence” Flashpoint on Story or Veteran difficulty. (1 time / 10 times / 25 times)
- Double Trouble: Defeat Tem-Su and Rada-Ki in the “Shrine of Silence” Flashpoint on Story or Veteran difficulty. (1 time / 10 times / 25 times)
- Cleansing the Curse: Defeat the Curse in the “Shrine of Silence” Flashpoint on Story or Veteran difficulty. (1 time / 10 times / 25 times)
- Ancient History: Defeat Kirba, the Forgotten in the “Shrine of Silence” Flashpoint on Story or Veteran difficulty. (1 time / 10 times / 25 times)
Master Mode
- Curse? What Curse?: Complete the “Shrine of Silence” Flashpoint on Master difficulty. (1 time / 10 times / 25 times)
- Taming the Vorantikus: Defeat the Corrupted Vorantikus in the “Shrine of Silence” Flashpoint on Master difficulty. (1 time / 10 times / 25 times)
- The Mystics’ Wisdom: Defeat Tem-Su and Rada-Ki in the “Shrine of Silence” Flashpoint on Master difficulty. (1 time / 10 times / 25 times)
- The Curse’s Bane: Defeat the Curse in the “Shrine of Silence” Flashpoint on Master difficulty. (1 time / 10 times / 25 times)
- The Grotesque Gormak: Defeat Kirba, the Forgotten in the “Shrine of Silence” Flashpoint on Master difficulty. (1 time / 10 times / 25 times)
Codexes
- Codex- Shrine of Silence, when you walk in
- Tem-Su and Rada-Ki – after you meet them
- Kirba, the forgotten after defeating him
- The Curse, I assume when you defeat it at the end of the Flashpoint
Lore
Shrine of Silence Codex
“Because the Voss accept the secretive nature of the Interpreters without question, the rituals and procedures conducted inside the Shrine of Silence are rarely–if ever–discussed. Even the most knowledgeable academics who study Voss society do not know for sure what occurs there.
The general consensus, however, is that the Shrine is the location of a peculiar ceremony that marks the end of a Voss’s training as an Interpreter. It is said that before an Interpreter can officially accept the role, they are required to stay in the Shrine of Silence for one week. During this time, they must light multiple sacred pyres, illuminating every corner of the temple, so that no transgressions can be hidden. The Voss may not eat, sleep, or speak; instead, they must silently consider every instance where they wrongfully judged another.
Many Interpreters have said that their time in the Shrine of Silence was a blessing. Others, including those who did not pass this last trial, claim that the practice was torture. Left alone, with nothing but deafening silence and glaring light, their thoughts turned sinister and malevolent.”
–From “Visions and Verities: A Collection of Essays on Myth, Symbolism, and Ritual within Voss Society,” by Dr. Eksa Fa’kar
Introductory Cutscene
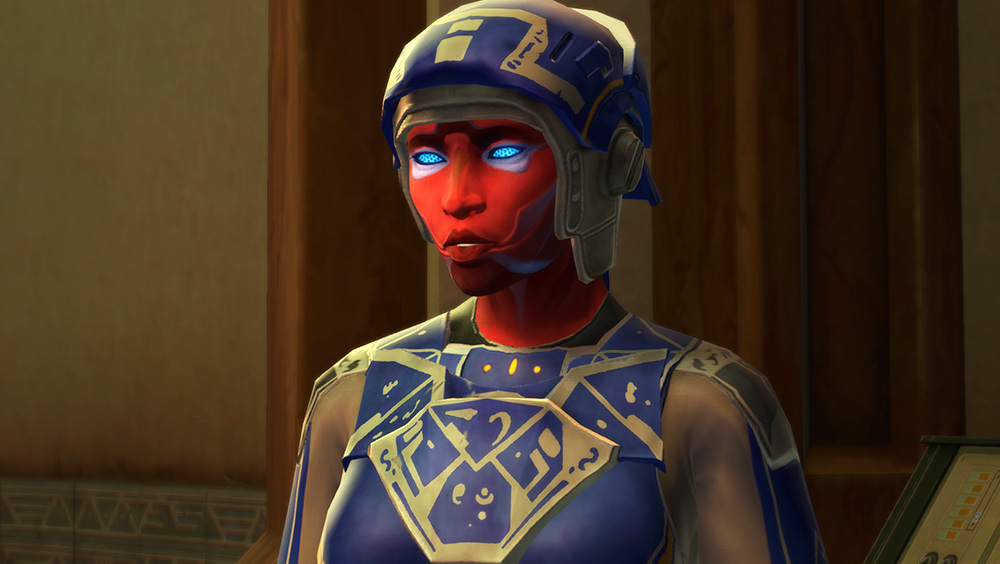
While the introductory one-time story quest for the Shrine of Silence with Jiri-Su is short, it is quite impactful. Here’s a some of the dialogue about the missing Voss Mystics and Commandos.
Jiri-Su: Outsider – you received my message. I apologize if I appear unwelcoming – I am not accustomed to seeking help from your kind. I am left with little choice. Two Mystics and a team of Voss Commandos are missing. They are in my charge. I must find them.
Player: I can help with that.
Jiri-Su: Thank you. It has been some time since anyone spoke to me with such determination. I requested assistance from the Shrine Restoration Initiative to help me search, but they do not respond. It is no surprise. There is still much damage to repair, even though the invaders have gone. But it is no excuse. Their lack of attention is the cause of this situation. Until they see this, more will be lost. The Initiative is slow to act. The Mystics asked to begin work on the Shrine of Silence. They were ignored. They did not wish to wait for approval and disappeared in the ruins of the shrine. They have not returned. I have asked other Commandos to help me find the missing. They refuse. They say the Shrine of Silence is cursed.
Player: The Shrine of Silence?
Jiri-Su: Yes. One of the many sacred sites used by the Interpreters. It is the one place that has received no attention during our reconstruction efforts. They do not say it, but it is plain to all
Player: There must be a reasonable explanation for their alarm.
Jiri-Su: There is none. We are Commandos. It is our duty to shield the Mystics, even from dangers we do not understand. That is why you are best-suited for this task. You are not affected by what we Voss fear – you can guide the missing Voss out of the Shrine of Silence.
Player: I’ll try, but… there’s a chance that something happened to them – I hope you understand.
Jiri-Su: Your concern is appreciated, but unnecessary. They are alive. I know it… they have to be.
Tem-Su and Rada-Ki Codex
“Tem-Su, my dear friend. I fear that my teachings have had a poor influence on you. Your insistence warms my heart, and under different circumstances, I would welcome your help–but you must recognize and accept your limits. The Shrine of Silence has claimed many Commandos, all of whom were skilled fighters… I do not want to imagine what an untested Mystic would face. Even I am uneasy at the task ahead, but we have delayed the Shrine’s restoration for too long.
You have far to go before you can assist in surveying the damage to the Shrine, and when the Initiative approves my proposal, they will agree with me. And before you take advantage of the delay in their response, you will not convince them otherwise. I have ensured it.
Fear not. You will find favor with Jiri-Su some other way. When my work is done, I will help you find it.”
–From a private message sent by the Mystic Rada-Ki to the Mystic Tem-Su
Ending Cutscene
Jiri-Su: What happened? Where are they, Tem-Su and the others?
Player: I’m so sorry. I couldn’t save them – but the monster responsible for their disappearance is dead.
Jiri-Su: Dead… they are all gone, because of me. It is as if I killed them myself. I should have stopped them. I should have followed them when they would not listen. I should not have waited to find them. So many chances to do the right thing… and I failed them all.
Player: The Voss chose to go into the Shrine. You can’t blame yourself for their decisions.
Jiri-Su: If one made that choice because of me, what then? Tem-Su… he was everything I did not expect in a son. Contemplative, cautious. I wanted a fearless child. He could sense my disappointment. He followed the others into the Shrine of Silence to show me I was wrong. I was proud – I did not stop him. The Shrine Restoration Initiative is to blame for the death of Tem-Su, Rada-Ki, and the others, as much as I am. I will not accept their judgment. But I must be punished for what I did to my own child….
Player: Living with the loss of your son is going to be difficult enough. You’re being too hard on yourself.
Jiri-Su: Your words are meaningless. I will find a way to make amends. Your service has come to an end, outsider. Your efforts are appreciated. We would do well to be more accepting of your kind. As long as we turn our backs on the unknown, the unfamiliar… we will be met with sorrow.
Player: Maybe staying with the Shrine Restoration Initiative is the best decision. What if there are other monsters in the ruins here?
Jiri-Su: It will be difficult to face the Initiative, but your words hold much truth. This can not be allowed to happen again. I am not the only one who bears responsibility. I will make them see this.
Player: Is there something you can do to help other Mystics? Something to stop this from happening again?
Jiri-Su: Yes… there will always be new Mystics. Those with little experience who must be warned away from dangerous places. I will go to the Shrine of Healing and ask what can be done.
Player: The Voss I met in the ruins were corrupted. Even if you went after them sooner… I don’t think they were the same people anymore.
Jiri-Su: How can you know that? It is impossible, now.
Player: At least you see that it’s your fault. Learn from your failures, and do better next time.
Jiri-Su: Any lessons I learn from this are meaningless now.
The Curse Codex
During their occupation of Voss, the ancient Sith conducted many experiments, including the exposure of creatures with strong connections to the dark side to a Force-enriched world. These test subjects were abandoned, however, when the people of ancient Voss exterminated the Sith who had conquered their homeworld. The cities and temples built by the Sith quickly fell into disrepair, until almost no sign was left of the invaders. But deep below the structure known as the Shrine of Silence, one of the Sith’s forgotten experiments has continued to thrive.
Whatever beast “The Curse” was originally has been lost to memory. In the millennia since it was first brought to Voss, the Curse has evolved, growing in size, drawing on the essence of all it devours, gaining sentience and many unnatural abilities. It can corrupt and confuse, it shows horrific visions to any unsuspecting victim that stumbles into its lair. The Curse’s prey will lash out violently against anything they see, and those who survive the gruesome hallucinations become subservient to the monster. Even the spirits of Voss are not immune to the Curse’s commands: it can tear openings in the barrier of Voss’s spirit world, summon its inhabitants, and compel them to obey.
Kirba, the Forgotten Codex
“The subject continues to fight. He thinks this will earn him freedom, that he will break out of our control. He does not understand. We want him to fight.
The subject curses us for offering him the gift of the dark side. He calls it ‘the nightmares.’ It is amusing. The subject boasts of his strength, yet he is too frightened to take hold of the kinetic power that burns just beyond his fingertips. We confine him with the most vicious of our creations. He relies on his primitive weapons.
He will see. He does not know the doom he faces. If he refuses the Force again, he will be obliterated.”
–From the notes of an ancient Sith alchemist, lost in the cavern under the Shrine of Silence
 Questions or comments? Feel free to send me a message on Twitter







 Discord
  Email swtorista@gmail.com
 Bluesky @swtorista.com
 Reddit /u/swtorista
 Twitch Swtorista
 Youtube
 Patreon
 Twitter @swtorista