

As you play Star Wars: The Old Republic, you’ll come across thousands of different pieces of armor. Some will have stronger stats so you’re more effective in combat, while others simply look cool. In this guide, we’ll be going over how to separate the looks of your armor from the stats of your armor, so you can look good without sacrificing your combat gear, and how to use the Outfitter to make Outfits in SWTOR.
Contents
The Outfitter
The Outfitter is a way of adding a costume on top of your armor – your armor is the pieces of gear that make sure you don’t die in battle – but the costume, more properly known as an Outfit, is just the way your character looks, and you can change your gear in and out without having your costume being affected. You can see both your gear and your outfits in your Character Sheet, which you can open by pressing “C” on your keyboard, or by choosing “Character Sheet” in the main menu under and icon of a person. This window changes almost every update, so don’t be surprised if it looks slightly different than this guide.

Your gear with stats is located in the Gear tab of the character sheet. When you need to upgrade your gear to have better stats, this is the tab you’ll do it from.

Your outfits are located in the Outfitter tab. This is how your characters “looks”, which can be separate from the way your gear looks.

By default, if you don’t set up an outfit, you’ll look visually the same as whatever default look the gear you are wearing has. Some players enjoy not setting up any outfits as they level, so they can easily see all the new pieces they equip while levelling and questing, as pieces often get cooler looking the higher level you get, and players can feel a sense of progression seeing their armor look stronger as they reach higher levels.
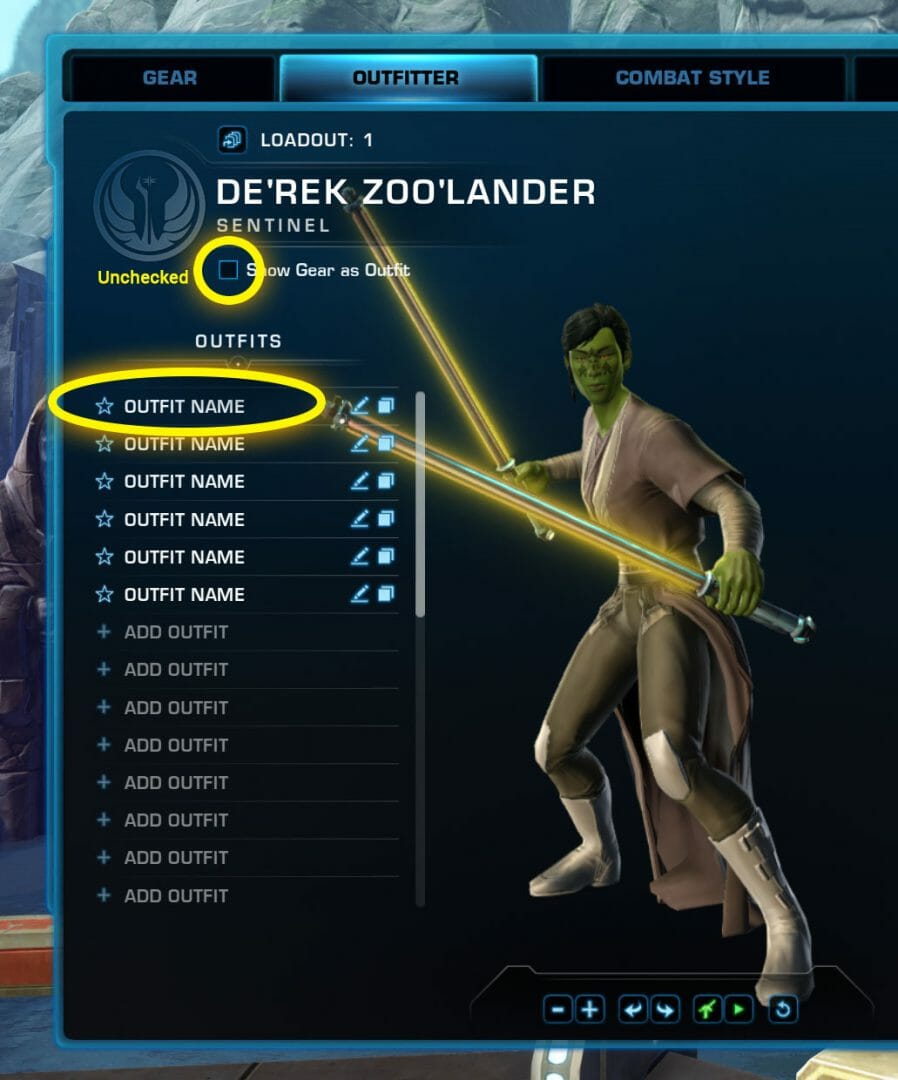
If you want to always show your worn gear as your look, you can use the “Show Gear as Outfit” checkbox at the top of the Outfitter. This will caused the Outfits list to be greyed out / faded out and unclickable, and will force your character to have the look of your equipment from the Gear tab. If you want to apply or edit an outfit instead, you’ll need to uncheck this first, or the Outfits list will not be clickable..

How to Create an Outfit
To create an Outfit, start by clicking on one of the outfit slots in the list on the left of the Outfitter. If this is your very first outfit you’d click first “OUTFIT NAME” on the list. If you can’t click these, first uncheck the “Show Gear as Outfit” checkbox at the top of the Outfitter.
In the center, to the right of your character, you’ll see a bunch of boxes that represent what your outfit currently looks like. It starts off empty, with a faded-out image of your Fear tab equipment, representing what those parts of the outfit will look like if you don’t equip anything.

You’ll notice a version of your inventory on the right – to add armor pieces to your chosen Outfit, right-click them in your inventory, which will stamp them into your outfit. This works differently than when you equip gear – the item is not stored in your outfit, instead an imprint is saved to your outfit, and the actual item stays in your inventory. This means you can use the same piece on multiple outfits.

If you don’t equip an item to a slot, it will usually show whatever piece of equipped you have quipped for that slot in the Gear tab. If you want a space to be blank, for example you’d like to have your character’s hands showing, you’d want to equip a special type of item called a Covert piece that hides the hands equipment – you can’t just leave that slot empty or your ugly Gear tab gloves will be showing through.
While you are adding items to your outfit, you can take a look at what you are creating by using the controls at the bottom to zoom, rotate, or draw your weapon. You can also right-click and drag your character to move them around, left-click and drag to rotate, and use the mousewheel to zoom in and out.

When you like the look of your outfit, save your outfit by pressing “Commit” on the bottom of the Outfitter. Every time you save an outfit, it will cost credits for each piece you commit. The cost goes up as you level up, so a fun tip is to set up your outfits early if you already know what you want to wear later on. At a low level, it costs as low as 50 credits piece piece saved into your outfit, while at a high level it costs around 17,000 credits per piece.
When you press Commit, you will be automatically changed into your new outfit, and you’ll see the outfit on your character’s body in the game.

If you don’t like the look of the outfit, pressing Commit is not permanent – you can also replace any pieces of your outfit later, you’ll just have to pay the fee again. To change your outfit later, just drag new items into that outfit from your inventory – for example if you found a cooler helmet, you can replace it without resetting the whole outfit. If you’re tired of an outfit, you can also replace every piece of it, and save yourself the cost of unlocking a new slot for a new outfit.
Outfit Slots
You can have up to 32 outfits on every character and get the first one unlocked for free, so it’s easy to try out. If your outfit names are white with a star beside them, that means you have that outfit slot unlocked, and grey ones are ones you haven’t unlocked yet. To unlock additional outfits, click “+ Add Outfit” out the outfit list. The cost of outfit slots goes up the more outfits you unlock, with later slots costing 1 million credits each. You can also can unlock outfit slots with Cartel Coins at 120 CC for an outfit slot for that character, or 300 CC to unlock an additional outfit slot for all of the characters on your account – this Cartel Coins deal is not very good, compared to the credit cost, so I recommend saving up credits to purchase outfit slots instead. [[Is it more expensive for free-to-play / preferred?]]

| Outfit Slot | Credits |
|---|---|
| 1 | Free |
| 2 | 20,000 |
| 3 | 30,000 |
| 4 | 45,000 |
| 5 | 70,000 |
| 6 | 100,000 |
| 7 | 150,000 |
| 8 | 225,000 |
| 9 | 350,000 |
| 10 | 500,000 |
| 11 | 1,000,000 |
| 12 | 1,000,000 |
| 13 | 1,000,000 |
| 14 | 1,000,000 |
| 15 | 1,000,000 |
| 16 | 1,000,000 |
| 17 | 1,000,000 |
| 18 | 1,000,000 |
| 19 | 1,000,000 |
| 20 | 1,000,000 |
| 21 | 1,000,000 |
| 22 | 1,000,000 |
| 23 | 1,000,000 |
| 24 | 1,000,000 |
| 25 | 1,000,000 |
| 26 | 1,000,000 |
| 27 | 1,000,000 |
| 28 | 1,000,000 |
| 29 | 1,000,000 |
| 30 | 1,000,000 |
| 31 | 1,000,000 |
| 32 | 1,000,000 |
| Total | 23,490,000 |
Rename
You can also name and rename outfits by clicking the pencil icon beside them, so you can label your outfits in a way that makes them easier to find. I highly recommend naming your outfits. Unfortunately, you can only use twelve letters to name your outfits, including spaces. Outfits are sorted alphabetically.

Favorite
If you have a lot of outfits and would like certain ones to show up at the top of the list, you can click the star icon beside those outfit names, and they’ll be bumped up above the un-starred outfits. You can favorite as many outfits as you want, and they’ll be sorted alphabetically within all your favorite outfits list. You can easily unfavorite an outfit later by re-clicking the filled-in star.

Switch Outfits
You can easily switch between Outfits you have made by clicking their name in the Outfit list. If you aren’t able to click your outfit names, first uncheck the “Show Gear as Outfit” checkbox at the top of the Outfitter. There’s currently no way to edit an outfit without switching into it first.

Copy an Outfit
The symbol of two pages beside outfit names allows you to make a copy of your outfits, but make sure you understands how it works before you press the icon of two pages, or you’ll accidentally over-ride one of your outfits.

First, you’ll want to choose which outfit slot you want to receive the copy – either an outfit slot you have unlocked, or by unlocking a new one. Make sure to name this Outfit Slot to make things less confusing. Second, you need to click the name of the outfit you want to copy, so you are wearing it as your active outfit, and make sure it has a name. Third, you click the icon of two pages on the outfit slot you want your previous set to be copied onto. You will get a warning box that will tell you you are copy your currently worn active outfit onto the outfit slot you pressed the icon of two pages. If it’s the right one, press yes! Just make sure the name of your original outfit isn’t showing up in the warning box or you’ll over-write it by accident.

What can you wear?
You can wear any type of armor in the Outfitter – you are not restricted to armor that matches the way your class looks. For example, as a Trooper, you could wear armor that makes you look like a Jedi. Or, if you’re a Jedi, you can wear armor that makes you look like a Sith. You will still need to follow the restrictions of the armor, for example, if you’re not a high enough level to wear a piece of armor as gear, you won’t be able to use it in the Outfitter either. This also includes light/dark alignment restrictions, and class restrictions, that will show up in red in the item’s tooltip if you aren’t eligible to wear them. The only exception to this is if you come across any older sets of gear that require “light, medium or heavy” armor… the Outfitter allows you to completely ignore these outdated restrictions.

The best part about the Outfitter is that you can wear almost any type of armor, even if it’s not one that would be good for your character in battle. Gear that has no stats attached to it is usually referred to as ‘cosmetic’ gear – it’s just for looks. A majority of the Cartel Market gear is considered cosmetic armor – if you find a piece of armor that is ‘empty’ and has no statistics, it’s not worthless – you can either use it in your Outfitter as-is, or you can add stats to it by adding modifications to it and equipping it in your Gear tab.
Loadouts
In addition to your look being saved to your Outfit, you can also save your Outfit to your Loadout. Loadouts allow you to save things like your ability choices and equipment choices, so it’s easier to switch between different roles or disciplines. Loadouts also save your outfits – so when you change from Tank to Healer, you’ll also look the part if you’ve set up outfits while in those Loadouts! To save your currently active Outfit to your currently active Loadout, click the small icon of some pieces of paper and an arrow on the very top left of the Outfitter, it will show your currently chosen Loadout name beside it, which by default is “Loadout: 1”.

Loadouts are only available for subscribers.
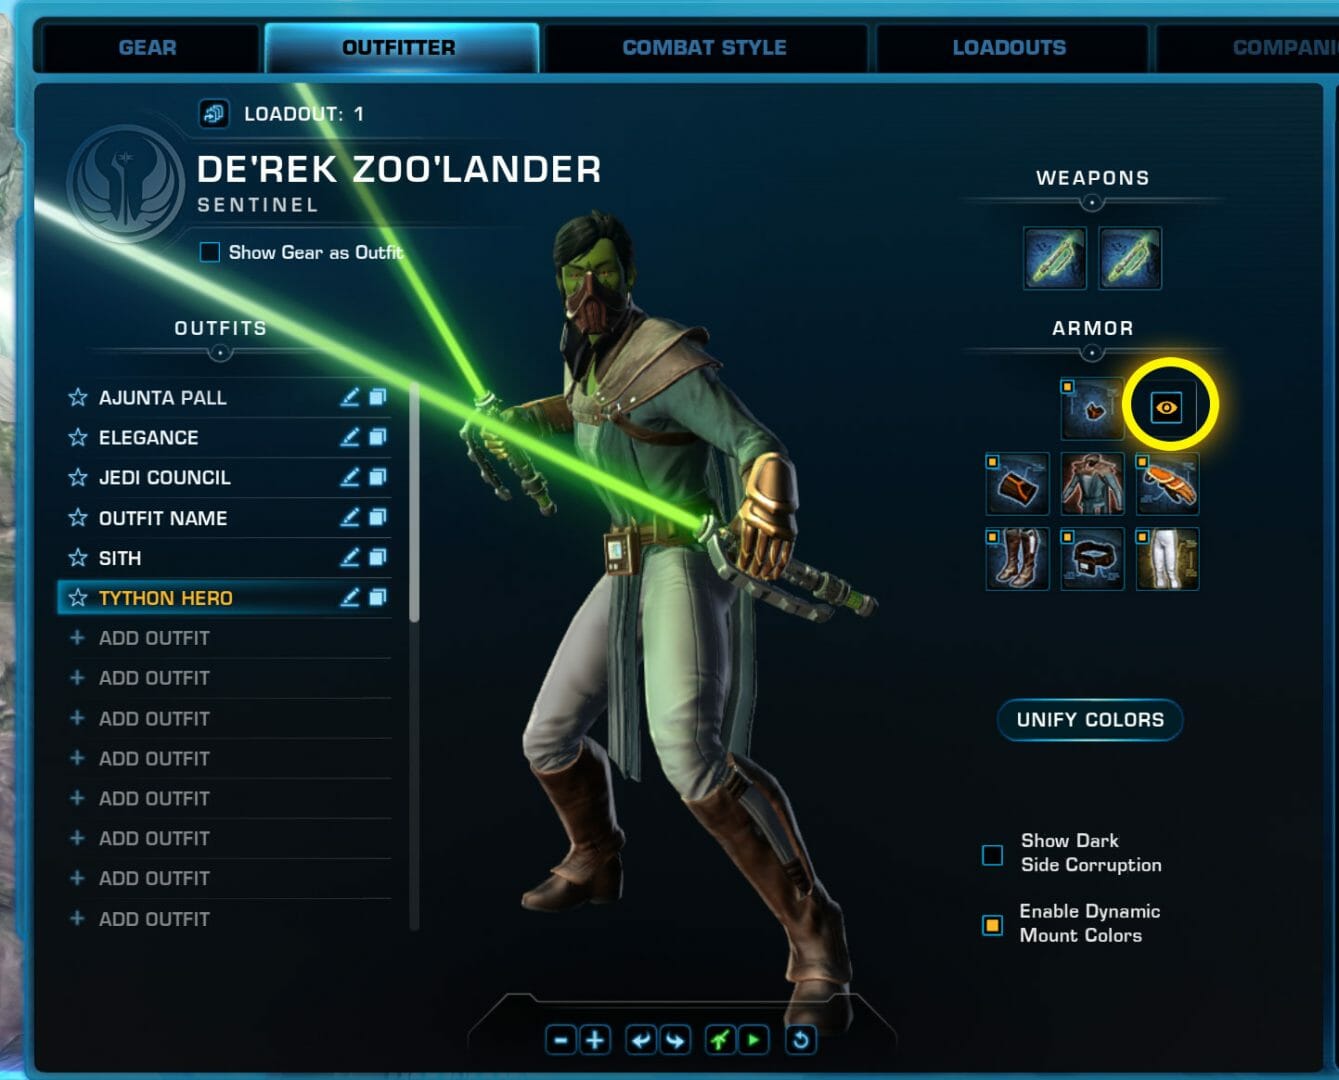
Hide Helmet
The “eye” icon beside your headgear slot is called the “Show/Hide Headslot” button, but player sometimes call it “hide helmet”. Clicking this will hide or show whatever headgear you have as part of your outfit, so your character’s face and hair will be fully visible.
There is a special exception to the helmets and headgear rules. Twi’lek characters can equip any type of helmet or mask into their head slot, but only some of them will be “visible” – others will simply not show up at all. Togruta and Nautolan characters can not display any type of helmet or mask at all. The closest headgear they can wear is the options available in the character creator, like eyepatches for Nautolan or headdresses for Togruta.
Free-to-play and preferred players can not choose to hide their helmets or masks. Often, the game has a bug where the player’s helmet or mask gets hidden on accident, even if the player does not have the unlock. The unlock for free-to-play and preferred players costs 280 CC per character or 750 CC per account. Alternatively, the player can choose not to wear a helmet at all in both their gear and outfit slot for easier content. Most players just wear a helmet or mask they like the look of, or wear a smaller unobtrusive headpiece like a circlet, if they don’t have the hide helmet unlock.
Unify Colors
If you are wearing miss-matched armor, you can use the “Unify Colors” button to match the colors of all your armor pieces to your chestpiece.

This works some of the time, but not all of the time – certain armor pieces have colored sections that can not change color and may stick out, or if you try to match two pieces that are made of different textures, they may look slightly different shades of the same color.
You can also choose to color-match some pieces, and not others. For example, you may want your gloves and boots to match your chestpiece, but not your pants, so they appear as a different color. To include or exclude specific pieces from being unified to the color of your chestpiece, left-click the tiny little checkboxes at the top left of each of your gear pieces. Clicking “Unify Colors” checks all of these boxes, but you can uncheck them manually.

Free-to-play and preferred players can’t use Unify Colors. Often, the game has a bug where the player’s colors become unified, even if the player does not have the unlock. The unify colors unlock for free-to-play and preferred players costs 210 CC per character or 750 CC per account. Alternatively, the player can choose pieces that go well together without being unified, or use dyes in each individual piece to make them match each other.
Dyes
If you want to change the color of your armor, you can use a Dye. Dyes can be obtained through the Artifice crafting skill, earned through various methods, bought from the GTN from other players, or purchased from the Cartel Market. You can place a dye in each individual piece, or place one dye in just your chestpiece and use the Unify Colors button to match the rest of your pieces to your chestpiece. Dyes are single-use, and range from pretty affordable to very expensive.
You can place a dye into the item first, and then into the Outfitter, or you can place the item in to the Outfitter and then place the dye into the Outfit. I recommend placing the dye into the item – that way you can re-use the item into multiple outfits, and you can also save the item in your bank which will allow you to re-make an outfit if you ever accidentally over-write it, which you can’t do if you place the dye directly into the outfit.
To dye an armor item, CTRL+RIGHT CLICK the item in your inventory, then you can drag the dye from your inventory into the modification panel, into the “Dye Module” slot. Once an armor piece is dyed, you can close the “Workbench” pop up, and place your newly-dyed item into your Outfit from your inventory.

Dyes have two parts – a primary color, and a secondary color. Sadly, you can not mix-and-match primary and secondary colors, so you’ll need to find a dye that has a pair of colors you like. A very small number of dyes are available that only have a primary or secondary color – you still can’t mix and match these.


If the primary color of a dye is Green, and its secondary color is Yellow, it will dye most of your armor Green, and make the accent pieces Yellow.

You can find out the primary and secondary color of a dye by rolling over the item with your mouse and reading the tooltip.

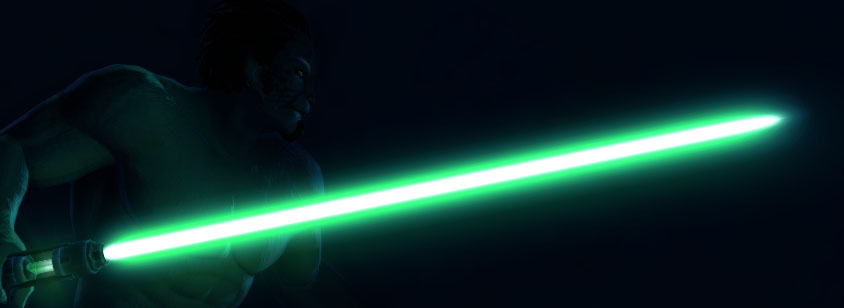
More importantly though, you will want to preview your dye with your outfit, by CTRL+LEFT CLICKING the dye and your armor piece items. As Dyes are one-use, you will always want to preview first. Some dyes do not always work exactly as expected from their item icons, and some armors dye strangely. You’ll notice in my example below, the blue lights did not change with a dye, and the black parts remained black.

A very small number of armors can not be dyed and do not have a “Dye Module” slot. You can double-check if an item has “Dye Module: Open” in its tooltip before you buy it if you want to make sure it is dyeable.

Weapons
Weapons are a recent addition to the Outfit Designer, and they can be a bit trickier to use than armor. To equip a weapon in your Outfit, it must be the same type of weapon as you have equipped in your gear – for example, if you have a double-bladed lightsaber equipped in your gear, you will only be able to add a double-bladed lightsaber to your outfit. You will not be able to add a single lightsaber or a blaster rifle, or wear an outfit that does not match your current weapon choice. This is where the “copy outfit” button becomes useful, as you can use it to create a second copy of your outfit but with a different weapon if you play more than one Combat Style.

If you wield two lightsabers or two blasters pistols, you can stamp the same item twice in most cases – you don’t need to buy a whole second copy of your lightsaber or pistol. The only time this doesn’t work is if your item is not considered both a Mainhand and Offhand item – you can see if it is when you rollover the item in your inventory and read the tooltip.
If your character only wields one weapon rather than two at a time, for example a Sniper Rifle or a Double-Bladed Lightsaber, you can’t add anything to the second Weapon slot in the Outfitter, as that is reserved for your non-visible off-hand.
Color Crystals
Color Crystals change the color of your lightsaber’s blade, or the color of your blaster fire. Your can find classic colors like blue, green, red and purple, and there’s also all kinds of unique colors that don’t exist anywhere else in the Star Wars universe. To add a Color Crystal to your outfit, you will need to first add it to your weapon in your inventory, and then second place the weapon item into your outfit. You can not add a color crystal directly to an outfit.
To add a crystal to your weapon, CTRL+RIGHT CLICK your weapon item in your inventory, then drag the crystal from your inventory into your weapon’s modification panel, then add the weapon to your outfit.
If you have two lightsabers or two blaster pistols, you can put a different color crystal in each one – they don’t have to match.
Enable Dynamic Mount Colors
There’s a small checkbox on the Outfitter called “Enable Dynamic Mount Colors” – there are a very, very few number of mounts that have lights that change color to match your mainhand’s lightsaber crystal, and this checkbox turns that function on or off.

Tunings
Weapon Tunings are an incredibly expensive cosmetic item that can add an additional visual effect to your weapon. For example, there’s a Lightning Tuning that will add crackles of colored lightning arcing up and down your lightsaber or blaster rifle. Adding a Tuning to your weapon works the exact same way as adding a color crystal, you CTRL+RIGHT click the weapon item in your inventory, drag the tuning into the weapon, then add the weapon into the Outfitter outfit.

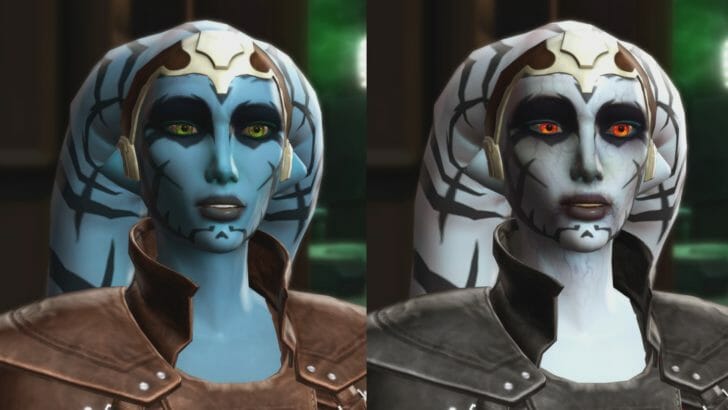
Dark Side Corruption
Near the bottom of the Outfitter is a checkbox called “Show Dark Side Corruption”. If your character has been tainted by the dark side, you can show this visually on your character’s face.

Dark Side Corruption is different per species, and different per level of dark your character is.
Preview
If you want to preview items CTRL+LEFT CLICK the items from your inventory to open them in the preview window. The preview window is incredibly useful for trying on items before you buy them, to get a rough idea on whether or not you like the way they look on your character. Just like in the Outfitter, you can you right-click and drag your character to move them around, left-click and drag to rotate, and use the mousewheel to zoom in and out.

Artifact Authorization
If you are Free-to-play or Preferred, you may not be able to add items to your outfits with a purple or gold border, as they require the Artifact Authorization unlock. The unlock for free-to-play and preferred players costs 1,200 CC for one character or 2,700 CC for the account. I would recommend simply looking for a different item to add to your outfit rather than buying the expensive Artifact Authorization unlock just to use it in the Outfitter.
Titles & Flairs
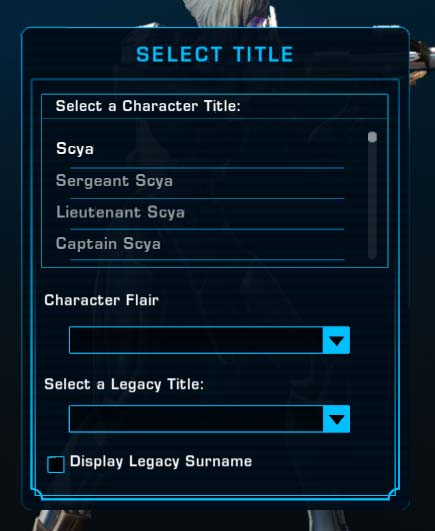
To adjust the title that shows up as part of your character’s nameplate, you need to head to the Gear tab, and click the small icon of a medal on a ribbon near the top left of the Gear tab, near your character’s name

You can choose your Character Title and Legacy Title in this popup window, and choose if you want to display your Legacy Name on your character or not with the checkbox.
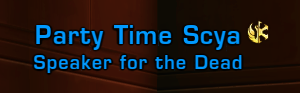
Flairs are visual items that decorate your character portrait and add a little icon beside your nameplate. A few can be earned, but most are quite expensive cosmetic items.

 Questions or comments? Feel free to send me a message on Twitter
  Tips for New Players
 How to Level Up Fast
 Combat Styles Guide
 Second Combat Style Guide
 Is SWTOR worth playing in 2024?
 Is SWTOR worth returning to in 2024?
 Easiest Classes to Play


 Twitter @swtorista
 Reddit /u/swtorista
 Discord Swtorista#0153
 Email swtorista@gmail.com
 Youtube Swtorista
 Twitch Swtorista
 Patreon