


 How to Craft
 Choose a Crew Skill
 Armormech
 Armstech
 Artifice
 Biochem
 Cybertech
 Synthweaving

 Gathering Guide
 Rare Materials Guide
 White Materials Guide
 Jawa Junk
 Augments
 Medpacs, Stims and Adrenals
 Synthweaving Crafting Tree


 Crafted Decorations
 Crafted Mounts
 Crafted Dyes
 Crafted Crystals
 Events Calendar
 Galactic Seasons
 PvP Seasons
 Bounty Event
 Double XP Event
 Feast of Prosperity
 Gree Event
 Life Day
 Nightlife Event
 Pirate Incursion Event
 Rakghoul Event
 Spring Abundance Festival
 Swoop Event

 Jedi Knight
 Jedi Consular
 Trooper
 Smuggler
 Sith Warrior
 Sith Inquisitor
 Bounty Hunter
 Imperial Agent
 Bounty Hunter
 Imperial Agent
 Jedi Consular
 Jedi Knight
 Sith Inquisitor
 Sith Warrior
 Smuggler
 Trooper
 Legacy Gear
 Lightsabers
 Double-Bladed Lightsabers
 Vibroswords
 Double-Bladed Vibroswords
 Blaster Pistols
 Blaster Rifles
 Sniper Rifles
 Blaster Cannons

Star Wars: The Old Republic’ has brought a great new way for solo players to get some of the best gear in the game, as long as they know how take advantage of the various level 80 systems in place! In this guide I’m going to teach you the fastest and easiest way to get to the best gear solo players can get in the game.

This advice is now out of date! Please check out the Level 80 Gearing Guide and its associated guides instead. Good luck gearing up! – Swtorista
Written guide updated for 7.3 – it’s easier than ever and requires one less step now!

Updates not in the video:
- Update 7.2 makes it so you can use this same method to get all the way to 336 gear.
- Before update 7.1.1, you also needed an over-all item rating of 324 or higher. This requirement has since been removed, so you only need to get a single item that is item-rating 336 with a blue border to turn in!
- You can now also trade 500 Conquest Commendations for 200 FP-1 Stabilizers at the Conquest Gear vendor, making it even faster to upgrade that earpiece to 336!
- Do you already have 330 Hyde & Zeek gear from the last update? You can upgrade any blue piece up to 336, if you don’t have an extra, go run a single Master Mode Flashpoint boss (first boss of Red Reaper) with all your equipment on so you don’t have to start at the bottom, or run Veteran Modes and hope you get lucky and get a blue if you don’t want to do Master!
- Update 7.3 removed the need for Conquest Commendations after your first basic set, and removed the need for Daily Resource Matrix all-together!
Contents
Goal
Our goal is to try and obtain a single item that is item-rating 336 with a blue border. This will allow you to get an almost full set of 336 blue gear for all your characters on your server.
All of the steps we’re going to take are the fastest and most efficient way to get to that point while playing as a brand new level 80 player who only wants to play solo.
You can use this same method to gear up with friends or in a group, it’ll just be faster if you aren’t playing alone!
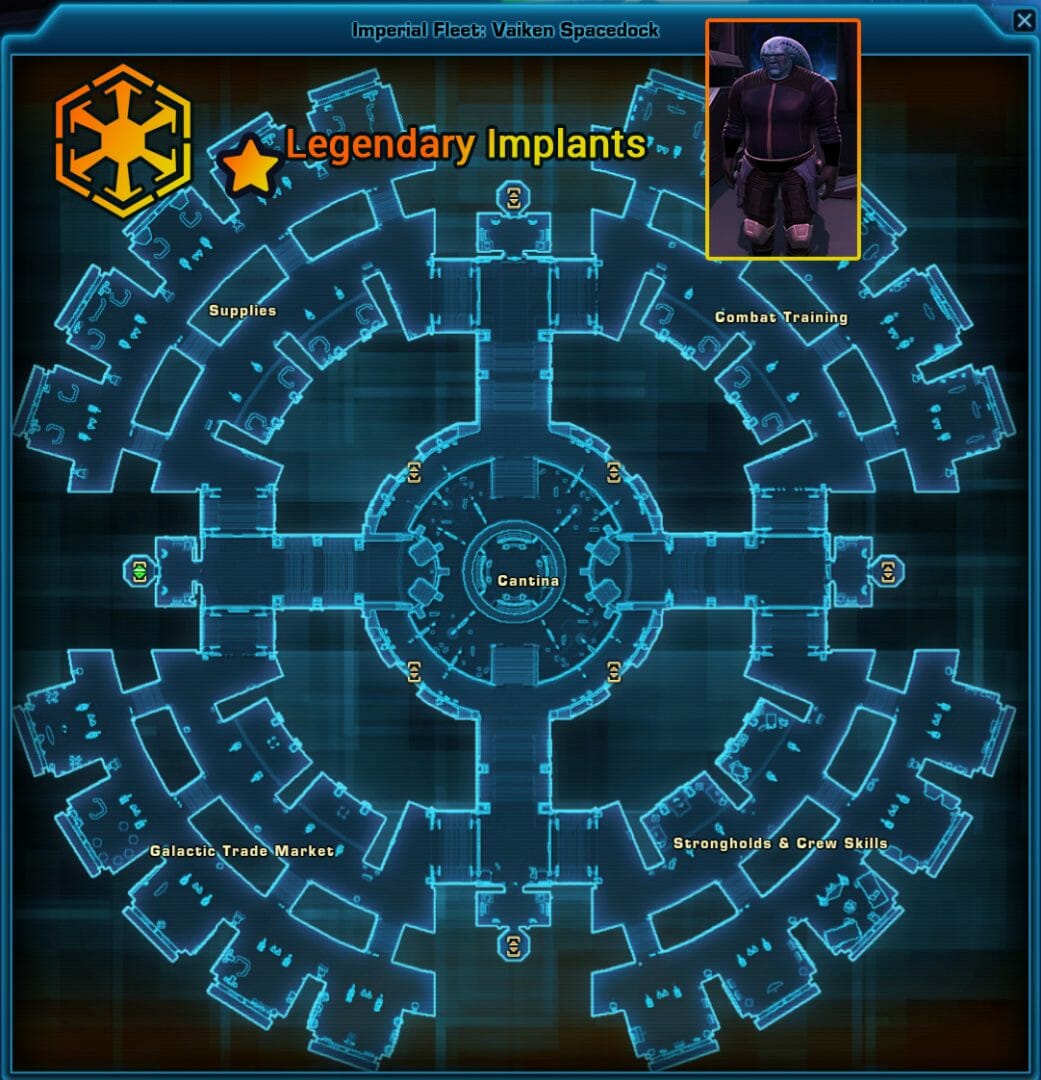
1. Legendary Implants Quest
As soon as you hit level 80, the very first thing you should do is head to the Supplies section of the Fleet and speak to the big Blue Twi’lek quest giver twice, which will give you the Technological Advancements quest. This will eventually allow you to buy some of the best Implants for your character in the game. Right now though, we’re just picking up the quest. Legendary Implants Guide
2. Conquest
Your next step is to complete a Conquest while at Level 80. Conquest is a weekly set of rotating objectives, and your goal is to earn 100,000 points within the week. You can see the Conquest panel by opening your Missions windows and pressing the Conquest tab. Completing a Conquest at level 80 will give you enough endgame currency to buy your first basic level 80 gear set. Conquest Guide
3. Purchase Basic Gear Set
Go to the Supplies section of the Fleet and find the Conquest Gear Vendor.


Buy one of each armor piece, a main hand, and an offhand, two yellow implants, a yellow earpiece, and two different red relics. This will give you a full set of basic “324 green” gear.
4. Get a Low-Level Earpiece
Once you have a full set of level 80 gear on, find and equip a low-level earpiece. We’ll be using this to “trick” a Flashpoint into giving us slightly better gear than it would normally.

The easiest place to get a low-level earpiece is on the planet of Ossus from the gear vendor, then equip it. Whatever earpiece you get, it must not be for level 80 characters.
Why are we wearing a low-level earpiece? Veteran Flashpoints, which are a type of group content designed for 4 players but are something we are going to be solo’ing, will normally drop a piece of randomly-chosen green gear for your character each time you defeat a boss. However, if the randomly chosen piece of gear happens to be an “accessory” piece, in a Veteran Flashpoint, instead of being green it will blue. In addition, if the Flashpoint detects that you happen to have a really low-level piece equipped, it will try and drop you that specific piece. We can combine these two facts together to force the Flashpoint to drop a blue earpiece when it would normally drop a random green item! This is why we are equipping this low-level earpiece.
5. Fight the First Boss of a Veteran Flashpoint
Veteran Flashpoints are meant to be fought in a group, but many of them can be done solo with a companion with a bit of practice.
For this guide, we will be running Red Reaper Veteran Mode, solo. Ideally, you will be doing this on a character who has the ability to Stealth, which will allow you to skip many of the smaller enemies between the bosses. It’s pretty easy with a little practice, even though it’s designed for four people.
As long as you have your low-level earpiece equipped, the boss will guarantee a drop of a blue earpiece!

KEEP THIS BLUE EARPIECE SAFE! You are going to upgrade it all the way up from 324 to 336. Do not accidentally delete it, destroy it, sell it, or disintegrate it. I recommend putting it near the bottom of your inventory so it stays separate from anything else that drops.
6. Run About 25 More Veteran Flashpoints
I hope you enjoyed running Red Reaper, because you’ll be running it about 25 more times! You’ll keep that low-level earpiece equipped, and any time you defeat a boss you’ll get a type of currency called FP-1 Stabilizers.

In addition, you’ll be getting blue earpiece every time you fight a boss.


 ->
->
For all these extra earpieces you’ll be getting, you’ll be deconstructing them – which will give you about 10 FP-1 Stabilizers per piece. You can deconstruct the leftover item by clicking the “broken lightsaber” icon in your inventory then selecting the leftover items.

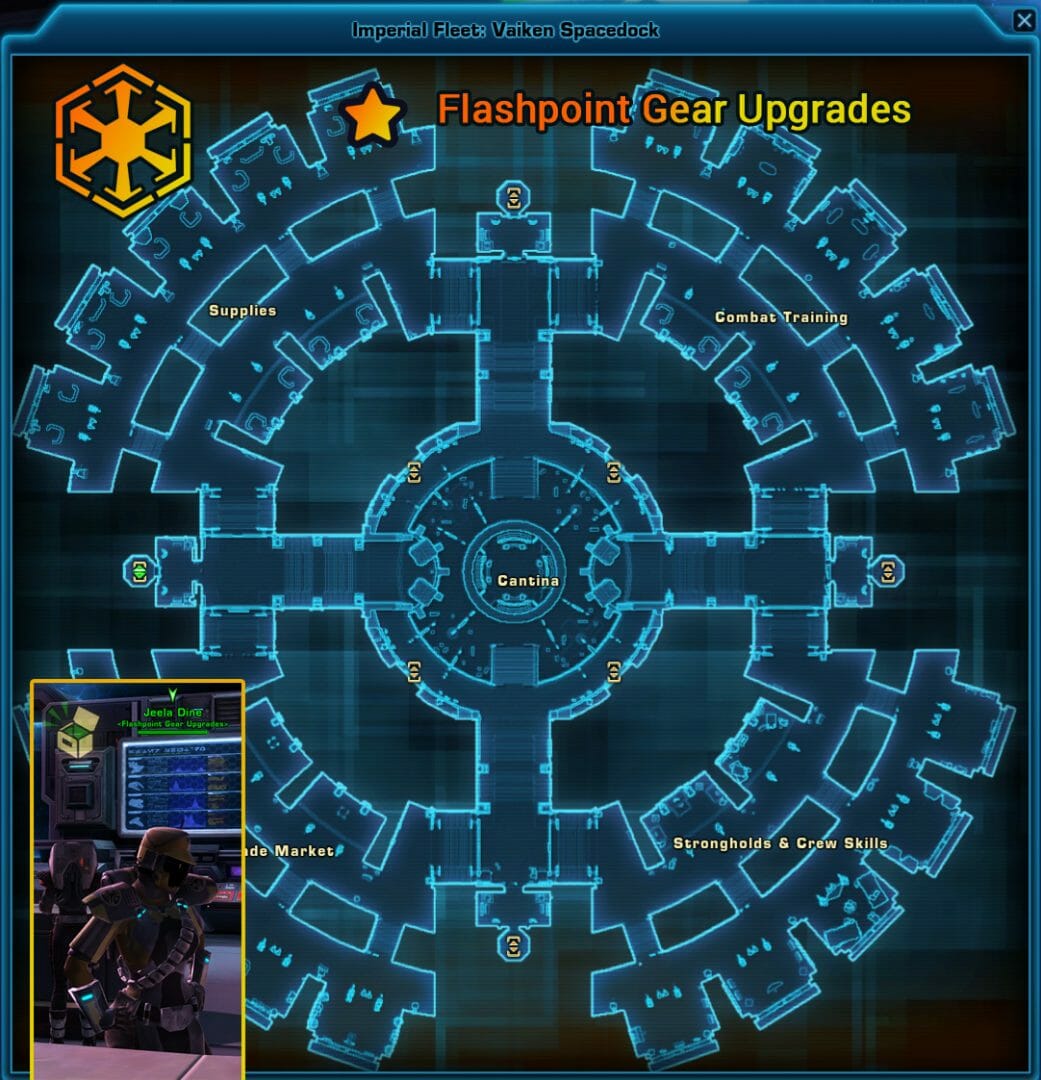
7. Upgrade Your Blue Piece
You will bring your blue earpiece to the Flashpoint Gear Upgrades vendor in the Supplies section of the Fleet. You will need a large pile of Fp-1 Stabilizers, a small pile of Daily Resource Matrix, and some credits to upgrade that blue earpiece.
The FP-1 Stabilizers will come from the Flashpoint bosses and deconstructing extra blue gear.
UPDATE 7.2 – There is an easy new way to get more FP-1 Stabilizers. If you have 500 Conquest Commendations currency (earned from Conquest) you can trade them in to the Conquest Gear Vendor for 200 Stabilizers, which is enough to upgrade one tier!

The exact costs varies a bit by piece, but here’s roughly what you’ll need if you do an earpiece:
- 324 to 326: 25 Conquest Commendations + 170 FP-1 Stabilizers + 35 Daily Resource Matrix + 50,100 Credits
- 326 to 328: 35 Conquest Commendations + 170 FP-1 Stabilizers + 40 Daily Resource Matrix + 53,900 Credits
- 328 to 330: 40 Conquest Commendations + 170 FP-1 Stabilizers + 40 Daily Resource Matrix + 57,800 Credits
- 330 to 332: 80 Conquest Commendations + 180 FP-1 Stabilizers + 40 Daily Resource Matrix + 61,000 Credits
- 332 to 334: 80 Conquest Commendations + 180 FP-1 Stabilizers + 40 Daily Resource Matrix + 65,000 Credits
- 334 to 336: 80 Conquest Commendations + 180 FP-1 Stabilizers + 40 Daily Resource Matrix + 69,000 Credits
Overall, starting at 324, it will cost you around 1,050 FP-1 Stabilizers which is about 25 rounds of Red Reaper total, and 235 Daily Resource Matrix, which is about 8 planets worth of dailies.
8. Unlock Hyde & Zeek
Once you have your blue 336 earpiece, you can unlock Hyde & Zeek and complete their quest!
Speak to Hyde & Zeek, pick up the blue 336 Prototype quest, then deconstruct your precious blue 336 earpiece once you’ve confirmed you are on the right quest. After you speak to Hyde & Zeek again, you’ll be able to turn in the quest and a vendor will become available.
9. Create Your Armor Set
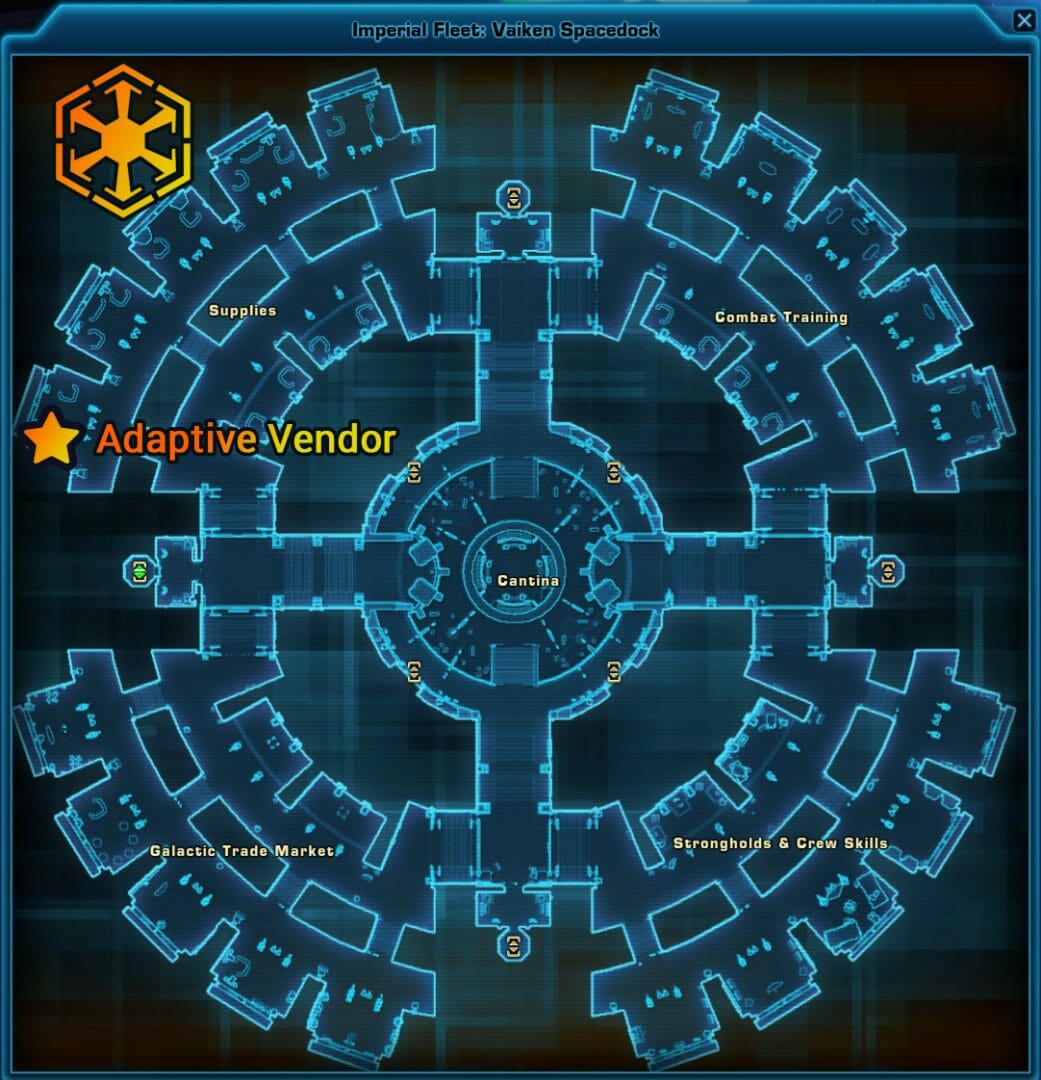
- Start by getting and equipping a full set of empty moddable gear, weapon and offhand equipped. you can easily get a set in the Supplies section from the Adaptive vendor.
- Equip what have available or can get for your Relics, a new Earpiece, and most important, Legendary Implants.
- Next, look at your Accuracy stat in your Character Sheet (Details). You want to reach as close to 2694 accuracy as possible, aka 110% accuracy, for non-PvP content if you are a Damage character. So start buying and equipping the yellow accuracy enhancements [Proficient Enhancement 103]” until you reach 110% accuracy on the Details sheet (scroll down in the sheet), so you never miss an enemy. Note your bracers and Belt can’t have enhancements. I needed about four to five accuracy enhancements.
- Your next step is your Alacrity, which controls how often you can use your abilities (and how fast casted abilities go). For most classes, you will be shooting for roughly just over 2,000 Alacrity, but it varies by class and by preference. With my Legendary Implants, this meant I only needed to buy two Alacrity enhancements. Stats info.
- The rest of your stats you can put into crit. The may mean an enhancement, or augments.
- The next part is easy – buy 7 of the red armorings “[Versatile Armoring 100]” one for each of your armor pieces, then the hilts/barrels/armorings you need for your weapon and offhand
- And then buy 9 of the red mods “[Versatile Armoring 103]”, one for each of your moddable pieces
- Last optional step would be to augment your gear.
Adaptive Vendor Map
Summary
While the whole explanation is a bit long, each individual step is pretty easy, and it’s a lot faster and efficient than the previous ways of gearing up in the expansion for solo players!
Here’s how to get the best solo gear in SWTOR as of 7.1.1:
- Step 1 – Reach Level 80 and pick up the Legendary Implants quest
- Step 2 – Complete a Conquest at Level 80 to earn the Conquest Commendations currency
- Step 3 – Purchase a basic set of green 324 Conquest Gear with your Conquest Commendations
- Step 4 – Acquire a below-level-80 Earpiece and equip it (GTN is an easy place to get it)
- Step 5 – Run a Veteran Mode Red Reaper Flashpoint Solo in Stealth, while wearing your low-level earpiece, forcing a blue earpiece to drop
- Step 6 – Run Veteran Mode Red Reaper Flashpoint Solo in Stealth about 20 more times with your low-level earpiece, deconstructing all gear you get from it except that initial blue earpiece
- Step 7 – Upgrade that initial blue earpiece from 324 -> 326 -> 328 -> 330 -> 332 -> 334 -> 336 using the currency you get from deconstructing the pieces you get from the Flashpoint bosses and the currency bags trade-in
- Step 10 – Once you have a blue 336 piece, speak to Hyde and Zeek and pick the 336 Prototype mission.
- Step 11 – Once you have the mission, deconstruct your 330 blue piece, completing the quest.
- Step 12 – You will now have access to a vendor that will sell you infinite item-rating 336 blue armorings, mods and enhancements, and you can now buy and equip an almost complete set of some of the best gear in the game, and the best gear a true solo player can get!
Faster With Group Content
If you are not actually a solo player, this whole process can go a lot faster.
- You can get guaranteed gear item-rating upgrades from the Groupfinder boxes. Just make sure to equip your awesome blue earpiece before opening up the boxes from the groupfinder quests as it will automatically upgrade your lowest piece.
- If you are already well-geared for item-rating from running any content, you can run a Master Flashpoint and if you get lucky it will drop a piece over a higher-item rating that matches one of your other pieces, so you don’t have to start directly at 324.
- More info
Thank you Zahk for helping with the research and brainstorming! Thanks Grumeua and shlebylee for tracking the exact costs of upgrading an earpiece!
 Questions or comments? Feel free to send me a message on Twitter


 Discord
  Email swtorista@gmail.com
 Bluesky @swtorista.com
 Reddit /u/swtorista
 Twitch Swtorista
 Youtube
 Patreon
 Twitter @swtorista