


 How to Craft
 Choose a Crew Skill
 Armormech
 Armstech
 Artifice
 Biochem
 Cybertech
 Synthweaving

 Gathering Guide
 Rare Materials Guide
 White Materials Guide
 Jawa Junk
 Augments
 Medpacs, Stims and Adrenals
 Synthweaving Crafting Tree


 Crafted Decorations
 Crafted Mounts
 Crafted Dyes
 Crafted Crystals
 Events Calendar
 Galactic Seasons
 PvP Seasons
 Bounty Event
 Double XP Event
 Feast of Prosperity
 Gree Event
 Life Day
 Nightlife Event
 Pirate Incursion Event
 Rakghoul Event
 Spring Abundance Festival
 Swoop Event

 Jedi Knight
 Jedi Consular
 Trooper
 Smuggler
 Sith Warrior
 Sith Inquisitor
 Bounty Hunter
 Imperial Agent
 Bounty Hunter
 Imperial Agent
 Jedi Consular
 Jedi Knight
 Sith Inquisitor
 Sith Warrior
 Smuggler
 Trooper
 Legacy Gear
 Lightsabers
 Double-Bladed Lightsabers
 Vibroswords
 Double-Bladed Vibroswords
 Blaster Pistols
 Blaster Rifles
 Sniper Rifles
 Blaster Cannons
Ossus is a beautiful planet that was ravaged by the Sith hundreds of years ago. On the planet’s surface lies the ruins of the great Jedi Library, which still holds untold secrets placed there by the great Jedi Masters of the past.
In this video, we’ll be going over how to unveil the secret of Jedi Master Ood Bnar on Ossus, as well as how to find and unlock the green Ossus Endurance Datacron. This is probably the most difficult datacron hunt and jumping puzzle available in the game, but at the end not only are you rewarded with +2 Endurance for all your characters on your server, you’ll also be granted Ood Bnar’s Weapon Tuning, a special item that can be placed on a lightsaber or blaster that gives your weapon the appearance of growing wooden vines. You can only obtain this datacron if you have finished the main Ossus storyline at level 70, otherwise you will be blocked from even entering the first hidden area.
Contents
Datacron Hunt Start
The treasure trail starts on the Ancient Ruins Map, which is the Dead Forest Quick Travel Point. I think you technically don’t need to go here first, but it’s very cool, so I highly recommend it. It’s located along the right side of the map – go enjoy the view for a few seconds, the turn to the left to see a green entrance.
This secret grove is the resting place of Jedi Master Ood Bnar. After the attack on Ossus hundreds of years ago, two dark lords returned to the planet to steal the remainder of the priceless information and artifacts housed there. Their trip, however, was not as simple as they had first planned, as the shape-shifting Jedi master Ood Bnar blocked their path as they were trying to steal the lightsabers, by transforming into a tree and concealing the sabers within its structure.
Although its unknown who left the clues in his sanctuary, near the tree you will see five glowing runes. You will need to find and click these runes in order, which are hidden across Ossus.
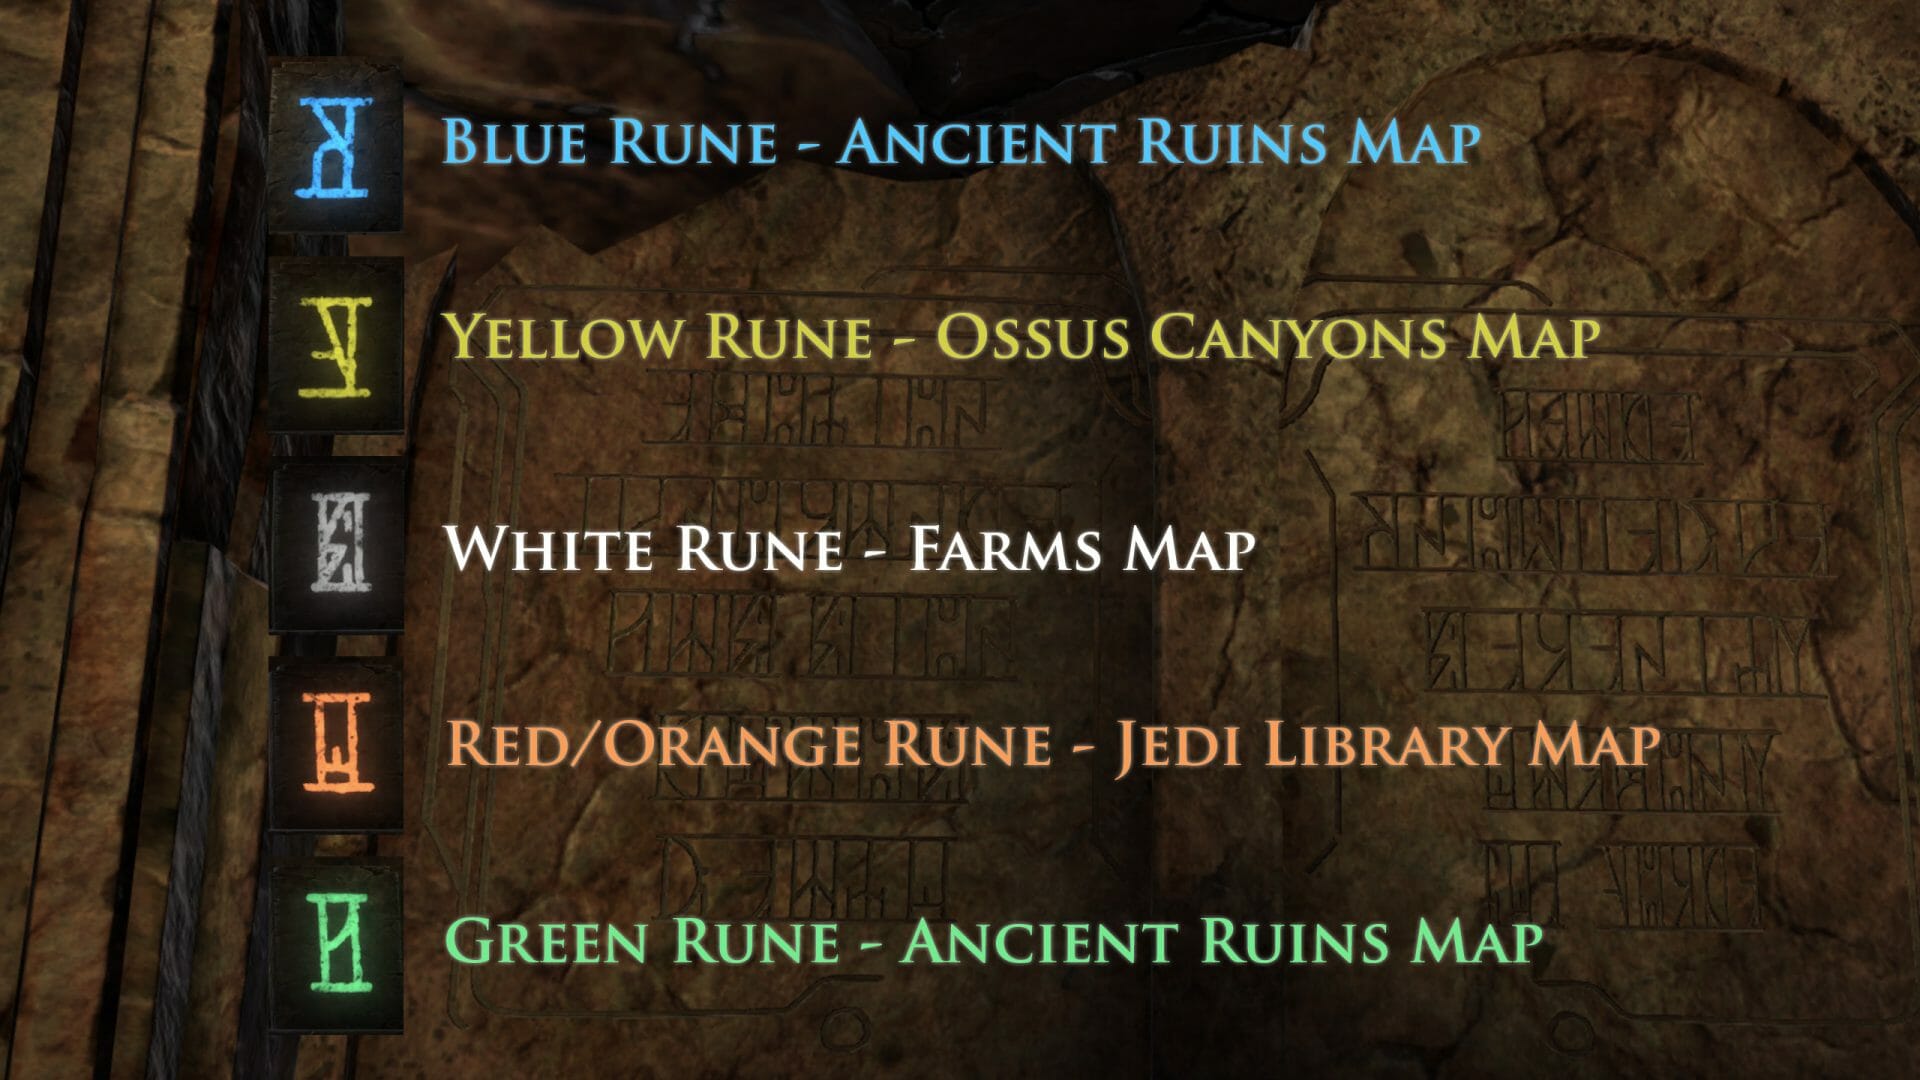
#1 Blue Rune – Ancient Ruins Map
The first rune is on the same map as Ood Bnar, and it’s located along the Southern edge of the map, near the entrance to the cave. You’ll need to jump along the rocks on the left-hand side of the cave entrance. The jumping puzzle is a bit annoying, but not difficult.
#2 Yellow Rune – Ossus Canyons Map
The second rune is located near the waterfalls of the Ossus Canyons Map. which is the Catacombs Quick Travel Point. In the middle of the lowest waterfall, there is a tiny ledge you can drop down to that creates a small space behind the water where the rune is hidden.
#3 White Rune – Farms Map
The third rune is located on the Farms map, near the northern edge of the map, in a tiny hidden cave in the mountains near the water on the left of the map.
#4 – Red/Orange Rune – Jedi Library Map
The fourth rune is located inside the Jedi Temple, in the second room past the entrance, there is a secret area you can acces by jumping on some pottery which brings you off the map.
#5 Green Rune – Ancient Ruins Map
The final rune is back where you started, on the Ancient Ruins Map which is the Dead Forest Quick Travel Point. You can find it along the North West edge of the map, on the mountainside.
Once you have found and clicked all the runes in the correct order, you can head back to Ood Bnar’s resting place and you’ll see a glowing yellow circle above the runes. This means you’re ready for the next step. If you’ve explored Ossus a bit already, the background of the runes will give you a clue of where to go next – the smaller runes engraved on the wall are similar to an area in the ruins of the great Jedi Library.
Jedi Library
Quick travel to the Jedi Temple Ruins, and enter the temple. There should now be a special new green phase a few rooms in to the temple, with a yellow circle glowing above its entrance. If you’ve been in this area before, you may recognize it, but if you’ve completed the special rune hunt, you will follow the doors sliding open until you see another yellow circle. This circle is a clue that you need to go back a bit and jump on the ledge, and fall in to a secret, dark area.
Mushroom Jumping Puzzle
This is the jumping puzzle. It’s quite difficult, not only because of the darkness, but also because the designer clearly enjoyed tricking the player as they jump. There are three phases of this jumping puzzle – once you get to the second or third, you won’t need to start at the beginning again, which is nice. In general, just follow the glowing blue mushroooms.
In the first area, it looks like there’s a large chasm you’ll fall down, don’t worry, it’s just dark, walk forward to the mushrooms and you’ll receive a droid that gives you some light.
I’m going to turn up the brightness in the video so you can see a bit better, in the cave it’s quite dark and a lot of the time you will barely be able to see the ledges you need to jump on to.
The first phase of the jumping puzzle isn’t too bad. There are no tricks. Find a small rock ledge with mushrooms on it, and start jumping up along the wall. You’ll need to jump across the halllway multiple times, jumping from one wall to the other side.
You’ll know you’ve reached the second phase when you find a long uninterrupted walkway with no way to fall. Go back to the beginning of this walkway, and there will be some blue mushrooms near the floor which will tell you where to start. You’ll eventually come to another set of pointed rock ledges facing each other from opposite sides of the hallway. This is a trick, and if you follow the obvious path by jumping to the other side of the walkway, you’ll bget trapped. Instead, where the pointed ledge is, jump along the wall to the left. (11:33 fail) (14:16 good)
You’ll know you’ve reached the third phase when, once again, you reach another safe space to walk around. This area is a large cavern. This time the mushrooms are liars, and don’t tell you where to start – the jumping puzzle starts on the left hand side from where you enter – look for a ramp made out of rock leading upwards. Eventually you will come across a choice – to jump across forward, or to the right. The forward path leads nowhere, so instead go to the right. A few jumps later, it looks like you need to jump on a small platform stalagmite. If you’re have trouble with that jump, don’t worry, you can actually jump straight to the glowing blue mushrooms a little bit ahead. Immediately after that you need to jump upwards along the wall, but it’s tricky, the only way I could get up was on a tiny notch on the far right-hand side when facing the wall.
Jedi Library Ruins upper Level
Congratulations! You made it through the dark jumping puzzle. You will now be in the upper area of the Jedi Library ruins. Find and click the large blue switch. You’ll now need to jump across the missing gaps in the floor. If you fall inside the gaps, you will be teleported back to where you ended the jumping puzzle. Very important though – if you fall, heal up – as far as we could tell, you could die of fall damage before you got teleported if you fell twice in a row, and if that happened, you’d be sent to the medcenter outside the temple and have to start comletely over at the beginning of the mushroom jumping puzzle. If you fall outside the gaps, into the large open area of the ruins, you will also not be teleported and will have to start completely over.
In the first section of jumping over the gaps, it’s pretty easy, just go carefully and look around for the shortest gap option.
In the second section, the gaps are huge, and I don’t think you can get across the large gaps on the right. You can very careful jump on and around the pillars on the left and walk on the thing ledges – just be aware if you fall on the left side, into the large open space of the ruins, you will not teleport and instead will need to re-start from the very beginning. The third section seems to just be a jump over the gaps, where you can press the second switch.
At this point, all the gaps will become holographically filled in and you walk on them, it looks very cool, and you’ll be able to click the datacron. It’s a bit anticlimactic once you do, but that’s because you need to bring the datacron back to Ood Bnar’s sanctuary, where we started the datacron hunt. Once there, right click the datacron’s stand and you’ll receive the datacron’s boost and Ood Bnar’s Weapon Tuning!
Ood Bnar’s Weapon Tuning
The tuning item itself is actually quite special – it’s Bind on Equip which means you can send it to another character or sell it on the GTN. You can obtain the weapon tuning once per character, by repeating the entire puzzle – so if you dual-wield lightsabers and want them to match, you’ll need to repeat the puzzle on a different character that has finished the Ossus storyline, or buy it on the GTN from another player. If jumping puzzles are fun for you, you could also complete this puzzle multiple times to make some credits on the GTN by selling the weapon tuning to other players.
If you’ve managed to complete Ood Bnar’s datacron hunt, give yourself a pat on the back, as you’ve completed the most difficult jumping puzzle in the game – congratulations!
 Questions or comments? Feel free to send me a message on Twitter


 Discord
  Email swtorista@gmail.com
 Bluesky @swtorista.com
 Reddit /u/swtorista
 Twitch Swtorista
 Youtube
 Patreon
 Twitter @swtorista