The Kessan’s Landing Daily Area is a special area of Ord Mantell introduced with Update 7.4, with a set of quests you can repeat to earn Reputation and rewards.

Contents
- How to Start
- Reputation
- Quests
- [WEEKLY] The Price of Freedom
- [WEEKLY] Heroic Missions: Kessan’s Landing
- [WEEKLY] Daily Area: Kessan’s Landing
- [HEROIC 4] The Droidbuster
- [Heroic 2+] Into the Fire / Volcanic Disruption
- [DAILY] Chain of Command
- [DAILY] Everything Must Go (Republic Version and Imperial Version are different?)
- [DAILY] Island Assessment
- [DAILY] Separating the Separatists
- [DAILY] Short Circuiting
- [DAILY] Turn the Lights On
- [DAILY] Grateful Grazers (Republic Only?)
- [DAILY] Panther Training (Imperial Only?)
- Geothermal Shielding Missions
- Datacron
- World Boss- FR3-D0M
- Achievements
- Rewards
How to Start
You can start the “Chains in the Dark” storyline once you have completed all previous stories, including Ruhnuk and Voss Interpreter’s Retreat. Once you have, you will automatically get a quest called “Road to Nowhere” in your quest tracker to launch.
You will not be able to start the Kessan’s Landing daily area quests until you have completed the
 Thank you player Zahk for all your help on this guide to make it easier for other players to find the quest objectives!
Reputation
Reputation is a way of gaining favor with different groups by completing quests for them. As you level up your reputation rank, more rewards for that reputation track become available. Reputation is shared by all your characters on your server, it is legacy-wide.
You can earn this Reputation by completing Manaan daily quests, by flying to the Kessan’s Landing Daily Area on Ord Mantell (not the normal Ord Mantell) and using the terminal to pick up the dailies and weeklies.
By using multiple characters, you won’t be limited to how many Ord Mantell quests you run, but you will still be gated by how many reputation points you can earn – you can only earn a hard limit of 12,000 reputation points per week.
Ranks
As you run dailies, you’ll rank up your reputation, and each rank unlocks new rewards from the Ord Mantell Reputation vendor near the quest terminal.
- None – 0 Reputation
- Outsider – 0/2,500 Reputation (2,500 total points needed)
- Newcomer – 0/5,000 Reputation (7,500 total points needed)
- Friend – 0/7,500 Reputation (15,000 total points needed)
- Hero – 0/10,000 Reputation (25,000 total points needed)
- Champion – 0/15,000 Reputation (40,000 total points needed)
- Legend – 0/30,000 Reputation (70,000 total points needed)
Tokens
Each type of token from questing and enemies gives you a different amount of Reputation – the values listed are with no guild/subscriber/buff bonuses:
 Mantellian Separatist Movement Leaflet: 50 Reputation
 Hidden Chain Insignia: 75 Reputation
 Bottle of Aged Daingen Melon Wine: 180 Reputation
 Kessan’s Landing Municipal Banner: 500 Reputation
 “Order of Mantellian Heroes” Commendation: 1250 Reputation
Quests
Need more information about the Kessan’s Landing daily quests? Scroll down!
| Republic Quest | Imperial Quest | Reward |
|---|---|---|
| [WEEKLY] The Price of Freedom |  Blue Blue |
|
| [WEEKLY] Heroic Missions: Kessan's Landing (Complete 3 Heroics) |  Purple Purple |
|
| [WEEKLY] Daily Area: Kessan's Landing (Complete 10 Dailies) |  Purple Purple |
|
| [Heroic 4] The Droidbuster |  Purple Purple |
|
| [Heroic 2+] Into the Fire |  Green Green |
|
| [Heroic 2+] Volcanic Disruption |  Green Green |
|
| [DAILY] Chain of Command |  Green Green |
|
| [DAILY] Everything Must Go |  Green Green |
|
| [DAILY] Island Assessment |  Green Green |
|
| [DAILY] Separating the Separatists |  Green Green |
|
| [DAILY] Short Circuiting |  Green Green |
|
| [DAILY] Turn the Lights On |  Green Green |
|
[DAILY] Grateful Grazers  | - |  Green Green |
| - | [DAILY] Panther Training  |  Green Green |
| [DAILY] Unstable Readings |  Green Green |
|
[WEEKLY] The Price of Freedom

Curb the Separatists’ influence in Kessan’s Landing by defeating the FR3-D0M propaganda droid.
Tasks: Defeat FR3-D0M
Reward: Blue Reputation Token, Noble Decurion Chest, Separatist Elimination Requisition Cache.
Tips:
- This boss sits in a large arena on the northeast side of Kessan’s Landing.
- Some usual red circles to stay out of that puts fire on the floor.
- Blue circles that goes out to about half the group and stays on you. Take these to the edges of the arena because it will put down an electrical field.
- Linear attack towards the tank – can be dodged.
[WEEKLY] Heroic Missions: Kessan’s Landing
The volatile situation on Kessan’s Landing has opened opportunities for Savrips to disrupt area operations.
Stop the Savrips from encroaching on local territory and complete the following Daily Heroic missions:
- [HEROIC 2+] Into the Fire
- [HEROIC 2+] Volcanic Disruption
- [HEROIC 4] The Droidbuster
Tasks: Complete Heroic Missions: 0/3
Reward: Purple Reputation Token, 40 Commendations, Noble Decurion Chest.
[WEEKLY] Daily Area: Kessan’s Landing
Improve public opinion of the Republic by completing 10 Daily Missions on Kessan’s Landing.
Tasks: Complete Daily Missions: 0/10
Reward: Purple Reputation Token, Noble Decurion Chest, 50 commendations.
Tips:
- It may seem like there aren’t enough dailies and it’ll take multiple days – the Heroics count as dailies as well, so you should be okay to do it in one.
[HEROIC 4] The Droidbuster

Rumors are quickly spreading that the Savrips have a secret weapon that could lay waste to Ardak Point’s defenses.
Destroy any technology the Savrips could use to harm innocent civilians.
Tasks: Defeat the Savrip Droidbuster
Reward: Purple Reputation Token, 3 Conquest Commendations, 30 Tech Fragments
Tips:
- This Heroic 4 takes place in an area just above the Heroic 2’s, in it’s own instance that contains just the boss fight. Your shuttle takes you to the lowest Quicktravel so take the path up to the area in the picture above.
- This is certainly solo-able, but takes awhile and doesn’t forgive micromanagement mistakes, so it isn’t recommended.
- The droidbuster has 3 main attacks he cycles through, with one unique enrage attack around 30% HP. All attacks are lethal to your healer companion and effort must be made to quickly set them to passive to move them out of harm’s way.
- Seeking Missiles: The savrip will beat his chest while channeling 4 red circles down on your character. Run these away from your companion.
- Fist Wave: The savrip will wind up a linear rectangle from himself to his target – swing the angle of the attack away from your companion and get far enough away from it.
- Electroshock Dance: This attack does not have a cast bar like the rest, but is demonstrated in the picture below. A yellow line will point from the savrip to one cardinal direction (true north, east, west, or south) where he will jump. Upon landing, a large electrified circle will appear that slows and quickly damages anything inside it. You will also get knocked back away from his impact, so there are three important things to handle – 1) do not be near the end of the yellow line indicator where he will land. 2) ensure that when you are knocked back, there is no electric field from a previous cast behind you to get trapped inside. 3) Set your companion to passive and have them run to you, away from getting caught in a field themselves – as this will quickly kill them. A helpful way to make companion management easier is to use a Ranged Healer companion and take them out of passive whenever you get them standing at intercardinal angles of the arena. (NW, NE, SW, SE).
- Droidbuster: this attack is his enrage, at 30% hp. He will move to the center of the room and start a 10 second cast that covers the entire arena. Run to any of the pillars in the room to deactivate the attack and resume the fight as normal. This attack has a 10 minute cooldown so you should only see it once even when soloing.

[Heroic 2+] Into the Fire / Volcanic Disruption

An unusual number of Savrips have pushed their way into the area. Take out their leaders and thin the herd. /
The Savrips have overrun a station that monitors volcanic activity from nearby Mount Felo.
Without readings from that monitoring station, the Mantellian Authority cannot warn Kessan’s Landing citizens in the event of an impending disaster.
Tasks: Defeat Mountain Crag Savrips 0/5. Defeat Savrip Champions 0/3. Retrieve DNA from a Savrip Warchief / Gather Readings from the Volcanic Evaluation System.
Reward: Green Reputation Token, 3 Conquest Commendations, 30 Tech Fragments for BOTH.
Tips:
- Both Heroic 2+ missions take place in the exact same spot; do them together.
- Though these missions come with a transport item, the shuttle takes you to the lowest Quicktravel point on the map. Head back up the road and into the tunnel on the map above to start the heroics.
- Into the Fire is a simple “go in and kill everything” mission. Decently Solo-able with a healer comp. For stealthers, some savrips are not part of the requirements, so leave them til last in a fight and cloak out to save time.
- Volcanic Disruption is a lot of clicking on and interacting with a series of objects along the walls labelled very clearly on the map and should be no trouble. Stealthers can sleep dart savrips and interact with them quickly if this mission is all they have left. Use the mission item to finish the last step.
- The tunnel system is not an instanced area, so grouping up with anyone who arrives may be faster and more considerate.

[DAILY] Chain of Command

The Mantellian Authority has received reports that Hidden Chain leaders who survived the events of Kessan’s Landing have taken refuge with their separatist allies.
Locate the Hidden Chain leaders and root them out.
Tasks: Retrieve Orders from Hidden Chain Captain
Reward: Green Reputation Token, 3 Conquest Commendations, 30 Tech Fragments
Tips:
- This mission initially takes place in the subterranean power station directly north of Ardak Point, but moves on as you take out named targets.
- Because of this, it’s best to pick it up with the rest and do it as you do the other dailies.
- Doesn’t seem to have a bonus, so feel free to stealth through enemies you don’t need.
- Only the Gold-level Captains inside count for stage 1. Loot them to start stage 2.
- Head to the northeast corner pictured below to interact with one of the two blue glowing terminals. This will summon the named enemy.

- Exit using the southeast corridor and follow the dirt road over to the farmland in the northeast.
- Kill any “Separatist Bomber” regular enemy in this sandy valley between the world boss and the farm to loot some explosives.
- Head to the glowing blue crate displayed below to summon the next named enemy to fight. She’s a gold level with 2 regular enemies as backup.

- The next enemy is far south at Fort Ronnig, inside the fort walls but outside any buildings.
- You specifically need to loot a Hidden Chain Beastmaster – Silver mob always accompanied by an Asharl Panther.
- Take this loot around the back of the main fort – overlooking the beach is the large beast cage that summons the last leader – a silver level mando with a silver beast helper.

[DAILY] Everything Must Go (Republic Version and Imperial Version are different?)

The Hidden Chain have provided high-grade ammunition to Separatists forces. With that kind of firepower, anyone who stands up against the Separatists won’t stand a chance.
Get the ammunition away from the separatist forces.
Tasks: Seize Ammunition Supply Crates from Separatists 0/7.
Reward: Green Reputation Token, 3 Conquest Commendations, 30 Tech Fragments
Tips:
- This mission takes place in the trenches outside Fort Ronnig, southeast of Ardak Point.
- Doesn’t seem to have a bonus, so feel free to stealth through enemies you don’t need.
- Objects needed are lootable containers pictured above, sporadically stored along the trenches outside the Fort.
- Head back to Ardak for the hand-in stage. You will drop off the supplies onto a shipping bed glowing blue directly north of the quicktravel drop-off, on your right
- There will be a small terminal to interact with afterwards that prompts a voiceless cutscene asking where to send the ammo. Choose any to complete.

[DAILY] Island Assessment

For the Separatist movement to survive, they must rely on a stable and secure infrastructure network throughout Kessan’s Landing.
Identify key structures and determine how to damage them so that the Separatists’ efforts can be disrupted.
Tasks: Scan the Separatists’ Communication Array
Reward: Green Reputation Token, 3 Conquest Commendations, 30 Tech Fragments
Tips:
- This mission’s first objective takes place just outside Port Granost’s quicktravel, in the same area as “Chain of Command’s” 2nd target.
- You can safely macrobinocular the satellite target before being near any enemies in the area: it’s sitting on a building overlooking the worldboss.
- Next you must click two terminals on towers nearby. Stealthers can sleep dart the Gold-mob already typing on them and continue with no fighting.
- The next objective is next door at the farmland southeast. Scan the banner easily seen from the road and loot 5 mines along the road.
- The 3rd objective is near the trenches of Fort Ronnig: from this farm area you can quickly get there from Orabina Cove by running through the lava tunnel shortcut pictured below – if you’ve done the geothermal shielding questline.
- This final objective is to simply scan the antenna poking out through the top of Fort Ronnig and then heading into the trenches to interact with a terminal.

[DAILY] Separating the Separatists

The Hidden Chain have provided Separatist forces with enough supplies to continue their work in Ardak Point.
Retrieve the supplies from the Separatists to tip the odds in favor of Kessan’s Landing citizens.
Tasks: Seize Fuel Canisters 0/5. Destroy Hidden Chain Ordnance 0/5. Recover Intel from Hidden Chain Commandants and Beast Masters 0/3.
Reward: Green Reputation Token, 3 Conquest Commendations, 30 Tech Fragments
Tips:
- This mission takes place in Fort Ronnig, past the trenches and inside the walls – the same area as “Chain of Command” and “Island Assessment’s” last targets.
- You can quickly get there from Orabina Cove by running through the lava tunnel shortcut pictured below – if you’ve done the geothermal shielding questline.
- You will need to destroy one kind of container (pictured above), and loot another kind (pictured below, along with the silver-level beastmasters you’ll need to loot for 3 items as well).
- As a stealther, keeping to killing only beastmasters and looting crates that are otherwise unguarded makes this pretty fast.
- The 2nd objective is to simply hand in the items, done at a terminal that will be directly in front of you as soon as you quicktravel back to ardak point.

[DAILY] Short Circuiting

The Mantellian Separatist Movement’s forces continue to target civilians on Kessan’s Landing.
A collection of combat droids gives the Separatists the upper hands. Destroy the droids before the Separatists can cause further harm.
Tasks: Defeat Separatist Scout Droids 0/15. Defeat Separatist Trench Patrollers 0/5. Defeat Extreme Environment Droid.
Reward: Green Reputation Token, 3 Conquest Commendations, 30 Tech Fragments
Tips:
- This mission takes place infront of Fort Ronnig, within the trenches outside – EXCEPT for the Extreme Environment Droid (location pictured above to the west).
- You can quickly get there from Orabina Cove by running through the lava tunnel shortcut pictured below – if you’ve done the geothermal shielding questline.
- In addition to killing the Scout Droids that float alongside the Trench Patrollers, there’s a decent cluster of them alone northwest of the trenches that can be AoE’d down fast to finish this mission faster.

[DAILY] Turn the Lights On

Local residents in Port Granost are reporting an inconsistent supply of power from the nearby substation.
Investigate the area and identify what could be causing the disturbance.
Tasks: Retrieve Repair Tools
Reward: Green Reputation Token, 3 Conquest Commendations, 30 Tech Fragments
Tips:
- This mission is NOT acquired at the initial Kessan Landing terminal – it is from Ramalla Ash’yn, a green twilek just beside the Ardak Point taxi.
- This mission takes place in the subterranean power station directly north of Ardak Point, which is a shared location for Chain of Commands beginning as well.
- Initial objectives in the power station are very straightforward – grab repair kit from first room and then work your way clockwise interacting with objects as you go. Chain of Command goes through these rooms in a similar order.
- The map will recommend you go back out of the power station through the western tunnel most people enter from. This is wrong as you should most definitely take the eastern tunnel out, as it puts you directly on top of the macrobinocular objective that follows – scanning the houses.

[DAILY] Grateful Grazers (Republic Only?)

Ranchers on Kessan’s Landing report that Separatists are rustling their grazers.
Locate and free the grazers from the Separatists’ clutches.
Tasks: Retrieve Keycard from Separatist Poachers
Reward: Green Reputation Token, 3 Conquest Commendations, 30 Tech Fragments
Tips:
- This mission is NOT acquired at the initial Kessan Landing terminal – it is from Daltist Se’gen, a blue twilek just beside the Port Granost Quicktravel up north.
- This mission takes place in the farmlands southeast of the worldboss, which is a shared location for Chain of Commands 2nd target as well.
- After killing a specifically named seperatist poacher enemy for the keys, open some of the glowing yellow cages (pictured below) to get the next objective.
- A boy will now follow you. The boy is not helpful. If you are stealthing, note that although the boy attempts to sneak, he is not good at it.
- Once the head poacher next to the house is defeated, target the boy and use the mission item.
- Quick travelling back for hand-in breaks nothing – the boy knows how to follow you.

[DAILY] Panther Training (Imperial Only?)
Acquire Panther Cage Access Codes and Training Materials
Collect Treats for an Asharl Panther
Free an Asharl Panther
Defeat the Separatist Associate Trainer and Acquire Tracking Device Deactivation Tool
Remove Tracking Device from Asharl Panther
[DAILY] Unstable Readings
A concerned local geologist is desperate for seismic readings from areas too dangerous to traverse.
Assist the geologist by gathering the readings.
Tasks: Gather Seismic Readings: 0/4.
Reward: Green Rep, 30 Tech Frags.
Geothermal Shielding Missions
Geothermal Shielding is a set of “secret” quests on the Kessan’s Landing area of Ord Mantell. Once completed, you get use of the Geothermal Shield Unit, which lets you explore areas of Kessan’s Landing on Ord Mantell you might not otherwise be able to safely walk through. Here’s the Geothermal Shielding quest guide!
Datacron
To get the secret Kessan’s Landing Ord Mantell datacron, you must complete a series of quests and solve a series of puzzles. It’s quite a long chain! Here’s the Kessan’s Landing Ord Mantell Datacron Guide.
SWTOR Kessan’s Landing Ord Mantell Secret Datacron & Lava Problems Quest Guide
World Boss- FR3-D0M


On the PTS, this boss tried to crash my computer. I think its the glowing animation on the “Suppressor Missiles” attack on the circles on the ground. He had 30 mill health, and we did not need a big group to fight him, but it was unclear how hard he hit due to the stuttering.
https://www.twitch.tv/videos/1961070492
Achievements
There are some fun and cute Ord Mantell secret achievements to go hunt down, including Grazer Whisperer and Tidewracked. I’ have them all covered in my Secret Ord Mantell achievements guide!
Rewards
The Ord Mantell Kessan’s Landing Reputation vendor is located in the main city where you first load in to the planet, where you exit to the east. There is also a decoration available through an Achievement.

Mounts
Mantellian Hover Turret
Type: Mount – Speeder Bike – Rarity: Artifact – Reputation Rank: Champion, Costs 1,000,000 Credits
Mantellian Separtist Hover Turret
Type: Mount – FR3 rare World Boss Drop
Pet
Woodland Nexu
Type: Pet – Adorable – Rarity: Prototype – Reputation Rank: Legend, Costs 1,000,000 Credits
Armor
Mantellian Support Armor
- Feet, Reputation Rank: Hero, Costs 750,000 Credits
- Wrist, Reputation Rank: Newcomer, Costs 750,000 Credits
- Chest, Reputation Rank: Legend, Costs 750,000 Credits
- Hands, Reputation Rank: Hero, Costs 750,000 Credits
- Head, Reputation Rank: Legend, Costs 750,000 Credits
- Legs, Reputation Rank: Champion, Costs 750,000 Credits
- Waist, Reputation Rank: Friend, Costs 750,000 Credits
Decorations
Beast Holding Cell
Type: Decoration – Civic – Structures – Rarity: Prototype – Reputation Rank: Legend, Costs 550,000 Credits

Beast Holding Cell (Teal)
Type: Decoration – Civic – Structures – Rarity: Prototype – Reputation Rank: Legend, Costs 550,000 Credits

Cube Topiary
Type: Decoration – Environmental – Trees – Rarity: Prototype – Reputation Rank: Hero, Costs 350,000 Credits

Emergency Blockade
Type: Decoration – Civic – Structures – Rarity: Artifact – Reputation Rank: Outsider, Costs 150,000 Credits

Field Monitor Light
Type: Decoration – Lights – Standing – Rarity: Premium – Reputation Rank: Outsider, Costs 150,000 Credits

Lava Pit
Type: Decoration – Civic – Structures – Rarity: Prototype – Reputation Rank: Newcomer, Costs 175,000 Credits

Mantellian Light Fixture
Type: Decoration – Lights – Standing – Rarity: Premium – Reputation Rank: Newcomer, Costs 175,000 Credits

Requisitioned Training Dummy
Type: Decoration – Civic – Structures – Rarity: Premium – Reputation Rank: Friend, Costs 250,000 Credits

Separatist’s Relay Desk
Type: Decoration – Furniture – Tables – Rarity: Prototype – Reputation Rank: Hero, Costs 350,000 Credits

Arrangement: Cantina Bar Pod
Type: Decoration – Furniture – Arrangement – Rarity: Artifact – Reputation Rank: Champion, Random Drop from Enemies
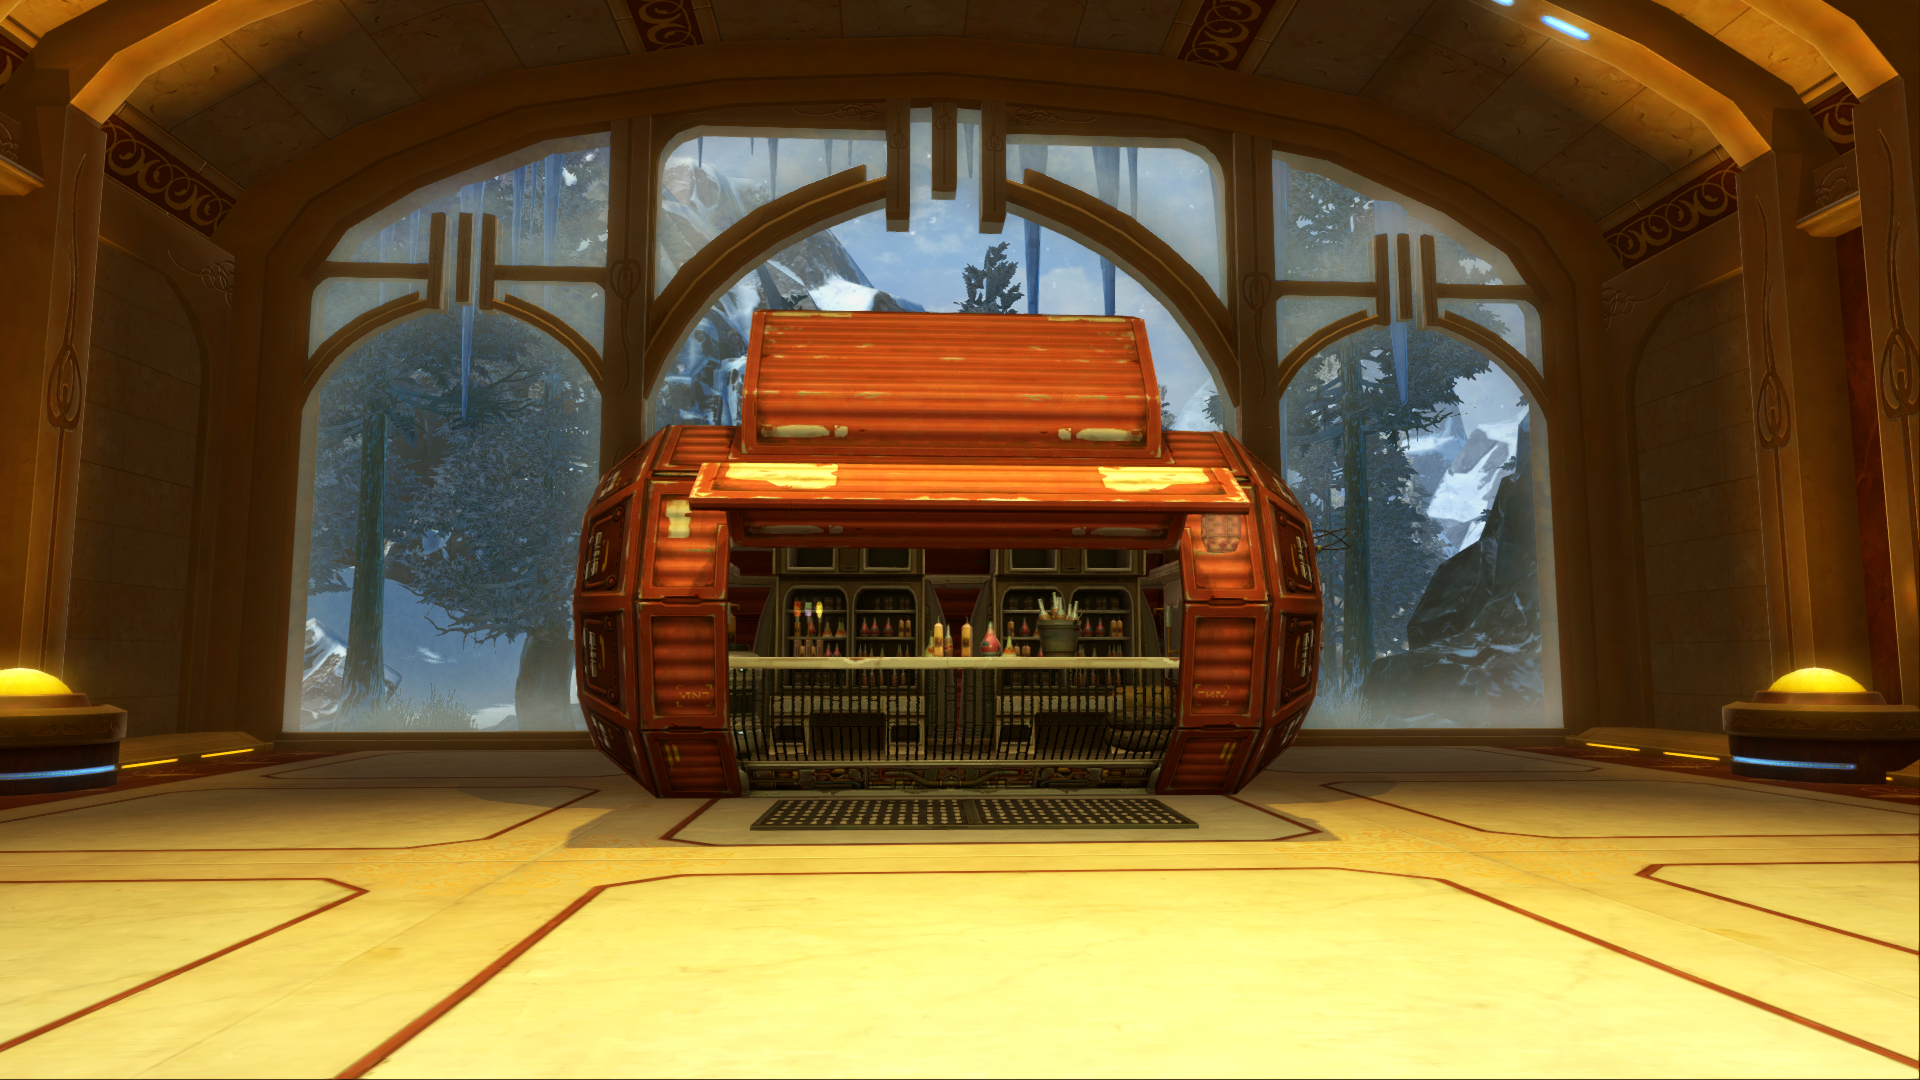
Arrangement: Cantina Restaurant Pod
Type: Decoration – Furniture – Arrangement – Rarity: Artifact – Reputation Rank: Champion, Random Drop from Enemies

Suspended Speeder Engine
Type: Decoration – Civic – Structures – Rarity: Artifact – Reputation Rank: Champion, Costs 450,000 Credits

Ranch Gapillian Grazer
Type: Decoration – Personnel – Beasts
Achievement
Titles
- Title: Heavy Artillery: Legend rank with Ord Mantell, Costs 1,000,000 Credits from Vendor
- Title: Mantellian Defender Friend rank with Ord Mantell, Costs 1,000,000 Credits from Vendor
- Legacy Title: Grazer Whisperer: Achievement
- Legacy Title: Debris Director: Achievement
- Legacy Title: Kessan’s Local: Friend Reputation Rank with Ord Mantell
- Legacy Title: Breaker of Chains: Legend Reputation Rank with Ord Mantell
List
| Name | Type | Description | Rep. Rank | Cost | |
|---|---|---|---|---|---|
 | Beast Holding Cell | Decoration | Civic - Structures | Legend | 550,000 |
 | Beast Holding Cell (Teal) | Decoration | Civic - Structures | Legend | 550,000 |
 | Cube Topiary | Decoration | Environmental - Trees | Hero | 350,000 |
 | Emergency Blockade | Decoration | Civic - Structures | Outsider | 150,000 |
 | Field Monitor Light | Decoration | Lights - Standing | Outsider | 150,000 |
 | Lava Pit | Decoration | Civic - Structures | Newcomer | 175,000 |
 | Mantellian Hover Turret | Mount | Speeder Bike | Champion | 1,000,000 |
 | Mantellian Light Fixture | Decoration | Lights - Standing | Newcomer | 175,000 |
 | Mantellian Support Boots | Armor | Feet | Hero | 750,000 |
 | Mantellian Support Bracers | Armor | Wrist | Newcomer | 750,000 |
 | Mantellian Support Chestplate | Armor | Chest | Legend | 750,000 |
 | Mantellian Support Gloves | Armor | Hands | Hero | 750,000 |
 | Mantellian Support Helmet | Armor | Head | Legend | 750,000 |
 | Mantellian Support Pants | Armor | Legs | Champion | 750,000 |
 | Mantellian Support Utility Belt | Armor | Waist | Friend | 750,000 |
 | Requisitioned Training Dummy | Decoration | Civic - Structures | Friend | 250,000 |
 | Separatist's Relay Desk | Decoration | Furniture - Tables | Hero | 350,000 |
 | Suspended Speeder Engine | Decoration | Civic - Structures | Champion | 450,000 |
 | Woodland Nexu | Pet | Adorable | Legend | 1,000,000 |
| Title: Heavy Artillery | Title | Character | Legend | 1,000,000 | |
| Title: Mantellian Defender | Title | Character | Friend | 1,000,000 | |
 | Ranch Gapillian Grazer | Decoration | Personnel - Beasts | Acheivement | |
| Legacy Title: Grazer Whisperer | Title | Legacy | Acheivement | ||
| Legacy Title: Debris Director | Title | Legacy | Acheivement | ||
| Legacy Title: Kessan's Local | Friend Reputation Rank with Ord Mantell | ||||
| Legacy Title: Breaker of Chains | Legend Reputation Rank with Ord Mantell | ||||
| Heavy Artillery | ? | ||||
| Mantellian Defender | ? | ||||
| Courier's Uniform | ? | ||||
| Mantellian Separtist Hover Turret | Mount | Speeder Bike, FR3 rare World Boss Drop |


 Mantellian Separatist Movement Leaflet: 50 Reputation
 Hidden Chain Insignia: 75 Reputation
 Questions or comments? Feel free to send me a message on Twitter
  Black Hole Daily Guide
 PvP Seasons 5 Guide and Rewards
 What to expect in Update 7.4, Chains in the Dark! – NOW LIVE!
 Lane Vizla + Basilisk Droid Quest Guide
 How to Get the Best Gear in the Game (7.4 Hyde & Zeek 340 and Rakata 344)
 Kessan’s Landing Hidden Achievements Guide
 Kessan’s Landing Grazer Whisperer Secret Hidden Achievement


 Twitter @swtorista
 Reddit /u/swtorista
 Discord Swtorista#0153
 Email swtorista@gmail.com
 Youtube Swtorista
 Twitch Swtorista
 Patreon