Star Wars: The Old Republic has 6 different crafting skills you can choose from: Armormech, Artifice, Armstech, Synthweaving, Cybertech and Biochem. In this video, we’ll be going over how to start Biochem crafting, how to level up your Biochem crew skill and unlock more crafting schematics, and lastly, we’ll be going over some of the cool things you can craft with Biochem at higher levels including medpacs, adrenals and stims.
Updated for 7.2 in 2023.
Contents
Basics of Biochem Crafting
You can start crafting after you’ve completed your first planet, at around level 10 or higher. There’s no penalty to starting late though, so if you want to save crafting for later, carry on following your purple quests and enjoying your class story.
How to Start Biochem
To choose a crafting skill, you’ll want to go to the Strongholds & Crew Skills section of the Fleet. If you’ve forgotten how to get to the Fleet, press P on your keyboard. In the General tab of your abilities there’s a useful ability called Emergency Fleet Pass. Once you are on the Fleet, open the map with the M key and look for the Strongholds & Crew Skills section. To pick up Biochem as your crafting skill, speak to the Biochem trainer in the rooms on the outer edge of the station. The room with crafting trainers in it is marked with a holographic sign with the shape of a gear or cog hanging over the room.
Matching Crew Skills
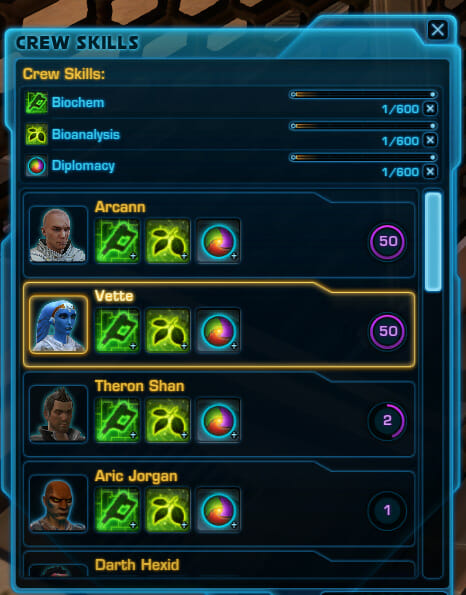
The two gathering crew skills that go with Biochem crafting are Diplomacy and Bioanalysis, which allow you to gather the materials to craft Biochem items, so go speak to the Diplomacy and Bioanalysis trainers in the next room, which is marked by the symbol of a hologram star.


Free-to-play and Preferred Accounts: If you are on a free-to-play account, you can only choose one crew skill per character, so you might instead take Biochem on one character, and Bioanalysis on another and have them work together, for a total of four character per server. If you’re a former subscriber, you’ll have two crew skill slots available, and if you’re a subscriber you naturally have 3 crew skill slots unlocked per character, so you can take all three complementary crew skills, Bioanalysis, Diplomacy and Biochem all on one character. The other major difference if you are not a subscriber you will only be able to queue one crafted item up at a time – as a subscriber, you can set your companion to craft five items in a row.
How to Start Crafting with Biochem
Once you’ve picked your crafting and gathering skills, press the B key on your keyboard to open the crew skills window. You can also find crafting in the main menu labelled as Crew Skills, under a symbol of a triangle.

You start out at crafting level 0, and you’ll unlock more crafting recipes, known as schematics, from the Biochem trainer as you level up your crafting level.
You can click the Biochem icon from the crafting panel to open the crafting schematics window which shows everything you have available to craft – when you chose Biochem as a crew skill, you also received some basic schematics to help get you started, including some earpieces, and most importantly, something called an Cell Graft.
 Biochem icon
Your goal as an Biochemist will be to craft basic items to level up your Biochem skill level, which will then unlock more schematics including earpieces, mods, enhancements, grenades and ship parts. Earpieces are a type of equipment, mods and enhancements are modifications which you can place into moddable equipment, grenades are a combat item you can use to stun enemies, and ship parts help upgrade your ship in the solo space missions.
The most basic part of Biochem crafting will be crafting different types of Cell Grafts.
Components


We’ll start by crafting a Dielectric Cell Graft, one of the default schematics you got when you chose Biochem, which once you click it will tell you it requires 2 x Dielectric Cell Fiber, 2 x Green Goo, and 2 x Hypo-syringe to craft. So where do you get those crafting materials?

Since this is Biochem, the materials will likely come from either Bioanalysis or Diplomacy, Biochem’s two complementary skills. To figure out which gathering skill the materials you will need come from, hover over the listed material. When you look at the tooltip by hovering over them, The Dielectric Cell Fiber is listed as Grade 1 Biochemical Sample and the Green Goo is Grade 1 Biochemical Compound – both of which come from Bioanalysis.

The simplest way to get materials for your first item is to open up your Bioanalysis missions, and send your companions out to get the materials listed in the mission descriptions.

White-bordered materials are a bit different – you can either send your companions to gather them if you have a mission available for them, or buy them directly from a vendor called the Crew Skills Trade Vendor in the Strongholds & Crew Skills section of the fleet who sells them pretty cheap.
Once you have all the materials you need, go back to your Cell Graft schematic for Biochem, and click craft on the bottom right, and your companion will start crafting. Once your companion is finished crafting your schematic, the item will show up in your inventory and your crafting level will go up.

Cell Grafts are the building blocks of Biochem crafting – while they’re pretty useless on their own, you can combine them with other materials to craft actual items. The first useful item you can craft is an implant, which requires 4 Biochemical Bonding Agent materials, which are a Grade 1 Medical Supply from Diplomacy, and 4 of the Dielectric Cell Grafts we crafted earlier, and you’ll be able to make your first medpac the same way once you reach Biochem level 20. Crafting Cell Grafts, then combining them with other materials, is how you craft almost every Biochem item in the game.
Where to Get Biochem Materials
There’s a lot of different ways to get materials for Biochem, including Biochemical Compound and Biochemical Samples from Bioanalysis, and Medical Supplies from Diplomacy.
Biochem Leveling Guide
Now that you understand the basics of Biochem crafting, let’s cover how to level up your Biochem crew skill.
Crafting low-level schematics won’t help you level up your crafting skill after the first few items you craft – you must craft more difficult items over time, and the easiest way to see if a crafting a schematic will raise your crafting level is by looking at the colors of the dot beside the schematic in the schematics window – if it’s grey, you won’t gain any crafting levels by crafting it, and crafting orange items will give you the biggest boost your crafting level, so whenever possible craft an orange dot item, followed by a yellow dot item if you don’t have one, then a green dot, and don’t even bother crafting any gray dot items for levelling. The exact number of points you get from each color is a bit weird, with orange giving around 3-4, yellow 2-3, green 1, and gray 0. Gathering missions work the exact same way.

The number on the left of the schematic name is supposed to represent how may of that item you can craft, but it doesn’t always update, so just close the window and re-open it if you need an updated count.
Fun Tip – if you open your crafting window, you can drag and drop your crafting skill icon at the very top down on to your quickbars, and then you can open it from there if you need it!
Cell Grafts
When most players are levelling up, they focus on crafting Cell Grafts whenever possible, even if the Cell Graft schematic has turned from orange to yellow to green. You can get a new Cell Graft schematic from the Biochem trainer roughly every 50 Biochem levels, and a sign that it’s time to go get a new Cell Graft schematic from the trainer is that your last Cell Graft has turned green (or gray) in your schematics panel. Here’s the list of levels where you can check back at the trainer for a new schematic:
| Icon | Material Name | Skill | Grade | Type | Notes |
|---|---|---|---|---|---|
 | Dielectric Cell Graft | Biochem | Grade 1 | Component |
|
 | Symbiote Cell Graft | Biochem | Grade 2 | Component |
|
 | Bio-Energy Cell Graft | Biochem | Grade 3 | Component |
|
 | Alien Cell Graft | Biochem | Grade 4 | Component |
|
 | Parasitic Cell Graft | Biochem | Grade 5 | Component |
|
 | Mutagenic Cell Graft | Biochem | Grade 6 | Component |
|
 | Metabolic Cell Graft | Biochem | Grade 7 | Component |
|
 | Anodyne Cell Graft | Biochem | Grade 8 | Component |
|
 | Fresh Red Cell Graft | Biochem | Grade 9 | Component |
|
 | Fresh Medicinal Cell Graft | Biochem | Grade 10 | Component |
|
 | Enhanced Medicinal Cell Graft | Biochem | Grade 10 | Component |
|
 | Premium Curious Cell Graft | Biochem | Grade 11 | Component |
|
 | Prototype Curious Cell Graft | Biochem | Grade 11 | Component |
|
 | Artifact Curious Cell Graft | Biochem | Grade 11 | Component |
|
If you’d like an easy to follow list of items to craft to level up Biochem efficiently, please visit TORCommunity’s Biochem Leveling Guide 1-700! I love this guide for leveling up fast.
What to do with crafted items while leveling crafting?
Apart from using them to craft finished items, there are two other things you can do with the Cell Grafts you craft. The first is to Deconstruct it – this will break it down in to its parts, and you’ll receive back some of the materials you put in to crafting it. This is useful to recoup materials if you are trying to quickly level up your crew skills and don’t have lots of materials on hand.

The final thing you can do with it is sell it – Cell Grafts usually sell for decent prices, as crafters can buy them to save time crafting specific items they want, and many types of Cell Grafts are also used in high-stakes Conquest crafting. To sell crafted items to other players, you can go to the Fleet, and go to the Galactic Trade Market section of the map. Once there, right click the big green terminal, and then click in the search box.

SHIFT+LEFT CLICK on the item from your inventory that you want to sell, and then click the search button and sort by price with lowest to highest. This will give you an idea of what the item is selling for – if you want to keep things easy, you’ll price your item slightly lower than the lowest listed price per item. Once you are ready to sell your item to other players, right click it from your inventory with the GTN, the Galactic Trade Network open, and it will bring up the sell panel where you can set the price – don’t forget that if you have two to sell, you’ll want to double your listing price. Some items, like Cell Grafts, are easy to sell, while other items, like finished lightsabers, may not have much demand. What sells well and what doesn’t fluctuates with the game’s updates and your server’s economy, and finding a niche to make credits in requires some research. For lower level Biochem crafting, players can look in to crafting and selling Cell Grafts or grenades.
What can Biochem Craft?
Now let’s cover some of the cool stuff you’ll be able to craft as you level up Biochem.
Biochemists get pretty much all of their schematics from the Biochem trainer, and reverse-engineering things they have crafted.
Biochem is often considered the most ‘useful’ skill as they can craft re-useable medpacs, stims and adrenals at a high level that only Biochemists can use. They can also craft implants, which are a bit difficult to get at lower levels, if you’re looking for some. However, in return for being able to craft such useful items, Biochemists can not craft any cosmetic items at all, unlike every other crafting crew skill.
Reusables
The most useful part of Biochem is the reusable Medpacs, Stims and Adrenals, which can save you millions of credits over time if you are running any type of harder content, whether it’s Operations, Flashpoints or PvP, or just want to do really well at solo content.


The interesting part about these is that you do not need to craft them yourself – instead, you just need to be level 700 Biochem to use them. So if you are looking to pick up Biochem just for the reusables, it’s cheaper to simply level your way up to Biochem 700, then have a friend craft you the reuseables you need or buy them from the GTN, rather than reverse-engineering them yourself.
Biochem Trainer Schematics
We’ll start with the easiest schematics, which come straight from the Biochem trainer as you level up your Biochem crew skill – these include all the Cell Grafts and all the basic medpacs, stims and adrenals. If you want to see what’s coming up for schematics from the Biochem trainer, you can open the window where you buy new schematics, then choose “All” from the dropdown on the top right of the panel. By default, it will only show you ones that you can actually buy right now based on your Biochem level.
Biochem Schematics from Reverse Engineer
When you deconstruct an item you have crafted yourself, you may have a chance of learning an upgraded version of that schematic. You can see if an item has an upgraded version when you roll over it in your inventory with the deconstruct tool.

For some crafting skills, like Synthweavers and Armormechs, deconstructing an item can give you a different version of the item with a different look, and there are some cool hidden armors you can craft using reverse engineering.
For Biochem, reverse-engineering is a major part of crafting, as it’s expected that if you’re trying to be a Biochemist, you’re trying to get the re-useable medpacs, stims and adrenals, which can only be obtained by reverse-engineering schematics from the trainer. You will need to deconstruct them in piles of what they were originally crafted in – so if you crafted a schematic and you got a pile of 3 medpacs, you’ll need to have a pile of 3 medpacs to reverse-engineer. If you don’t have enough in the pile, it will be greyed out.

Medpacs
Medpacs are one-use items that allow you to recover some health, and are extremely useful when you are in difficult fights and are close to dying. For high-level content, solo players will more than likely want to have a pile of high-level medpacs on hand, and for difficult group content, players are absolutely expected to have good medpacs on hand and use them often. There are actually two types of medpacs you may come across when crafting – the first kind heals just yourself, and is the standard Medpac, and the other type is called a Med Unit, which will heal both you and your companion and can be very useful for solo content.


Low-level Medpacs from the Trainer
As you level up Biochem, more medpac schematics will become available to you from the Biochem trainer. Each medpac will show up at a certain Biochem level at the trainer, and each one is useful up to a certain character level, so you can use them while levelling or craft some for a friend who is levelling.
Every Prototype (blue-bordered) medpac can also be reverse-engineered to learn an Advanced (purple-border) version that heals slightly more.
These crafted medpacs are not necessary while levelling, you should be fine using the free medpacs you pick up off the ground.
| Icon | Item | Biochem | Lvl |
|---|---|---|---|
 | Prototype Battle Medpac | 20 | 24 |
 | Prototype Field Tech Medpac | 100 | 32 |
 | Prototype Bio-Enhanced Medpac | 180 | 40 |
 | Prototype Experimental Medpac | 255 | 46 |
 | Prototype Hyper-Battle Medpac | 310 | 50 |
 | Prototype Exotech Medpac | 360 | 46 |
 | Prototype Nano-Infused Medpac | 410 | 60 |
 | Prototype Anodyne Medpac | 460 | 62 |
 | Prototype Polybiotic Medpac | 510 | 65 |
 | Prototype Polybiotic Medpac | 560 | 70 |
 | Prototype Kyrprax Medpac | 620 | 75 |
Medpacs for Level 80 (Kyrprax Medpacs)
The best medpacs in the game are the Kyrprax medpacs which are for level 75, even though characters can be level 80. The green version’s schematic comes from the Biochem trainer at level 610, and you can reverse-engineer it to learn the blue, then purple, and then gold re-useable version. The gold re-useable version has the same healing power as the purple version, but requires the user to have Biochem as a crew skill and be a level 7o0 Biochemist.
| Component | Crafting | Materials |
|---|---|---|
 Premium Kyrprax Medpac Premium Kyrprax Medpac |
Biochem 610, from trainer |  Premium Curious Cell Graft x2 Premium Curious Cell Graft x2 |
 Premium Intravenous Injector x10 Premium Intravenous Injector x10 |
||
 Prototype Kyrprax Medpac Prototype Kyrprax Medpac |
Biochem 620, 20% reverse engineer chance from green version |  Premium Curious Cell Graft x2 Premium Curious Cell Graft x2 |
 Premium Intravenous Injector x10 Premium Intravenous Injector x10 |
||
 Prototype Intravenous Injector x10 Prototype Intravenous Injector x10 |
||
 Advanced Kyrprax Medpac Advanced Kyrprax Medpac |
Biochem 630, 20% reverse engineer chance from blue version |  Artifact Curious Cell Graft x2 Artifact Curious Cell Graft x2 |
 Premium Intravenous Injector x10 Premium Intravenous Injector x10 |
||
 Prototype Intravenous Injector x10 Prototype Intravenous Injector x10 |
||
 Artifact Intravenous Injector x10 Artifact Intravenous Injector x10 |
||
 Advanced Kyrprax Medpac MK-2 (reuseable) Advanced Kyrprax Medpac MK-2 (reuseable) |
Biochem 700, 5% reverse engineer chance from purple version |  Artifact Curious Cell Graft x5 Artifact Curious Cell Graft x5 |
 Premium Intravenous Injector x10 Premium Intravenous Injector x10 |
||
 Prototype Intravenous Injector x10 Prototype Intravenous Injector x10 |
||
 Artifact Intravenous Injector x10 Artifact Intravenous Injector x10 |
||
 Legendary Ember x5 Legendary Ember x5 |
Med Unit
| Component | Crafting | Materials |
|---|---|---|
 Premium Kyrprax Med Unit Premium Kyrprax Med Unit |
Biochem 620, from trainer |  Premium Curious Cell Graft x2 Premium Curious Cell Graft x2 |
 Premium Intravenous Injector x10 Premium Intravenous Injector x10 |
||
 Prototype Kyrprax Med Unit Prototype Kyrprax Med Unit |
Biochem 640, 20% reverse engineer chance from green version |  Premium Curious Cell Graft x2 Premium Curious Cell Graft x2 |
 Premium Intravenous Injector x10 Premium Intravenous Injector x10 |
||
 Prototype Intravenous Injector x10 Prototype Intravenous Injector x10 |
||
 Advanced Kyrprax Med Unit Advanced Kyrprax Med Unit |
Biochem 700, 20?% reverse engineer chance from blue version |  Artifact Curious Cell Graft x2 Artifact Curious Cell Graft x2 |
 Premium Intravenous Injector x10 Premium Intravenous Injector x10 |
||
 Prototype Intravenous Injector x10 Prototype Intravenous Injector x10 |
||
 Artifact Intravenous Injector x10 Artifact Intravenous Injector x10 |
Stims
Stims are a one-use item that gives you a boost to your stats for a few hours and lasts even if your character dies. While not many players use stims while levelling, they are very useful for high-level solo content, and you are expected to have a stim in high-level difficult group content.
Below are the options for level 75 crafting stims – they are still the best, even though the new max-level is now 80.

Fortitude Stim
| Component | Crafting | Materials |
|---|---|---|
 Premium Fortitude Kyrprax Stim Premium Fortitude Kyrprax Stim |
Biochem 620, from trainer |  Premium Curious Cell Graft x2 Premium Curious Cell Graft x2 |
 Premium Intravenous Injector x10 Premium Intravenous Injector x10 |
||
 Prototype Fortitude Kyrprax Stim Prototype Fortitude Kyrprax Stim |
Biochem 650, 20% reverse engineer chance from green version |  Premium Curious Cell Graft x2 Premium Curious Cell Graft x2 |
 Premium Intravenous Injector x10 Premium Intravenous Injector x10 |
||
 Prototype Intravenous Injector x10 Prototype Intravenous Injector x10 |
||
 Advanced Fortitude Kyrprax Stim Advanced Fortitude Kyrprax Stim |
Biochem 680, 20% reverse engineer chance from blue version |  Artifact Curious Cell Graft x2 Artifact Curious Cell Graft x2 |
 Premium Intravenous Injector x10 Premium Intravenous Injector x10 |
||
 Prototype Intravenous Injector x10 Prototype Intravenous Injector x10 |
||
 Artifact Intravenous Injector x10 Artifact Intravenous Injector x10 |
||
 Advanced Fortitude Kyrprax Stim MK-2 (reuseable) Advanced Fortitude Kyrprax Stim MK-2 (reuseable) |
Biochem 700, 5% reverse engineer chance from purple version |  Artifact Curious Cell Graft x5 Artifact Curious Cell Graft x5 |
 Premium Intravenous Injector x10 Premium Intravenous Injector x10 |
||
 Prototype Intravenous Injector x10 Prototype Intravenous Injector x10 |
||
 Artifact Intravenous Injector x10 Artifact Intravenous Injector x10 |
||
 Legendary Ember x5 Legendary Ember x5 |
Proficient Stim
| Component | Crafting | Materials |
|---|---|---|
 Premium Proficient Kyrprax Stim Premium Proficient Kyrprax Stim |
Biochem 620, from trainer |  Premium Curious Cell Graft x2 Premium Curious Cell Graft x2 |
 Premium Intravenous Injector x10 Premium Intravenous Injector x10 |
||
 Prototype Proficient Kyrprax Stim Prototype Proficient Kyrprax Stim |
Biochem 650, 20% reverse engineer chance from green version |  Premium Curious Cell Graft x2 Premium Curious Cell Graft x2 |
 Premium Intravenous Injector x10 Premium Intravenous Injector x10 |
||
 Prototype Intravenous Injector x10 Prototype Intravenous Injector x10 |
||
 Advanced Proficient Kyrprax Stim Advanced Proficient Kyrprax Stim |
Biochem 680, 20% reverse engineer chance from blue version |  Artifact Curious Cell Graft x2 Artifact Curious Cell Graft x2 |
 Premium Intravenous Injector x10 Premium Intravenous Injector x10 |
||
 Prototype Intravenous Injector x10 Prototype Intravenous Injector x10 |
||
 Artifact Intravenous Injector x10 Artifact Intravenous Injector x10 |
||
 Advanced Proficient Kyrprax Stim MK-2 (reuseable) Advanced Proficient Kyrprax Stim MK-2 (reuseable) |
Biochem 700, 5% reverse engineer chance from purple version |  Artifact Curious Cell Graft x5 Artifact Curious Cell Graft x5 |
 Premium Intravenous Injector x10 Premium Intravenous Injector x10 |
||
 Prototype Intravenous Injector x10 Prototype Intravenous Injector x10 |
||
 Artifact Intravenous Injector x10 Artifact Intravenous Injector x10 |
||
 Legendary Ember x5 Legendary Ember x5 |
Versatile Stim
| Component | Crafting | Materials |
|---|---|---|
 Premium Versatile Kyrprax Stim Premium Versatile Kyrprax Stim |
Biochem 620, from trainer |  Premium Curious Cell Graft x2 Premium Curious Cell Graft x2 |
 Premium Intravenous Injector x10 Premium Intravenous Injector x10 |
||
 Prototype Versatile Kyrprax Stim Prototype Versatile Kyrprax Stim |
Biochem 650, 20% reverse engineer chance from green version |  Premium Curious Cell Graft x2 Premium Curious Cell Graft x2 |
 Premium Intravenous Injector x10 Premium Intravenous Injector x10 |
||
 Prototype Intravenous Injector x10 Prototype Intravenous Injector x10 |
||
 Advanced Versatile Kyrprax Stim Advanced Versatile Kyrprax Stim |
Biochem 680, 20% reverse engineer chance from blue version |  Artifact Curious Cell Graft x2 Artifact Curious Cell Graft x2 |
 Premium Intravenous Injector x10 Premium Intravenous Injector x10 |
||
 Prototype Intravenous Injector x10 Prototype Intravenous Injector x10 |
||
 Artifact Intravenous Injector x10 Artifact Intravenous Injector x10 |
||
 Advanced Versatile Kyrprax Stim MK-2 (reuseable) Advanced Versatile Kyrprax Stim MK-2 (reuseable) |
Biochem 700, 5% reverse engineer chance from purple version |  Artifact Curious Cell Graft x5 Artifact Curious Cell Graft x5 |
 Premium Intravenous Injector x10 Premium Intravenous Injector x10 |
||
 Prototype Intravenous Injector x10 Prototype Intravenous Injector x10 |
||
 Artifact Intravenous Injector x10 Artifact Intravenous Injector x10 |
||
 Legendary Ember x5 Legendary Ember x5 |
Command Stim
| Component | Crafting | Materials |
|---|---|---|
 Premium Command Kyrprax Stim Premium Command Kyrprax Stim |
Biochem 620, from trainer |  Premium Curious Cell Graft x2 Premium Curious Cell Graft x2 |
 Premium Intravenous Injector x10 Premium Intravenous Injector x10 |
||
 Prototype Command Kyrprax Stim Prototype Command Kyrprax Stim |
Biochem 650, 20% reverse engineer chance from green version |  Premium Curious Cell Graft x2 Premium Curious Cell Graft x2 |
 Premium Intravenous Injector x10 Premium Intravenous Injector x10 |
||
 Prototype Intravenous Injector x10 Prototype Intravenous Injector x10 |
||
 Advanced Command Kyrprax Stim Advanced Command Kyrprax Stim |
Biochem 680, 20% reverse engineer chance from blue version |  Artifact Curious Cell Graft x2 Artifact Curious Cell Graft x2 |
 Premium Intravenous Injector x10 Premium Intravenous Injector x10 |
||
 Prototype Intravenous Injector x10 Prototype Intravenous Injector x10 |
||
 Artifact Intravenous Injector x10 Artifact Intravenous Injector x10 |
Adrenals
Adrenals are a one-use item that give you a 15 second boost to your stats, and you can not use another one for three minutes. There are different types of Adrenals, with each one giving different benefits depending on what role and class you are playing.
((The images of the adrenals in the table below are wrong, they look different in-game. – Swtorista))
Attack Adrenal
| Component | Crafting | Materials |
|---|---|---|
 Prototype Kyrprax Attack Adrenal Prototype Kyrprax Attack Adrenal |
Biochem 640, from trainer |  Premium Curious Cell Graft x2 Premium Curious Cell Graft x2 |
 Premium Intravenous Injector x10 Premium Intravenous Injector x10 |
||
 Prototype Intravenous Injector x10 Prototype Intravenous Injector x10 |
||
 Advanced Kyrprax Attack Adrenal Advanced Kyrprax Attack Adrenal |
Biochem 680, 20% reverse engineer chance from blue version |  Artifact Curious Cell Graft x2 Artifact Curious Cell Graft x2 |
 Premium Intravenous Injector x10 Premium Intravenous Injector x10 |
||
 Prototype Intravenous Injector x10 Prototype Intravenous Injector x10 |
||
 Artifact Intravenous Injector x10 Artifact Intravenous Injector x10 |
||
 Advanced Kyrprax Attack Adrenal MK-2 (reuseable) Advanced Kyrprax Attack Adrenal MK-2 (reuseable) |
Biochem 700, 5% reverse engineer chance from purple version |  Artifact Curious Cell Graft x5 Artifact Curious Cell Graft x5 |
 Premium Intravenous Injector x10 Premium Intravenous Injector x10 |
||
 Prototype Intravenous Injector x10 Prototype Intravenous Injector x10 |
||
 Artifact Intravenous Injector x10 Artifact Intravenous Injector x10 |
||
 Legendary Ember x5 Legendary Ember x5 |
Critical Adrenal
| Component | Crafting | Materials |
|---|---|---|
 Prototype Kyrprax Critical Adrenal Prototype Kyrprax Critical Adrenal |
Biochem 640, from trainer |  Premium Curious Cell Graft x2 Premium Curious Cell Graft x2 |
 Premium Intravenous Injector x10 Premium Intravenous Injector x10 |
||
 Prototype Intravenous Injector x10 Prototype Intravenous Injector x10 |
||
 Advanced Kyrprax Critical Adrenal Advanced Kyrprax Critical Adrenal |
Biochem 680, 20% reverse engineer chance from blue version |  Artifact Curious Cell Graft x2 Artifact Curious Cell Graft x2 |
 Premium Intravenous Injector x10 Premium Intravenous Injector x10 |
||
 Prototype Intravenous Injector x10 Prototype Intravenous Injector x10 |
||
 Artifact Intravenous Injector x10 Artifact Intravenous Injector x10 |
||
 Advanced Kyrprax Critical Adrenal MK-2 (reuseable) Advanced Kyrprax Critical Adrenal MK-2 (reuseable) |
Biochem 700, 5% reverse engineer chance from purple version |  Artifact Curious Cell Graft x5 Artifact Curious Cell Graft x5 |
 Premium Intravenous Injector x10 Premium Intravenous Injector x10 |
||
 Prototype Intravenous Injector x10 Prototype Intravenous Injector x10 |
||
 Artifact Intravenous Injector x10 Artifact Intravenous Injector x10 |
||
 Legendary Ember x5 Legendary Ember x5 |
Efficacy Adrenal
| Component | Crafting | Materials |
|---|---|---|
 Prototype Kyrprax Efficacy Adrenal Prototype Kyrprax Efficacy Adrenal |
Biochem 640, from trainer |  Premium Curious Cell Graft x2 Premium Curious Cell Graft x2 |
 Premium Intravenous Injector x10 Premium Intravenous Injector x10 |
||
 Prototype Intravenous Injector x10 Prototype Intravenous Injector x10 |
||
 Advanced Kyrprax Efficacy Adrenal Advanced Kyrprax Efficacy Adrenal |
Biochem 680, 20% reverse engineer chance from blue version |  Artifact Curious Cell Graft x2 Artifact Curious Cell Graft x2 |
 Premium Intravenous Injector x10 Premium Intravenous Injector x10 |
||
 Prototype Intravenous Injector x10 Prototype Intravenous Injector x10 |
||
 Artifact Intravenous Injector x10 Artifact Intravenous Injector x10 |
||
 Advanced Kyrprax Efficacy Adrenal MK-2 reuseable) Advanced Kyrprax Efficacy Adrenal MK-2 reuseable) |
Biochem 700, 5% reverse engineer chance from purple version |  Artifact Curious Cell Graft x5 Artifact Curious Cell Graft x5 |
 Premium Intravenous Injector x10 Premium Intravenous Injector x10 |
||
 Prototype Intravenous Injector x10 Prototype Intravenous Injector x10 |
||
 Artifact Intravenous Injector x10 Artifact Intravenous Injector x10 |
||
 Legendary Ember x5 Legendary Ember x5 |
Triage Adrenal
| Component | Crafting | Materials |
|---|---|---|
 Prototype Kyrprax Triage Adrenal Prototype Kyrprax Triage Adrenal |
Biochem 640, from trainer |  Premium Curious Cell Graft x2 Premium Curious Cell Graft x2 |
 Premium Intravenous Injector x10 Premium Intravenous Injector x10 |
||
 Prototype Intravenous Injector x10 Prototype Intravenous Injector x10 |
||
 Advanced Kyrprax Triage Adrenal Advanced Kyrprax Triage Adrenal |
Biochem 680, 20% reverse engineer chance from blue version |  Artifact Curious Cell Graft x2 Artifact Curious Cell Graft x2 |
 Premium Intravenous Injector x10 Premium Intravenous Injector x10 |
||
 Prototype Intravenous Injector x10 Prototype Intravenous Injector x10 |
||
 Artifact Intravenous Injector x10 Artifact Intravenous Injector x10 |
||
 Advanced Kyrprax Triage Adrenal MK-2 (reuseable) Advanced Kyrprax Triage Adrenal MK-2 (reuseable) |
Biochem 700, 5% reverse engineer chance from purple version |  Artifact Curious Cell Graft x5 Artifact Curious Cell Graft x5 |
 Premium Intravenous Injector x10 Premium Intravenous Injector x10 |
||
 Prototype Intravenous Injector x10 Prototype Intravenous Injector x10 |
||
 Artifact Intravenous Injector x10 Artifact Intravenous Injector x10 |
||
 Legendary Ember x5 Legendary Ember x5 |
Shield Adrenal
| Component | Crafting | Materials |
|---|---|---|
 Prototype Kyrprax Shield Adrenal Prototype Kyrprax Shield Adrenal |
Biochem 640, from trainer |  Premium Curious Cell Graft x2 Premium Curious Cell Graft x2 |
 Premium Intravenous Injector x10 Premium Intravenous Injector x10 |
||
 Prototype Intravenous Injector x10 Prototype Intravenous Injector x10 |
||
 Advanced Kyrprax Shield Adrenal Advanced Kyrprax Shield Adrenal |
Biochem 680, 20% reverse engineer chance from blue version |  Artifact Curious Cell Graft x2 Artifact Curious Cell Graft x2 |
 Premium Intravenous Injector x10 Premium Intravenous Injector x10 |
||
 Prototype Intravenous Injector x10 Prototype Intravenous Injector x10 |
||
 Artifact Intravenous Injector x10 Artifact Intravenous Injector x10 |
||
 Advanced Kyrprax Shield Adrenal MK-2 (reuseable) Advanced Kyrprax Shield Adrenal MK-2 (reuseable) |
Biochem 700, 5% reverse engineer chance from purple version |  Artifact Curious Cell Graft x5 Artifact Curious Cell Graft x5 |
 Premium Intravenous Injector x10 Premium Intravenous Injector x10 |
||
 Prototype Intravenous Injector x10 Prototype Intravenous Injector x10 |
||
 Artifact Intravenous Injector x10 Artifact Intravenous Injector x10 |
||
 Legendary Ember x5 Legendary Ember x5 |
Decorations
All crew skills can also craft decorations. Biochems, Armstechs, and Armormechs can craft Industrial Decorations, including things like furniture, crates, and computer terminals. There are four different types of Industrial prefabs, and they become available at Biochem level 150, 300, 450, and 500.


There are also Universal Prefabs, which are a combination of an Industrial prefab, a Synthetic prefab which is created by Artificers, Synthweavers and Biochemists, a Fabricator Crystal and a Fabricator Design, the last two any crafting profession can craft. Universal Prefab decorations include all kinds of cool decorations like fountains, statues, walls, furniture, and useful items like cargo holds.
On top of that, there are also War Supply decorations, which are also a combination from multiple crafting professions, of which Biochem can contribute to. These include giant crystal formations, statues, and lots of other strange decos.
Lastly, all crafting professions can craft the expensive Dark Project decorations, which include ship decorations.
If you want to craft your own decorations, please visit my How to Craft Decorations guide.
| Icon | Material Name | Skill | Grade | Type | Notes |
|---|---|---|---|---|---|
 | Dark Project MK-1 | Strongholds | Decorations |
| |
 | Fabricator Crystal MK-1 | Strongholds | Grade 1 | Decorations |
|
 | Fabricator Design MK-1 | Strongholds | Grade 1 | Decorations |
|
 | Industrial Prefab MK-1 | Strongholds | Grade 1 | Decorations |
|
 | Synthetic Prefab MK-1 | Strongholds | Grade 1 | Decorations |
|
 | Universal Prefab MK-1 | Strongholds | Grade 1 | Decorations |
|
 | Fabricator Crystal MK-2 | Strongholds | Grade 2 | Decorations |
|
 | Fabricator Design MK-2 | Strongholds | Grade 2 | Decorations |
|
 | Industrial Prefab MK-2 | Strongholds | Grade 2 | Decorations |
|
 | Synthetic Prefab MK-2 | Strongholds | Grade 2 | Decorations |
|
 | Universal Prefab MK-2 | Strongholds | Grade 2 | Decorations |
|
 | Fabricator Crystal MK-3 | Strongholds | Grade 3 | Decorations |
|
 | Fabricator Design MK-3 | Strongholds | Grade 3 | Decorations |
|
 | Industrial Prefab MK-3 | Strongholds | Grade 3 | Decorations |
|
 | Synthetic Prefab MK-3 | Strongholds | Grade 3 | Decorations |
|
 | Universal Prefab MK-3 | Strongholds | Grade 3 | Decorations |
|
 | Fabricator Crystal MK-4 | Strongholds | Grade 4 | Decorations |
|
 | Fabricator Design MK-4 | Strongholds | Grade 4 | Decorations |
|
 | Industrial Prefab MK-4 | Strongholds | Grade 4 | Decorations |
|
 | Synthetic Prefab MK-4 | Strongholds | Grade 4 | Decorations |
|
 | Universal Prefab MK-4 | Strongholds | Grade 4 | Decorations |
|


 How to Craft
 Choose a Crew Skill
 Armormech
 Armstech
 Artifice
 Cybertech
 Synthweaving
 Gathering Guide
 Rare Materials Guide
 White Materials Guide
 Jawa Junk
 Augments
 Synthweaving Crafting Tree


 Crafted Decorations
 Crafted Mounts
 Crafted Dyes
 Crafted Crystals
 Events Calendar
 Galactic Seasons
 PvP Seasons
 Bounty Event
 Double XP Event
 Feast of Prosperity
 Gree Event
 Life Day
 Nightlife Event
 Pirate Incursion Event
 Rakghoul Event
 Spring Abundance Festival
 Swoop Event

 Jedi Knight
 Jedi Consular
 Trooper
 Smuggler
 Sith Warrior
 Sith Inquisitor
 Bounty Hunter
 Imperial Agent
 Bounty Hunter
 Imperial Agent
 Jedi Consular
 Jedi Knight
 Sith Inquisitor
 Sith Warrior
 Smuggler
 Trooper
 Legacy Gear
 Lightsabers
 Double-Bladed Lightsabers
 Vibroswords
 Double-Bladed Vibroswords
 Blaster Pistols
 Blaster Rifles
 Sniper Rifles
 Blaster Cannons


 Questions or comments? Feel free to send me a message on Twitter


 Discord
  Email swtorista@gmail.com
 Bluesky @swtorista.com
 Reddit /u/swtorista
 Twitch Swtorista
 Youtube
 Patreon
 Twitter @swtorista