


 How to Craft
 Choose a Crew Skill
 Armormech
 Armstech
 Artifice
 Biochem
 Cybertech
 Synthweaving

 Gathering Guide
 Rare Materials Guide
 White Materials Guide
 Jawa Junk
 Augments
 Medpacs, Stims and Adrenals
 Synthweaving Crafting Tree


 Crafted Decorations
 Crafted Mounts
 Crafted Dyes
 Crafted Crystals
 Events Calendar
 Galactic Seasons
 PvP Seasons
 Bounty Event
 Double XP Event
 Feast of Prosperity
 Gree Event
 Life Day
 Nightlife Event
 Pirate Incursion Event
 Rakghoul Event
 Spring Abundance Festival
 Swoop Event

 Jedi Knight
 Jedi Consular
 Trooper
 Smuggler
 Sith Warrior
 Sith Inquisitor
 Bounty Hunter
 Imperial Agent
 Bounty Hunter
 Imperial Agent
 Jedi Consular
 Jedi Knight
 Sith Inquisitor
 Sith Warrior
 Smuggler
 Trooper
 Legacy Gear
 Lightsabers
 Double-Bladed Lightsabers
 Vibroswords
 Double-Bladed Vibroswords
 Blaster Pistols
 Blaster Rifles
 Sniper Rifles
 Blaster Cannons

The HK-51 Droid companion is one of the most unique companions in Star Wars: The Old Republic, as unlike most companions which are earned through the story, HK-51 can only be earned through a long quest chain where the player rebuilds the droid after searching for scavenged parts that have been hidden across the galaxy. In this video, we’ll be going over everything you need to know about the HK-51 quest line.
HK-51 Video Guide:
Theoretika Video Guide:
Contents
- Who can get HK-51?
- Where to Start the Quest
- The Fatality
- The Theoretika
- Exploring the Theoretika
- Theoretika Guide
- 1. Find the Engineer’s ID Badge
- 2. Find a Battery
- 3. Place the Battery
- 4. Access the Security Terminal
- 5. Activate the Main Engineering Breaker
- 6. Jumping Puzzle
- 7. Get to the Research Lab
- 8. Activate the Research Lab Power Breaker
- 9. Fight the Creature
- 10. Access the Main Research Station
- Finding the HK Parts
- 1. Recover HK Transistor / Outlaws Den
- 2. Recover HK Chassis / Taris Endar Spire
- 3. Recover HK AI Regulator / Coruscant Jedi Temple
- 4. Recover HK Motivator / Dromund Kaas Dark Temple
- 5. Recover HK Power Core / Hoth
- 6. Recover HK Weapons Protocol / The False Emperor Flashpoint
- 7. Recover HK Loyalty Chip / Maelstrom Prison or The Foundry
- Get HK-51
- Getting HK-51 on Other Characters
- HK-51 Gifts & Influence
- HK-51 Purple Crystal
- HK-51 Bugs
Who can get HK-51?
The first thing you need to know is that HK-51 is not directly available for free-to-play players, as the quest chain to earn it is located in a location that is locked to either subscribers or to players who have the Section X unlock. This section was created early in the game’s lifetime, and the developers were testing out locking certain areas behind a subscription or unlock, similar to how expansions work – except you lose access, if you later unsubscribe, unlike the expansion areas. If you are currently subscriber, you can just fly to the quest start. Otherwise, if you are either free-to-play or preferred, if you want to do this quest line, you’ll need to purchase the Cartel Market item called Access Authorization: Section X, which costs 375 Cartel Coins per character, or about four months worth of free Cartel Coins from a security key.

There is technically also an account-wide version available, but I recommend just purchasing it for one character rather than your account, as there’s a character unlock that will allow you to unlock HK-51 for each of your characters once you’ve earned him the first time
To complete this quest, you’ll need a level 50 character, and you’ll also need a second character on the opposite faction who has completed their first planet, as you’ll need to go searching for a piece on both Dromund Kaas Imperial-side and on Coruscant Republic-side.
Where to Start the Quest
To start the quest, head to the Section X area of Belsavis, a daily area that is separate from the rest of the planet and has a separate galaxy map point to land on.
Tip: Section X easy travel is available on the solo tab.

The droid quest giver is really close to where you land from the shuttle on Section X. Republic-side, the droid is named B6-31, and Imperial-side, the droid is named G0-A1.
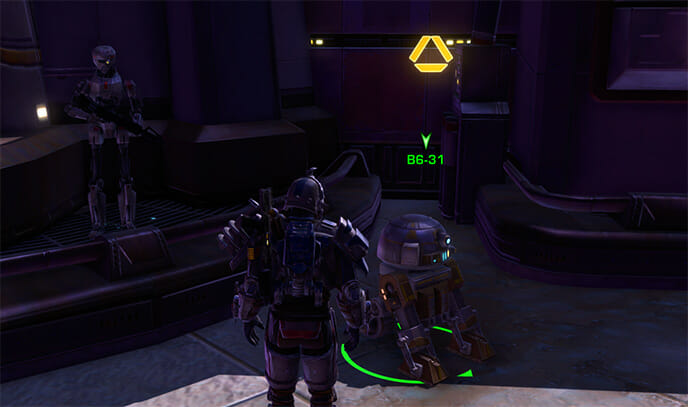

This questgiver will send you to another NPC named Bren on Republic side or General Avrun Imperial side.


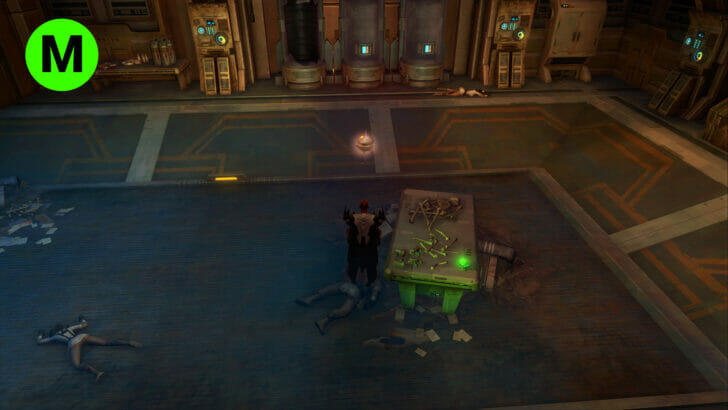
The Fatality
The second step of the quest is The Fatality, a crashed ship you’ll need to travel through to reach the broken HK droid. This part of the quest can be done alone or with up to a group of four.

The quest is labelled as a Heroic 2+ quest, but most players will be able to solo this entire quest chain.
There’s no real secrets here – just travel through the broken ship, fight or sneak past anything along the way, until you find the damaged droid storage.

From there, you’ll be asked to return back outside to Bren or General Avurn.
The Theoretika
The third step of the quest is the Theoretika, a really unique environment that’s a lot of fun to explore. Just like the last step, this part of the quest can be done alone or with up to a group of four – if you’re grouping up, tell everyone in your group to open their galaxy map and fly to the Theoretika which will be in the top of the map and meet up there.

The Theoretika is an explorational puzzle area, where you’ll need to explore the abandoned ship and figure out how to unlock its various doors until you can reach the research area hidden deeper in the ship.
In addition to unlocking the ship, there’s an additional bonus mission where you can search through the ship for seven hidden datalogs that will show you a short cutscene the better explains what happened to the ship and why it was abandoned.
The ship is designed to be a bit spooky and if possible, I recommend exploring it in the dark – but if you need it, you can either turn down the graphics so you can see, better, or you can turn on the flashlight by clicking the icon that shows up beside the quest on the top right of the screen.


Exploring the Theoretika
Rather than providing a guide to the Theoretika on this video, I recommend just exploring the ship and seeing what you can find, as the main goal of the quest is to be explorational. If you get stuck, I have a step-by-step guide on how to unlock all the doors and how to find all the datalogs in the written version of this guide, linked in the description below.
If you wanted to do the bonus stuff and not miss out on anything, you’ll want to make sure to find all seven datalogs and create a Nylite Injector before you go into the Med Bay, however, you can still go back and find the datalogs even after you complete the final part of the Theoretika if you accidentally did things in the wrong order, so as long as you don’t leave the ship you don’t have to worry too much about missing out by exploring on your own.
If you decide to follow all the leads and explore the entire Theoretika, you’ll be treated to a special room with a bonus puzzle to solve that I won’t spoil for you, but if you need help, I also have the instructions for that in the written guide.
Theoretika Guide
- Find the Engineer’s ID Badge on a corpse in the northern hallway of the Thoretika, which will give you access to the Blast Doors in the south of the map
- (A)(Optional) Find the first hidden datalog in the south-eastern room, it’s on a crate beside a bunk bed in a corner of the room, with a blinking yellow light
- (B)(Optional) Find the second hidden datalog in the south-western room, it’s on the floor behind a large crate beside a bunk bed, with a blinking green light
- Find a Battery in the blast doors to the south which will now be unlocked
- (C & D)(Optional) Find the third and fourth hidden datalogs, there is one in each of the side-rooms of each of the southern blast doors, one is blinking green and the other is blinking yellow
- Place the Battery in the room in the north, which will power up the locked door in the north
- Access the Security Terminal in the same room, which will unlock and open the locked door in the north
- (E)(Optional) Click the medical droid just up the stairs to find the fifth hidden datalog
- Activate the Main Engineering Breaker, it’s across a pool of nasty water in the only unlocked door on the next level, which will unlock the locked doors on this level
- Cross back over the water through the small jumping puzzle starting up a ramp, at one point you can explode a barrel to open up a walkway to get across
- (F)(Optional Bonus) Get the Security ID from the corpse outside the newly-opened doors in the east hallway of the second map
- (G)(Optional Bonus) Go back to the first map, and find the previously-locked door of the north-east room.
- (H)(Optional Bonus) Escape the locked room by finding the clickable crate in the north-east corner of the room near the door….
- (I)(Optional Bonus) …and then find the clickable fuse in the pile of garbage on the floor diagonally opposite, to repair the door.
- (J)(Optional Bonus) Data Log 6 – Find the sixth datapad, glowing yellow on the table, accessible once the door is repaired.
- (K)(Optional Bonus) Find the Medical Officer’s ID Badge, on the corpse blinking green, accessible once the door is repaired.
- (L)(Optional Bonus) Find the Medical Lab, located in the south of the second map, accessible with the Medical Officer’s ID Badge
- (M)(Optional Bonus) Data Log 7 – Find the final datalog, glowing green on the table in the Medical Bay
- (N)(Optional Bonus) Crate a Nylite Injector by first finding and right-clicking the pile of Empty Stim Injectors on a table in the Medical Bay….
- (O)(Optional Bonus) … then finding the Nylite Canisters on the floor in the back of the room
- Get to the Research Lab, in the north of the second map
- (Optional) Read the blue panel beside the blue tank, you can’t read it later
- Activate the Research Lab Power Breaker, which will power up the lab
- Fight the Creature, (Optional Bonus) if you made one, right-click the Nylite Injector from the Missions Items inventory while the boss is selected from short range
- Access the Main Research Station to get the HK Schematics, from the computer in the north of the lab


1. Find the Engineer’s ID Badge
(1) Find the Engineer’s ID Badge on a corpse in the northern hallway of the Thoretika, which will give you access to the Blast Doors in the south of the map

(A)(Optional) Find the first hidden datalog in the south-eastern room, it’s on a crate beside a bunk bed in a corner of the room, with a blinking yellow light

(B)(Optional) Find the second hidden datalog in the south-western room, it’s on the floor behind a large crate beside a bunk bed, with a blinking green light

2. Find a Battery
(2) Find a Battery in the blast doors to the south which will now be unlocked

(C)(Optional) Find the third and fourth hidden datalogs, there is one in each of the side-rooms of each of the southern blast doors, one is blinking yellow….

(D)(Optional) …and the other is blinking green

3. Place the Battery
(3) Place the Battery in the room in the north, which will power up the locked door in the north

4. Access the Security Terminal
Access the Security Terminal in the same room, which will unlock and open the locked door in the north

(E)(Optional) Click the medical droid just up the stairs to find the fifth hidden datalog

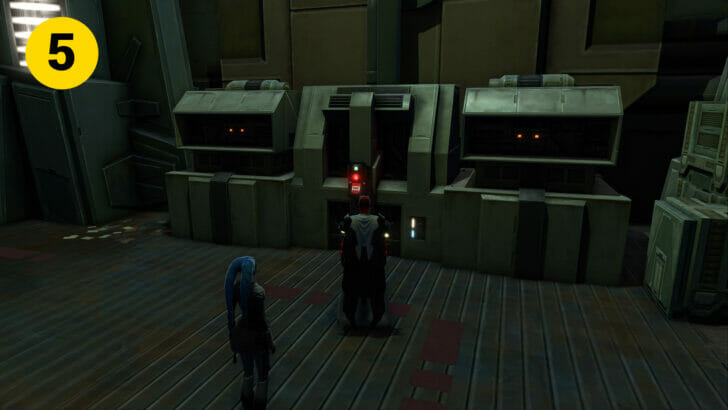
5. Activate the Main Engineering Breaker
(5) Activate the Main Engineering Breaker, it’s across a pool of nasty water in the only unlocked door on the next level, which will unlock the locked doors on this level
6. Jumping Puzzle
(6) Cross back over the water through the small jumping puzzle starting up a ramp, at one point you can explode a barrel to open up a walkway to get across
(F)(Optional Bonus) Get the Security ID from the corpse outside the newly-opened doors in the east hallway of the second map

(G)(Optional Bonus) Go back to the first map, and find the previously-locked door of the north-east room.
(H)(Optional Bonus) Escape the locked room by finding the clickable crate in the north-east corner of the room near the door….

(I)(Optional Bonus) …and then find the clickable fuse in the pile of garbage on the floor diagonally opposite, to repair the door.

(J)(Optional Bonus) Data Log 6 – Find the sixth datapad, glowing yellow on the table, accessible once the door is repaired.

(K)(Optional Bonus) Find the Medical Officer’s ID Badge, on the corpse blinking green, accessible once the door is repaired.

(L)(Optional Bonus) Find the Medical Lab, located in the south of the second map, accessible with the Medical Officer’s ID Badge
(M)(Optional Bonus) Data Log 7 – Find the final datalog, glowing green on the table in the Medical Bay
(N)(Optional Bonus) Crate a Nylite Injector by first finding and right-clicking the pile of Empty Stim Injectors on a table in the Medical Bay….

(O)(Optional Bonus) … then finding the Nylite Canisters on the floor in the back of the room

7. Get to the Research Lab
(7) Get to the Research Lab, in the north of the second map
(Optional) Read the blue panel beside the blue tank, you can’t read it later
8. Activate the Research Lab Power Breaker
(8) Activate the Research Lab Power Breaker, which will power up the lab
9. Fight the Creature
(9) Fight the Creature, (Optional Bonus) if you made one, right-click the Nylite Injector from the Missions Items inventory while the boss is selected from short range
10. Access the Main Research Station
(10) Access the Main Research Station to get the HK Schematics, from the computer in the north of the lab
Finding the HK Parts
After you leave the Theoretika, you’ll be sent on a hunt across the galaxy to find seven different HK parts. Five are hidden on planets, and two are hidden in flashpoints. There are hints about where each of these pieces are hidden in the quest log.
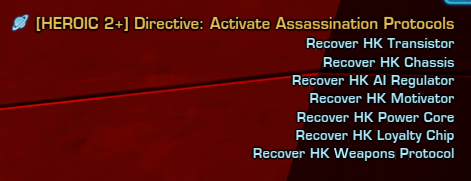
You must have completed the Theoretika quest and you must be on this step of the quest before you can pick up the HK pieces. If you are not, you can still find the pieces, but won’t be able to use them.
1. Recover HK Transistor / Outlaws Den


The first piece, the HK Transistor, is located in Outlaw’s Den on Tatooine.
Republic side, the closest quick travel will be Outpost Salara then run south, Imperial side the closest quick travel or taxi is Mos Anek then run north.
You are looking for a Jawa vendor in the south section of Outlaws Den named Kizzit, and you’ll need to buy the Wrapped HK Transistor item which can be right-click in your inventory to receive the quest item, it costs 125,000 credits.
This jawa also sells the Burba Seismic Excavator/Scanner – you got one for free by doing the Theoretika quest, but if you ever lose the one you got, you can re-buy it from this jawa vendor for 50,000 credits. This scanner item is Legacy-Bound, which means you can transfer it between your characters through your legacy bank or mail.
This next part can be done alone or in a large group of up to 24 players. As long as all players are working together and communicating, the more players searching, the faster it will go, as when one player finds a hidden piece all other players can then also find it.

2. Recover HK Chassis / Taris Endar Spire

The second piece, the chassis, is on Taris, near the Endar Spire’s ship wreck. The fastest way to get to Taris is using the Activities panel solo tab Heroic shuttle. The closest Republic quick travel and taxi is Waypoint Station Aurek in the center of the map, Imperial side the closest taxi and quicktravel is the Tower Command Station. From either of those, run to the right on the map, to the east, and look for the crashed ship. Imperial side it’s going to look different, as the map will be in the night time rather than the day time like the Republic side.

This is where you start using your Burba Seismic Excavator/Scanner item.

The way it works is that the HK piece you are searching for is hidden somewhere on the map, and you can use the scanner to find it. Right-clicking the scanner from your inventory will place it down on the ground, and it will search 2 meters around you, 5 meters around you, 10 meters and then 25, which is shown by the circles that appear around your character. If you don’t find anything, move to a new location outside the range of the largest green circle that appeared, and try again, covering the map the best you can in a series of large circles.
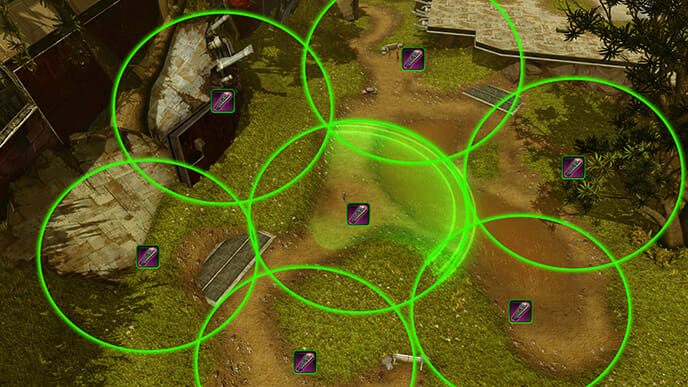
Once you find a piece, it will tell you how far away it is as a hint. You can use that hint to triangulate the piece’s exact location – if it’s within 25m, go just outside your green circle’s radius, and check again. If you get another hit, it will be somewhere between your new circle and your old circle, like an overlapping venn diagram. If you don’t get a hit, it will probably be on the other side of your original circle.

If you’re searching for pieces as part of a large group, have one player get to the location and then summon the rest, to prevent players accidentally finding a piece before the others get there. Have your spread fan out and start looking. When a player finds a piece, have them say in chat how far away the piece is, for example 25m or 5m from them. When that happens, all players should open their map, and find that player by rolling their mouse over the purple dots on the map representing players, and run to them and start searching nearby. Once one player finds them, a yellow light will appear in the air, and all players in the group should rush over to it and right-click the piece before it disapppears – it will only be visible for one minute, then disappear, and be hidden in a brand new random location, so anyone who wasn’t fast enough getting to it will need to start the search all over.

For the piece on Taris, it can be found anywhere near the Endar Spire or its surrounding area, especially to the east and west technically outside of the Endar Spire’s map area.
3. Recover HK AI Regulator / Coruscant Jedi Temple

The third piece, the AI regulator, is hidden in the Jedi Temple on Coruscant, and is only findable by Republic characters.

The fastest way to get here is to take the Heroic shuttle to Coruscant through the activities panel in the solo tab, then pick up the Enemies of the Republic heroic form the heroics terminal and take the heroic shuttle, and run north to the Jedi Temple elevator, otherwise just quick travel or taxi to the Jedi Temple.
The part can be found almost anywhere in the Jedi Temple, including on top of broken pillars. It doesn’t seem to be hidden on the secret second floor though.

Instead of a mission item, you’ll get a normal item, that you can right-click to consume. If you were doing the main quest on an Imperial character and just hopped on a Republic character to look for the part in the Jedi Temple, you can now send both the head item and the scanner item back to your Imperial character, as this special head item is legacy-bound. Once it’s on the right character, right-click it from your inventory.

4. Recover HK Motivator / Dromund Kaas Dark Temple

The fourth piece, the Motivator, is hidden in the Dark Temple approach on Dromund Kaas, and is only findable by Imperial characters. It’s hidden in a really big area – most players starts near the temple doors, and work their way south along the temple approach.
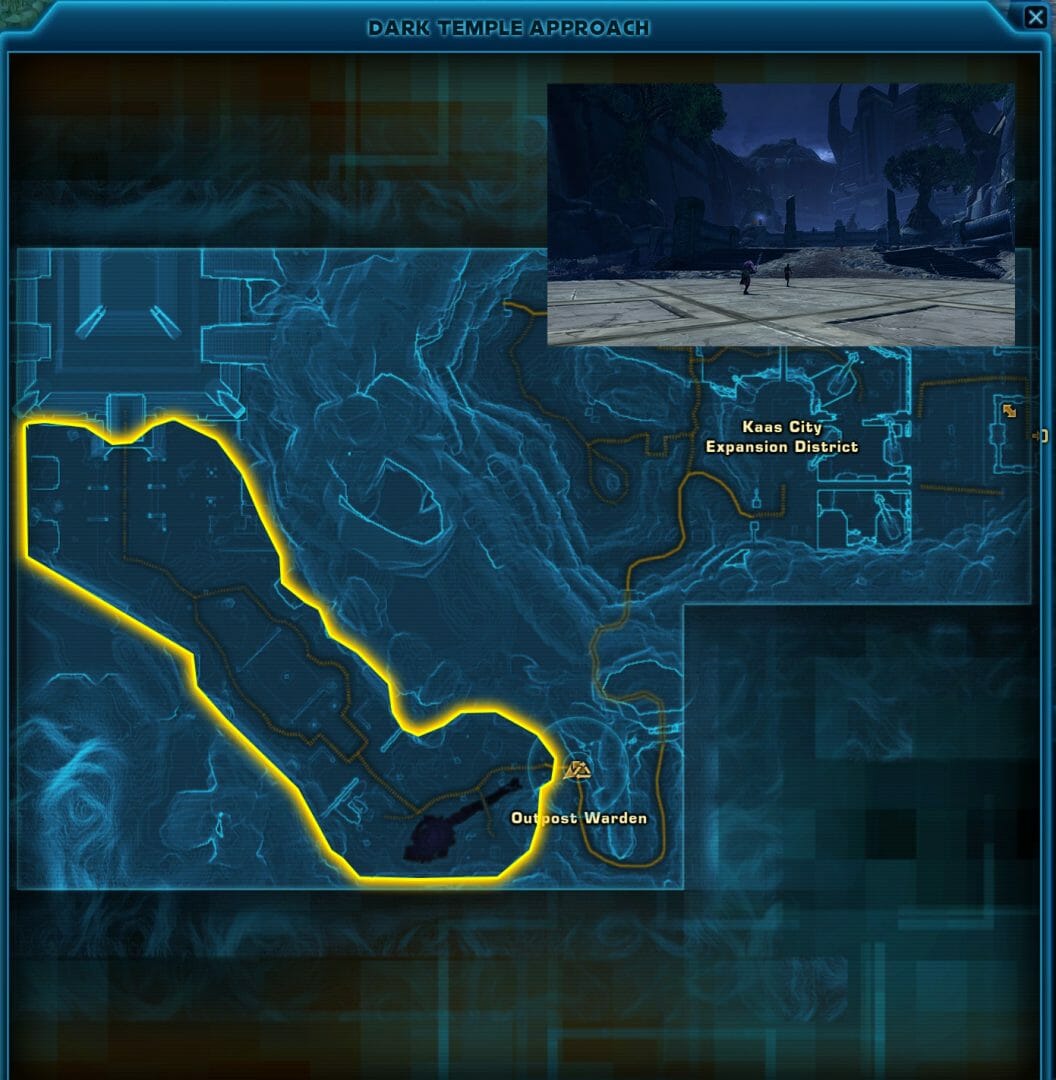

Instead of a mission item, you’ll get a normal item, that you can right-click to consume. If you were doing the main quest on a Republic character and just hopped on an Imperial character to look for the part at the Sith Temple, you can now send both the motivator item and the scanner item back to your Republic character, as this special motivator item is legacy-bound. Once it’s on the right character, right-click it from your inventory.
5. Recover HK Power Core / Hoth

The fifth piece, the Power Core, is hidden on Hoth near the wreck of the Ambria’s Fury ship, which is the north of the Glacial Fissure map.

The fastest way to get there Republic side is to use the Heroic shuttle to get to Hoth, then pick up the Heroic quest “The Terror Brigade” and just run to the left. Otherwise, quick travel to Outpost Zerek and run one map to the left.
Imperial side, the closest quick travel and taxi is probably Thesh Outpost, then run north east to the top right of the map.

There’s a really big area to search. Try searching along and in the wreckage in a loop around the ship, then move outwards if you don’t find it. The map I’m showing isn’t an exact area where you can find the part – it’s just a general location of where the ship is.
6. Recover HK Weapons Protocol / The False Emperor Flashpoint


The sixth piece, the weapons protocol, is hidden in the False Emperor Flashpoint. The flashpoint can be run on story mode, and the piece will drop direclty from the HK-47 boss for any players who are on the right step of the HK-51 questline. As far as I can tell, you don’t need to finish the Flashpoint if you just want to continue working on earning HK-51.
![]()
7. Recover HK Loyalty Chip / Maelstrom Prison or The Foundry

The seventh piece, the loyalty chip, is available to pick up at the end of Maelstrom Prison Flashpoint on Republic side, or The Foundry Flashpoint on Imperial side.
The flashpoint can be run on story mode alone or with a group. Just a heads up, there may be some bugs involved if you try and run it on veteran mode for the part, so it’s recommended to run it on story mode even if you are running in a group. You can also technically run it in Master Mode.
Republic side, the piece is available at the end of the Flashpoint before you leave, it’s after the final boss in the room behind the final boss, and you want to pick it up from a glowing blue crate before you leave the Flashpoint.
Imperial side, you will need to complete the entire Flashpoint including the final boss, and the HK piece will be available from a small glowing blue holopad to the right of the large blue terminal that ends the flashpoint, you’ll want to grab it before finishing the flashpoint directly after defeating the final boss.

Get HK-51
Once you’ve found all the pieces, you’ll be sent back to Section X, where you’ll return to The Fatality and meet your new droid companion!

Getting HK-51 on Other Characters
Once you have earned HK-51 on one character, you do not have to go through the steps to get him a second or third time to get him on other characters. Instead, there is a special legacy unlock that becomes available after you earn him the first time. To unlock HK-51 for your other characters, go in to your Legacy window, then into your Character Perks, and there will be a perk called HK-51. Click the one with a credits symbol, and you’ll be able to pay 1 million credits to unlock HK-51 on your character. You’ll need to pay the 1 million for every character you want to unlock him on, or you can re-earn him by doing the HK-51 quest all over again.

HK-51 Gifts & Influence
HK-51 loves Military Gear best, but will also accept Maintenance and Weapons gifts as a second favorite, and lastly likes Technology and Trophy gifts.

HK-51 Purple Crystal
If you’re looking for a purple crystal, once you’ve earned HK, the weapon he comes with includes a free Purple Eviscerating Crystal that you can use even on a free-to-play or preferred account. It’s a +36 crystal, so not quite as good as the normal purple crystals you can get on the GTN, but it’s unique as it does not require artifact authorization.

HK-51 Bugs
Quest Reset – While we quested, we had one player’s quest reset after they had finished the Theoretika, moving them back to the step where they need to enter the Theoretika, even though no other players in the big group had their quest reset. Another player in chat said they had a similar problem, where they were midway searching for parts, but the quest reset making them have to re-do the Theoretika, but at least they got to keep the parts they had found after they did so. Another player believed their quest disappeared from their quest list, but re-appeared after they recovered a part. I do not know what causes this. This quest may also reset if you become unsubscribe and lose the Section X access partway through the quest.
Maelstrom Prison / The Foundry in Veteran Mode – There may be an issue running this flashpoint and getting the piece in veteran mode. It’s recommend to run it in Story mode, even if you are in a group, or if you are wierdos, run it in Master Mode, skipping veteran mode all together. This is likely related to the veteran mode being available to low level players, but this HK quest is only for high-level players.

 Questions or comments? Feel free to send me a message on Twitter


 Discord
  Email swtorista@gmail.com
 Bluesky @swtorista.com
 Reddit /u/swtorista
 Twitch Swtorista
 Youtube
 Patreon
 Twitter @swtorista