

“Parsing” is the act of measuring how much damage you are doing in Star Wars: The Old Republic, and using that information to get better at playing your class and understanding how your abilities work.
In this guide, we’ll be going over the basics of how to set up StarParse with SWTOR, and how to measure your damage against a dummy. Parsing isn’t just for players taking on the hardest content – it can be a fun way to deep dive into your character even if you are just playing solo.

How to set up StarParse
StarParse is a fan-made tool made by player Ixale that uses the game saves to your computer to track what abilities you and your team mates use in battle, and then formats them in a way that is easy to read and understand. StarParse does not change your gameplay – it will not click buttons for you, instead it helps monitor what you are doing, so you can make better decisions next time you enter combat. It only “parses” your combat numbers, and does not in any way interfere with the game’s files.
To get StarParse working, you will need to follow these simple steps:
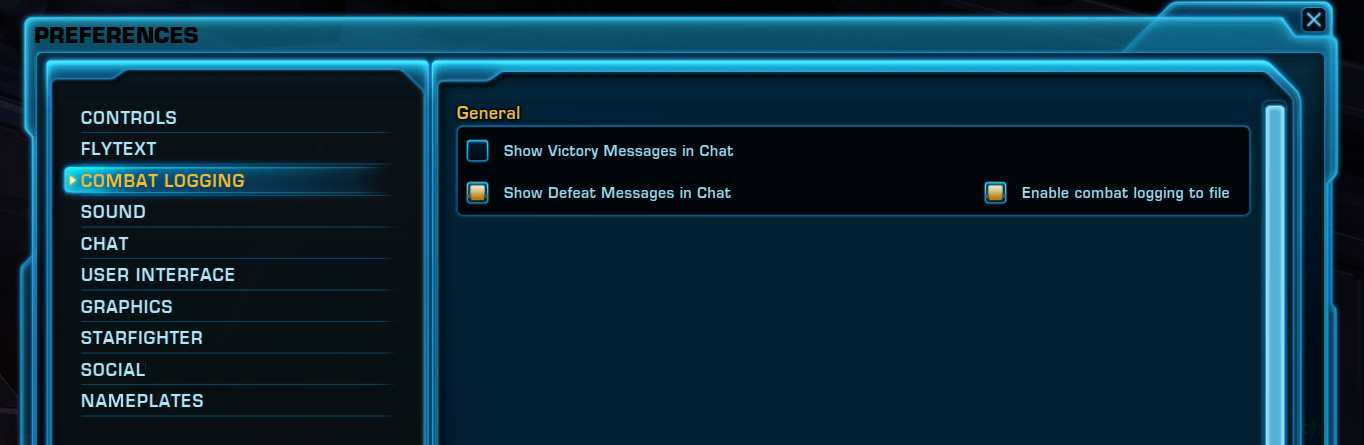
1. Enable Combat Logging
By default, your game does not save your combat numbers. To enable combat logging, press ESC on your keyboard -> Preferences -> choose Combat Logging on the menu on the left, and then check “Enable combat logging to file”. This will save your combat numbers to a text file on your computer.
2. Download and Install StarParse
The second step is to download Starparse. As it is a fan-made tool, I can not give you any guarantees that it is safe from malware to download, but players have been using this tool for over 7 years, and it has a reputation of working great and being the default tool for individuals and groups to track their combat.
To download StarParse, go to ixparse.com and click “Get StarParse”.

This will download a file called “StarParse-1.0.exe”, likely to your Downloads folder. Double-click this file to run the installer.
3. Open StarParse
Once StarParse is installed, you can open it up along with Star Wars: The Old Republic.

There are two main ways to use StarParse – “Parse” and “Raid”, which are two buttons on the top right. “Parse” is what you use when you are practicing alone, and “Raid” is what you use when you want to see your whole groups numbers. If you don’t press either of these, StarParse will not display any of your combat numbers.
Parsing
Once you have StarParse up and running, you can working on “parsing”, which is when you take your character to a training dummy, and practice your abilities and rotation, with the goal of improving your damage.
Training Dummy

A training dummy is a special type of enemy that doesn’t attack back, and is used specifically for practicing combat on in a controlled environment.
The most common training dummy players use to practice is their ship dummy. The ship dummy is a legacy-wide unlock you can get for all of your characters, located in the “Global Unlocks” section of your Legacy panel, in the “Other” section in the menu. When players say they are practicing on their ship dummy, they are usually referring to the Operations Training Dummy, which costs 500,000 Credits and Legacy Level 10 to unlock. If you aren’t able to unlock the training dummy on your ship yet, there are some other Training Dummy Locations and the next best one is located on the Fleet.
When you’re first starting out, you’ll find a dummy, and just hit it a bit and work on practicing your rotation by getting familiar with your abilities and how they interact with eachother. When I’m starting a new class for the first time, I like to sort out my bars in a way that’s really easy to see the abilities they are key to my rotation separated from my abilities that are defensive or are only for special occasions.
Training Dummy Modulators

You’ll notice when you are hitting the training dummy it doesn’t really seem to lose health, as it has 100 million health by default.
You can modify your ship training dummy using a set of items sold by the ship Repair Droid. The Ship Repair Droid is not available by default, and must be unlocked – it costs 1,000,000 Credits and requires Legacy Level 7. You can also visit a friend’s ship who has the droid and buy the items there without having to unlock the droid yourself. All the items are legacy-bound and only cost 1,000 credits each.
Once you’ve got the basics of your class down, you can start to actually measure how much damage you are actually doing, and to emulate an environment similar to an operation, you’ll use these two modulators – one to reduce some of the dummy’s defenses like your team mates would in a real operation, and the second to give the dummy a set amount of health, so you know when to stop attacking. You’ll buy these items from the training droid:
 Training Dummy Armor Reduction Module
- Training Dummy Advanced Health Modulator (6.5 million health)
 Training Dummy Armor Reduction Module
 Training Dummy Advanced Health Modulator (6.5 million health)
Then you will select the dummy, and right click each of these items in your inventory to apply them, then attack. You will need to re-apply them every time the dummy resets. You can also place these items on your quickbar to save time.

When you’re first starting, if you’re finding it too difficult to kill the dummy when it has six and a half million health, you can use the yellow “Training Dummy Basic Health Modulator” which may give you more motivation to practice your rotation as the dummy will die a lot quicker, it’s just not used as a benchmark when comparing your parse to other players’ scores, and isn’t a great representation of how long you’ll need to be attacking most Operation bosses.
How to Parse
Once you’ve got the basics of your class down, you can start to actually measure how much damage you are actually doing.
- Step 1 – Have StarParse open, click “Parse” on the top right, turn on your “Personal” interface in StarParse
- Step 2 – Check your character’s gear, item-rating, tactical items, implants and ability tree to make sure you have everything you want equipped and aren’t missing anything
- Step 3 – Open a level 80 guide for your class to follow along the Rotation section
- Step 4 – Find a Training Dummy (see Training Dummy Locations Guide)
- Step 5 – Apply the two Modulator items to the dummy
- Step 6 – Practice your rotation and “kill” the dummy
- Step 7 – Check how you did in StarParse!
In short, Parsing is the act of hitting the dummy and then seeing how well you did. Obviously, things like getting better gear or adjusting your gear stats will help up your damage score, but how and when you use your abilities is also incredibly important. Understanding how your abilities interact to make each other stronger, and how to spend more time not using your basic attack, will also highly affect your damage. If you are not a skilled gamer, you may also be working on upping your “APM” – your actions per minute, especially if you are using a keyboard and aren’t using keybinds yet.
While parsing can absolutely help you up your damage in actual combat, keep in mind your numbers on the dummy will always be higher than in an actual fight, because in most Operations, you or the boss will have to move around, and everyone on your team needs to help with mechanics. The idea is to understand your abilities so well and have your keybinds memorized to muscle memory on the dummy, so you can simply perform your attacks whiteout thinking and use your time in the raid to instead pay attentions to the actual fight’s unique timing and the mechanics.
Healing/ Tanking Parsing
Are you a healer or tank and want to practice on the dummy?
Healing Dummy? While you can technically practice your healing on a training dummy, all three types of healers have abilities that are affected by how much damage your allies take, which isn’t replicated well even on the healing dummy. The healing dummy works by giving you a dummy to heal that is almost at zero health, and you heal it up to 100% health… but it doesn’t actively take any damage as you heal, so it’s not a good representation of healing an actual fight. Most players suggest to simply jump into group content right away to practice healing, whether that’s a Flashpoint, Operation or PvP, but if you’re looking for something the practice on alone before you go in, I recommend at level 80 to try running the Veteran Mode Hammer Station flashpoint alone, with just you and your tank or DPS companion. You can use the dummy to get a basic idea of how your healing abilities work and interact though.
Tanking Dummy? Much like healing, a lot of the tanking abilities have special effects as you actively take damage, and dummies are of course not attacking you back. A lot of the tanking role is also very situational, like knowing when to move, swap targets, and knowing when you use your heavy defenses, none of which can be practiced on the dummy. You can use the dummy to get a basic idea of how your rotation works though and see how your abilities interact.
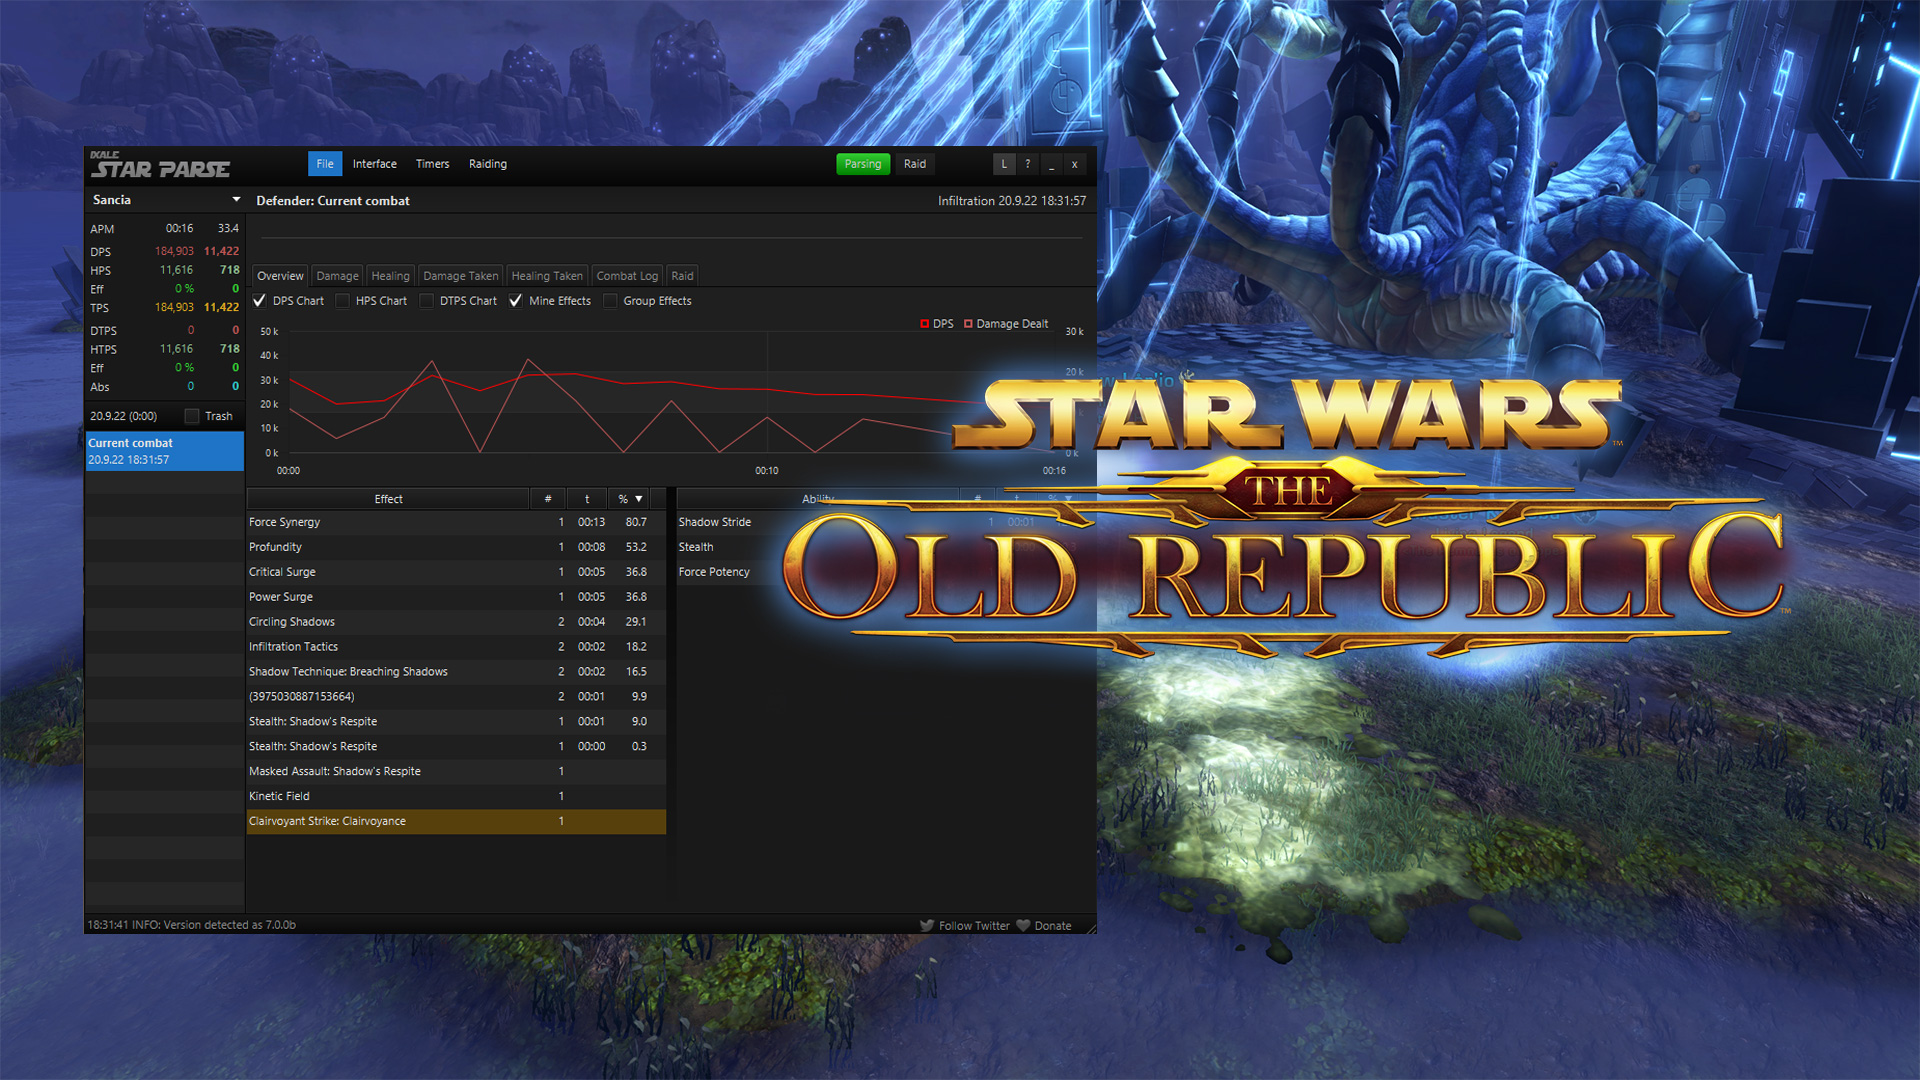
StarParse Interfaces
Being able to see how much damage or healing you are doing during combat can be really useful if you are learning to get better at combat.
There are different types of interfaces you might want to turn on that float on top of Star Wars: The Old Republic. They’re all moveable by clicking and dragging the title, and resizable by dragging the bottom corners, so place them somewhere out of the way – I like to keep them where they default to in the top right of my screen.
“Personal” Interface
The personal interface is a box that will show your stats live as you play. To show interfaces, use the interface dropdown at the top of the StarParse window.

- APM = Actions per Minute, how many abilities you are actually using vs wasted downtime
- DPS = Damage per Second, for damage characters
- HPS = Heals per Second, for healers
- Eff = Effective Heals Percentage, for healers, how much heals didn’t get wasted in over-healing
- TPS = Threat per second, mainly for tanks
- DTPS = Damage taken per second, how much damage you are taking, for tanks and for you if you are taking more damage than the rest of your team
- HTPS = Heals (you’ve) taken per second
- Eff = Effective Heals (you’ve) taken per second
- Abs = Damage you Absorbed per second
Raid Interfaces
If you are playing with others, you can turn on the “Raid Damage”, “Raid Healing” or “Raid Threat” interfaces which will show the stats of all the members in your group, even if they don’t have StarParse.
On these raid interfaces, you will be able to watch two main things – your own numbers, so you can improve on your personal bests, and your teams numbers, so you can see what type of damage numbers might be typical for your class or role in a fight. For example, if my teammates are all doing 20,000 damage, and I’m only doing 5,000, that means I’m way behind and I’ll want to learn to get a lot better if I want to try out harder content. Maybe the issue is my gear, maybe it’s how I’m playing my class, or maybe it’s just how much downtime I have running around doing nothing instead of actually damaging the boss that I need to work on.
Having StarParse open is really useful to team leaders as well, as it can help them figure out where issue may be happening – certain Veteran Mode and Master Mode Operation bosses require a certain amount of damage or healing within a specific amount of time, and if everyone playing is not meeting a minimum threshold, they can work with players individually to give advice to help them meet that threshold. Even if you’re just leading story mode, having StarParse quietly open can give you a good idea about which of your players are excelling at their roles, and can help those that may be struggling or who have questions about their class. Even as an individual you can take advantage of this knowledge – I can ask my team mates who are doing better than me if they have any tips to help me improve. If you’re in a friendly group or a guild group, there’s a good chance that experienced player would love to share what they know.
Timers

While StarParse can’t tell you how to play, it does have one function that many players use to perform better in Operations. StarParse can’t help you step out of the fire, or taunt for you as a tank, but it can interpret the combat logs of the fight and give you an audio cue when something interesting is happening that you need to watch out for, using timers. There are many pre-set timers available for Operations, and you can also set your own.
Timer Settings

You can turn timers on and off using the Timers menu at the top of StarParse, and you can adjust the timers with the Settings option in the Timers menu. For both custom timers and the built-in timers, in the Settings you can adjust what color they show up as in the Timer interface, what sound they play when the timer runs out, and you can even have a droid give you a 5 – 4 – 3 -2 – 1 countdown before the timer runs out so you have some warning. When adjusting your individual timers, make sure to click “Save changes” to save your timer settings or they won’t apply. Your timers will only ever work if you are in “Parsing” or “Raid” mode with the buttons at the top of StarParse, so make sure to turn those on if you want your timers to work!
Operation Timers
The most common timers I’ve seen used are the timers for running the bombs in Explosive Conflict, and timers for the pushes and pulls in veteran mode Temple of Sacrifice, but there’s a whole bunch you can use. If you are doing story mode operations, I don’t really recommend worrying about timers, but they can become invaluable in veteran mode and master mode operations as not all Operations have the best built-in visual or sound cues when the fight changes. Some teams even set up custom timers for their teams and share the settings with their team mates for better teamwork.
Ability Timers
While you may have heard of using timers in Operations, did you know you can also set timers for your abilities? If you have any abilities that need to be re-used over time, for example your longer Damage over Time abilities, you can create a custom timer to remind you to re-apply them as their timer runs out. Normally, you would just have to keep track through memorizing about how long they last, and by watching your enemy’s debuffs – but with StarParse’s custom timers, you can have StarParse send you a reminder instead. If you’re struggling to remember to re-use some of your longer-cooldown abilities, like buffs or defensives, you could also use an ability timer to remind you that it’s available again instead of just watching the built-in timer on the icon.

Here’s how to set up a custom ability timer in StarParse:
- 1 – Give it a Name, something that’s easy for you to recognize and not too long. Use the name of the ability if you aren’t sure what to name it
- 2 – For the Trigger, choose “Ability Activated”
- 3 – For the Source, choose “You”
- 4 – For the Ability, you will need to type the EXACT name of the ability as it appears in-game, so StarParse can recognize it in the combat log when it’s used
- 5 – For the Duration, this will depend on what type of ability you are tracking. If it’s an ability like Corrosive Dart that you want to re-apply when it runs out but the actual ability is available all the time, you’ll want the timer to be how many seconds it will take for the debuff to run out – which in this case, is 18 seconds. For abilities like your defensives where you just want a reminder that they are available again, you want to put the cooldown time, make sure to type it in in seconds not minutes. To find out either of these numbers, just roll over your ability in-game and check the tooltip.
- 6 – If you want, set Cancel on to “Combat finished” so your timers don’t keep going even after the fight is done
- 7 – At the end of the timer settings, there are three main ways to have your timers remind you – the display, the sound, and the countdown.
- The Display is what shows up in your Timer interface, and you can choose what color it shows up for. You can actually have three different Timer interfaces spread across your screen, called Combat Timer A, B and C, and the little dropdown beside display allows you to pick which one this timer shows up on – just leave it on A if you aren’t sure.
- The sound is an audio cue that will play when the timer runs out. You can choose one of the funny built-in Star Wars quotes as a sound cue, or even upload your own mp3 file. The slider on the right is the volume. The tiny arrow button is the test button to play the sound as a sample which is great if you are adjusting the volume. The offset will play the audio cue early by however many seconds you type in – so if you want a reminder before your ability runs out, you can have the sound play 2 or 3 seconds before the timer is actually up.
- The countdown option will give you a countdown, down from the number of your choice, and you can even choose the voice and adjust the offset and the volume. The default countdown is five, but you can set it as high as 10, or you can set it to 2 or 3 if you only want a short countdown.
Other Timers
There is crazy amount things you can with the customer timers, all of which are covered in the StarParse documentation page.
Healing Overlay
When it comes to cues, out of all three roles, healers really get the short end of the stick in the game when it comes to tracking their abilities. If you are learning healing in operations, you may notice it can be difficult to track some of your abilities that are meant to be re-applied over time, or to know at a glance who does or does not have a specific healing-over-time ability on them without clicking through each member of your raid group to check them.
The “Hots Tracking Overlay” in StarParse is a special overlay that will keep track of certain abilities for each healing discipline, and display them on top of your raid frame, so you no longer have to click each ally to check their status.
- Operative: Kolto Probe, with stacks and remaining duration, includes Surgical Probe resets
- Scoundrel: Slow-release Medpac, with stacks and remaining duration, includes Emergency Medpac resets
- Mercenary: Kolto Shell, without remaining duration and charges
- Commando: Trauma Probe, without remaining duration and charges
- Sorcerer: Static Barrier, without remaining duration (you may be using the Deionized buff to track this already)
- Sage: Force Armor, without remaining duration (you may be using the Force-imbalanced buff to track this already)
 Sorcerer: Static Barrier, without remaining duration (you may be using the
  Deionized buff to track this already)
 Force-imbalanced buff to track this already)
This special overlay does require a little more setup than the other interfaces. I highly recommend that before setting this up, you wait until your team is all invited and in an operations group, have your team leader set everyone up in their correct place in the raid frame, and then enable the healing overlay, to avoid frustration.
Here are the instructions from the StarParse documentation about how to add the HOTS overlay:
Before the overlay can be used, it needs to be positioned over the Operation frames and tracked players need to be aligned with their respective frames:
- If not already, place hots (shields) on players you wish to track – they will be added to the overlay (top to bottom, left to right) once you enable it (if the hot was placed within the last 15 minutes).
- Enable the Raid Hots overlay (via Interface menu) and make sure Lock overlays is disabled (using the menu or a hotkey if set – see Overlays settings) – a grid should appear (as shown on the left screenshot above).
- Click the A button to automatically position the overlay over your Operation frames. Adjust the position and slots manually using the handles if needed and move the players around so they match with their respective frames. Remove unwanted players by clicking their X button (they will be added again if you hot them).
- Once finished, Lock the overlays (via menu or hotkey) for the grid to disappear (as shown on the right screenshot).
- StarParse will keep adding new players to the grid as you hot (shield) them as long as the overlay is active. Once the visible slots are filled, hidden slots will be used. If you then remove one of the “visible” players, the next “hidden” player will automatically take his place.
 Questions or comments? Feel free to send me a message on Twitter
  Basic Class Guides
 Difficult Fight Tips
 Training Dummy Locations

 Twitter @swtorista
 Reddit /u/swtorista
 Discord Swtorista#0153
 Email swtorista@gmail.com
 Youtube Swtorista
 Twitch Swtorista
 Patreon