


 How to Craft
 Choose a Crew Skill
 Armormech
 Armstech
 Artifice
 Biochem
 Cybertech
 Synthweaving

 Gathering Guide
 Rare Materials Guide
 White Materials Guide
 Jawa Junk
 Augments
 Medpacs, Stims and Adrenals
 Synthweaving Crafting Tree


 Crafted Decorations
 Crafted Mounts
 Crafted Dyes
 Crafted Crystals
 Events Calendar
 Galactic Seasons
 PvP Seasons
 Bounty Event
 Double XP Event
 Feast of Prosperity
 Gree Event
 Life Day
 Nightlife Event
 Pirate Incursion Event
 Rakghoul Event
 Spring Abundance Festival
 Swoop Event

 Jedi Knight
 Jedi Consular
 Trooper
 Smuggler
 Sith Warrior
 Sith Inquisitor
 Bounty Hunter
 Imperial Agent
 Bounty Hunter
 Imperial Agent
 Jedi Consular
 Jedi Knight
 Sith Inquisitor
 Sith Warrior
 Smuggler
 Trooper
 Legacy Gear
 Lightsabers
 Double-Bladed Lightsabers
 Vibroswords
 Double-Bladed Vibroswords
 Blaster Pistols
 Blaster Rifles
 Sniper Rifles
 Blaster Cannons

The Black Hole was originally an area where you could work on earning high-end gear when the game was closer to its launch – these days, it’s a unique area of Corellia with repeatable missions and a repeatable Heroic. Unlike many other daily areas, this planet does not offer cosmetic items to collect through Reputation and also doe not offer end-game currency through its quests, so players go to the Black Hole to see all the story in the game or go there to do occasional Galactic Seasons objectives.
Unique rewards for Black Hole have been deprecated, but you can still earn endgame currency by completing them. There are also no hidden secrets, special achievements or datacrons in the Black Hole, but there are some interesting one-of-a-kind quests.
 Thank you player Zahk for all your help on this guide to make it easier for other players to find the quest objectives!
Contents
How to Start
To start the Black Hole story and quests, you need to be level 50+. This area is available to free-to- preferred, and subscribed players. Your character does NOT have to be up to Corellia in their class story, but this storyline takes places in the timeline after Corellia/Ilum.
 Galactic Seasons Tip: Don’t care about story? Just travel to the Black Hole using the Activity Finder solo tab.
![]() Republic players can start the Black Hole story questline on the Republic Fleet at a glowing blue terminal, in the inner ring labelled “holonet”, giving them the quest called Corellia Rising.
Republic players can start the Black Hole story questline on the Republic Fleet at a glowing blue terminal, in the inner ring labelled “holonet”, giving them the quest called Corellia Rising.
![]() Imperial players can start the Black Hole story questline by speaking to Sergeant Karloss, Priority Mission Courier in the inner ring of the fleet, he is wearing a grey Imperial uniform and is near the Security Key vendor kiosk on the other side of the Sith Inquisitor kiosk.
Imperial players can start the Black Hole story questline by speaking to Sergeant Karloss, Priority Mission Courier in the inner ring of the fleet, he is wearing a grey Imperial uniform and is near the Security Key vendor kiosk on the other side of the Sith Inquisitor kiosk.
These quests are both very specific, and ask you to travel to NORMAL CORELLIA, and then take the nearby shuttle to the Black Hole. Do not fly straight to the Black Hole or use the Activity Finder to get there or it won’t trigger the next story quest.

This quest will lead you to the basement level of the Black Hole outpost and a very short story quest.


![]() Republic players should pick up the quests from both terminals, and the droid upstairs. Any time you return to Corellia, you’ll want to pick up the 4 [DAILY] quests and the [WEEKLY] from one terminal, the [HEROIC] from the other terminal, and the [AREA] quest from the droid on the main level.
Republic players should pick up the quests from both terminals, and the droid upstairs. Any time you return to Corellia, you’ll want to pick up the 4 [DAILY] quests and the [WEEKLY] from one terminal, the [HEROIC] from the other terminal, and the [AREA] quest from the droid on the main level.

![]() Imperial players should pick up the quests from the terminal, and the heroic from the questgiver nearby, the same one you spoke to for your story quest. Any time you return to Corellia, you’ll want to pick up the 4 [DAILY] quests and the [WEEKLY] from the terminal, the [HEROIC] from General Konya, and the [AREA] quest from the droid on the main level.
Imperial players should pick up the quests from the terminal, and the heroic from the questgiver nearby, the same one you spoke to for your story quest. Any time you return to Corellia, you’ll want to pick up the 4 [DAILY] quests and the [WEEKLY] from the terminal, the [HEROIC] from General Konya, and the [AREA] quest from the droid on the main level.
The fastest way to get to the Black Hole dailies if you plan to repeat them is by using the Activity Finder. You can use this any time you want to repeat the quests, as it will teleport you directly in front of the daily/weekly quest terminals. You can do this by clicking the icon of “three little people” near your minimap, choosing the Solo tab at the top, selecting Daily Area: Black Hole, then clicking the green travel button. This also automatically gives you the weekly quest.

Or you can fly to the Black Hole directly in your ship (make sure to select Black Hole instead of standard Corellia as a landing zone when you see the planet.)

Rewards
Depending on your level when completing a Black Hole Mission, there are also some additional rewards aside from credits and experience tied to some missions. Below max level, you mostly only get credits and xp. At a higher level, there are additional rewards.
 Ancient Prototype Storage Box: At any level, the Heroic 2+ mission will award one Prototype Storage Box. Inside is a random piece of level 50 prototype quality gear from 1.0, all of which can be cheaply purchased from specialty goods vendors.
 Conquest Commendations (at max-level, [DAILY] missions give 3 each, [HEROIC] gives 30, [WEEKLY] gives 50): Conquest Commendations will be awarded for most Planetary Repeatables. It’s used to upgrade virtually every track of gear upgrade, in varying amounts.
 Tech Fragments (at max-level, [DAILY]/[HEROIC] missions give 33 each): Tech Fragments are an endgame currency used to buy Legendary Implants, Tacticals, materials for the best Augments in the game, and some older/cosmetic armors.
 Conquest Gear Piece: at max-level, the Weekly mission will award a Conquest Gear Box in addition. These have a minimum item level of 324, and are green quality.
Missions
There are 5 Republic [DAILY] quests and 1 Republic [HEROIC], and 5 Imperial [DAILY] quests and 1 Imperial [HEROIC]. They are different on each faction if you want to try them all.
[HEROIC 2+] Chasing the Shadow
 Republic only – Easy Phased Heroic, lot’s of annoying CC-heavy enemies.

Tips
- There’s no heroic shuttle for this mission, so the location is noted in the image above. It’s a long walk and you’ll have to keep to the east side of the map in sort of a “5” shaped path to be safest.
- Stealth can be good but this should be totally soloable for anyone with a healing companion out – droids like to grapple you around but feels like a standard storymode flashpoint.
- Enter the elevator in the lobby and then take a U-turn shaped path into the southern dead end on the 2nd floor. If you’ve been stealthing, some mobs here will pop you out of it. You must kill the security officer sitting in the lounge to progress. Take the keycard to the huge door to the east and then click each orange reticle on the corners of the door – I don’t think this is an objective anywhere else in the game so it’s bolded here to avoid any confusion.
- The final boss of this heroic is pretty easy nowadays. He will spam grenades that drop large AoE’s on the floor. Some will slow or stun you, but most of those can be interrupted. Interrupt hypermatter grenades and let his full auto cast go uninterrupted. Simply run around him in a circle to get out of grenades and he should go down eventually.

[HEROIC 2+] End of Torvix
 Empire only – Moderately Difficult Heroic, Many Steps and a Puzzle

Tips
- This mission takes place in the Hypermatter Tower, the largest building in the playable Black Hole area.
- You will want your companion set to healing if you’re solo for sure. Enemies inside are about as dangerous as flashpoint mobs and you’ll probably want to know your classes good defensive options. If you’re struggling, focus on killing one thing at a time to bring incoming damage down to a maneageable level for your companion.
- The first half is almost identical to the republic heroic – go inside, take an elevator, do the U-turn to find a security officer, loot the ID, head to the next elevator. Stealthing is hit or miss, some enemies can detect you and are hard to sneak around.
- Once you get to the 2nd elevator this mission deviates drastically from it’s republic cousin. Fight through the next 3 security checkpoints (activating terminals to open the next door as you go) and eventually come to the final room, with a large hypermatter generator in the center.
- You’ll be asked to disable security on a panel in front of this large blue orb – this will start waves of enemies coming at you culminating in a bit of a boss fight. Take care not to re-press the panel in between waves thinking it starts the next one – you can end up fighting two bosses.
- The annihilator boss isn’t super special; just take care to avoid the large purple circle AoEs it generates. If you’re struggling, leave it alive last and clean up stragglers first so your companion can heal you more reliably.
- Finally, you’ll come to the puzzle. The picture below does not show the pipes you are trying to align by design – many players find that looking at the pipes just confuses them more! The solution is to press the left button once, the middle button three times and the right button twice. these presses can be done in any order but it must be that many presses or you’ll have to solve it manually. After this, press the new highlighted button to vent, and you’re done.

SOLUTION: Press the first button on the left once, the middle button three times, the final button on the right twice.
[DAILY] Counter Eco-Terrorism
Republic only – Unique Open World Daily, gimmick can be confusing.

Tips
- You’ll start with heading south to the quest objective mid-way down the Black Hole map – in a valley with leaking bright blue fluid.
- This stuff is radioactive and will kill you very quickly if you stand in it too long, with a debuff that does more damage each second you spend in it.
- To be able to fix the leaks in the tower, you must kill nearby Torvix enemies along the edge of the blue fluid, and loot them for a unique anti-rad injector.
- It will show up as a mission item once looted – use it and you will get 10 stacks of radiation protection, or 10 seconds of safety in the fluid. Quickly run in, click a hole in the tanks to seal it (this takes four seconds) and then run out again. If you’re very fast you may get 2 or 3 in one injectors safety period.
- Re-using the mission item in the mission log won’t work unless you have another – they’re unique and you can only carry one at a time. Kill more Torvix guards and loot them again until you get 4 leaks done.
- Once finished, the mission will tell you to hand it in to the terminal – but after 30 seconds it also simply auto-completes wherever you happen to be.

[AREA] Criminal Crackdown
Republic only – Super Simple Open World Mission, 3 Steps.

Tips
- This mission takes places entirely within the upper third of the open world Black Hole area. You’ll start by killing 15 of any Torvix enemies (the only enemies you can even find in this upper third of the map). Remember to pick up [DAILY] Stolen Victory as well, as it’s in the exact same area.
- Immediately once you’ve killed your 15th, you’ll probably end up killing more as you retread the same areas breaking 4 weapons boxes. As a stealther, you can usually sleep dart/mind maze one of the nearby enemies and break the box with no combat.
- After four boxes, your search area objectives will be replaced with a specific object to go break along the Western wall of the Refinery District.
- Doing so summons a gold-level Quick-Shot Quarl, who is interruptable and not a tough fight. Loot him and complete the mission.

[DAILY] Eyes and Ears / Hypermatter Directive
Republic – Eyes and Ears, Empire – Hypermatter Directive
Fairly easy phased stealth mission, Simple combat if detected.

Tips
- For Republic, this mission takes place inside a warehouse marked in the upper third of the Black Hole area, nearby where Quick-Shot Quarl is summoned for Criminal Crackdown. Imperials go to a warehouse on the far east wall halfway up the map, with an identical interior and mechanic to deal with.
- You’ll enter a very dark warehouse that becomes more navigable a short ways down the ramp, as a flashlight droid will appear to illuminate your surroundings.
- Seeker probes will constantly show up and throw out a red sensor laser in a circle before dissapearing again, in a pattern. To avoid these (and avoid all combat), walk up to the edge of a red circles radius as it’s going out. Wait patiently for it to come again. They always deploy in the exact same spot over and over again. Run past/to the listening device planting spot immediately as it leaves, giving you the maximum time to safely move.
- If detected, it’s no big deal. The rapid response droids that attack are simple Silver-level mobs that won’t pose any trouble. They just slow you down a little.
- It’s suggested to move either counterclockwise or clockwise through the warehouse and staying on the perimeter, keeping an eye out for listening device planting locations (the orange reticle in the screenshot below) so you don’t miss any and have to back-track through probes you’ve already dodged. For imperials, this is much easier as instead of planting devices you are simply looting big glowing blue boxes. Hard to miss any.
- There’s no step two. After all 5 devices are planted, the mission completes.

[DAILY] Forced Labor
Republic only – Very Easy open world mission, Straightforward Objectives and Combat. 1 Step.

Tips
- This mission takes place inside a facility halfway down the Black Hole map, along the east wall.
- Probably the easiest mission in the Black Hole. As a stealther it’s over in seconds. The building is filled with A) groups of 3 very easy to kill Torvix guards, and B) A single gold level Overseer. None are challenging by any means. Simply open 5 cells and the mission auto resolves.

[DAILY] Stolen Victory
Republic only – Very easy open world mission. Straightforward loot objects objective. 1 Step.

Tips
- This mission takes place in the exact same area as Criminal Crackdown, which is a great reason to pick up all missions at once.
- As you defeat Torvix enemies, you should see these open arms creates to loot as well for this mission (pictured above). They can have 1 – 3 weapons out of 15 per box.
- They are fairly spread out and there’s usually only 1 or 2 boxes per objective marker on the map. This seems scarce, but remember that silver-level Torvix enemies (that you are fighting for Criminal Crackdown anyways) will also drop one or two weapons.

[DAILY] No Trace Left
Empire only – Simple Unphased Daily, No Combat.

Tips
- This mission takes place within the underground base where the heroic and most dailies are picked up.
- You shouldn’t have to go any further than the visible parts of the overlay map on the image above.
- You’ll get an item to discover traitors in a short radius around you, simply walk into a group of NPCs and use the mission item.
- If it seems like you clicked the item on a few groups and still aren’t done, simply re-try them again. In a few minutes a few of them end up being traitors again.

[DAILY] Glow
Empire only – Unique Phased Daily, gimmick can be confusing.

Tips
- This mission takes place within the pipeline control station on the southern wall of the Black Hole, just next door to the imperial base. It is flooded with a bright blue fluid.
- This stuff is radioactive and will kill you very quickly if you stand in it too long, with a debuff that does more damage each second you spend in it.
- Kill the first group of enemies you can see in front of the first pipeline interactable, and loot them for a unique anti-rad injector.
- It will show up as a mission item once looted – use it and you will get 10 stacks of radiation protection, or 10 seconds of safety in the fluid. From here you can run through the fluid and stick to the left-hand wall to go into the pockets. There are two pipeline interactables down here – even if you stealth you should probably kill this stuff for extra rad-injectors for your way back.
- Re-using the mission item in the mission log won’t work unless you have another – they’re unique and you can only carry one at a time. Kill more Torvix guards and loot them again until you get 4 pipeline fixes done. The final one after the two in a fluid is a mirror of the first, on a console beside the far ramp.
- Once finished, the mission will tell you to hand it in to the terminal – but after 30 seconds it also simply auto-completes wherever you happen to be.

[DAILY] Control the Battlefield
Empire only – Easy Open World Daily, One Step.

Tips
- This mission can easily be done just by clearing out the enemies wandering outside the Imperial home base. Make sure you have the Asset Liquidation area mission from the probe picked up as well, as droid enemies in these packs of Torvix guards count for both objectives.
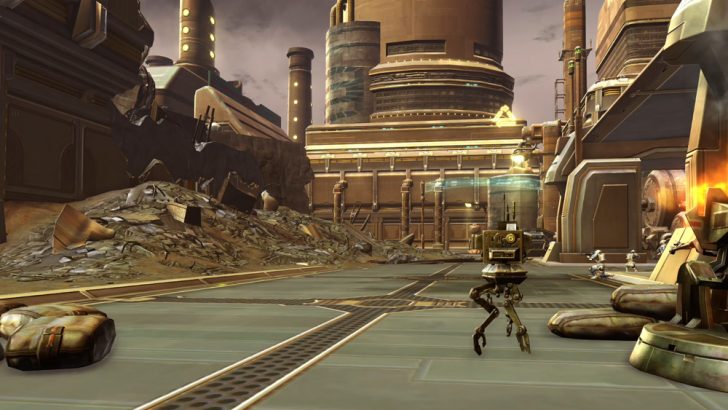
- Note that the Torvix War Droids are a specific enemy mixed into Torvix groups, in the above image. The image below, despite being a droid found often in the same area, awards no credit to this objective.
- There is no second step to this mission; keep attacking Torvix enemies that have war droids accompanying them and this will auto-turn in on the spot before you’ve finished Asset Liquidation.

[AREA] Asset Liquidation
Empire only – Easy Open World Daily, Three Steps.

Tips
- This mission takes place around the bottom half of the Black Hole open world map, and is a mirror of the Republic’s Criminal Crackdown.
- This should be done simultaneously with Control The Battlefield, as all of the Torvix War Droids count for both missions.
- After killing 20 of any enemies around the southern Black Hole, your next step will be to frequent the same area, now looking for six glowing blue crates to blow up. This portion can be stealthed pretty quickly with a sleep dart or mind maze before looting.
- The third step requires interacting with a terminal on the large lightning-rod in the southeast corner of the map. This will summon T-5RZ, who is a gold-level mob that doesn’t do much of anything special. Interrupt a few of his missile attacks and he should go down easy.

 Questions or comments? Feel free to send me a message on Twitter


 Discord
  Email swtorista@gmail.com
 Bluesky @swtorista.com
 Reddit /u/swtorista
 Twitch Swtorista
 Youtube
 Patreon
 Twitter @swtorista