


 How to Craft
 Choose a Crew Skill
 Armormech
 Armstech
 Artifice
 Biochem
 Cybertech
 Synthweaving

 Gathering Guide
 Rare Materials Guide
 White Materials Guide
 Jawa Junk
 Augments
 Medpacs, Stims and Adrenals
 Synthweaving Crafting Tree


 Crafted Decorations
 Crafted Mounts
 Crafted Dyes
 Crafted Crystals
 Events Calendar
 Galactic Seasons
 PvP Seasons
 Bounty Event
 Double XP Event
 Feast of Prosperity
 Gree Event
 Life Day
 Nightlife Event
 Pirate Incursion Event
 Rakghoul Event
 Spring Abundance Festival
 Swoop Event

 Jedi Knight
 Jedi Consular
 Trooper
 Smuggler
 Sith Warrior
 Sith Inquisitor
 Bounty Hunter
 Imperial Agent
 Bounty Hunter
 Imperial Agent
 Jedi Consular
 Jedi Knight
 Sith Inquisitor
 Sith Warrior
 Smuggler
 Trooper
 Legacy Gear
 Lightsabers
 Double-Bladed Lightsabers
 Vibroswords
 Double-Bladed Vibroswords
 Blaster Pistols
 Blaster Rifles
 Sniper Rifles
 Blaster Cannons

Maelstrom Prison is a Flashpoint in Star Wars: The Old Republic that you can run alone, with friends, or with other random players through the groupfinder.
Contents
Maelstrom Prison

After a vicious battle on and above Taral V, the Republic now holds the coordinates of the secret Imperial prison, as well as valuable star charts that are needed to navigate the dangerous nebula that surrounds it. With this information, ships led by the Jedi Master Oteg make their way to the Maelstrom Nebula and rescue the captured Jedi. But they are not alone; an Imperial fleet under the command of a vicious Grand Moff pursues them, determined to make the Republic pay for their attack on an Imperial world. As Republic and Imperial fleets battle, a small group of elite heroes make their way into the prison. Now they must work together to fight their way through elite Imperial soldiers, deadly war droids and powerful Sith to find and free the Jedi prisoner.
How to Start
Maelstrom Prison is a Flashpoint meant to be played at almost any time during your levelling or story path – but it would be smart to play it, and its partner flashpoint, before you start the expansions. You can encounter it in the story part way through your class story, replay it alone in Story mode, or play it outside of the story with a group in Story, Veteran or Master mode.

Use the tabs above for instructions for how to enter the flashpoint in the story line, and how to enter it in Solo (Story) mode, Veteran mode, and Master mode by faction.
- Story: Lvl 29+
- Solo: Lvl 29+
- Veteran: Lvl 15-80
- Veteran Groupfinder: Lvl 29-80
- Master Mode: Lvl 50-80 †
- Master Mode Groupfinder: Lvl 80

Story – Republic Instructions
![]()
![]()

Requirements: To play the Maelstrom Prison Flashpoint in the story, and receive all the special cutscenes related to the Flashpoint in the story, you will need to be level 29+ and on the The Jedi Prisoner quest after completing Taral V. If you are below this level, and have not completed the previous steps to The Jedi Prisoner, you can not play the story quest for this Flashpoint. Taral V & The Jedi Prisoner Quest Guide
![]()
Timeline: In the story, this Flashpoint takes place immediately after its partner Flashpoint, Taral V, which takes places roughly after Taris on the Imperial side and before Quesh – but the story is not heavily tied into the main storyline, so you can play it whenever you want, but it would be smart to play the overarching The Jedi Prisoner quest before you start the expansions, as its story is directly tied into the second expansion’s plot.

Bring a Friend: If you want to bring a friend along for this Flashpoint in Story Mode to do the full story line, you easily can.
If they have not done the Maelstrom Prison storyline, they can join you in a group and you can follow the exact same steps together as long as they are level 29+ and are on the same story step as you. If they aren’t on the same step, they can still enter the Flashpoint with you. Tell your friend to go talk to the nearby Deck Officer Bessel alien and pick up the [Start Story Mode] quest and then they will be able to enter the Flashpoint with you.
If they have already run the storyline, they’ll be able to join you in the cutscenes after you finish Taral V, by walking in the door after you on the The Telos for Master Oteg’s quest, The Jedi Prisoner. Then after you finish that cutscene with them watching, you’ll be able to enter the Flashpoint, but your friend won’t have any quests so they can’t walk in behind you… tell them to go talk to the nearby Deck Officer Bessel alien and pick up the [Start Story Mode] quest and then they will be able to enter the Flashpoint with you.

Either way, they can also use the Solo tab in the Activity Finder to quickly join you once you are already inside the Flashpoint as long as they are level 29+.
![]()
Directions to the Republic Story Quest for Maelstrom Prison: Maelstrom Prison is a direct follow up to the Taral V flashpoint during the multi-step The Jedi Prisoner quest. After you finish the Taral V Flashpoint during The Jedi Prisoner, the quest will tell you to return to Master Oteg on The Telos. Then after speaking to him, the quest will have you go to Complete Flashpoint: Maelstrom Prison right outside, and should automatically give you the quest [STORY] Flashpoint: Maelstrom Prison.
Didn’t automatically get the [STORY] Flashpoint: Maelstrom Prison quest? If you did not automatically get the quest, the first step is to check your quest log. If you already have a version of Maelstrom Prison in your quest log, for example Veteran mode or Master Mode, you’ll not automatically receive the Story version. If you do have a Veteran Mode quest, find it in your quest log and click the Abandon button. Then you can pick up the [STORY] Flashpoint: Maelstrom Prison quest from the Deck Officer Bessel alien outside the flashpoint’s entrance. The second reason you may not automatically get the quest is if you’ve already used the Reset All Active Flashpoints option too many times earlier today, then you just need to wait before picking up the story mode again tomorrow, but it is unlikely this is the issue.
If you’re on the The Jedi Prisoner quest step, but forgot how to enter the flashpoint, here’s the instructions.
Step 1 – Get to the The Telos – either quicktravel if you have it, or…

.. take the Taxi to the The Telos. To get there, use the Elevator on the east side of the Republic Fleet to the Interfleet Transport level.
![]()
Then take the Taxi to the The Telos.

Step 3 – Go down the nearby elevator to the Hangar Deck.

Maelstrom Prison will be on the right on the Hangar Deck. Head on in, you don’t need to talk to the alien outside the entrance as you should already have the quest.
If you play in Story Mode, you will also get a Combat Support Droid to help you, just like you did in Taral V.
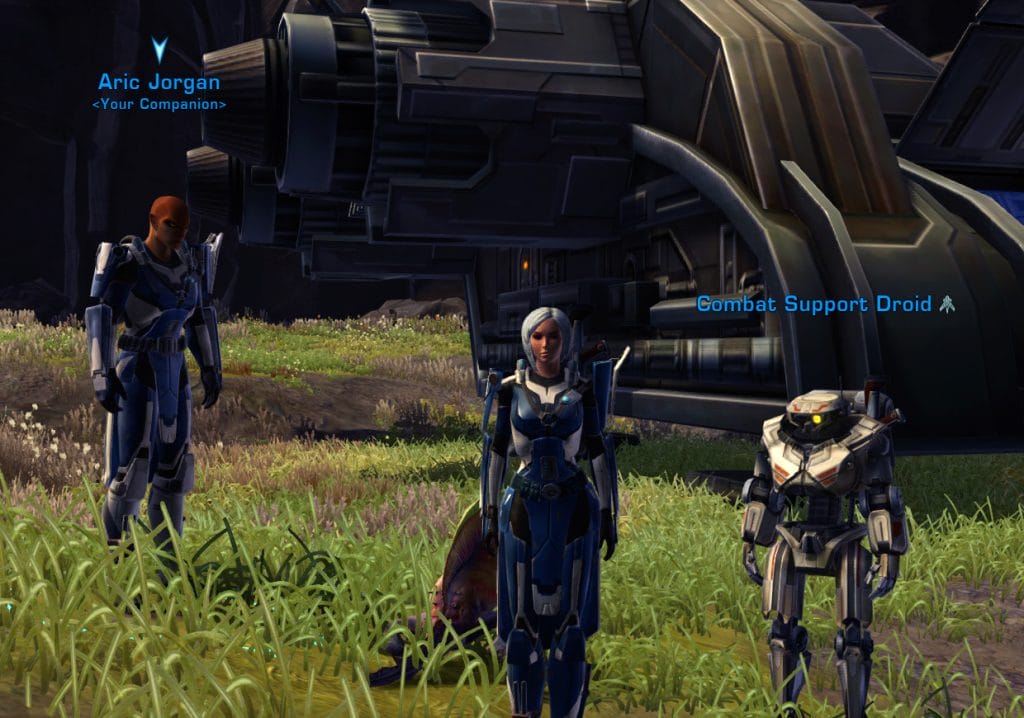
If you lose him, you can re-summon him by left-clicking the blue symbol beside the Maelstrom Prison quest.

If you can’t see that icon, you can also right-click the item in the Mission Items tab of your inventory.

![]()
Story Progress: [STORY] Maelstrom Prison alone will not progress your storyline – it is simply the repeatable solo version. To work on the overarching story, you also need to be on the quest The Jedi Prisoner on the step Complete Flashpoint: Maelstrom Prison and then run the [STORY] Flashpoint: Maelstrom Prison quest.

Lost the quest? If you lost the The Jedi Prisoner quest, head back to the MP-77 Droid you started at to re-pick up the quest related to Taral V. Keep in mind this story-based introductory quest The Jedi Prisoner is one-time-per-character. If you lost the ability to walk into the Flashpoint door, or lost the quest with the word Flashpoint in it, you can pick up the [STORY] Flashpoint: Maelstrom Prison quest from the Deck Officer Bessel alien outside the flashpoint’s entrance.

Solo (Story) – Republic Instructions
![]()

You can also run this repeatable Flashpoint solo outside of the one-time story quest, at level 29+.

Activity Finder: The FASTEST and EASIEST way to get into the Maelstrom Prison Flashpoint soo mode is with the Activity Finder. If you are level 29 or higher, click the icon of “three little people” on the bottom right of your screen which will open the Activity Finder Window.
Then choose the Solo tab in the Activity Finder.

On the solo tab, scroll down and find the listing for Maelstrom Prison on the list under Flashpoints, select it, then click the green Travel button. This will take you right into the Flashpoint!
Bring a Friend: You are allowed to bring friends along for this Flashpoint, you do not have to do it alone even though it is considered soloable. Your friends must also be level 29+, be in a group with you, and then you can all use the Solo Tab of the Activity Finder to get into the Flashpoint, and it will put you together no matter where in the galaxy you started from.
![]()
There’s really no need to walk into the Flashpoint manually, but here are the instructions.
Manual Entry (Republic): The Maelstrom Prison Flashpoint entrance is located on the fleet on the The Telos, and you need to take the eastern fleet elevator to the Interfleet Transport level, and a taxi to the The Telos. You can also quicktravel directly to the The Telos from the fleet. Then you need to take the second elevator down to the Hangar Deck to find the flashpoint door.
Step 1 – Get to the The Telos – either quicktravel if you have it, or…
.. take the Taxi to the The Telos. To get there, use the Elevator on the east side of the Republic Fleet to the Interfleet Transport level.
![]()
![]()
Then take the Taxi to the The Telos.
Step 2 – Take the southern elevator on The Telos down to the Hangar Deck
Step 3 – Speak to the alien questgiver Deck Officer Bessel.
And choose [Start Story Mode] which will be available as long as you are level 29 or higher.
If you play in Story Mode, you will also get a Combat Support Droid to help you.
If you lose him, you can re-summon him by left-clicking the blue symbol beside the Maelstrom Prison quest.

If you can’t see that icon, you can also right-click the item in the Mission Items tab of your inventory.
![]()
Story: [STORY] Flashpoint: Maelstrom Prison alone will not progress your storyline – it is simply the repeatable solo version. To work on the overarching story, you also need to be on the quest The Jedi Prisoner on the step Complete Flashpoint: Maelstrom Prison and then run the [STORY] Flashpoint: Maelstrom Prison quest. See the Story tab for more info.
Veteran – Republic Instructions
![]()
![]()
Maelstrom Prison also has a repeatable 4-player Veteran version. It is meant to be completed by a group with any type of Republic characters in it, you do not necessarily need a tank or healer to complete it. You will likely also have good luck with 2 players and 2 companions, or 3 players and 1 companion.
Group Finder: If you want to queue up and enter Maelstrom Prison in veteran mode through the group finder, you will need to be level 29-80 and not currently on any Maelstrom Prison Flashpoint quests or it won’t show up as an option in the group finder. If you are level 29-80, click the icon of “three little people” on the bottom right of your screen which will open the Activity Finder Window. Then choose the Group tab in the Activity Finder.
Filter: If you want to specifically run Maelstrom Prison and not a random Flashpoint, make sure to choose Veteran Flashpoints, then click the Filter button the right and narrow your choices down to just Maelstrom Prison before pressing Join Queue. Joining the queue will put you in line to be matched with random players to play Maelstrom Prison with.
Groupfinder flashpoints do NOT show the cutscenes. To see the cutscenes related to this Flashpoint, you must enter it manually by walking in the door.
Bring a Friend in the Groupfinder: You can queue up with a group of 2, 3, or 4 players in the group finder. If you have a full group of 4, it will bring you straight to the Flashpoint with your full group. If you have 2 or 3 players in your group, the group finder will match you with other random players until you have a full group – but you’ll always be paired with your friends who started off in your group, and will not be split up.
![]()
Story: [VETERAN] Maelstrom Prison will not progress your storyline – it is simply the repeatable group version. If you are a low level, this is the only version that will show up on the actual Flashpoint questgiver in front of the entrance door – so don’t be confused and accidentally enter the group version if you are a low level, as it is not meant to be completed alone.
![]()
Veteran Manual Entry (Republic): To enter this Flashpoint manually in veteran mode, the Maelstrom Prison Flashpoint entrance is located on the fleet on the The Telos, and you need to take the eastern fleet elevator to the Interfleet Transport level, and a taxi to the The Telos. You can also quicktravel directly to the The Telos from the fleet. Then you need to take the second elevator down to the Hangar Deck to find the flashpoint door. The veteran repeatable mode will be called [Start Veteran Mode] from the alien. You can then walk in the nearby door and play the Flashpoint.
Bring a Friend Manually: Veteran Mode Flashpoints are not meant to be completed alone, though highly-skilled, highly-geared, high-level players might be able to. To bring friends along for this Veteran Flashpoint, they’ll need to pick up the Veteran Mode quest from the questgiver – or you can pick up the quest and share it with them, but they’ll still need to walk in the door manually. Characters walking in the door need to be level 15+.
Step 1 – Get to the The Telos – either quicktravel if you have it, or…
.. take the Taxi to the The Telos. To get there, use the Elevator on the east side of the Republic Fleet to the Interfleet Transport level.
![]()
![]()
Then take the Taxi to the The Telos.
Step 2 – Take the southern elevator on The Telos down to the Hangar Deck
Step 3 – Speak to the alien questgiver Deck Officer Bessel
And choose [Start Veteran Mode] which will be available as long as you are level 15 or higher.
Master – Republic Instructions
![]()
![]()
Master Mode is the hardest version of Maelstrom Prison. It is meant to be completed by a high-level high-skilled group at level 80. Most teams will want a Tank, Healer and two Damage characters.
Group Finder: If you want to queue up and enter Maelstrom Prison in Master Mode through the group finder, you will need to be level 80 and not currently on any Maelstrom Prison Flashpoint quests or it won’t show up as an option in the group finder. If you are level 80, click the icon of “three little people” on the bottom right of your screen which will open the Activity Finder Window. Then choose the Group tab in the Activity Finder.
Filter: If you want to specifically run Maelstrom Prison and not a random Flashpoint, make sure to choose Master Flashpoints, then click the Filter button the right and narrow your choices down to just Maelstrom Prison before pressing Join Queue. Joining the queue will put you in line to be matched with random players to play Maelstrom Prison with.
Groupfinder flashpoints do NOT show the cutscenes. To see the cutscenes related to this Flashpoint, you must enter it manually by walking in the door.
Bring a Friend in the Groupfinder: You can queue up with a group of 2, 3, or 4 players in the group finder. If you have a full group of 4, it will bring you straight to the Flashpoint with your full group. If you have 2 or 3 players in your group, the group finder will match you with other random players until you have a full group – but you’ll always be paired with your friends who started off in your group, and will not be split up. Your friends all need to be level 80 too.
![]()
Story: [MASTER] Maelstrom Prison will not progress your storyline – it is simply the repeatable difficult group version.
![]()
Master Manual Entry (Republic): To enter this Flashpoint manually in master mode, the Maelstrom Prison Flashpoint entrance is located on the fleet on the The Telos, and you need to take the eastern fleet elevator to the Interfleet Transport level, and a taxi to the The Telos. You can also quicktravel directly to the The Telos from the fleet. Then you need to take the second elevator down to the Hangar Deck to find the flashpoint door. The veteran repeatable mode will be called [Start Master Mode] from the alien. You can then walk in the nearby door and play the Flashpoint.
Bring a Friend Manually: Master Mode Flashpoints are not meant to be completed alone, and are designed for level 80 players who are comfortable with their role and class. To bring friends along for this Master Flashpoint, they’ll need to pick up the Master Mode quest from the questgiver – or you can pick up the quest and share it with them, but they’ll still need to walk in the door manually while you’re in a group. Level 50-80 characters can technically enter Master Mode flashpoints, but all the enemies are level 80, and they will die very quickly.
Step 1 – Get to the The Telos – either quicktravel if you have it, or…
.. take the Taxi to the The Telos. To get there, use the Elevator on the east side of the Republic Fleet to the Interfleet Transport level.
![]()
![]()
Then take the Taxi to the The Telos.
Step 2 – Take the southern elevator on The Telos down to the Hangar Deck
Step 3 – Speak to the alien questgiver Deck Officer Bessel
And choose [Start Master Mode] which will be available as long as you are level 80.
Bosses
X-37 Oppressor Droid

When you hear the boss making a ticking clock sound, and see “Punishment” being cast, back away from the boss the avoid damage.

This boss also punches people across the room, so try and put your back facing a wall/corner.
Colonel Daksh

Colonel Daksh has a fun mechanic. He will knock evryone back, then will start charging his optics, and then after he is done charging, he will start randomly shooting between players with a really strong attack.

If he is targetting you, you can avoid his line of site by running behind the metal containers in the room to hide from him. He will chase you – keep running around the containers away from him!

When doing this solo, he rapidly switched between me and my companion and my droid – so you may want to just start hiding as soon as his optics are charged.

Lord Kancras

Lord Kancras is the “beast boss”.
Bonus Boss: Ancient Maelstrom Flayer

To unlock the bonus boss, you must do the Painful Employment bonus quest:
- Stage 1: Defeat Imperial Forces: 0/100
- Stage 2: Defeat the Unleashed Beasts: 0/30
- Stage 3: Override the Containment Consoles
- Final Stage: Kill the Ancient Maelstrom Flayer

The actual fight is easy, just be aware he has a knockback and a lot of health!
Lord Vanithrast

Lord Vanithrast is a very simple fight with no real mechanics. He dies fast.
Grand Moff Kilran

Kilran actually has quite a few mechanics – the idea is he has a shield up, and you can’t hurt him until you get into close range, so you are supposed to run up to him to hurt him. His super-shield looks like a red screen around him,

Or a blue screen icon near his character parotrait.

In the olden days, he used to snipe you and easily kill you with very heavy damage, and you would sneak your way forward by hiding from his line-of-sight between the pillars in the walkway leading up to him. These days, he does very little damage, so feel free to run right up to him.
He is supposed to teleport or run forward as you reach him. Unfortunately, he often gets stuck in his shield mode where he can’t get damaged.

If he gets stuck, your and/or your team need to run forward past him and hide behind the various crates and boxes. Then, when he tries to shoot you, he will run forward. Eventually, he will be properly moved forward and will no longer have his shield up.

The final part of the fight once he has moved far ahead, you will need to kill the nearby enemies that appear before you can hurt him again.
Then you can finish the Flashpoint! Use Exit Area or the nearby door around a tunnel to leave.
![]()
Bonus
There are two bonus quests for Taral V each with multiple steps. Defeat 100 Imperial Forces, then 30 beasts will unlock the Bonus Boss, and the glowing blue Prison Defense Consoles and Munitions Stockpiles are just for extra XP and credits.
Disrupting Defenses (Bonus)
- Destroy Prison Defense Consoles: 0/8
- Destroy Munitions Stockpiles: 0/12
There is many of the Defense Consoles all over the map – they are large glowing blue computers, and you only need to find eight of them.

THERE IS ONLY 12 MUNITIONS STOCKPILES in the Flashpoint so you must find them all to do the bonus quest. They look like a single glowing blue cannister in a set of three, often surrounded by enemies.

Painful Employment (Bonus)
- Stage 1: Defeat Imperial Forces: 0/100
- Stage 2: Defeat the Unleashed Beasts: 0/30
- Stage 3: Override the Containment Consoles
- Final Stage: Kill the Ancient Maelstrom Flayer
Imperial Forces: If you want to do this bonus quest and bonus boss, you need to start by defeating 100 Imperial Forces, and you’ll want to start working on killing Imperials right away. Kill all the smaller enemies on the first map, and many before the beast pens on the second map – you can skip the largest Maximum Security droids, but to get to 100, you’ll need to kill almost everything else – you’ll only be able to skip one or two groups and still reach your 100 goal before you start running into beasts to kill.
Unleashed Beasts: The same things applies to the Beasts – you’ll need to kill almost all of them except the giant Terentatek. Lord Kancras’s beasts he summons do count towards the bonus boss counter, but of course, the faster he dies, the less show up.
The bonus boss is locked under a glowing red floor barrier and will not come out unless you complete the bonus quest.
To do Stage 3: Override the Containment Consoles, right-click the glowing blue terminals around the trapped beast.


Then you can fight the Ancient Maelstrom Flayer bonus boss!

Skips
What follows are a quick gallery of images depicting specific walking routes that may save you some time by avoiding enemies during the flashpoint – certain routes will be highlighted as the main “community routes” that you’ll probably see players in random activity-finder groups try to do – if you only practice one skip out of all of these, make it the community one! All of the following images are done without stealth or without a sleep dart/mind maze from a stealth character, so anyone can attempt them. If you fail to slip by unnoticed or see your team has attacked the enemies – always pull back from these routes and go back to help them defeat them! These may save time if everyone does them, but nothing makes a flashpoint slower than running ahead and not helping others to get out of combat again.
 Stealth: If you are playing Maelstrom Prison alone and are on a Stealth character, or with a group of all stealthers, you can choose to skip many of the early enemies if you are going to speed, since they won’t detect you, just don’t stand in the fire as you run! The first enemy you actually need to fight is the first boss the big droid boss X-37 blocking the door, have fun skipping until then. No other droids or enemies can see you in stealth.
Skip #1

Pretty standard corner skip here, right after the first group of enemies you can’t skip. If you aren’t going for bonus objectives, skipping packs like this becomes pretty common. In the room ahead, thread the needle between bonus objective items and just engage the big patroling gold droid to save time.
Skip #2

This droid in the open can be skipped by hugging the left wall. Beware in the next area the gold-level droid patrolling around. You may have to deal with that depending on group speed.
Skip #3

This skip is just threading the needle between bonus objective packs again – but the arrow points to a small pillar you can hide behind at the far end so that as you aggro the first boss, you also break line of sight and drag it into the corner: this is because the patroling gold droid is very likely to pull with it eventually if you fight it where it stands. It has long casts and may stay put anyway, but one extra gold mob during a boss fight isn’t so bad compared to the rest of the room. If the gold droid is pulled, beware of it’s concussive charge knockback. You can easily get pushed into mobs you skipped.
Skip #4

Another bonus objective skip by threading the needle. On this one, the gold droid on the right patrols while the left stays still. If you walk right on this grey line with the greebled box in your way like the arrow in the image, you shouldn’t aggro either even if the patroling one is right across from the standing one. Just jump the box and keep running to the wall.
Skip #5

After long green hallways of unskippable imperials, you can skip again once in this more open room – run around the right pillar and hop over the feet of the sith statue. This is a pretty close shave, and may depend on what direction the Terentatek is facing, as it does slowly waddle a little here and there, but I’ve squeaked by without stealth when he’s looking southwest.
Skip #6

After the first group of flyers in the beast pens gets defeated you can pretty much skip the entire rest of the room – drop down the ramp to your right and run behind the boxes, jump across the little kennels and get to the next ramp up. From here, a gold level terentatek will come out of the next green hallway. Run across his path between him and the security droids in the back, going for the far corner. Go down his hallway as he passes you by.
Skip #7

After the beastmaster sith boss you’ll get to the first map of the System Core – still looks kind of Beast-Pen-ish. Dodge a terentatek (below this images point of view) and hop off to the right side of the room. You can skip all these sith in the center by hugging the right wall and hopping the health dispenser to the next ramp and out. Unfortunately for the rest of the system core, its littered with widely spread out groups and narrow halls with sith statues that get in the way of wall-hugging, so not much is skippable after this.
Rewards
In addition to the usual rewards of XP, credits, gear and end-game currency, Maelstrom Prison has the following rewards available.
The Computer Desk (Imperial) decoration is an automatic reward for completing the repeatable solo-friendly [STORY] mode, picked up through the Activity Finder. It can also be bought and sold on the GTN.
Objectives
- Board Maelstrom Prison in the Shuttle
- Disable Prison Security
- Enter the Core Chamber
- Defeat Grand Moff Kilran
- Use the Holding Cell Controls
 Questions or comments? Feel free to send me a message on Twitter


 Discord
  Email swtorista@gmail.com
 Bluesky @swtorista.com
 Reddit /u/swtorista
 Twitch Swtorista
 Youtube
 Patreon
 Twitter @swtorista