


World bosses are fun challenges larger groups can take on for fun in the open world in Star Wars: The Old Republic. World Bosses used to offer very little in the way of rewards, but now all World Bosses drop a decent crate of endgame gear and 25 techfragments for each person who is in the group. World Bosses are one of the few types of content in the game that players can take on as a group at lower levels, as the other large group content, Operations, is reserved for level 70 and higher. World Bosses are also great as you can take them on with a group of up to 24 players, the largest group content in the game. This guide is a list of all the world bosses you can link to your group so you can all easily find the boss, and know about and mechanics they may have.
NEW 2022: As of update 7.0, you can still only have an operations group as big as 24 people, but anyone who hits a boss, in the group or out of it, can get credit and loot from the boss – so you can take big groups of people to fight the bosses, they just need to be split up into multiple operations groups. However, if your team members are working on the Aratech Coral quest, they will not get credit unless they are in the group that pulls the boss. All players who hit the boss at least once, in the group or out of it, will get credit for Galactic Seasons, and for any loot or Tech Fragments the bosses drop.
 quesh
quesh
Contents
- World Boss Tips
- Open-World Bosses
- Coruscant (Republic) – SD-0 Droid Robot
- Dromund Kaas (Imperial) – The First
- Taris (Republic) – Subject Alpha Rakghoul
- Balmorra (Imperial) – Grandfather
- Nar Shaddaa – Battledroid R4-GL
- Tatooine – Trapjaw
- Alderaan – Ulgo Siegebreaker Droid
- Taris (Imperial) – The Ancient One Worm
- Quesh – Rogue Cartel Warbot
- Hoth – Gargath
- Hoth – Snowblind
- Belsavis – The Primal Destroyer
- Corellia – Lucky the Rancor
- Voss – Nightmare Pilgrim
- Expansion Worldbosses
- Events Worldbosses
World Boss Tips
- These world bosses can not be solo’d. They will cause your companion to tremble in fear, and your companion will not be able to help you during the fight. It’s recommend to bring a group of four or more for the world bosses below level 50, and bigger groups for the other bosses.
- Once you have a group started, if you want to invite more than four players to your group, right click your character portrait and choose “Convert to ops group” to make the group hold more players.
- If the boss has already been defeated and is not around, you can open your map, and choose a different instance from the dropdown on the bottom right and see if the boss is available in that instance.
- Use the Heroic and Daily shuttles to get to the bosses and planets quicker.
- If you are planning a “world boss day” for you and your guild or your group of friends, you can save time by placing your different characters near the world bosses before the event, then using guilds summons to summon your group to the bosses so they don’t have to travel. When you are done the first boss, log out, log in to your next character who is sitting near the next worldboss, then summon your group again. If you really wanted to attend on your first character, log back out and in to your main character, and have another group member at the next world boss who was summoned, summon you. Summoning requires that your guild has a flagship, that you have permission to access the guild funds (so free-to-play and preferred players can not summon others) and have guild permission to use summons. Summons send out an invitation to all players in your group to join you at your location. It’s a short invitation so give your group a warning before and when you summon so they know to accept it.
- If you are doing an “on the fly” world boss tour, and your characters have the ability to summon, it’s fastest as the group leader to simply log out as soon as you defeat the first boss, log in to another character, heroic travel from the solo panel and run to the boss, then summon your group. That way you will always have your summon available from cooldown. Make sure to set “Group Leader” to a player who understands you will need to be re-invited to the group, before you log off.
- Share the maps below to your group if you are not summoning.
- You can take low level players along as long as they meet the minimum suggested level. When on the planet, you will be scaled down, so lower level characters are not at a big disadvantage compared to high level characters when fighting world bosses. You can even take lower level characters if they don’t mind dying. Low level characters WILL need a ship.
- Players who have not earned their ship will NOT be able to accept summons. If you are doing Coruscant or Dromund Kaas, and inviting from general chat, you may want to instead share the nearby heroic and have players run to you.
- If you enjoy these single-boss fights, there are also Operations at level 70+ that have only one boss that are not covered in this guide. This includes The Golden Fury aka Toborro’s Courtyard on Makeb, the Colossal Monolith on Ziost, Hive of the Mountain Queen on Ossus, the secret Dreadful Entity and the Hateful Entity bosses, the limited-time Xenoanalyst II from the Gree event, and the Eyeless Rakghoul world boss from the limited-time T.H.O.R.N. event.
[Weekly] Priority Targets Quest
If you’re looking for a few extra rewards, there’s a weekly quest from the Operations Terminal in the middle of the Supplies section of the Fleet that you can pick up that rewards you with a small amount of credits and XP. This quest, the Priority Targets weekly quest, will send you out to hunt down three of the listed bosses, and the quest is shareable.
You must be in the group that pulls the boss for Priority Targets to get counted, not just tag the boss with shared tagging.
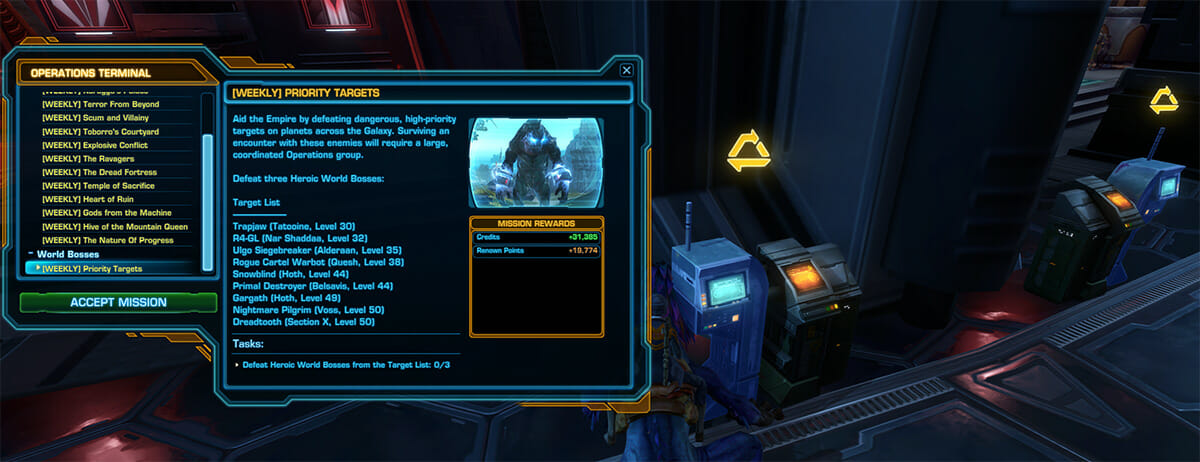
Target List
———————–
- Trapjaw (Tatooine, Level 30)
- R4-GL (Nar Shaddaa, Level 32)
- Ulgo Siegebreaker (Alderaan, Level 35)
- Rogue Cartel Warbot (Quesh, Level 38)
- Snowblind (Hoth, Level 44)
- Primal Destroyer (Belsavis, Level 44)
- Gargath (Hoth, Level 49)
- Nightmare Pilgrim (Voss, Level 50)
- Dreadtooth (Section X, Level 50)
Aratech Coral Mount Quest
While most of the bosses do not have any quests related directly to them, there is a one-time quest available in the Galactic Trade Network section of the fleet, in the cages, near the Speeder vendor that you can pick up. To earn a unique mount, the quest will tell you to defeat both the Hoth world bosses, the Belsavis worldboss, and the difficult Voss worldboss three times each. If you plan on fighting Snowblind, Gargath, The Primal Destroyer, or the Nightmare Pilgrim, you may want to pick up the Aratech Coral quest.
You must be in the group that pulls the boss for the Aratech Coral Quest to get counted, not just tag the boss with shared tagging. So if you are fighting Nightmare Pilgrim with a very large group, make sure all the players who are working on their Aratech Coral quest are in the original group that summons the boss.
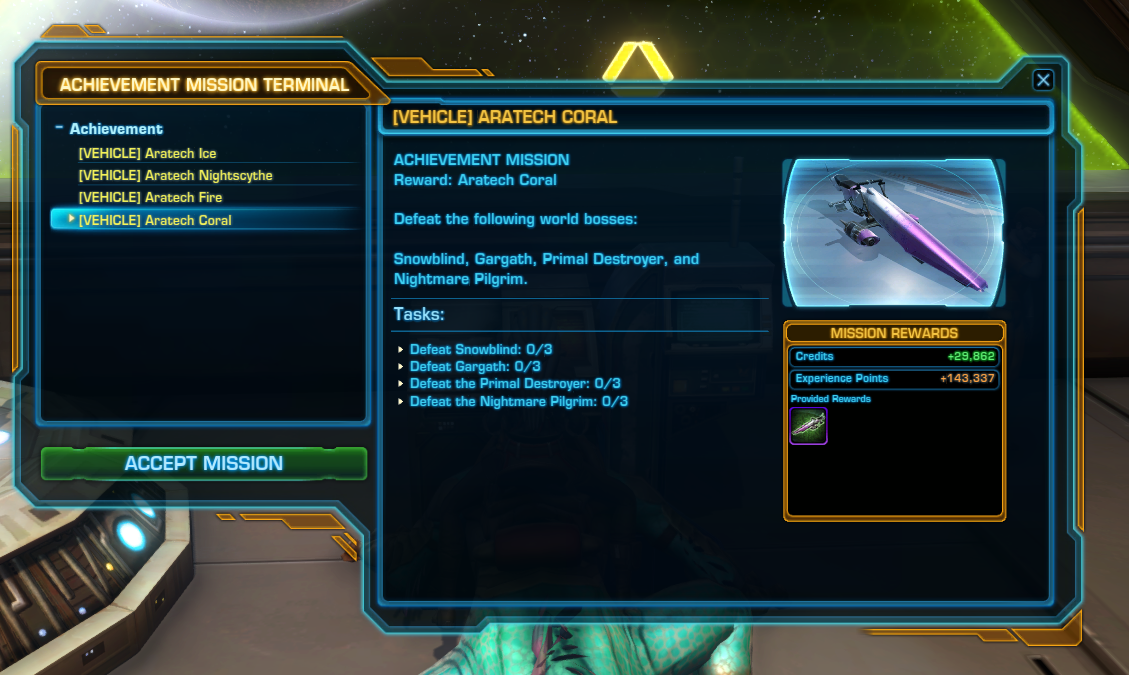
- Defeat Snowblind 0/3
- Defeat Gargath 0/3
- Defeat The Primal Destroyer 0/3
- Defeat Nightmare Pilgrim 0/3
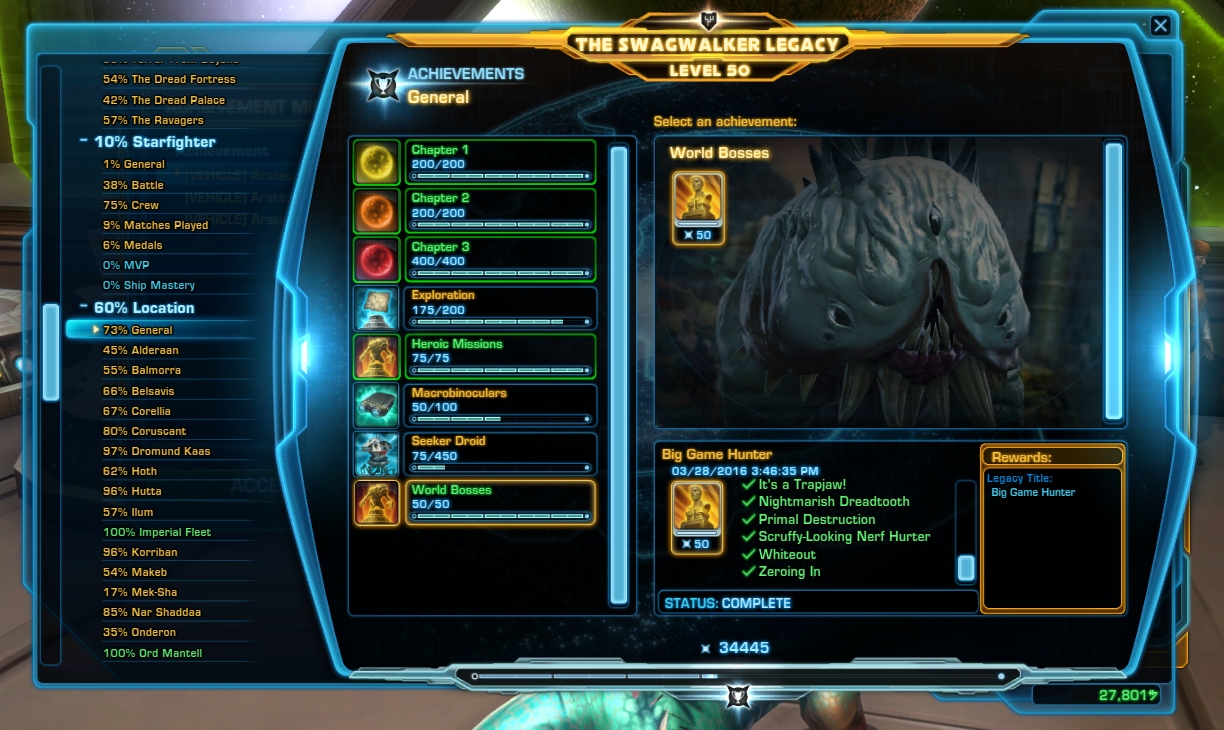
Big Game Hunter Title & Achievement
If you defeat all SD-0 Droid Robot, The First, Subject Alpha Rakghoul, Grandfather, Ulgo Siegebreaker Droid, Rogue Cartel Warbot, The Ancient One, Trapjaw, Gargath, Snowblind, The Primal Destroyer, Lucky the Rancor, Battledroid R4-GL, Nightmare Pilgrim, Dreadtooth on all three modes, you’ll get an achievement and a legacy title called “Big Game Hunter” for all your characters on your server.
Open-World Bosses
These bosses are simply meant to be found and fought with a group!
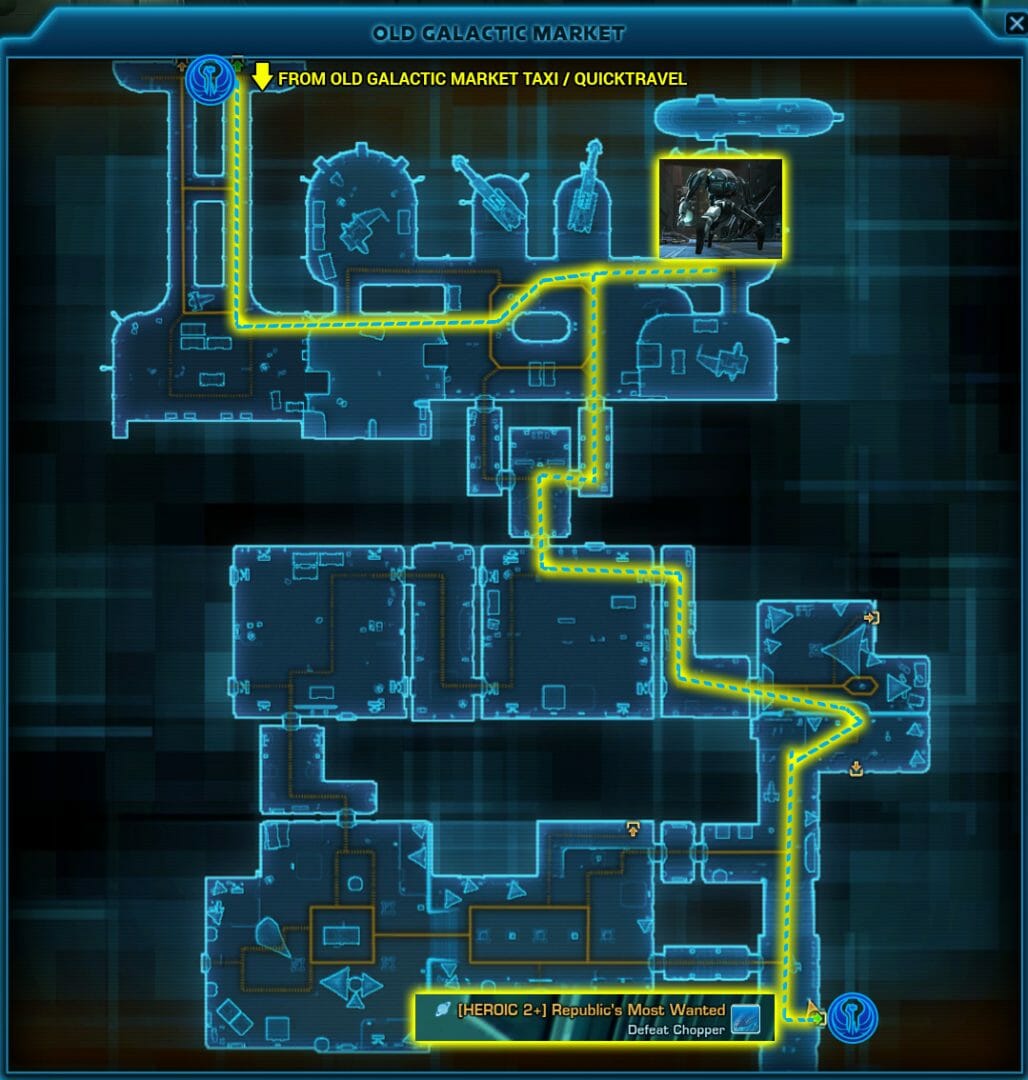
Coruscant (Republic) – SD-0 Droid Robot
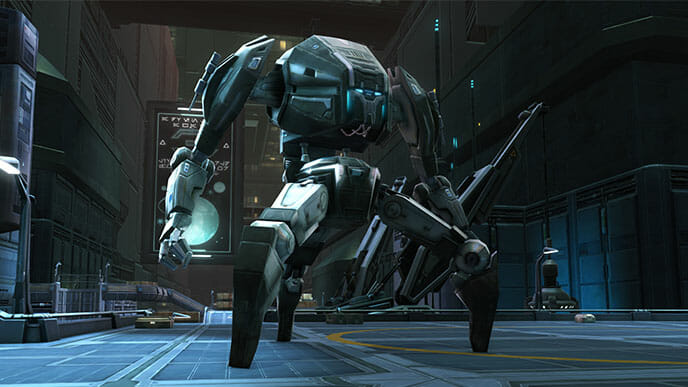
Directions: The worldboss SD-0 is a Republic-only worldboss and is recommended for characters level 17 and up. The easiest way to get to SD-0 is to pick up the Coruscant heroics from the activities panel, by clicking the symbol of “three little people” near your minimap, then clicking the solo tab, choosing “Heroics Missions: Coruscant” then clicking travel, which will let you skip past the orbital station. From there, you can either pick up the “Republic’s Most Wanted” heroic quest and take the heroic shuttle then run north, or take a taxi to the Galactic Market Taxi. You can also quicktravel to the Old Galactic Market and run south to the boss.
How many players? Unlike most of the other low-level world bosses, you can NOT go into this fight with just four high-level characters. For being a level 17 world boss, SD-0 has a ton of mechanics that can easily kill your team members, and one of them seems to be bugged and will simply kill anywhere from 2 to 6 of your team mates during your fight. I recommend going in with at least ten members though I’ve seen up to sixteen suggested for this world boss.
1. Proximity Laser – The killer mechanic is Proximity Laser. Throughout the fight, including often at the very beginning, two team members will be targeted with a proximity laser and will be marked with a big red circle over their character’s bodies. What I’ve always been told is that these two players need to run far apart from eachother, and if they’re too close to eachother, they’ll explode and die. These two players will be connected by a beam of light, with the color of the beam indicating how far away they are from each other, with yellow being way too close, blue being pretty good and green being acceptably far away. However, in my experience, it seems to matter how far away the two players are when they originally picked instead, and I’m not entirely convinced that running away even helps, but for the sake of this guide, I’ll advise you to at least try and run away from your team mate if you both get targetted by the proximity laser. I do know if you are successfully 20m away from your targetted team mate and have a green alser, not only will you not die, but you’ll also get a damage boost for a short time.
However, what usually happens is that two players get marked, then they explode and both die without having a lot of time to separate – in my testing, two of my players started near each other at full health and died in under 3-4 seconds, which wasn’t enough time for them to notice they had the red circle and actually run far enough away to survive. My team mates who survived and actually got the lucky green beam were ones who were lucky enough to already be 20 m away from each other when they were picked – for example a ranged player and a melee player. As far as I can tell there’s no way to outsmart the boss and have it pick players who are already far apart, and I think it may be entirely random who the boss picks. There’s also no way to know when the droid casts Proximity Laser, your group just needs to watch their characters’ bodies for the red-orange circle on them – there no cast or ability that the boss does. It seems to happen first at the very beginning of the fight, then once every 30 seconds or so.
This is why such big groups are recommended – a chunk of your team mates will likely just die and there’s not much you can do about it. I don’t know if it’s a bug and you’re supposed to have more time to separate, or if you’re simply supposed to take less damage and things got strange when they added level sync, or if this is the intended mechanic and every group I’ve ever been in just sucks at it, but this boss is pretty much impossible for smaller groups and this mechanic is why you will automatically die in the first second or two if you try and solo the boss.
One thing that helps a little bit is to have your ranged player spread out in a big circle around the boss before you start, and if you get lucky, those spread-out players will get picked. Another thing that helps is to instruct your team, especially your tank, not to leap or jump to the boss to start the fight – just have them walk in on foot, otherwise there’s a higher chance two your team mates will immediately get the orange circle and then explode.
Either way, the Coruscant world boss is hilariously over powered for being a boss designed for low-level players.

2. Ionized Stream – INTERRUPT – Ionized Stream is a strong attack which can be interrupted. The animation looks like red lasers, and the cast icon looks like a purple lightning.

3. Static Discharge / Ionized – The tank on the boss will get stacks of Ionized which will cause them to take extra damage for each stack. Another player should taunt the boss when the tank is taking too much damage. They can swap back once the original tank’s stacks wear off.
![]() The Ionized icon looks like a white trooper on a blue background with electricity and can stack up really fast.
The Ionized icon looks like a white trooper on a blue background with electricity and can stack up really fast.
- Planet: Coruscant
- Recommended level: 17+
- Fast way to planet: Solo tab of Activity Finder, Heroic Missions: Coruscant
 Closest Heroic Shuttle Republic: [Heroic 2+] Republic’s Most Wanted (run north)
- Closest Quicktravel Republic: Old Galactic Market (furthest right on map, run south)
- Closest Taxi Republic: Galactic Market Taxi (furthest right on map, run south)
- Imperial: No access to this boss
 Closest Heroic Shuttle Republic: [Heroic 2+] Republic’s Most Wanted (run north)
 Imperial: No access to this boss
Dromund Kaas (Imperial) – The First

Directions: The worldboss The First is recommended for characters level 17 and up. The easiest way to get to the First is to pick up the Dromund Kaas heroics from the activities panel, by clicking the symbol of “three little people” near your minimap, then clicking the solo tab, choosing “Heroics Missions: Dromund Kaas” then clicking travel, which will let you skip past the orbital station. Once there, pick up the [HEROIC 2+] Shadow Spawn and use the heroic shuttle to get there quicker, or quick travel or speeder to The Wall.
Mechanics: The world boss on Dromund Kaas is pretty simple. All you need to know is that when it hits 20% health or lower, The First will dish out extra damage, so your team will want to kill it quickly after that point.
- Planet: Dromund Kaas
- Recommended level: 17+
- Fast way to planet: Solo tab of Activity Finder, Heroic Missions: Dromund Kaas
- Republic: No access to this boss
- Closest Heroic Shuttle Imperial: [HEROIC 2+] Shadow Spawn
- Closest Quicktravel Imperial: The Wall (bottom of map)
- Closest Taxi Imperial: The Wall Speeder (bottom of map)
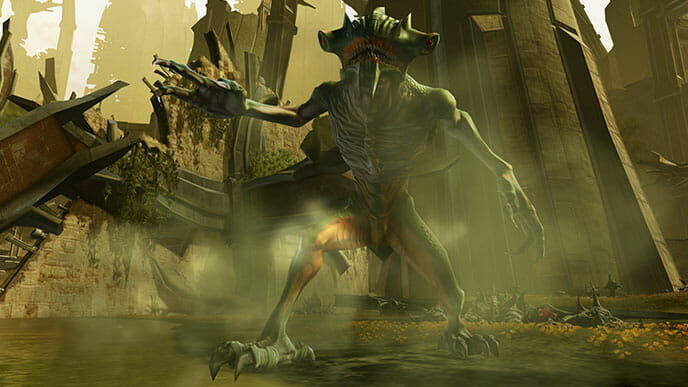
Taris (Republic) – Subject Alpha Rakghoul
Directions: The worldboss Subject Alpha is recommended for Republic characters level 21 and up. The easiest way to get to Subject Alpha is to pick up the Taris heroics from the activities panel, by clicking the symbol of “three little people” near your minimap, then clicking the solo tab, choosing “Heroics Missions: Taris” then clicking travel, which will let you skip past the orbital station. If you don’t have the Draay quicktravel unlocked which is near the middle of the map, also pick up the Total Elimination heroic from the terminal, and use the shuttle to get there quicker than the taxi, otherwise simply quicktravel to the Draay and run east.
Mechanics: This failed experiment world boss has a fantastic move where he picks a player and throws them high in to the sky. When he does this, he usually switches targets, so it’s handy to have a second tank on hand to taunt him back quickly, but not necessary. If you’re having trouble with healing, have your team spread out. This boss can very easily be taken on with a group of four higher-level characters, or with a larger group of low-level characters.
- Planet: Republic Taris
- Recommended level: 21+
- Fast way to planet: Solo tab of Activity Finder, Heroic Missions: Taris
- Closest Heroic Shuttle Republic: [Heroic 2+] Total Elimination, though the quicktravel is faster
- Closest Quicktravel Republic: Draay (bottom middle of map)
- Closest Taxi Republic: Waypoint Station Draay Settlement (bottom middle of map)
- Imperial: No access to this boss
Balmorra (Imperial) – Grandfather

Directions: The worldboss Grandfather is recommended for Imperial characters level 21 and up. The easiest way to get to Grandfather is to pick up the Balmorra heroics from the activities panel, by clicking the symbol of “three little people” near your minimap, then clicking the solo tab, choosing “Heroics Missions: Balmorra” then clicking travel, which will let you skip past the orbital station. Then you can either speeder or quicktravel to Vanguard Outpost on the far left of the map, or pick up the [HEROIC 2+] The Republic’s Last Gasp which is also nearby and use the heroic shuttle.
Mechanics: Grandfather is definitely a fun group boss to fight – he wanders around in a lake on the very edge of the Balmorra map, and he’s a HUGE Bormu. He does damage to everyone near him with his stomp, so make sure to tell your healers and ranged players to stay more than 4 meters away from him, however, players who are standing more than 20 meters away will do 75% less damage when they would normally – so make sure your ranged damage dealers do not stand too far away from the boss. He does a forward-facing conal attack, so makes sure only the tank is near his mouth. Grandfather does also heal himself over time, so don’t let up your attack. This boss can very easily be taken on with a group of four higher-level characters, or with a larger group of low-level characters.
- Planet: Imperial Balmorra
- Recommended level: 21+
- Fast way to planet: Solo tab of Activity Finder, Heroic Missions: Balmorra
- Republic: No access to this boss
- Closest Heroic Shuttle Imperial: [HEROIC 2+] The Republic’s Last Gasp (run north)
- Closest Quicktravel Imperial: Vanguard Outpost (farthest left quicktravel)
- Closest Taxi Imperial: Vanguard Outpost Skyhopper (farthest left speeder)
Nar Shaddaa – Battledroid R4-GL

Directions: The Nar Shaddaa worldboss Battledroid R4-GL is recommended for characters level 25 and up. Just like the other worldbosses, the easiest way to get to the Battledroid worldboss is to pick up the Nar Shaddaa heroics from the activities panel, by clicking the symbol of “three little people” near your minimap, then clicking the solo tab, choosing “Heroics Missions: Nar Shaddaaa” then clicking travel, which will let you skip past the spaceport. If you’re Republic side, you can save some time by picking up the Heroic “The Morgukai”, which has a shuttle that will save you some time. Otherwise the closest Republic quick travel is High Security Lockdown, and on that map you need to head to the west and find the exit called Network Access, which is just north of the Morgukai heroic shuttle. From there, head to the north east on the Network Security District map. Imperial side, it’s a lot easier, and you can quicktravle or take a taxi to Network Access, then just walk South and then east to get to the boss.
Mechanics: The Nar Shaddaa worldboss is quite easy, and I think you could do it with as few as three high level characters. The battledroid has an ability called Repeater Cannon you can interrupt to reduce damage in the first half of the fight, then later it becomes uninteruptable. It sounds like a high pitched shooting sound.

There’s also a missile that goes out that does damage over time called Trauma and Burning and can be cleansed.

- Planet: Nar Shaddaa
- Recommended level: 25+
- Fast way to planet: Solo tab of Activity Finder, Heroic Missions: Nar Shaddaa
- Closest Heroic Shuttle Republic: [Heroic 2+] The Morgukai
- Closest Quicktravel Republic: High Security Lockdown (bottom right on map)
- Closest Taxi Republic: High Security Lockdown Speeder (bottom right on map)
- Closest Heroic Shuttle Imperial: None
- Closest Quicktravel Imperial: Network Access (bottom right on map)
- Closest Taxi Imperial: Network Access Speeder (bottom right on map)
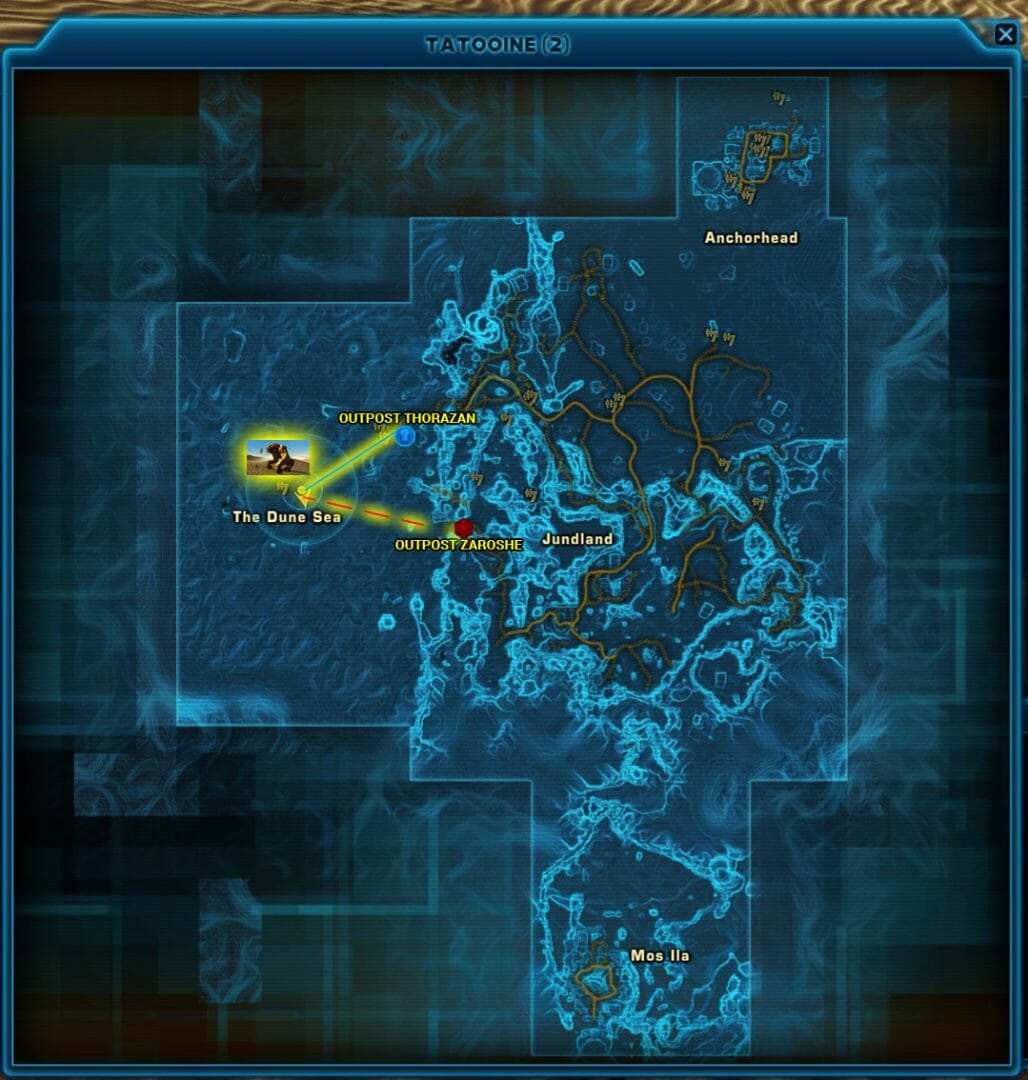
Tatooine – Trapjaw


Directions: The worldboss Trapjaw is recommended for characters level 29 and up. Just like the other worldbosses, the easiest way to get to Trapjaw is to pick up the Tatooine heroics from the activities panel, by clicking the symbol of “three little people” near your minimap, then clicking the solo tab, choosing “Heroics Missions: Tatooine” then clicking travel, which will let you skip past the spaceport. If you are Imperial side, you can also get to the boss quickly by picking up the “Prison Labor” Tatooine Heroic which will give you a transport just south of the boss. On Republic side, quick travel to Outpost Thorazan or take the taxi there, and Trapjaw is in the desert to the South West. Imperial side, if you can’t use the heroic transport, quicktravel to Outpost Zaroshe on the far left of the map, or take the speeder, and Trapjaw is located deep in to the desert to the west. To make Trapjaw appear, click the small blue skull in the sand surrounded by dead Jawas.
Mechanics: Trapjaw has some fun stuns with a long range and some area attacks, but nothing you really need to watch out for. Trapjaw is a pretty easy fight, and we did it quite easily with a group of four including two undergeared damage characters, a tank and a healer at level 75.
- Planet: Tatooine
- Recommended level: 29+
- Fast way to planet: Solo tab of Activity Finder, Heroic Missions: Tatooine
- Closest Heroic Shuttle Republic: None
- Closest Quicktravel Republic: Outpost Thorazan (far left on map)
- Closest Taxi Republic: Outpost Thorazan Speeder (far left on map)
- Closest Heroic Shuttle Imperial: [Heroic 2+] Prison Labor
- Closest Quicktravel Imperial: Outpost Zaroshe (far left on map)
- Closest Taxi Imperial: Outpost Zaroshe Speeder (far left on map)
Alderaan – Ulgo Siegebreaker Droid
Directions: The worldboss Alderaan is recommended for characters level 33 and up. The easiest way to get to the Siegebreaker droid is to pick up the Alderaan heroics from the activities panel, by clicking the symbol of “three little people” near your minimap, then clicking the solo tab, choosing “Heroics Missions: Alderaan” then clicking travel, which will let you skip past the orbital station. On Republic side, the quickest way to get there is to quicktravel or taxi to Wardpost Hurne then run south. Imperial side quicktravel or taxi to Outpost Ghrent. The droid wanders around in a small section of the river. This boss can very easily be taken on with a group of four higher-level characters, or with a larger group of low-level characters.
Mechanics: Ulgo Seigebreaker is a pretty simple boss, stay out of the bad stuff on the ground and have fun using your interrupts!
![]()
 Plasma Pulse – Will pick a player and start hitting them with a laser beam, can be interrupted!
![]()
 Fusion Missile – This will cause a very faint red circle to appear on the ground, just have your team members run far away from them – this can be interrupted! The circle can be very hard to see because it’s often underwater and the area where you’ll get hit seems to be bigger than the actual circle, so give it lots of space. If you have a big group, try and and interrupt these as they can hit many members at once.

- Planet: Alderaan
- Recommended level: 33+
- Fast way to planet: Solo tab of Activity Finder, Heroic Missions: Alderaan
- Closest Heroic Shuttle Republic: None
- Closest Quicktravel Republic: Wardpost Hurne (middle of the map)
- Closest Taxi Republic: Wardpost Hurne Thranta (middle top of the map)
- Closest Heroic Shuttle Imperial: None
- Closest Quicktravel Imperial: Outpost Ghrent
- Closest Taxi Imperial: Outpost Ghrent Thranta
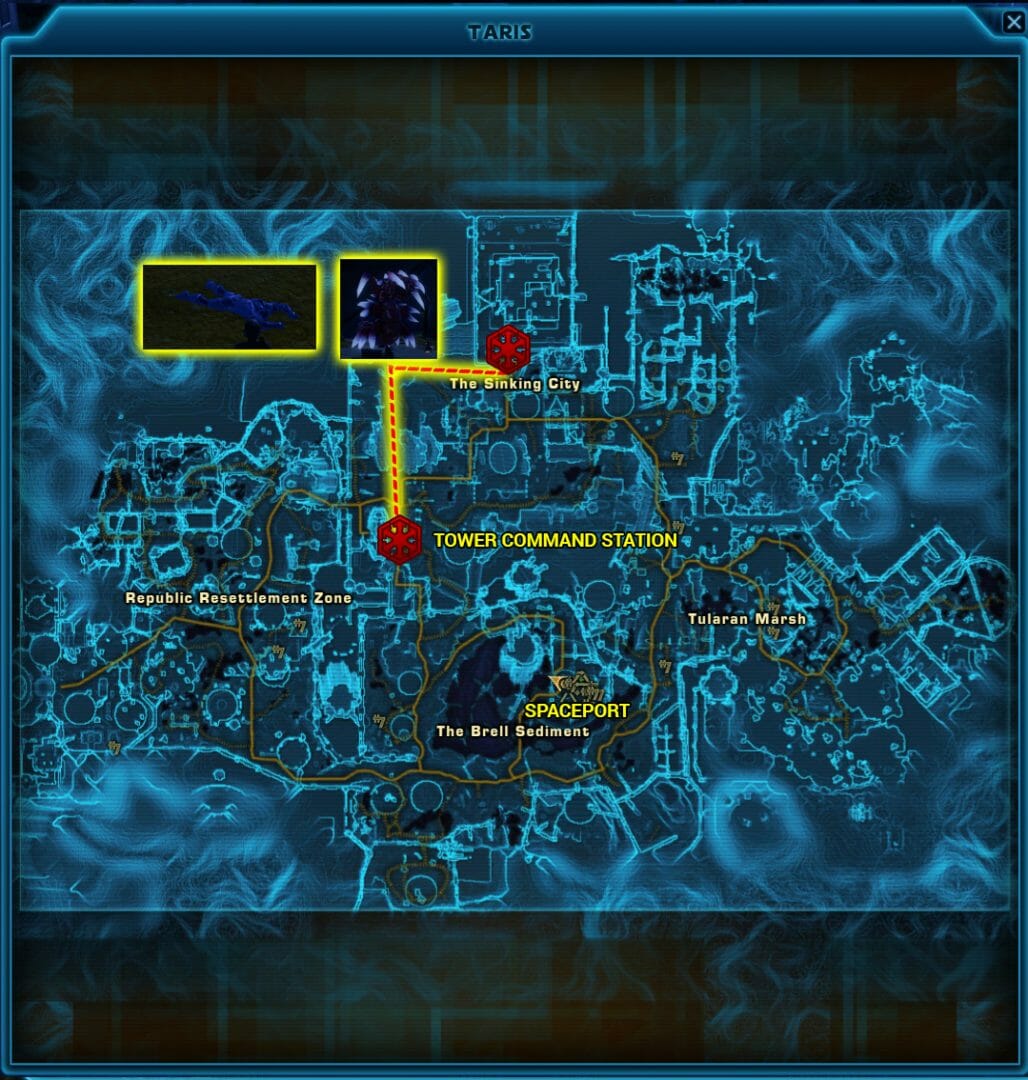
Taris (Imperial) – The Ancient One Worm
Directions: The worldboss The Ancient One is recommended for Imperial characters level 37 and up. The easiest way to get to the Ancient One is to pick up the Taris heroics from the activities panel, by clicking the symbol of “three little people” near your minimap, then clicking the solo tab, choosing “Heroics Missions: Taris” then clicking travel, which will let you skip past the orbital station. Then quicktravel to the New Tarisian Dawn (top middle of map) quicktravel point and run left, or if you don’t have it, take a speeder or quicktravel to Tower Command Station in the middle of the map and run north. Look for a large pipe with a glowing blue “Mysterious Defeated Jedi” fallen body and click it to summon the boss. This boss can very easily be taken on with a group of four higher-level characters, or with a larger group of low-level characters.
Mechanics: Also known as ‘The Worm’, this fun and chaotic world boss in the dark is a lot of fun. At about 90% and every minute and a half after that point, the Ancient One will summon its young to attack your group. The boss also has a Shockwave ability that does damage to the whole group, but you can interrupt it.

![]() Shockwave – Shockwave is a frequent attack that can be interrupted.
Shockwave – Shockwave is a frequent attack that can be interrupted.
- Planet: Imperial Taris
- Recommended level: 37+
- Fast way to planet: Solo tab of Activity Finder, Heroic Missions: Taris
- Republic: No access to this boss
- Closest Heroic Shuttle Imperial: None
- Closest Quicktravel Imperial: New Tarisian Dawn (top middle of map) or Tower Command Station (middle of map)
- Closest Taxi Imperial: Tower Command Station Speeder (middle of map)
Quesh – Rogue Cartel Warbot

Directions: The worldboss Rogue Cartel Warbot is recommended for characters level 37 and up. You will need to fly to Quesh, as there is no Quesh heroic quicktravel option to get there faster. On Republic side, the warbot is located just to the west of the Republic area you load in to, head south west as you leave the camp and head towards the gap in the large walls. Imperial side quicktravel or taxi to Imperial Waystation in the middle of the map.
Mechanics: The biggest mechanic the Rogue Cartel Bot will throw at you are giant lightning storms – they’ll show up as a faint red circle around the ground, and you’ll not only want to run out of them as soon as possible, but go a bit further out of them and jump with your character to make sure the game knows you’re well out of them. Hilariously, I think this attack might actually be called ‘Gonk Power’, and it kicks in when the boss has 65% health or lower.

I will probably still get hit with the lightning where my trooper is standing on the bottom left, even though she is out of the red circle.
 Explosive Charge – Throughout the fight, the boss will throw an Explosive Charge on some of your group members – it looks like an orange flower debuff icon, and the players who have it will hear a ticking timebomb beeping sound effect and see the debuff timing down. When it explodes at the end of the timer, it will do a chunk of damage, and also do damage to everyone around that player, so you’ll want to either spread your group up or simply tell them to run away from the group when they have the timed explosive on them.

![]() Experimental Prototype Attack – At the end of the fight, the boss will count down from five and then explode itself! If your team wants to live they should back away, they do not need to continue attacking at this point.
Experimental Prototype Attack – At the end of the fight, the boss will count down from five and then explode itself! If your team wants to live they should back away, they do not need to continue attacking at this point.
There’s also some kind of threat drop, so if you have a tank you’ll want to let them know to re-taunt when they lose the boss.
- Planet: Quesh
- Recommended level: 37+
- Fast way to planet: None, need to take your ship
- Closest Heroic Shuttle Republic: None (no heroics)
- Closest Quicktravel Republic: Republic Base (where you load in)
- Closest Taxi Republic: Republic Base Speeder (where you load in)
- Closest Heroic Shuttle Imperial: None (no heroics)
- Closest Quicktravel Imperial: Imperial Waystation
- Closest Taxi Imperial: Imperial Waystation Speeder
Hoth – Gargath
Directions: The first Hoth worldboss Gargath is recommended for characters level 41 and up. The easiest way to get to Gargath is to pick up the Hoth heroics from the activities panel, by clicking the symbol of “three little people” near your minimap, then clicking the solo tab, choosing “Heroics Missions: Hoth” then clicking travel, which will let you skip past the orbital station. Republic side, if you don’t have the Jagged Plains Republic Outpost unlocked, also pick up the “Frostclaw” from the terminal, as it will let you get pretty close to the Heroic and save you a taxi trip, otherwise quicktravel to the Jagged Plains Republic Outpost and run to the east. Imperial side the “Taking the Heat” heroic is nearby, or you can quicktravel or taxi to the Jagged Plains Garrison. Gargath wanders around in the tundra so he’s sometimes hard to find compared to the other world bosses.
Mechanics: This boss has an interesting mechanic, where it switches between attacking the group and attacking a single target, usually the tank. You’ll see red text pop up on the screen to indicate his changes.
The first is ‘earthquakes’ – these show up as red circles and cracks on the ground that your group will want to step all the way out of when Gargath spreads his focus outwards.
![]()

When Gargath narrows his focus, he’ll stop putting earthquakes out and focus on a single player again.
![]()
With that said, when I tested fighting him alone I got the red text… but when I fought him with a big group, there was no red text and as far as I can tell no mechanics, possibly because we were damaging him so fast with a full group.
- Planet: Hoth
- Recommended level: 41+
- Fast way to planet: Solo tab of Activity Finder, Heroic Missions: Hoth
- Closest Heroic Shuttle Republic: [Heroic 2+] Frostclaw, but quicktravel is closer
- Closest Quicktravel Republic: Jagged Plains Republic Outpost (furthest south quicktravel)
- Closest Taxi Republic: Jagged Plains Republic Outpost Speeder (furthest south)
- Closest Heroic Shuttle Imperial: [Heroic 2+] Taking the Heat
- Closest Quicktravel Imperial: Jagged Plains Imperial Garrison
- Closest Taxi Imperial: Jagged Plains Imperial Garrison Speeder
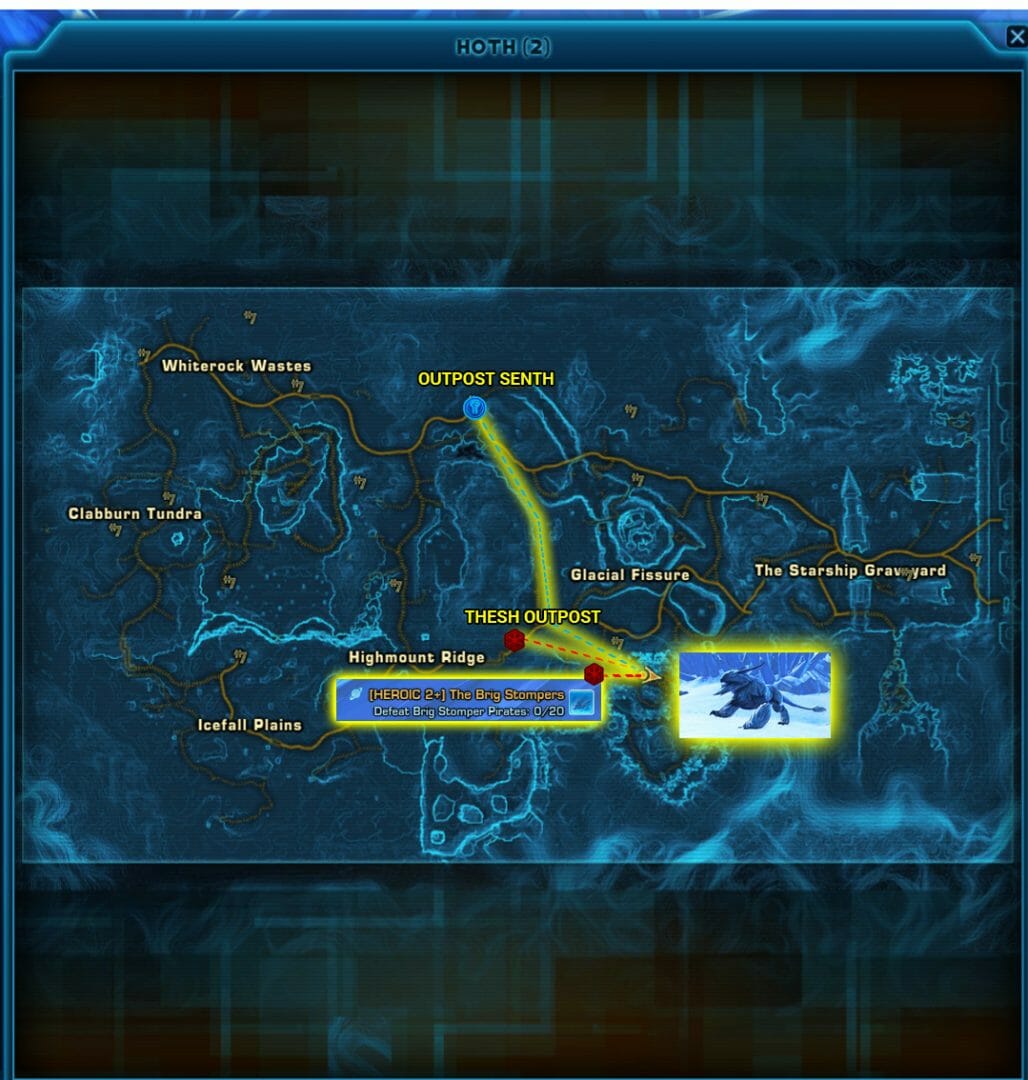
Hoth – Snowblind

Directions: The second Hoth worldboss Snowblind is recommended for characters level 41 and up. The easiest way to get to Snowblind is to pick up the Hoth heroics from the activities panel, by clicking the symbol of “three little people” near your minimap, then clicking the solo tab, choosing “Heroics Missions: Hoth” then clicking travel, which will let you skip past the orbital station. While you’re there, if you’re an Imperial player, pick up the “Brig Stompers” Heroic and use the shuttle, as it will place you just south of Snowblind in the crystal forest. On Republic side, quick travel to Outpost Senth or take the taxi there, then run way South, while not taking any paths that lead downwards into the crevasses. Imperial side, if you can’t use the heroic, quicktravel to Thesh Outpost or take the speeder, and Snowblind will be fairly nearby, just head west in to the crystal forest.
Mechanics: Snowblind has an interesting mechanic your group will want to pay attention to. Throughout the fight, the boss will create a snowstorm. When this happens, players will need to huddle up for warmth, otherwise they will get a stacking debuff that will likely kill them if they go off on their own, so make sure all group members know to stack up when the snowstorm happens. Other than that mechanic, Snowblind is not difficult, but may take a long time to kill. I believe you can fight this boss with a group of four, though I recommend more, as it seemed like it would take us a very long time with two undergeared damage characters, a tank and a healer.

- Planet: Hoth
- Recommended level: 41+
- Fast way to planet: Solo tab of Activity Finder, Heroic Missions: Hoth
- Closest Heroic Shuttle Republic: None
- Closest Quicktravel Republic: Outpost Senth (middle top of map)
- Closest Taxi Republic: Outpost Senth Speeder (middle top of map)
- Closest Heroic Shuttle Imperial: [Heroic 2+] Brig Stompers
- Closest Quicktravel Imperial: Thesh Outpost (near center of map)
- Closest Taxi Imperial: Thesh Outpost Speeder (near center of map)
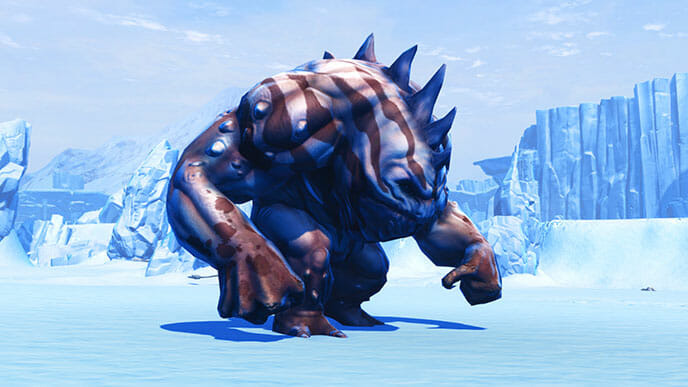
Belsavis – The Primal Destroyer

Directions: The Primal Destroyer worldboss is recommended for characters level 45 and up. Much like the Hoth worldboss, the easiest way to get to the Primal Destroyer is to pick up the Belsavis heroics from the activities panel, by clicking the symbol of “three little people” near your minimap, then clicking the solo tab, choosing “Heroics Missions: Beslavis” then clicking travel, which will let you skip past the orbital station. If you are on an Imperial character, you can pick up the “Freeing the Fallen” heroic and then run north to save time. If you can’t take the heroic, quicktravel to Imperial Frontline Camp, or take the speeder there, and once there, get off the taxi and run in to the nearby cave, use the Rakata Transporter to taxi to Lower Prison Magma Transport, exit the purple cave to the west, then hop on your speeder and drive north along the path for a long time. Note that in the past you may have needed to unlock the Rakata transporters through the story, now anyone may use them.
Mechanics: The Primal Destroyer has an important mechanic your group will need to know about. Shortly into the fight, the boss will summon three beasts to help him in the fight. If any of these beasts die, the boss will become much stronger, so it’s important to keep them alive and defeat the boss first. Let your team know not to use area attacks, and not to attack the smaller enemies. The Primal Destroyer is not difficult to fight, and we did it quite easily with a group of four including two undergeared damage characters, a tank and a healer. Make sure the tank does their best to keep the aggro of all four enemies, or if you have a second tank that tank can pull the smaller enemies away from the boss.
- Planet: Belsavis
- Recommended level: 45+
- Fast way to planet: Solo tab of Activity Finder, Heroic Missions: Belsavis
- Closest Heroic Shuttle Republic: None
- Closest Quicktravel Republic: Oasis Republic Post (top of map)
- Closest Taxi Republic: Taxi to Republic Frontline Speeder, once there, get off the taxi and run in to the nearby cave, use the Rakata Transporter to taxi to Oasis Republic Post, then hop on your speeder and drive north.
- Closest Heroic Shuttle Imperial: [Heroic 2+] Freeing the Fallen
- Closest Quicktravel Imperial: Quicktravel to Imperial Frontline Speeder, once there, get off the taxi and run in to the nearby cave, use the Rakata Transporter to taxi to Lower Prison Magma Transport, exit the purple cave, then hop on your speeder and drive north along the path for a long time.
- Closest Taxi Imperial: Taxi to Imperial Frontline Speeder, once there, get off the taxi and run in to the nearby cave, use the Rakata Transporter to taxi to Lower Prison Magma Transport, exit the purple cave, then hop on your speeder and drive north along the path for a long time.
Corellia – Lucky the Rancor

Directions: The worldboss Lucky is recommended for characters level 50 and up. Also like the other worldbosses, the easiest way to get to Lucky is to pick up the Corellia heroics from the activities panel, by clicking the symbol of “three little people” near your minimap, then clicking the solo tab, choosing “Heroics Missions: Corellia” then clicking travel, which will let you skip past the spaceport. On Republic side, at the heroic terminal, you can pick up the “Concierge” Heroic which will put you just west of the world boss. If you can’t use the heroic Republic side, quick travel to Axial Park North or take the taxi there, it’s on the top middle of the map. Imperial side, quicktravel to Axial Park South on the top middle of the map, or take the speeder. Note that in the past, you may have had to unlock the speeders through the story, but now anyone may use the trams. Lucky is located in the very center of the park, in a walled in area that has a crack in it you can enter through.
Mechanics: Lucky does not have any special mechanics. However, he has two casted attacks that your team should try and interrupt as often as possible to reduce incoming damage. Lucky has a LOT of health compared to the other worldbosses. We were able to do it with a team of four including two undergeared damage characters, a tank and a healer, but it took us 27 minutes to kill him, so I highly recommend bringing a larger group.
Reward: The ‘Lucky’ title from beating Lucky, and the ‘Unlucky’ title for being defeated by lucky.
- Planet: Corellia
- Recommended level: 50+
- Fast way to planet: Solo tab of Activity Finder, Heroic Missions: Corellia
- Closest Heroic Shuttle Republic: [Heroic 2+] Concierge
- Closest Quicktravel Republic: Axial Park North (middle top of map)
- Closest Taxi Republic: Axial Park North Tram (middle top of map)
- Closest Heroic Shuttle Imperial: None
- Closest Quicktravel Imperial: Axial Park South (middle top of map)
- Closest Taxi Imperial: Axial Park South Tram (middle top of map)
Voss – Nightmare Pilgrim

Directions: The Nightmare Pilgrim worldboss is recommended for characters level 48 and up but is a very difficult boss and it’s probably better to be 50 or over with some basic high level gear. The easiest way to get to the Nightmare Pilgrim is to pick up the Voss heroics from the activities panel, by clicking the symbol of “three little people” near your minimap, then clicking the solo tab, choosing “Heroics Missions: Voss” then clicking travel, which will let you skip past the orbital station. On Republic side quicktravel or taxi to Camp Talanis, then head west then south. Imperial side is a bit easier at Outpost Skyline. The boss is summoned by right clicking the “Forbidden Knowledge” tablet that glows blue.
Number of Players in 7.0 / 2022: This boss had a special mechanic that originally made it so you could only fight the boss with 16 people. This is no longer applicable. You can bring as many people as you want, and its recommended to bring more than 16 as it has a hard DPS check. Be aware the more players you bring, the worse the lag is, making it hard to see bloodmark and hard to make sure you don’t kill the first boss too fast. Also be aware that only the group that does the original pull of the boss will get credit for the Aratech Coral quest, though all players who tag the boss will get Galactic Seasons credit.
Splitting the Team: There are a couple ways you can choose to split up your group between the two bosses in this fight, but I’ve had the best luck with having everyone except one of the tanks start on the boss on the left, on the dog. Then when a player gets Bloodmark, which I’ll explain later, they switch over to the Pilgrim.
Mechanics: The Nightmare Pilgrim is no longer as difficult as it was when it was first released, but still has some incredibly unforgiving mechanics that will almost automatically kill your teammates if they aren’t paying attention. Originally, every member of the group had to have a special item called an AlphaWave Inhibitor to ward off the mental assaults sent out by the boss, and you’d need decent end-game gear. These days, you no longer need the special item, and don’t need much gear – but one thing hasn’t changed, and if your group isn’t paying attention, you’ll get wiped out easily.

The Pilgrim – The humanoid boss on the right is called The Pilgrim, and has a conal attack so you’ll want to have a tank turn him away from the group. The two bosses are tied together, and you can not kill The Pilgrim while the other boss is still alive, so you’ll want to kill them roughly at the same time with the dog going down first.

Throughout the fight, the Pilgrim will knock everyone around him backwards, and then put up a shield. It’s VERY important that all players stop damaging the Pilgrim when his shield is up, as he reflects all attacks back at the player, often killing them.
 Recharge Shield: While the Pilgrim has his shield up he’ll also have a buff and a casted ability called Recharge Shield that’s an icon of a glowing orange armored man. You’ll know when the shield is about to go down because you’ll see the cast bar running out.

The Thing from the Stars – aka “The Dog” – The second boss is technically called The Thing From the Stars, but many players have nicknamed it “the dog” to keep things simple. All players will start on the dog except for the tank on the pilgrim, and the dog has two extremely important mechanics to pay attention to.
 Gore: The Dog will be constantly try to cast the ability called Gore – it has an extremely quick cast, and needs to be interrupted as often as possible.
![]()
All tanks and damage players should be helping to interrupt Gore, as there will be far too many gores for the tank to take care of alone.
![]() The reason you want to interrupt it is because the tank who is holding dog will eventually receive an orange debuff called Damage Vulnerability, and Gore hits really hard while this debuff is on.
The reason you want to interrupt it is because the tank who is holding dog will eventually receive an orange debuff called Damage Vulnerability, and Gore hits really hard while this debuff is on.
 Enraged Gore & Bloodmark: The second mechanic dog has is incredibly important – it will cast an ability called Enraged Gore, which is very different than the normal Gore you need to interrupt, and Enraged Gore can not be interrupted. It looks like a cast bar with an icon of a dripping red skull.
![]()
On seeing this, ALL players attacking dog need to immediately stop all their attacks. The boss will randomly choose a handful of players who are attacking them over the course of a few seconds, and give them the Bloodmark debuff. This debuff has the exact same symbol of a dripping red skull, and these players will also be marked temporarily with a white glowing light pillar. For the entire time players have this red debuff, even after the white light goes away, they should not attack the Dog at all, as damaging the dog will harm the player with the debuff. During this time, the player can still make themselves useful either by continuing to focus on interrupting the boss, or switch over to the Pilgrim and attack him for a while.


If you have three tanks, and the tank on Dog gets Bloodmark, the third tank should pick up Dog. If you only have two tanks, the two tanks will want to switch bosses if one of them has Bloodmark, so the marked tank will wind up on Pilgrim instead. Worse comes to worse, if you have a tank on dog and they get Bloodmark, they can actually stay there, and only interrupt and use taunts, but not do any damage until their Bloodmakr wears off.
Make sure at least one player is keeping an eye on the Dog’s health, and have them direct players over to Pilgrim one by one once the Dog starts getting low, so the group can kill the dog and the Pilgrim will die shortly afterwards. If you kill the Dog, and the Pilgrim still has a lot of health, the fights becomes very hard as when the Dog dies, he will become enraged and deal extra damage. In my groups where I have less experienced players, we often kill dog long before we kill Pilgrim, and it seems to work out ok, even if it’s messy.
Dying During the Fight / Return to Medcenter: When you die, you’ll want to return to medcenter and quickly run back on your speeder. The only time you don’t want to do this is when the enemies only have a little bit of health left. For example, if both enemies are up, just stay dead if they are both under 15% – or, if only Pilgrim is left, stay dead as well. This is because if you are still running back from the medcenter when the fight ends, you won’t get any credit, but if you are dead on the floor you will get credit.
![]() Fighting a Second Time: Heads up, when you defeat the Nightmare Pilgrim, you’ll get a debuff called Mental Exhaustion, which was supposed to discourage players from fighting the boss over and over. These days, the debuff hardly hurts you, so feel free to take on Nightmare Pilgrim a second time! What many groups do is have one player switch to a different character that does not have any debuff and did not fight Pilgrim before, and have them click the tablet for the group on that new character.
Fighting a Second Time: Heads up, when you defeat the Nightmare Pilgrim, you’ll get a debuff called Mental Exhaustion, which was supposed to discourage players from fighting the boss over and over. These days, the debuff hardly hurts you, so feel free to take on Nightmare Pilgrim a second time! What many groups do is have one player switch to a different character that does not have any debuff and did not fight Pilgrim before, and have them click the tablet for the group on that new character.
- Planet: Voss
- Recommended level: 48+ technically
- Fast way to planet: Solo tab of Activity Finder, Heroic Missions: Voss
- Closest Heroic Shuttle Republic: None
- Closest Quicktravel Republic: Camp Talanis (lowest quicktravel on map)
- Closest Taxi Republic: Camp Talanis Skyhopper (lowest taxi on map)
- Closest Heroic Shuttle Imperial: None
- Closest Quicktravel Imperial: Outpost Skyline (lowest quicktravel on map)
- Closest Taxi Imperial: Outpost Skyline Skyhopper (lowest taxi on map)
Expansion Worldbosses
Section X – Dreadtooth

Directions: The worldboss Dreadtooth is recommended for characters level 50 and up. The easiest way to get to Dreadtooth is to pick up the “Daily Area: Section X” quest from the activities panel, by clicking the symbol of “three little people” near your minimap, then clicking the solo tab, then clicking travel, which will let you travel immediately there, otherwise you will need to fly to Section X, which is on Belsavis, just make sure to choose the Section X point on the planet to save time. On Republic side run north from the camp, and Imperial side run south, the map is quite small. Dreadtooth walks in an oval path near the center of the map around some broken walls. Dreadtooth is ONLY accessible to current Subscribers or those who have purchased the Cartel Market unlock.
Mechanics: Dreadtooth is a very unique world boss as he’s the only world boss that you can use items on to make him stronger, and he also drops an item that can be used to fight a secret boss hidden in an Operation. When he’s in his normal mode, known as ‘1 stack’, he’s quite easy to fight with a small group.
There will be a little white glowing circle on the ground when you start the fight – this actually isn’t an attack, instead it’s just a marker for where you started the fight and helps keep other marauding players from taking Dreadooth away from you, so keep your group near wherever you start the fight.

![]() Drouk Hunter Debuff: The other part of this protection mechanic is the Drouk Hunter buff that your whole team should get if they are close enough when the fight starts. Any player who does NOT get this special animal-skill buff will be destroyed. To make sure everyone gets the buff, make sure your healers don’t bubble anyone at the beginning of the fight, tanks remove their guards at the beginning of the fight, and everyone starts attacking and healing as soon as possible after the tank starts the fight.
Drouk Hunter Debuff: The other part of this protection mechanic is the Drouk Hunter buff that your whole team should get if they are close enough when the fight starts. Any player who does NOT get this special animal-skill buff will be destroyed. To make sure everyone gets the buff, make sure your healers don’t bubble anyone at the beginning of the fight, tanks remove their guards at the beginning of the fight, and everyone starts attacking and healing as soon as possible after the tank starts the fight.

![]() Out of Combat Debuff: If you die, you’ll notice that you get a blue debuff called Out of Combat, which says you will lose Drouk Hunter if you return to medcenter, remain out of combat for too long, or if you re-engage Dreadtooth at full health. So if you do die, do not return to medcenter! If you are revived, don’t heal up to full health and make sure to get back in to the fight quickly, and if you happen to stealth out don’t stay stealthed out for long and don’t heal to full. Unlike almost every other worldboss, you can NOT die, return to medcenter and run back, because if you do you’ll get the orange Dread debuff, and if you get that and try to attack Dreadooth, he’ll kill you instantly.
Out of Combat Debuff: If you die, you’ll notice that you get a blue debuff called Out of Combat, which says you will lose Drouk Hunter if you return to medcenter, remain out of combat for too long, or if you re-engage Dreadtooth at full health. So if you do die, do not return to medcenter! If you are revived, don’t heal up to full health and make sure to get back in to the fight quickly, and if you happen to stealth out don’t stay stealthed out for long and don’t heal to full. Unlike almost every other worldboss, you can NOT die, return to medcenter and run back, because if you do you’ll get the orange Dread debuff, and if you get that and try to attack Dreadooth, he’ll kill you instantly.
![]() Dread Debuff: Dreadtooth senses the weakness of your resolve and will destroy you if you remain close. You cannot become a Drouk Hunter while under the effects of Dread.
Dread Debuff: Dreadtooth senses the weakness of your resolve and will destroy you if you remain close. You cannot become a Drouk Hunter while under the effects of Dread.
Most groups wait till he wanders near the paved area with the wall. He has a cleave forward attack, so you’ll want to turn him away from the group, usually the tank will put their back against the wall and have Dreadtooth also faces the wall.
While Dreadtooth with five or more stacks in his Frenzied or Nightmarish form has many difficult mechanics to deal with, Dreadtooth in his weaker forms is pretty easy. There’s no tank swap, there’s no crazy reflected damage, and you mostly just need to stay out of the red circles on the ground. If you want you can have one ranged DPS player stand way in the back of the group, which will help keep some of the rocks from hitting your entire group. You will want a decently large group, and a few more healers than normal.
![]() Healers, and players, will want to watch out for the Ground Spike debuff called Bleeding that looks like a man being shot by a red laser on a blue background, as it can and should be cleansed as often as possible.
Healers, and players, will want to watch out for the Ground Spike debuff called Bleeding that looks like a man being shot by a red laser on a blue background, as it can and should be cleansed as often as possible.
 When you defeat him, your group will get 1 Dreadful Essence item. This item is what makes him stronger – so your group can gather more of these and apply them to Dreadtooth if you want to try taking him on in more difficult modes!
5+ & 10 stack Guide by Merlyn: Info
- Planet: Section X (on Belsavis)
- Recommended level: 50+
- Fast way to planet: Solo tab of Activity Finder, Daily Area: Section X
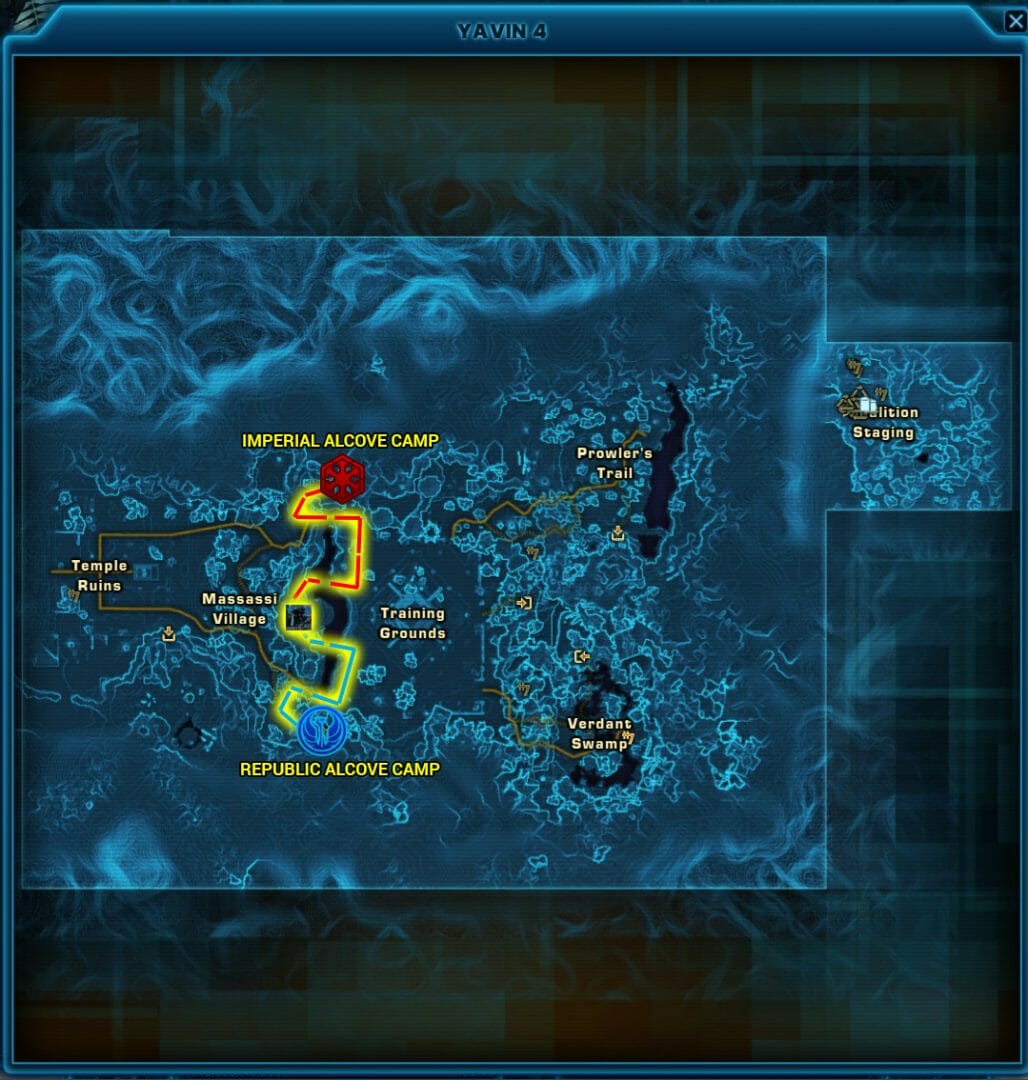
Yavin 4 – Lance Squadron Command Unit

Directions: The Lance Squadron worldboss is recommended for characters level 60 and up who are not afraid of their computer crashing. The easiest way to get to the Lance Squadron is to pick up the “Daily Area: Yavin 4” quest from the activities panel, by clicking the symbol of “three little people” near your minimap, then clicking the solo tab, then clicking travel, which will let you travel immediately there, otherwise you will need to fly to Yavin 4. Reaching the Lance Squadron Command Unit is fairly easy, quick travel or take the speeder to the Alcove camp on either faction in the middle of the map, then run East to the previous map, and the boss is on a ledge across a bridge.
Not only does this world boss have a lot going on, but it also has an incredible amount of lag and the need to get out of circles moving around on the ground, which can make things really difficult especially because you need a larger group to fight it compared to some of the early world bosses, as it has ten million health total.
Knockback – The boss has quite a nasty knockback and is standing on the edge of a cliff. Players should do their best to always have their backs to a wall and be away from the cliff edge – ranged players usually put their backs to the shorter rock wall with a forest behind it. The tank is the most likely to get knocked back, so to get a wall behind them, they usually start the fight by gaining the boss’s attention, and running behind a pillar near the entrance to the cliff platform. This will cause the boss to stomp over to the pillar to look for them, and then they can run out again and put their back to the pillar and fight the boss right there. This also means the melee players standing behind the boss are farther away from the edge when the knockback or throws happen.
Yellow Circles – As soon as the fight starts, yellow circles will start moving around the floor randomly. If a player gets caught in one, it will stop moving, turn red, then explode. Players should be trying to avoid these, or trying to purposefully step on ones that are farther away from the group and stepping out of them so they stay still for a few seconds.

High Energy Beam – Once the boss reaches under 97%, he’ll target the tank with aggro with a “High Energy Beam” which will give the tank ten stacks of an orange debuff called Melted Armor, and all ten stacks will reduce armor negative 100%. While you have the Melted Armor Debuff, the High Impact Bolt attack also does twice as much damage. You’ll either want to tank swap, or save a strong defensive ability that lasts around ten seconds.

![]()
![]() Melted Armor Debuff (stacks up to 10)
Melted Armor Debuff (stacks up to 10)

Toxic Cannisters – At 93% the boss will add in another mechanic into the mix. He will throw Toxic Cannisters on the ground that look like red circles with green gas in them, and seem to appear mostly under the walker’s feet, endangering the melee players. The Poisoned debuff can and should be removed by players with a cleanse and by healers, the debuff looks like a green man holding his hand to his neck on a poisonous green background.
![]() Poisoned Debuff (cleanse)
Poisoned Debuff (cleanse)
Dying / Run backs / Medcenter / Summons – In this fight, players tend to die a LOT. More than any other fight – the mechanics are hard, there’s particularily bad lag, the boss drops aggro and murders people, there are scary circles rampaging around randomly and even if you escape all those you might still get thrown off the cliff.
One way to combat these problems is to not accept death as the final outcome for all players in your group. When players die, tell them to “return to medcenter” and run back (the closest medcenter is on the wrong map, just make sure they know to return to medcenter and run to the right / east.) Just make sure that if the boss is almost dead, I’d say at around 10%, tell your group not to return to medcenter, as they won’t get credit if they are away from the fight when the boss is defeated.
One way to speed up this process is once everyone is ready to start the fight in front of the boss, send out a summon but tell everyone NOT to press accept or reject. Then, when a player dies, they can return to medcenter, then press “accept” and be summoning straight into the fight. Once that summon’s timer runs out, a player out of combat, or a player who stealths out to get out of combat, can send out another summon by running just out of range of the fight and summoning again.
Note that some groups or players may consider “return to medcenter” or summoning as “cheating”. It will be up to the individual group to decide what they want to do. Personally, due to the lag from this boss, and its incredible difficulty level, I found it was a lot of fun and huge challenge to do this fight even with these extra workarounds! Our successful hodge podge run took over thirteen minutes, he was enraged at the end, and only seven of our seventeen teammates were still alive when he fell!
Mechanics: Info
- Planet: Yavin 4
- Recommended level: 60+
- Fast way to planet: Solo tab of Activity Finder, Daily Area: Yavin 4
- Closest Heroic Shuttle Republic: None
- Closest Quicktravel Republic: Republic Alcove Camp (run East)
- Closest Taxi Republic: Republic Alcove Camp Taxi (run East)
- Closest Heroic Shuttle Imperial: None
- Closest Quicktravel Imperial: Imperial Alcove Camp (run East)
- Closest Taxi Imperial: Imperial Alcove Camp Taxi (run East)
Yavin 4 – Ancient Threat

The Ancient Threat is one of the most involved bosses in the game – before you can summon it, you must go on a treasure hunt across the galaxy, gathering knowledge and buffs. Once you’ve finally summoned the boss, it’s an incredibility difficult fight, and the most important part is don’t cleanse!
Mechanics & Info: Info – See Merlyn SWTOR’s site!
- Planet: Yavin 4
- Recommended level: 60+
- Fast way to planet: Solo tab of Activity Finder, Daily Area: Yavin 4
Ziost – Worldbreaker Monolith

Directions: The Worldbreaker Monolith worldboss is recommended for characters level 60 and over after they have fully completed Ziost (or can be summoned). The easiest way to get to the Monolith worldboss is to pick up the “Daily Area: Ziost” quest from the activities panel, by clicking the symbol of “three little people” near your minimap, then clicking the solo tab, then clicking travel, which will let you travel immediately there, otherwise you will need to fly to Ziost. The Monolith is hiding in the most north western area of the map, there’s no quicktravel or speeder.
Mechanics: Not to be confused with the Colossal Monloith, a very difficult single-boss Operation fight, the Worldbreaker Monolith is a large world boss on Ziost. The world boss is much easier, though the first time you fight it, it may seem like there’s a lot going on.
Tank – First off, make sure the tank turns the boss away from the group, and the group stands behind the boss, as he has a giant frontal attack. Second, the tank will have small purple circles placed under where they are standing, and they should take a few steps to the left or right to get out of them.
Stasis – There will be three additional smaller monolith enemies that appear, and your team will want to try and split up their damage evenly between them, as at 20% health they go into a stasis mode. Once all three are in stasis, then you can go back to beating on the boss. Stasis looks like a purple swirly. Eventually, the stasis will wear off and you’ll need to ignore the boss and fight the small monoliths again to put them back in stasis.

Drain Lifeforce – If anyone gets caught in the frontal attack, they’ll get the Drain Lifeforce debuff, which can be cleansed.
![]() Drain Lifeforce (cleanse)
Drain Lifeforce (cleanse)
- Planet: Ziost
- Recommended level: 60+
- Fast way to planet: Solo tab of Activity Finder, Daily Area: Ziost
- Location: North West, no quick travel or taxi, just run there
Ossus – Kil’Cik

Directions: The worldboss Kil’Cik is recommended for characters level 70 and up. The easiest way to get to the Ossus bug world boss is to pick up the “Daily Area: Ossus” quest from the activities panel, by clicking the symbol of “three little people” near your minimap, then clicking the solo tab, then clicking travel, which will let you travel immediately there, otherwise you will need to fly to Ossus. There’s also a one-time Flesh and Steel quest from the Ossus mission board near where you load in that will give you extra credits, xp, an Ossus weapon and 30 Relics of Ossus, the Ossus reputation currency. On Republic side quicktravel or take a taxi to the Catacombs, then run east along the side of the mountain and up the steep steps. Imperial side quicktravel or take a taxi to the canyons.
Mechanics: The hardest part of this boss is the lag due to the many smaller enemies. In 7.0, you will still want a big group to do this fight, try and get as close to a full group of 24 as you can. It’s useful to have 2 or even 3 tanks to help pick up all the smaller enemies, and a handful of healers.
- Players will get red circles under their feet, which will drop onto the ground and turn into green spit that the rest of the team will want to stay out of.
- You can start the boss on the side of the room or in the center. I recommend to start on the side, that way some of the spit goes there instead of the center of the room.
- There will be three types of additional enemies – the big Guardians, the Medics, and the little bugs.
- You will want to have your second tank or even main tank take the guardians and keep their attention.
- You will want to assign 2-3 damage players to specifically look for the medics in the swarm, and interrupt and kill them.
- As for the smaller enemies, try and have your tanks bring them to the boss, so they can all be killed together. Just watch out for spit!
- This boss a has a long run back and dies decently quick, so be careful about returning to medcenter when he gets under 20% health, it may be better to just stay dead.
Info
- Planet: Ossus
- Recommended level: 70+
- Fast way to planet: Solo tab of Activity Finder, Daily Area: Ossus
- Closest Heroic Shuttle Republic: None
- Closest Quicktravel Republic: Catacombs Entrance (far right on map)
- Closest Taxi Republic: Ancient Catacombs Speeder (far right on map)
- Closest Heroic Shuttle Imperial: None
- Closest Quicktravel Imperial: Ossus Canyons
- Closest Taxi Imperial: Canyons Camp Speeder
Ossus – R8-X8

Directions: The worldboss R8-X8 is recommended for characters level 70 and up. The easiest way to get to the Ossus droid world boss is to pick up the “Daily Area: Ossus” quest from the activities panel, by clicking the symbol of “three little people” near your minimap, then clicking the solo tab, then clicking travel, which will let you travel immediately there, otherwise you will need to fly to Ossus. There’s also a one-time Flesh and Steel quest from the Ossus mission board near where you load in that will give you extra credits, xp, an Ossus weapon and 30 Relics of Ossus, the Ossus reputation currency. On Republic side quicktravel to the Dead Forest or take the speeder to the Ancient Ruins Outpost. Imperial side quicktravel to the Dead Forest or take the speeder to the Canyons Camp Speeder and run north.
Mechanics: Update 7.0 – THIS BOSS IS VERY DIFFICULT. You will likely need a full group of 24, including two tanks, a handful of healers, and lots of DPS, and lots of people with summons.
- He starts with a shield. You need to damage the shield down quickly or he will respawn. It will not look like you are doing any damage until the shield breaks.
- Make sure you are standing behind the boss unless you are the tank. He does a forward conal attack called Incinerate that really hurts. Tanks should use their defensive cooldowns during Incinerate.
- Fuel cells with a yellow nameplates will appear during the fight. The boss will want to eat them – so you want to destroy them. To destroy them, if you get a red circle under your feet, rush as soon as possible to stand on top of a yellow fuel cell. The red circle will turn orange, drop on the ground, and then you can move. If you successfully got the orange circle to drop on the fuel cell, you’ll destroy the fuel cell, and the robot won’t be able to eat it. You’ll know red circles are coming when the droid casts “Requesting Aerial Support”. Incinerate can also destroy fuel cells.
- When a fuel cell explodes, it should leave behind a fire puddle – the boss needs to not stand in the fire puddles and the tanks need to drag him out of any fire under his feat. Unfortunately, the fire puddles are often invisible due to a bug. If you are taking mystery damage, move out of the way, you might be standing in an invisible fire puddle. If he’s in fire too much, he’ll go into a temporary rampage and won’t be tauntable.
- You can not interrupt anything in this fight.
- Your group will die a lot. Have someone send out a summon right before the fight, and when people die and run back to the door, have them send out another summon to help the hoards of dead return to the fight. Don’t “return to medcenter” under 15% health or you won’t get credit.
- In-depth mechanics explanation reddit post by another player!
Info
- Planet: Ossus
- Recommended level: 70+
- Fast way to planet: Solo tab of Activity Finder, Daily Area: Ossus
- Closest Heroic Shuttle Republic: None
- Closest Quicktravel Republic: Dead Forest (top on map)
- Closest Taxi Republic: Ancient Ruins Outpost (top on map)
- Closest Heroic Shuttle Imperial: None
- Closest Quicktravel Imperial: Dead Forest (top on map)
- Closest Taxi Imperial: Canyons Camp Speeder (run North)
Mek-Sha – Dread Pirate Karvoy

At 50%, Karvoy’s “splatter-skull” ability becomes a cone attack and does about double damage that his “headshot” ability does, which he also stops using at 50%. He also seems to take more damage.
- Planet: Mek-Sha
- Recommended level: 75+
- Fast way to planet: None, need to fly there in your ship unless you have the Heroic in your quest log
- Closest Heroic Shuttle Republic: None
- Closest Quicktravel Republic: Backroad Med Center
- Closest Taxi Republic: None
- Closest Heroic Shuttle Imperial: None
- Closest Quicktravel Imperial: Backroad Med Center
- Closest Taxi Imperial: None
Ruhnuk – Kithrawl
Kithrawl is the new world boss on Ruhnuk, who is meant to be fought in a larger group, and there is also a quest to go fight him as part of the dailies/weeklies.

Directions: The Kithrawl worldboss looks like a giant naked molerat and is recommended for characters level 80 and over on Ruhnuk. The easiest way to get to the Ruhnuk worldboss is to quicktravel to the Quarry Overlook, but if you don’t have that quicktravel point you can taxi or pick up the [HEROIC 2+] Weak Links from the daily temrinal on Ruhnuk and shuttle there. To get to the boss after quicktravelling or shuttling, run north, and then run across a narrow bridge spanning the northern part of the map. At the end of the bridge is a cave, and at the end of the cave is Kithrawl. There are some enemies in the way, so it’s recommended to summon your team there if you can. If you see datapads while running through the tunnel, those are for the Weak Links heroic quest.
Mechanics: Kithrawl is a fairly simple boss. Stay out of the red lava circles on the ground when they appear. Keep him away from the edge, as he has a big circular knockback. He can not be interrupted. He has a lot of health, so the more friends you bring the better, but he is not very strong, so you can technically even solo him with your companion.
- Planet: Ruhnuk
- Recommended level: 80
- Fast way to planet: Fly there
- Closest Heroic Shuttle: [HEROIC 2+] Weak Links
- Closest Quicktravel: Quarry Overlook (north on the map)
- Closest Taxi: Upper Quarry Taxi (north on the map)
- Once at the Taxi, Quicktravel point, or Heroic Shuttle, you will want to run across the very narrow high-up bridge in the north section of the map.
Events Worldbosses
Surgok’k

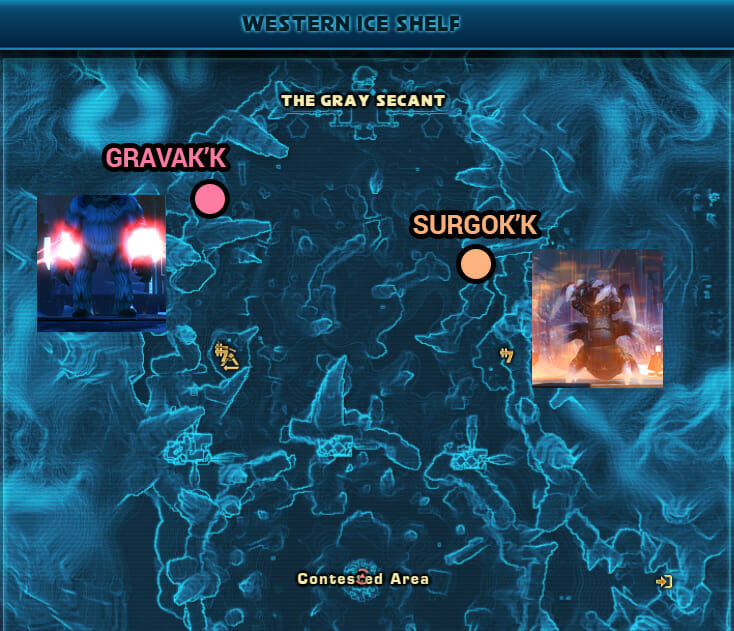
Directions: Surgok’k is only available during the Relics of the Gree limited-time event, and is located in a cave in the north east.
Mechanics: For Surgok’k the giant worm there’s a debuff that needs to be cleansed or healed through, and some additional enemies the group will need to dispatch.
- Event: Relics of the Gree limited-time event
- Planet: Ilum
- Recommended level: 50+
- Fast way to planet: Solo tab of Activity Finder, Event: Relics of the Gree (only during event)
Gravak’k

Directions: Gravak’k is only available during the Relics of the Gree limited-time event, and is located in a cave in the north west.
Mechanics: Gravak’k the giant wampa, watch out for the red circles so you don’t get hit by icicles falling from the ceiling, and make sure to stay behind him so you don’t get hit by his claws.
- Event: Relics of the Gree limited-time event
- Planet: Ilum
- Recommended level: 50+
- Fast way to planet: Solo tab of Activity Finder, Event: Relics of the Gree (only during event)
Shellshock

Directions: Shellshock the Alderaan Rakghoul World Boss is wandering round in the north west section of the King’s Pass map, to the left on the map of House Trader’s Circle. To get to him easily, exit the Spike and head North West.
Mechanics: While the Rakghoul event is active, depending on which planet is infested, a unique infected world boss will be available on the planet’s surface. Unlike most normal world bosses, the Rakghoul event world bosses offer great rewards including one of the rare items needed to buy the infected varactyl and dewback mount rewards, and the world bosses each also have a chance to drop a pet you can’t get any other way. The world bosses are not particularly difficult and players often put impromptu groups together to fight them in general chat. The only important thing to know about the rakghoul world bosses is that all of them have a special ability that will remove your vaccine and then infect you if you don’t use another vaccine right away, so you’ll want to stock up on vaccines before you leave, as neither the Revan vendor nor the field repair droid sells Vaccines.
Shellshock can drop the Plagueshard Lylek pet.
- Event: Rakghoul Resurgence on Alderaan limited-time event
- Planet: Alderaan
- Recommended level: ? 20+?
- Fast way to planet: Solo tab of Activity Finder, Event: Rakghoul Resurgence (only during event)
Toxxun

Directions: Toxxun is very easy to get to Imperial side – just taxi or quicktravel to the Axial Park map, and then run to the east. Republic side, the route to Toxxun is a lot harder – you can either taxi or quicktravle to Axial Park, OR take the [HEROIC] Concierge heroic shuttle which is slightly closer. Then you need to run through a series of confusing tunnels and broken paths heading towards the bottom right of the map – use the map to follow the correct direction and not waste time.
Mechanics: While the Rakghoul event is active, depending on which planet is infested, a unique infected world boss will be available on the planet’s surface. Unlike most normal world bosses, the Rakghoul event world bosses offer great rewards including one of the rare items needed to buy the infected varactyl and dewback mount rewards, and the world bosses each also have a chance to drop a pet you can’t get any other way. The world bosses are not particularly difficult and players often put impromptu groups together to fight them in general chat. The only important thing to know about the rakghoul world bosses is that all of them have a special ability that will remove your vaccine and then infect you if you don’t use another vaccine right away, so you’ll want to stock up on vaccines before you leave, as neither the Revan vendor nor the field repair droid sells Vaccines.
- Event: Rakghoul Resurgence on Corellia limited-time event
- Planet: Corellia
- Recommended level: ? 20+?
- Fast way to planet: Solo tab of Activity Finder, Event: Rakghoul Resurgence (only during event)
Plaguehorn
Directions: [[I keep forgetting to take map screenshots sorry.]]
Mechanics: While the Rakghoul event is active, depending on which planet is infested, a unique infected world boss will be available on the planet’s surface. Unlike most normal world bosses, the Rakghoul event world bosses offer great rewards including one of the rare items needed to buy the infected varactyl and dewback mount rewards, and the world bosses each also have a chance to drop a pet you can’t get any other way. The world bosses are not particularly difficult and players often put impromptu groups together to fight them in general chat. The only important thing to know about the rakghoul world bosses is that all of them have a special ability that will remove your vaccine and then infect you if you don’t use another vaccine right away, so you’ll want to stock up on vaccines before you leave, as neither the Revan vendor nor the field repair droid sells Vaccines.
Plaguehorn can drop the Plaguehorn Reek pet.
- Event: Rakghoul Resurgence on Tatooine limited-time event
- Planet: Tatooine
- Recommended level: ? 20+?
- Fast way to planet: Solo tab of Activity Finder, Event: Rakghoul Resurgence (only during event)
 Questions or comments? Feel free to send me a message on Twitter
  Galactic Seasons Guide and Rewards – Season 6, Building a Foundation!
 Date Night Guide and Achievement Rewards – Lana, Theron, Koth, Arcann romance!
 How to Pick a Server
 How to Get Cartel Market Certificates
 What can you do with Cartel Market Certificates?
 Tips for Returning SWTOR Players (2024)
 Legacy Guide


 Twitter @swtorista
 Reddit /u/swtorista
 Discord Swtorista#0153
 Email swtorista@gmail.com
 Youtube Swtorista
 Twitch Swtorista
 Patreon