


 How to Craft
 Choose a Crew Skill
 Armormech
 Armstech
 Artifice
 Biochem
 Cybertech
 Synthweaving

 Gathering Guide
 Rare Materials Guide
 White Materials Guide
 Jawa Junk
 Augments
 Medpacs, Stims and Adrenals
 Synthweaving Crafting Tree


 Crafted Decorations
 Crafted Mounts
 Crafted Dyes
 Crafted Crystals
 Events Calendar
 Galactic Seasons
 PvP Seasons
 Bounty Event
 Double XP Event
 Feast of Prosperity
 Gree Event
 Life Day
 Nightlife Event
 Pirate Incursion Event
 Rakghoul Event
 Spring Abundance Festival
 Swoop Event

 Jedi Knight
 Jedi Consular
 Trooper
 Smuggler
 Sith Warrior
 Sith Inquisitor
 Bounty Hunter
 Imperial Agent
 Bounty Hunter
 Imperial Agent
 Jedi Consular
 Jedi Knight
 Sith Inquisitor
 Sith Warrior
 Smuggler
 Trooper
 Legacy Gear
 Lightsabers
 Double-Bladed Lightsabers
 Vibroswords
 Double-Bladed Vibroswords
 Blaster Pistols
 Blaster Rifles
 Sniper Rifles
 Blaster Cannons
Eternity Vault is the first Operation that was available in Star Wars: The Old Republic, and one of the two shorter introductory Operations that are great first choices for players new to playing Operations. While this Operation is considered quite easy, and you’ll probably be fine to jump right in without a guide, this video will go over all the details of this Operation so you know exactly what you are getting into.
Annihilation Droid XRR-3
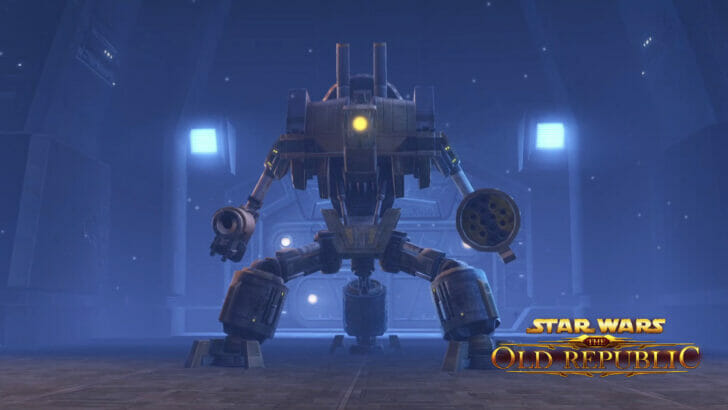
The first boss is Annihilation Droid XRR-3, better known as the droid or robot boss.
Escape Pod & Ramp – When you enter the Operation, you’ll be surprised with a crash landing onto the planet of Belsavis, but to get there you’ll need to first right-click a glowing blue escape pod. Once you’re on the planet, make your way to the nearby ramp made of snow, but DO NOT RUN ALL THE WAY UP THE RAMP! Otherwise you’ll start the fight by accident, and your group may not be ready or all have arrived yet.
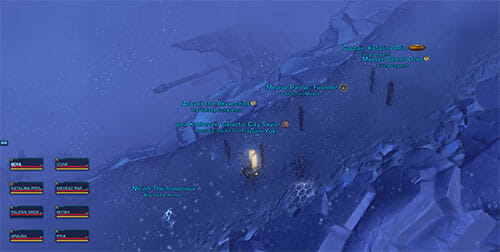
My group waiting at the bottom of the ramp until we are ready.
Batteries – To get the boss to appear, your group will need to attack the turrets on the left and the right at the top of the ramp. You can either attack the yellow Power Cells at the bottom of the turrets, or directly attack the Perimeter Defense Cannons at the top. Some groups like to split up half and half between the turrets, but most groups just let the group attack whatever they want. Once the second turret dies, you’ll want to back up towards the ramp, as the boss will be jetting down from the sky in the middle of the turret platform.

Turrets and Power Cells. Back up after killing them.
Tank – The tank in the group will start the fight by picking up the boss and turn it away from the group, and the tank will face their back towards a corner of the door behind them. The tank will get knocked back very often, so it’s nice to be knocked back into a corner instead of farther off into the snow the left and the right of the robot. The boss wil usually switch targets at this point and need to be taunted back. If you have a second tank, the second tank can pick up the boss when the first tank is knocked back – otherwise, the main tank can simply jump back into the fight as soon as possible after they are knocked back. The sign that the tank is about to get knocked back is the boss saying “Proximity Violation” and then swinging his arm. If the other players are standing too close to the tank when the swipe happens, or a damage character accidentally gains the boss’s attention, the boss will knock back anyone who is in front of his swinging arm, which is why we turn the boss away from the group.

The tank turns the boss away from the group.
Missile Salvo – Throughout the fight, the boss will crouch down, start firing a ton of missiles, and say “I have been armed with 24 distinct weapons technologies”. Almost all groups will expect you to take this as a queue to stack up together, as the missiles put out a lot of damage that is easier to heal if everyone is grouped up together in front of the boss. This tactic of grouping up is sometimes jokingly called a “cuddle puddle” as one of the most visible group healing moves is a large circle of Force Healing that everyone needs to be standing in or they won’t be healed. When the boss stands back up again, you should spread out a bit again.

My team grouping up for heals in front of the boss.
Red Circles – Another move the boss does is place many red circles on the ground under where you and your group members are standing. You’ll know this is coming because the boss will say “Engaging Storm Protocols” , and your team mates may say something like “watch your feet”, as there’s a good chance a red circle will appear directly under your feet. During this phase, keep your eyes on the ground, and simply take a few steps to the left or the right if you get a red circle – you do not need to run around all over the map. You’ll usually only get 1 or 2 red circles.

Taking a few steps out of the red circle under my feet.
Burn Phase – At 10% health, the boss will enter a burn phase, which means you need to kill it quickly before it kills you. If you want to be kind to your healers, use a shield or other defensive cooldown to reduce the damage you take during this phase. There’s no exact indicator when this happens, but the boss will start its Missile Salvo and it won’t stop until it dies!
Gharj
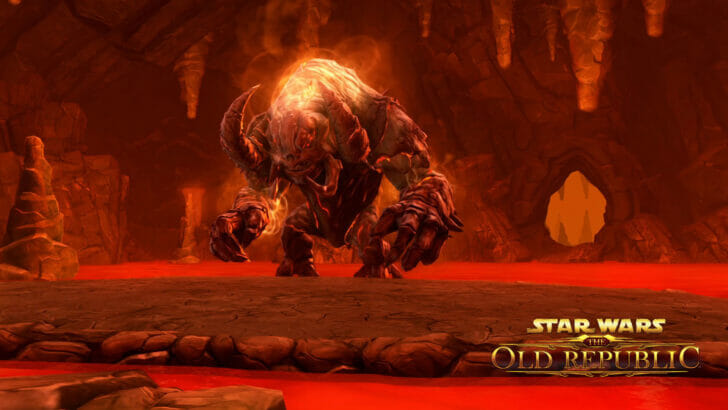
Gharj is the second boss in the operation, and he’s sometimes known as the lava boss. While experienced groups may ignore his mechanics completely, newer groups will want to pay attention to his three special mechanics.
Positioning – The tank will always take the boss to one far side of the platform and turn him away from the group, usually on the left side of the platform. The ranged players and healers will stand as far back away from the boss as possible, and the close-range players will stand behind the boss to attack him.
Smash – The boss will jump in to the air and smash his feet into the ground, hurting everyone around him and placing a green-brown cracked circle animation on the ground around him. This hurts everyone within range, which is why the healers and ranged players stay back to start.
Slam – After the Smash and the green-brown circle appears on the ground, the entire group will want to move in behind the boss, including the healers and the ranged players, as the boss will do a slam attack that knocks everyone except the tank back. The players will want to move in as close to the boss as possible without being on top of him, and to aim their back towards the farthest part of the platform- imagining that they will be knocked back in a straight line. If you get knocked back in to the lava, you can aim your back better next time, just get out of the lava as soon as possible. If you get knocked back into a lava waterfall, you will be automatically die, so at least make sure you are not going to get flung into the lavafalls. Once you are knocked back, stay at the far side of the platform until you see that smash and green-brown circle appear, so you can move in close again for the next knockback slam.
Platforms – As Gharj’s health goes down, he will destroy the platform he is standing on, and a trail of stalagmites will fall from the ceiling allowing you to jump to the next platform. The mechanic is signaled by the screen shaking, and the platform you are on starting to sink into the lava. Find the path, and jump to the next platform. While this happens, Gharj will also start doing his Smash attack by jumping up and down in place, which will hurt if yo are standing nearby, so if you need to run past him to get to your next platform, you may want to wait a second or two and run between smashes, especially in veteran mode. Partway through the fight, while heading to the next platform, you may see some smaller enemies appear affectionally known by players as “puppies” or “dogs” – don’t stop to fight them, instead attack them on the way or ignore them and just jump until you get to the next platform. When you get to the next island, stay near the side of the platform where you arrived, as the tank will be taking Gharj to the other side of the platform.
Lava Platform Bugs – Now here’s the fun part. This boss gets bugged on a very frequent basis. You may find out that the platform you are on disappears, and there’s no new platform for you to jump to. Or you may find the Smashes and Slams never happen, as you damaged the boss too fast. If you don’t see a new platform show up, the safest bet is just to stay where you are. Dealing with the strange bugs related to this boss has been a constant source of amusement for more experienced groups, and a head-shaking experience for new groups.
Ancient Pylons
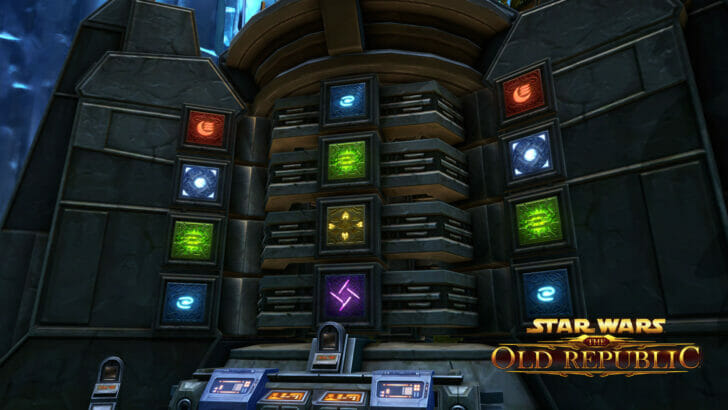
The Ancient Pylons are the third boss, and this fight is often known as the “puzzle boss” as there’s no giant robot or monster to fight directly. Instead, your group will split up in half, and solve a two-part puzzle, with one part located in the North and one part located in the South.
The concept of the puzzle is that there is a set of wheels in the center of the pylon, and the goal is to make the center wheel match the outer symbols by turning the wheel. The symbols on the outside are random every time, and the North and the South have different symbols. To rotate the wheel in the center, starting with the bottom wheel and moving your way up, right-click the blue terminals on the left or the right. When the symbol matches, right-click the central terminal the lock-in the matching wheel and move on to the next wheel in the stack.
In the past, teams would “solve” the puzzle by figuring out the least amount of clicks to the left or the right would solve the puzzle, as too many clicks would cause the enemies in-between clicks to become too strong and too numerous. These days, while the fight still can technically be failed, the easiest way to solve the “puzzle” is to just click the left button until the wheel matches, making the puzzle simple enough for even groups of players who don’t know each other to solve. Experienced groups can “solve” the puzzle beforehand and issue orders of the fastest way to spin the wheels, making the overall fight shorter.
When a terminal is clicked, it will turn from blue to grey colored, and will turn blue again once it becomes available to be clicked again. In-between clicks, enemies will appear that your group will need to fight.
In story mode, you can split your team in half, and designate one person in the North and one in the South to click the left button and lock in the wheels.
In veteran mode, when a player clicks the terminals, they will not be allowed to click the terminal again for a few seconds, so multiple players will need to help with the puzzle. If a player has clicked the puzzle and can’t click it again, they will have a small glowing orange cube floating above their head until they can click again.
If you are finding your group is getting hit hard with damage by the enemies that show up, encourage them to use interrupts and stuns. The smaller enemies also have a shield that reflects damage back at the attacker – so in veteran mode especially, players will want to stop that shield from going up in the first place, or not attack until it goes down.
When the puzzle is solved, you’ll be automatically teleported to the entrance to the next fight, and your rewards will be in a chest you can grab before moving forward.
Infernal Council

The fourth fight against the Infernal Council, known as the Council fight or the Lords boss, is quite unique and is actually eight individual enemies, and each member of the team fights one of the enemies alone.
There are three different types of enemies in this fight, known as Marauders, Assassins, and Juggernauts. You can tell which ones are which by clicking on them and looking near their character portrait, under their names. The Juggernauts are meant to be fought by tanks, the Assassins by healers, and the rest of the group takes on the Marauders. While this is the recommended and expected distribution, if your group isn’t made of the normal setup of two tanks, two healers and four damage-based characters, don’t worry – assign players the best you can and then have anyone leftover just go pick a lord to fight. Groups will often tell you to go pick out and stand in front of an enemy before the fight starts, to make sure everyone is properly assigned a council member. If you aren’t sure what to pick, look for a Marauder to fight if you are a damage-based character.
The important part about this fight is that you CAN NOT HELP YOUR TEAM MATES. Do everything in your power not to accidentally hit any other enemy except the one you are assigned to, as it can cause the fight to fail for your entire group. Do not use large-area-based attacks, do not throw your lightsabers, don’t use any group buffs, don’t roam around, and don’t heal your team mates.
You can only help one single team-mate with one single attack once your own enemy has been defeated. What groups usually do is tell you to defeat your enemy first, then look around the room. If there is a player that is very behind compared to the group, you can attack their enemy with one single hard-hitting attack to help them.
This fight can get pretty funky if you are short a team-mate. What I’ve seen most groups do is assign the unattended lord to another player who feels confident they can kill their enemy first. The entire group will need to be very careful and not accidentally hit the unattended council member, even though they are very likely running around the room getting in the way. Then, when the assigned player is done with their first council member, they will move on to their second. This doesn’t always work however, as the council member may have picked a new favorite player and decided to go after them instead. As long as no player damages the unattended lord while it is running around, any player can technically pick it up once they’ve defeated their own boss.
Soa

Soa is the final fight in this operation, and also one of the most cinematic fights in the entire game. Although the operation is considered easy when it comes to damage, you can still very easily get yourself killed in this fight, and the goal will be to keep yourself alive long enough to see the whole thing.
Top Floor
Entrance – Be careful not to run too far forwards or you will accidentally start the fight. Most teams will tell you to jump down the little ledge from the hallway onto the circular platform that Soa is on, but not to walk forward any closer to the boss.
Entrance Bug – Unfortunately, there is a nasty bug that sometimes starts the fight if any player jumps down off the first ledge onto the round circular platform. If you want to avoid this, stay up on the smaller ledge until you are ready to start!
Positioning – The ranged players and healers will want to stay as far back from Soa as possible, and stand near to the door and ledge where they entered the room, on the outer ring of the platform. The close-range players will want to attack Soa close-up, but try and stay as close to where they entered as possible – so don’t run through or behind the boss. You’ll need to run back to where you originally started near the entrance fairly soon, so keep this in mind when moving forward to attack Soa. If you get disoreinted, look at the map, as the entrance is in the WEST or the LEFT SIDE of the map.
Shield – When the fight starts, Soa will actually have a glowing orange shield up, you can’t damage him while the shield is visible and he’s awakening.
Green Puddles – Soa will place down large green puddles on the ground that harm anyone standing in them. If a puddle shows up where you are standing, move out of it, but keep in mind that you’ll need to run back to the outer ring near the entrance soon.
Next Phase – At 75%, Soa will shield up, and say, “I have waited 20,000 years, but I will wait no longer!”, and the ground will start shaking. This is a sign that the middle rings of the platform are about to fall away, and the team needs to get back quickly to the outer ring near the entrance, which will soon become a ledge with a sheer drop all around it. If you aren’t on the correct ledge after the floor falls, you’ll either plummet to your death, or be stuck on a ledge in the middle of nowhere away from your group. If you are a close-range player, you may want to start moving away from Soa and back towards the entrance at around 80%,and let the range shoot him from far away for the last few percent. The goal will be to carefully jump down the ledges as they appear, and reach the next floor with your group.
Drop Down – Once the floor falls away, you should be safe to jump one ledge down from the ledge you started on. On this platform you will WAIT! Every time you jump down a platform, you take damage, and if you jump down at full speed there’s a good chance you will get yourself killed. If you jump down to a third nearby platform right away off the side, it’s a very long drop, and you won’t be giving your healer a good chance to heal you with the group. Instead, if you are patient, another platform will appear behind the second ledge that is a much less steep drop, and your team will carefully jump down to it and multiple other platforms, attacking the yellow enemies you see along the way. If you have healing abilities, heal yourself as you dropdown. When you reach a natural point where there is no more ledges to jump to yet, group up with your team and stack up for heals, and help heal your team mates if you happen to have any healing abilities, since there are no enemies nearby. Soon, another ledge will appear, and you’ll be able to continue. At any point you are extremely close to death, don’t jump off the side of the ledge, instead heal yourself or give your healer a chance to find and heal you. Once you reach the floor, stack up for heals again and wait for the boss to arrive!
Small Pylons & Pylon Bug – On the way down, there will be small yellow-named pylons on the ledges and platforms as you jump down that need to be destroyed along the way. Most groups will simply have the group destroy them as they go with everyone getting a few shots on the pylons as they are running, but unfortunately there is a bug that can cause the pylon destruction benefit not to take place, making the fight harder. To avoid this bug, your team should not destroy the pylons as a team, and instead no one touches the pylons while jumping down except for one designated damage-based player who will kill them all by themselves.
Middle Floor
Mind Traps – On the middle floor, a fun new mechanic is introduced called “Mind Traps”. A random member of your team will be sucked into the mind-trap, and won’t be able to help with the fight until they are freed. To free your team-mate, attack the glowing blue mind trap pyramids as soon as they appear.
Lightning Orbs – Soa also likes to assign lightning orbs to players randomly in the group. When the orb reaches you, it will explode, hurting everyone nearby, and it also zaps anyone it comes near to with lightning as it is travelling on its way over to find you. You can help your team by looking for and running over to your orb when you see your name show up in red text on the screen, and explode it by running in to it when none of your team mates are nearby. In story mode, one lighting orb will appear, and in hard mode, two will appear for two different players. Teams will often call out the names of the players who need to go find their lightning orbs out in voice chat.
Flying – There also another fun mechanic introduced in this phase where Soa will pick a random team member to hurl into the air, causing them to fly around. If this happens to you, just enjoy the ride! You’ll wind up on the OPPOSITE side of the room where you will want to wind up, so make sure to orient yourself when you land.
Next Phase – At 29%, Soa will shield up again, and again say, “I have waited 20,000 years, but I will wait no longer!”, and then the middle of the platform will drop away again. You’ll want to be in the same safe position as last time, which will be WEST or on the LEFT SIDE of the map, on the outside ring of the platform, or you’ll fall to your death when the platform crumbles. Melee players might want to get moving at around 35% especially as they may need to get oriented after jumping between Soa and the Mind Traps. Much like the ledges before, stick with your group, and don’t jump if you are too low on health to survive the fall.
Final Floor
Shield – On the final floor, Soa will put up a shield, and can’t take any damage unless the shield is removed.
Pyramid – To destroy the shield, your tank will need to bring Soa to under a pyramid that will float into the air. On storymode, the location where the pillar will fall is marked with a glowing blue circle, but in hard mode, players will need to guess where it will fall based on its shadow and its location in the air. If Soa is correctly hit with the falling pillar, he will crouch down, and become vulnerable to attacks. When this happens, all players will want to focus on attacking Soa at full force, ignoring any Mind Traps or Lightning Orbs until Soa has re-shielded. When the pyramid falls, there is also sometimes a knock-back, so players, especially the tank, will want to position themselves so they are not flung back into the lava around the edge of the platform. The pillar itself also really hurts if it gets dropped on you, so avoid it when possible.
Mind Traps & Lightning Orbs – While Soa is shielded, players will want to focus on the Mind Traps and the Lightning Orbs, and help the tank position the boss the best that they can.
Soa Death Bug Can’t Revive – If one of your team members dies during the fight, especially while jumping, and finds out they can’t revive even after the battle is over, have them Return to Area Start, ride the speeder, run back to the final fight room, then jump and fall to their death down below where you are. Your team can then revive them and they can get their reward. If the team hasn’t looted, they can instead Return to Medcenter, then run back into the operation, and they’ll be able to loot the boss, but don’t do this unless your whole team knows to wait to loot the boss.
Sneaky Tricks
When it comes to Operations, most experienced players are more interested in fighting the bosses who often have interesting mechanics. In-between these bosses are what is known as trash – less powerful enemies that are simply meant to keep you from getting to the next boss too quickly. Players have developed tactics for skipping the trash or dealing with it quickly, often based on the classes that are currently in your group.
First Skip – After Droid Boss
Once you defeat the first boss, the giant droid, you’ll walk down a hallway that eventually leads to a large circular room with a giant pit and a precarious walkway. Before you step foot on the walkway, if you look down the pit to the left, there’s a ledge down below with some enemies on it. A skilled player with Force Speed or more often a Scoundrel or Operative with a roll can quickly fling themselves off the ledge before the walkway on to the ledge down below. If they land successfully, they can then stealth their way forward to the next boss. The rest of the team can then kill themselves and go catch the speeder way back at the beginning of the Operation, down the ramp, and skip all the beginning trash.
Second Skip – Lava Ramp
After fighting the lava boss, Gharj, there are many enemies in the large open room with grass and trees. To get to the pylon quicker, your group can stick mainly to the left wall of the room, fight a few enemies along the way, and then there is a little bridge made of rock that goes over a river of lava that you can cross to skip trash located more on the right side of the room over the constructed stone bridges that is the normal route. Unfortunately players often have trouble with this jump and wind up in the lava instead of acrss the shortcut, so if yoy have a Sorcerer or Sage on hand, have them at the ready to Force Pull your team mates if they miss the jump.
After that there really isn’t much trash so have fun just fighting bosses!
 Questions or comments? Feel free to send me a message on Twitter


 Discord
  Email swtorista@gmail.com
 Bluesky @swtorista.com
 Reddit /u/swtorista
 Twitch Swtorista
 Youtube
 Patreon
 Twitter @swtorista