


 How to Craft
 Choose a Crew Skill
 Armormech
 Armstech
 Artifice
 Biochem
 Cybertech
 Synthweaving

 Gathering Guide
 Rare Materials Guide
 White Materials Guide
 Jawa Junk
 Augments
 Medpacs, Stims and Adrenals
 Synthweaving Crafting Tree


 Crafted Decorations
 Crafted Mounts
 Crafted Dyes
 Crafted Crystals
 Events Calendar
 Galactic Seasons
 PvP Seasons
 Bounty Event
 Double XP Event
 Feast of Prosperity
 Gree Event
 Life Day
 Nightlife Event
 Pirate Incursion Event
 Rakghoul Event
 Spring Abundance Festival
 Swoop Event

 Jedi Knight
 Jedi Consular
 Trooper
 Smuggler
 Sith Warrior
 Sith Inquisitor
 Bounty Hunter
 Imperial Agent
 Bounty Hunter
 Imperial Agent
 Jedi Consular
 Jedi Knight
 Sith Inquisitor
 Sith Warrior
 Smuggler
 Trooper
 Legacy Gear
 Lightsabers
 Double-Bladed Lightsabers
 Vibroswords
 Double-Bladed Vibroswords
 Blaster Pistols
 Blaster Rifles
 Sniper Rifles
 Blaster Cannons

Explosive Conflict is the third Operation added to Star Wars: The Old Republic, and although it is an older one, many of its mechanics can really pack a punch. This video will go over all the details of this Operation so you know exactly what you are getting into.
Zorn & Toth

Zorn and Toth are the first set of bosses in Explosive Conflict, and are often known as “the Drouks”.
Positioning: Your team leader should split your team up, with half of your team on Toth and half on Zorn, so the Drouks can be attacked roughly at the same rate. In story mode, you can stack the two Drouks up together to help defeat them faster. Your tanks should face the Drouks away from the rest of your team, and your team should stand behind the drouks, with ranged players and healers standing far away to avoid damage. If your team is struggling to stay alive, you can have your two tanks split the Drouks up, making them less powerful.
Red Circles: When the Drouks reach 60% health and 20% health, large red circles will appear on the ground. You’ll want to carefully step way out of these circles as soon as possible, and don’t step back into them until they have completely disappeared. These do a lot of damage even in story mode, so make it a priority to get out of them.

Shriek, Mental Anguish & Cleanse: Healers should try to cleanse the Mental Anguish debuff when they see it, it looks like a yellow-orange man’s head with a busted eardrum.
Handler: After both Drouks are defeated, their handler will jump into the fight and your team will fight him, and he’s a great enemy to practice using your interrupt on, as everything he does is interruptable in story mode.
(Veteran Mode) Tanks & Positioning: In Veteran mode, the two bosses must be kept apart at least 15 meters by the tanks, with the tanks having their back against the wall. We like to take Zorn, the boss that starts on the left on a wall that’s not visible from where you enter the room – it’s parallel to the ledge you jump down from at the beginning, and located on the left of the battle field, but not allll the way on the left where there’s a tree, and Toth, the Drouk that starts on the right side to the right side wall, a few rock outcroppings away from the cave entrance. [[Merlyn, did you say even your veteran mode group doesn’t split them up? or was that the tank swap you don’t do]]
(Veteran Mode) DPS/Healers & Positioning: Ideally, with your team split up in half, your leader will assign ranged players to Zorn. Ranged players will want to try and stay far away from both bosses, as both have attacks that can be avoided by distance, reducing your damage taken.
(Veteran Mode) Shriek, Mental Anguish & Cleanse: In Veteran mode, Healers should cleanse the Mental Anguish debuff, it looks like a yellow-orange man’s head with a busted eardrum. This is important to be cleansed as not only does it do damage, but it also reduces how much damage the player can do while they have the debuff.
(Veteran Mode) Tank Swap: Starting at 90% health, and then again at 70, 0, 30 and 10 percent health, the Drouk on the right, Toth, will jump to the Drouk on the left, Zorn. The tanks will need to quickly swap targets when this happens, and bring each Drouk back to its original position, while being on the opposite Drouk of what they started with. The actual jump is quite painful, so the tank on Zorn can use a defensive ability before it happens to avoid a big chunk of damage. The tank on Zorn should be watching for the jump, and when they see it, should stop all damage, as there’s a very high chance they’ll get Fearful in the next few seconds once the jump happens.
 (Veteran Mode) Fearful: When the Drouks jump and are close to eachother for a short time, any of your team mates who are 28 meters or closer to Zorn will be hit with the Fearful debuff, which makes Zorn hit harder and makes all damage directed at Zorn be reflected back in your team mate’s face. To avoid this, players attacking the Drouk on the right, Toth, should simply stay away from Zorn all together, and long-range players attacking Zorn should be attacking from outside the 28 meters range, which is part of the fun of the fight, as most ranged abilities have a 30 meter range, leaving a very narrow window for ranged players to stay in. If you have close-range player attacking Zorn, or one of your ranged team mates was a little too close, or if anyone in your entire group gets the Fearful debuff, they should immediately stop attacking Zorn, and organized groups will often have them switch places with another player on the other boss.
(Veteran Mode) Or Don’t Swap…?: Another way to deal with the Fearful tank swap debuff is to simply have your tanks not swap Drouks at all. Instead, the tank on Zorn, will get Fearful, but will not attack Zorn, and instead only use their taunts and defensives, so they don’t get the Fearful damage bounced back to them. The downside of this tactic is that the tank on Zorn with Fearful will take a lot more damage, so the tank will need to use a strong defensive once they get Fearful, and the healers really need to be ready to heal through all the extra damage on the Zorn tank. [[Merlyn, what is the upside to this strategy? Is is the bosses moving around less?]]
(Veteran Mode) Or Don’t Split…?: If you have a lot of melee damage characters and are struggling to keep them alive with Fearful, you can also try having your team not be split up at the beginning, and instead have them burn down Toth together to just below 10% health, which will quickly trigger all the Fearfuls while they stay far away from Zorn. Then, they can switch to Zorn, and attack him without having to worry about Fearful happening at all. If you try this out, just be careful not to drop Toth below 5% or you’ll accidentally trigger his enrage. [[Merlyn, why don’t you like this? It seems like it would work really well? Or just feels like ‘cheating’?]]
(Veteran Mode) Baradium Heave: At 80% health and 40% health, the drouks will randomly choose a member of your team and place a yellow circle under their feet. Your team mate who gets the yellow circle will need to go run under Toth, the Drouk on the right, and eventually the circle will turn from yellow to purple, and at that time your team mate should run out of it and go back to where they were. While Toth is Berserk, he does higher damage, so you’ll want to bring that yellow circle over as quickly as possible.
(Veteran Mode) Die at the Same Time: Your goal is to try and kill Toth and Zorn at the same time, so make sure you’re keeping an eye on their health, as they enrage when either Drouk drops below 5% health. If one’s getting close to that enrage percent, and the other is still over 10%, have one of your DPS switch over to the healthier one.
(Master Mode) Differences: In Master Mode, better known as Nightmare mode, the fight gets incredibly difficult mostly due to the sheer amount of damage that the bosses dish out, in addition to all the other mechanics and tighter timing and positioning. Healers should focus even more on cleansing the yellow-orange Mental Anguish debuff, the red-circles will kill you if you get caught in them, and in general, you want to avoid taking as much damage as possible.
 (Master Mode) Baradium Poisoning: The only major difference is a fun mechanic called Baradium Poisoning, where a very short time into the fight players will get poisoned and will need to use a medpac to clear away the poison. The poisoned debuff looks like a green man bending over and you’ll want to use a medpac immediately after seeing it.
(Master Mode) More tips: For both Veteran Mode and Master Mode, the Fearful mechanic and positioning can be difficult to deal with, and if you’d like more tips or some alternative strategies, please check out Merlyn’s in-depth guide, linked in the description of this video.
Looking for more in-depth strategies and mechanics for the Drouks? Merlyn’s Explosive Conflict GuideMerlyn’s notes from Zorn & Toth:
– You mention red circles at 60%, they also happen at 20%.
– I would mention the soft enrage that triggers when either Drouk reaches 5% health. Teams should make sure both Drouks are sub-10% before either one gets pushed below 6% health. This is especially important in Veteran or Master mode.
– For Vet, might be worth clarifying that the Drouks must be at least 15m apart to avoid the Surging mechanic where they gain rapidly buff their damage dealt and reduce damage taken. As you note, the tanks being against opposite walls is plenty of distance.
– For Vet, I would emphasize that any ranged DPS and healers should try to be at least 28m from both Drouks if possible. Being >28m from Zorn will avoid Mental Anguish DoT and Fearful, while being >25m from Toth will avoid his AoE Smash that deals substantial damage. For newer players, this fight is all about controlling damage taken since the DPS/heal check is pretty easy so long as players don’t die to avoidable damage.
– Typo in the Shriek/Mental Anguish paragraph where “0” should be replaced by “50”.
– Mental Anguish should be cleansed in all difficulties. In Vet it adds stacks of Weakened every time it ticks for damage. Each stack of Weakened reduces damage done by 5% and lasts for THIRTY SECONDS. This means a DPS who doesn’t cleanse will deal between 5% and 75% less damage over the DoT duration. Thus the cleanse is important to avoid taking damage but also to avoid a huge damage debuff.
– Tank Swap – The Zorn tank should be watching for the leap and immediately stop using any attack abilities, since they are pretty much guaranteed to get Fearful. If the team swaps, the Toth tank picking up Zorn can go ahead and attack since they should not get Fearful.
– Tank Swap – It’s worth mentioning that some groups may want to avoid the tank swap. Fearful reflects damage to anyone who attacks and it applies a +100% damage taken debuff. If not swapping, the Zorn tank should not attack at all and should pop a strong high duration defensive cooldown. Resilience/Force Shroud, Saber Ward, Energy Shield, etc. My teams even in Master Mode usually do not swap so it’s doable as long as your healers are prepared for it.
– Fearful – An alternative strategy for teams to deal with Fearful is to put all DPS on Toth to burn him just below 10% health. This will trigger all the Charge leaps that trigger Fearful. Then when Toth is sub-10% (MUST KEEP HIM >5% TO AVOID SOFT ENRAGE) then everyone can safely burn Zorn down without worrying about Fearful. I’m not a huge fan of this strat but it works really well for teams with lots of melee DPS.
– Baradium Heave – Might mention that Toth gains Berserk and deals +100% damage, which can only be broken by hitting Toth with Baradium Heave. If you miss Toth with the purple circle then you likely will get another yellow circle, though you have a bit less time to get into position.
– Master Mode – Agree that Baradium Poisoning is the most noticeable new mechanic in Master Mode. Technically there are some other differences. For example, Zorn has 15% more health than Toth and Toth gains 50% DR during Berserk. That usually isn’t noticeable since those two pretty much offset where Toth takes less damage during Berserk but Zorn has more health so they usually balance out. Also, the Handler at the end is immune to interrupts. He is still pretty easy but is not nearly the pushover as in Story or Veteran Mode.
– Master Mode – There is a lot more to discuss around strategy but sounds like you plan to avoid those for your guide. Happy to discuss if you like!
Firebrand & Stormcaller

Firebrand and Stormcaller are the second set of bosses it Explosive Conflict, but are better known as “the tanks”.
Positioning: Your team leader should split your team up again, with half of your team on Firebrand and half your team on Stormcaller, so the Tanks can be attacked at roughly the same rate. Most groups have their team-mate who is a tank stand on the nose of the enemy tank, and the rest of your team mates will stand on the sides of the tanks. When you’re fighting the tanks, you should be physically on top of them, and not on the ground. At the start of the fight, all players should rush to the tanks and try and get on top of them as quickly as possible.
 Yellow Ground Duty Healer: One of the healers on your team will be chosen by your team leader to stay on the ground instead of on the tanks. This healer will need to be on the move, as they’ll be frequently targetted by a yellow beam of light, as well a yellow circle on the ground, a yellow targetting circle closing in on their body. When the debuff that goes with this expires, they can step out of the yellow light to avoid the damage. The debuff for being Targetted looks like a man on a pink background with an orange targeting laser on him. The assigned healer will want to stick in the area on the ground between the two tanks, so they can heal the group on either side will dodging the circles.
(16-person) Yellow Ground Duty Healer: If you happen to be playing the 16-person version, two healers will need to be on the ground, and they can use the area between the tanks and the area behind the tanks to run around, and you can mark your two healers to make it easier for them to avoid each other.
(Veteran Mode) Yellow Ground Duty Healer: In Veteran mode [[something about cleansing]]
(Veteran Mode) (16-person) Yellow Ground Duty Healer: If you have a team member who is a ranged DPS but has high mobility and a self-cleanse, you can also have them on the ground instead of a healer.
Defensive System: Throughout the fight, or more specifically at every 20% interval, the tanks will yell, “Engaging Defensive Systems!”. A few seconds after you hear this, you and your team mates will be knocked backwards off of the tanks and everyone will need to go find shelter under the glowing orange shields near your tank. In story mode, these shields will always be on the outside edge of the tank, and will never appear in the front of the back of the tank, and you can use that knowledge to aim your character’s back towards where the shield will be, when you hear the “Engaging Defensive Systems!” audio cue. Find your shield, get inside and stay inside, and you and your team mates will kill the smaller enemies in there. While the shields are up, the bosses take very little damage, so only attack them from the shields if all the other enemies are dead. You’ll know it’s time to return to the tanks when you see your group running out of the shield, but the exact way to know is by looking at the tank boss on the left, Firebrand – it will be doing a channeled attack called Mortar Barrage with an icon of a bunch of missiles – when that ability is all done, then it’s safe to leave the orange shield and head back to the tanks.
(16-person) Defensive System: If you are playing the 16-person version, there will be a total of four shields, with two on each side – one at the front and one at the side of the tank. You can either split your team up evenly among all four before the fight, or you can just tell your team members they can jump between shields or use ranged attacks to help clear the other shield’s enemies when theirs are done.
Stormcaller Tank Out of the Shield: The tank player on Stormcaller will want to stay out of the shields during the Defensive Systems part of the fight, as they’ll be targeted by a special attack that will drop lightning spheres on them. They goal is to move around the map, dropping lightning spires, while trying not to drop them on the shields and trying to stay within range of the healers.
Where to stand on the tank: While the tank player should always be on the front of the tank, your team can decide if they want to have the rest of their team mate stand on the inside edge of the tank or on the outer edge if the tank, near the wall. If your team decides to stand on the inside, so both teams are closer together, this makes it easier to heal, but harder to get positioned for the knockback during the shield phase. If they decide to stand on the outer edge of the tank, it makes the knockback easier, but it makes it hard for the healer running around in the center to reach all team members for healing.
(Veteran Mode) Defensive System: In Veteran mode, these shields get a lot trickier. The first big change is that their location will be more random – the shields can appear either in the front, the back, or to the side of the tank, and they appear in separate randomized locations for each tank. To easily figure out where they will appear so you can position yourself for the knock back, you can watch your mini-map – look for three little dots, as that represents the three enemies that will appear where the shields come up. The second big change is that if you aren’t careful you can accidentally kill your shield by destroying your shield generator on the ground – so only use single target attacks on the Trandoshan enemies in the shield, and don’t use any area attacks or attacks that travel between multiple enemies. If you want to use AOEs, you can take advantage of pushes or pulls to get the Trandoshans away from the shield first.
(Veteran Mode) Double Destruction: In Veteran mode, there’s also a new mechanic added that will require your team mates to protect your players who are tanks. The first is called Double Destruction, and will be for the players on Stormcaller, the tank on the right. Stormcaller will start casting an ability called Double Destruction, and during that time, your team mate who is tanking will need to have two human shields in front of them to soak up the Double Destruction for them. The most common way to deal with this is to instruct your damage-based team mates to stick together on the side of the tank, and when the blue Double Destruction cast starts, your team mate who is tanking will run behind them, then afterwards run back to their original position on the nose of the tank. Whatever tactic your team chooses, if your team mate who is tanking Stormcaller gets Double Destruction, they’re probably going to die. The two players who get Double Destruction will take extra damage over time, so your healers should be prepared to heal them.
(Veteran Mode) Incinerate: In Veteran mode, there’s a second mechanic that happens very shortly after Double Destruction called Incinerate. This is a long cast that the Firebrand tank, the tank on the left, places on your team mate who is tanking Firebrand. When the cast starts, the player it starts on will have their armor burned away, and will probably die if Firebrand attacks them, so the goal is to get another member of your team to take the Incinerate Armor debuff by taunting Firebrand away temporarily. There’s a ton of different tactics, and the best choice depends on what type of classes are in your group. The oldest by-the-books tactic is to have the tank on Stormcaller taunt Firebrand immediately after Double Destruction, and the Firebrand tank will taunt Firebrand back when they see the Incinerate cast has started. Another great option is to have one of your damage-focused team mates who also has a taunt, taunt Firebrand immediately after Double Destruction, instead of the other player tank doing it. That way, neither of the tanks gets Incinerate. If your team is damaging the bosses fast enough, you may not even see Incinerate at all.
(Master Mode) Differences: In Master Mode, better known as Nightmare mode, the fight gets incredibly difficult mostly due to the extremely high amount of damage your team mates will need to dish out to the tanks compared to most other Master Mode fights, and there’s also a ton of damage going out for the healers to deal with, so players will need to be even more careful with positioning and timing.
(Master Mode) Positioning & Tactics – Killing Firebrand First: With such a high damage check, there are two ways to tackle the fight – you can either split up the group in half on each tank, or have your entire team focus on Firebrand, killing it down to under 20% so that all the Defensive Systems phases are taken care of, and you can then focus on Stormcaller afterwards and kill it without Defensive Systems in the mix. You’ll need to make sure you still have two players on Stormcaller to help with Double Destruction. When Stormcaller dies, Firebrand will enrage, so your team will want to run under the shields, until the shields are gone then kill Firebrand before it kills you. Killing Firebrand first is the go-to for teams who struggle with the high DPS check.
 (Master Mode) Trandoshan Bomber: There is one major difference in Master Mode, and that’s the Trandoshan Bomber under the orange shields. One of the Trandoshan enemies at random will explode if it is defeated while in the shield, so your team will need to push or pull it out of the shield first. To identify the bomber, you can look at the Trandoshan’s buffs, and it looks like an orange mushroom cloud explosion and is called the Overcharged Jetpack buff. If you wind up with a group that doesn’t have a push or a pull, or you accidentally miss, you can either wait till the end of the shield phase to kill it, or ignore the mushroom Trandoshan and have a ranged player kill it once you are back up on the tanks.
(Master Mode) More tips: For both Veteran Mode and Master Mode, there are some interesting ways to deal with the different mechanics based on your class and your teams composition. If you want to learn more about that and some alternative strategies, please check out Merlyn’s in-depth guide, linked in the description of this video.
Looking for more in-depth strategies and mechanics for Firebrand and Stormcaller? Merlyn’s Explosive Conflict Guidemerlyn notes
– Positioning – Some groups may prefer to have the players on the tanks stack on the inside side of the tanks. This can be helpful because it enables the Stormcaller healer to keep all players in range to help compensate for the Firebrand healer running on the ground. It also makes LoS easier for the Firebrand healer to help add heals. This is very much a group preference though and some may prefer outside to make sure no one gets punted the wrong way for defensive systems.
– Ground Duty Healer – Depending on group composition it may be easier to have a ranged DPS on the ground, particularly in 16m groups so that half (or more) of your healers aren’t running around. If so, Sage/Sorcerer or Commando/Mercenary are great since they have decent mobility to move out of stuff and can self-cleanse. Gunslinger/Sniper can not self cleanse so is not necessarily a great option unless a healer is dedicated to cleanse them when necessary.
– Defensive systems – Might be good to mention that the big tanks get a huge buff to damage resistance during defensive system, so it’s fine to attack them when trash is dead but don’t waste any big hitters or cooldowns. I don’t recall the exact % but I want to say it’s 95% damage resistance.
– Defensive Systems – Might add a brief section for tanking during defensive systems to make sure the Storm tank knows to kite lightning orbs, and particularly to stay out of the shield but close enough to be healed.
– Defensive systems (vet) – One trick that may be helpful is you can use knockbacks/pulls to move adds out of the shields to make it safer to use AoEs. This trick is far more relevant in Master mode and not necessary in Veteran.
– Double Destruction – Might mention that the two human shields who get stacks of Single Destruction will take significant periodic damage from the debuff, so will need extra healing and/or use of defensives to help mitigate the damage.
BURNING FIREBRAND FIRST – the anfter last shield hpase switch to lightninguntil final shield phase see video when that is – then switch back after – this is what we do
[[get mushroom debuf icon image]]Colonel Vorgath

Colonel Vorgath, better known as the minefield, is the third boss in the Explosive Conflict operation. Your team will not fight the boss directly until the end, and will need to carefully make their way through the unmarked minefield to reach the other side of the battlefield. The fight will start when one of your team mates runs through the red striped lines at the end of the hallway, so make sure everyone stays away from them until your team is ready to go and the elevator in the minefield is near the floor.
Moving Across the Minefield: At the beginning of the fight, there is no indication of where the mines are hiding, so your team will want to stay behind the sandbags until a GREEN square shows up. When it does, your team will be safe to move on to the green square and stay there. If you step into any of the blank spaces, your character will automatically get hit by a mine. If another gene square shows up in front of you, attached to the green square you are currently on, you and your team can move forward on to it, staying safely in the green. If a red square appears ahead of you, a large Demolition Droid will soon appear on the battlefield, and you’ll need to kill it quickly. When it does, random members of your group will have a symbol floating above their head, indicating that they have a mine defusal kit. Your team should look around to see who got it, and start looking out for the red square in front of them to turn from red to yellow. Once it turns yellow, any team members who have the mine defusal kit can run forward safely onto the yellow square, and right-click the bomb to defuse it. Once it is defused, and the square turns green, your group can move forward again. Once you reach the very end of the field, there will be a blue button on the right hand side you can right-click to disable the entire mine field.
Demolition Probe and Cleave: In story mode, the Demolition Droid is pretty easy to fight. Your team can help reduce how much damage the Probe does to your group by interrupting its Cleave ability.
(Veteran Mode) Demolition Probe Knock-back and Interrupts: In Veteran mode, the Demolition Droid has a knock-back ability called Overload which will knock all nearby players back if it is successfully completed. If your team is lucky enough to have found a route against the wall, your entire team should cuddle up and place their backs against the middle of the wall, so if the knock back happens, you’ll just be knocked back instead of into the middle of the minefield, or at least positioning your character’s back towards the other nearby green squares attached to the one you are on should keep you alive. It’s better to instead have your team interrupt the droid’s Overload ability as often as possible – this may take some team work by your team, for example calling it out in voice chat or by assigning an order of who will interrupt first second and third and so on.
(Master Mode) Demolition Probe Knock-back, Cleave and Interrupts: In Master Mode, the Overload knock-back can no longer be interrupted. Where it gets strange is that instead of hitting everyone nearby, the knockback only hits anyone in front of the Demolition Probe – so as long as the tank keeps their back against the wall, your Healers and damage team mates don’t technically need to squash against he wall, as long as they are standing safely behind the droid. Instead of interrupting the Overload, a new attack will be cast often called Cleave, that should be interrupted as often as possible to reduce incoming damage. Another important thing to know about Master Mode is that you really must have a minefield route along the left or right wall, as there will not be any safe green squares behind you as you progress for the knockback – your previous path will turn red as you move forward, so don’t hang around the old squares either. [[ can do callouts about cleave]] [[cleanes orange is faster so need a faster cleanser on it – nad yellw one take lnger to get off — probably there in hard mode — yes they are ]]
Assassin Droids: Throughout the fight in all modes, Assassin Droids will show up on the field, and will explode if they reach you. Your team will want to destroy them from far away, and push them away if they get too close.
Colonel Gorgath: If you make it to the end of the minefield without blowing yourself up, you’ll fight Colonel Vorgath and his turrets. When you get up there, your team should not attack the turrets – instead there’s a pretty funny bug, where if you bring your team away form the turrets and towards the cave entrance, the turrets won’t be able to reach your team mates and won’t attack you at all. Vorgath the boss is actually very easy to fight if you make it to him – if you get a red grenade circle around you, run away from your team mates so you don’t drop it on them, and your tanks will need to pay attention with their taunts as Vorgath likes to switch targets a lot.
[[bleed to cleanse, it is blue]] Looking for more in-depth strategies and mechanics for the minefield and Colonel Gorgath? Merlyn’s Explosive Conflict GuideSolving the Minefield Puzzle: Everything we just talked about is for the players down in the minefield below, but one player, usually the second tank, will actually stay behind and solver the puzzle. When the fight starts, instead of waiting on the ground near the sandbags, the solver will jump up the elevator and start working on the puzzle, which is why the minefield fight is sometimes known as the “puzzle boss” of this operation.
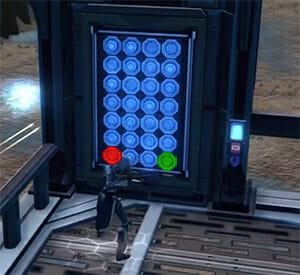
The minefield puzzle starts like this, with only blue squares available, which means it is unknown if the square is safe to step on or if it has a mine:

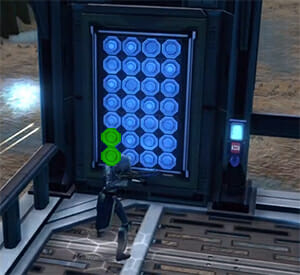
Your team’s puzzle solver will start by right-clicking the very bottom-left corner square. If you are lucky, right-clicking it will reveal it to be a safe spot, and the square will turn green:

If you are unlucky, it will turn red, saying that there is a mine there:

No matter what is revealed, the border of the puzzle will turn from blue to red. When it turns blue again, that means the puzzle is available to be used again, and you’ll be able to right-click another square at that point. You can even right-click the squares while fighting the single little enemy that shows up to save time.
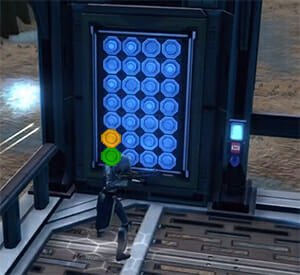
If you got unlucky and revealed a red square on your first square, you can next try the very bottom-right square instead, and hope for a green on there. The goal is to try and get a path along the wall on the left or the right. In story mode, it doesn’t actually matter where you start and the timer is very generous so it doesn’t even matter how long you take, but in veteran mode it makes things a lot easier, and in master mode must go along the wall do the the probe’s knock-back. So you can save some time by getting lucky and getting a “free” green square either on the bottom left or bottom right to start with. If you get really unlucky and don’t see a single green square, in story mode or veteran mode, just keep clicking bottom squares until you get a green one, in master mode you’ll probably want to restart the fight.
The next step is to start creating the path for your team once you have picked a starting square, by right-clicking the next square up the path in a straight line. If you are lucky, you’ll get another green square, and your team can move forward, and you’ll work on right-clicking the next square up again.
If you are not lucky, the next square up will be red. This is the point where you will need to reveal a Demolition Probe Droid for your team, by right-clicking the small blue button to the right of the minefield map.

The will turn your character into a hologram, and you’ll be search for a mining droid, preferably one against the wall ahead of where your team is. Once a droid is revealed, you’ll be teleported back to the puzzle and will have to fight another small enemy, but while you do, keep an eye on your team down below. They will be fighting the mining probe. When it gets close to dead, say around 10%, you can right-click that red square which will turn it yellow for a short time.
When the probe droid is defeated, at least one of your team members will receive the Mine Defusal Kit, and will be able to safely run onto the yellow square down below, right-click the mine, and defuse it, which will turn that yellow square green. From there, you’ll just keep revealing squares up the path in a straight mine, and go look for a Mining Probe Droid with the other button any time you reveal a red square! Once your team is all the way through, they can press a blue button on the right-side of the end of the minefield, which will make it safe for you to run across, but if you are playing in story mode or veteran mode you can jump down behind the sandbags and start running across the green path as soon as your final green square is revealed and join your team.
(finally) thoughts/comments on Colonel Vorgath / Minefield:
– Typo in the “Moving Across the Minefield” section where green is misspelled “gene”.
– Might be good to add in the moving section that you cannot move diagonally across the minefield. I’ve seen some folks try to get cute with that if they aren’t explicitly told you can’t do so.
– For the demo probe droid, not sure if it’s worth mentioning that the person(s) who get the defusal kit are typically the person(s) closest to the droid when it is destroyed. You get 4 kits in 8m story mode but 1 kit in all other difficulties (you probably should get 4 in 16m SM but the Vet mode mechanics bleed through so you only get 1). This means folks who are newer to the fight should try and avoid standing quite as close if they don’t want to deal with the mechanic, and experienced folks can force it to get the kit themselves. I do this regularly to get the kit every time when leading really new groups through EC.
– If you want, you might mention that in story mode you can use the defusal kit to disarm multiple mines if the team is quick enough. This might make sense as an “advanced” tip for story mode. If the person running the puzzlze clicks quickly enough, you can get 3 mines disarmed but 2 is pretty easy.
– The assassin droids are not dangerous in story mode but in vet and master mode they are much more dangerous. You can cc them in story/vet iirc but cannot cc in master mode. There are various strats to deal with them. CC in lower difficulties works, some teams will try to use slow/roots or rely on healers to help deal with them until the probe droid is down. Some teams will slow/root just one that way they come in staggered to make the xplosions easier to heal through.
– For vet mode, I would add that the cleave attack can often be ignored but if the droid enrages the cleave needs to be interrupted as well because it will do far more damage and may one shot non-tanks.
– Small typo in master mode section, “he wall” should be “the wall”.
– Cleave is not a new attack as described in the master mode section, it is present in lower difficulties also. It is ideal to interrupt Cleave since you cannot interrupt Overload in Master Mode, though the importance depends somewhat on how the team is positioned.
– Typo where “Colonel Gorgath” should be “Colonel Vorgath”. Also should clarify that you only need the healers to stand near the cave entrance. As long as the tanks/DPS do not attack the turrets they will aggro to the healers due to healer aggro and then can be out ranged.
– I like the detailed walkthrough of the minefield puzzle and particularly the screenshots. The one thing I might suggest adding is a little discussion for Veteran/Master Mode. The timing to beat the turret enrage is much tighter in those difficulties, so I suggest the person running the minefield ignore the add at first when they get up there the first time. Uncover a green square then immediately summon the probe droid then worry about the add. The add can’t damage you while you teleport down below anyway. Also, as soon as you trigger a mine square for defusal (turn yellow), go ahead and teleport down to get the next probe droid. I usually just stand there as a hologram until the moment the mine is disarmed and turns green, then immediately run to the wall. The combo of those steps helps save 10-15s on getting the first probe droid and around 5s for each probe droid after that, so altogether can save the team 35-45s over the fight and may often be the margin to beat the enrage if you get a “bad” puzzle combo.
Walker & Warlord Kephess

Warlord Kephess is the final boss of Explosive Conflict, and is sometimes simply know as “the Walker” or “Kephess”.
Positioning: While your team will be fighting the Walker itself, most of the time you’ll be fighting other enemies, so be very careful to stay away from the Walker the rest of the time as it has a nasty stomp attack that will crack the ground below it if you get too close. There will also be purple fire on large patches on the ground that will heavily damage any of your team mates standing in it, so they’ll want to step out of the purple fire or blackened patches on the ground as quickly as possible. In story mode, you really only need one tank for this fight.
Imperial Siege Droids & Interrupts: The fight starts off by your group attacking the three smaller droids protecting the walker, and your team’s leader will split your team up into three groups and assign each group an Imperial Siege Droid to focus on. Not only will your group attack their assigned droid, but they’ll also work on interrupting it. In story mode, the interrupts help reduce damage, while in the harder modes, interrupting every or almost every Calibrating Shot is important, as it places a stacking debuff on your team mates which will eventually get them killed if they get too many, so you will want to assign some type of interupt schedule or rotation with your team to make sure everyone doesn’t waste their interrupt all at once.
Bomber: As soon as you defeat the three Siege Droids, a new enemy will show up called the Bomber, which will appear in one of the three corners and will have an explosive symbol over their head. This special enemy needs to be found and defeated as quickly as possible by your entire team. Many teams like to pull the Bomber close to the group, so players can attack it faster.
Bomb: As soon as the Bomber dies, one of your team mates will receive a Bomb, and their name will appear in red text on the screen and they’ll have a bomb symbol over their head. The player who gets this will need to run under the Walker, and when they reach the center of the area under the Walker, they will be automatically rappel into the Walker, and place the bomb. Jedi Consular Sages and Sith Inquisitor Sorcerers can help this player out and help reduce the damage they take by using Force Pull on them once they have rappelled up into the Walker, and that way they never have to step foot on the dangerous ground below the walker on the way back down.
Walker: Once the walker is kneeling, the entire group will want to focus their energy on damaging the Walker for the short time that it is vulnerable. Once it stands back up again, you won’t be able to damage it until another Bomber is defeated.
Trandoshans: Soon after you start attacking the Walker for the first time, a pack of Trandoshans will appear in front of the door to the right of the Walker. These Trandoshans come with a shield, and the shield will cause anyone who attacks a small Trandoshan under the shield will have all that damage reflected back to them. So your team will want to find and attack the taller Trandoshan, named the Trandoshan Warrior, and quickly kill him with single-enemy attacks until he and his shield are defeated, and then you can use area attacks to quickly take down the whole pack of Trandoshans. There will be three packs of Trandoshans total, the first will be by the door to the right of Kephess, the second will be by the door you entered from, and the final pack will be to the left of Kephess. Once the third Trandoshan pack is defeated, look for another Bomber, and then attack the Walker for a second time!
(Veteran Mode) Trandoshans: In the more difficult modes, these shielded Trandoshans get a lot tougher, and your team will want to kill them a lot quicker. Some teams simply continue having their team focus on finding and killing the Warrior, while others have the two tanks co-ordinate an area taunt and then a single taunt by the other tank to pull the Warrior away from the smaller Trandoshans, making them vulnerable sooner.
(Master Mode) Trandoshans: In Master Mode, two large Warrior Trandoshans appear in each pack, and dealing with them gets even tougher.
Purple Power Droids: Shortly after you attack the Walker for a second time, the purple Power Droids will show up. Your team will want to stack up directly under the Power Droid that does not have the purple circle around it, and attack that droid they’re standing on top of. When the purple circle switches droids, your team should quickly move out of it and go stand on the other droid. One member of your team, usually your tank, will stand between 8-10m away from the Power Droid, attracting its attention and stopping it from firing directly on your stacked up group. [[I can’t find anything in the swtor.jedpedia that actually supports this tho?]] When you defeat the Power Droids, look for another Bomber, and then fight the Walker again!
Kephess: Around the third time you start fighting the Walker, Kephess will jump down out of the Walker onto the ground, abandoning it. Your team should focus on fully killing the walker, and ignoring Kephess until it is defeated. One of your tanks will go pick up Kephess, keeping him away from the group as they focus on the Bombers and the Walkers that show up. Once the Walker is down, everyone will focus on fighting Kephess together. All your team mates should stay behind Kephess, as he’s got a nasty frontal attack with his swords that will hit anyone in front of him.
Red Circle: Kephess will jump in the air, and where he is going to land will be marked by a red circle. In story mode, players should move out of that red circle to avoid damage. The tank taking care of Kephess will want to be ready to taunt him back as soon as he lands.
https://sites.google.com/view/merlyn-swtor/operations/explosive-conflict?authuser=0
(Veteran Mode) Kephess Red Circles: In Veteran mode, Kephess gets a whole new mechanic for both tanks to deal with together. He’ll still jump into the air and then put a red circle on the ground where he’s going to land, but in Veteran mode, whoever is closest to the red circle when he lands will automatically be targeted by Kephess, so your entire team should run away from the red circle and your tank should be the closest to it every time it appears. His first attack after he lands will be a very powerful attack called Empowered Slash, which will give the tank that got it a painful debuff called Savage Wounding. Immediately after Kephess does this attack and you see him raise his swords, your team’s second tank will want to taunt, so that the first tank can recuperate from the heavy blow, especially as they’ll be taking damage over time from the debuff.
(Master Mode) Kephess Red Circles: In Master Mode, after Kephess lands in his red circle, he’ll use grapple hook or a force pull to pull the closest person to his red circle to him, and then he’ll do his Empowered Slash. The second tank will want to taunt specifically when they see Kephess pull the first tank towards him.
Big Purple Circle / Gift of the Masters: At just under 60% health, Kephess will create a large purple circle around him called ‘Gift of the Masters’, and all team members will want to run out of it to avoid damage. After that, have your team finish Kephess up together!
(Master Mode) Nightmare of the Masters: In Master Mode, to add insult to injury, if more than one player dies after the giant purple circle appears, Kephess will become immortal.
(Veteran Mode) Breath of the Masters: In Veteran mode, after the big purple circle happens, Kephess will run to the current tank and hit them with a different very powerful fast attack called Savage Arcing Slash, it’s shown by an animation of a glowing black purple Kephess raising his swords in the air and slicing downwards, which will also knock the tank back. Immediately afterwards, Kephess will cast a channeled ability called Breath of the Masters of that same tank, making them glow black and purple, and that glowing tank will start dropping purple circles on the ground, five in a row. The tank dropping circles will want to drop them close together, so they shouldn’t run too far away when they drop a circle, and they should drop them around the outer edge of the room. The second taunt will want to taunt during the Breath of the Master channel, picking up Kephess, and then staying within distance of their fellow tank so they can repeat that pattern again after the other tank drops five circles. The tank that gets knocked back also gets a second special debuff called Touch of the Masters, which will cause them to automatically die if they take any additional damage from Kephess after Breath of the Masters, so the tank swap needs to happen very quickly.
(Master Mode) Breath of the Masters: In Master Mode, Breath of the Masters becomes even more difficult as Kephess will pull the tank dropping purple circles to him after that tank drops the second circle. Handling Breath of the Masters in Master mode is all about the timing an positioning, and if you want some great tips about where to go and when to be there, check out Merlyn’s indepth guide at merlynswtor.com , which also includes some fantastic tips and ideas about how to handle the difficult Trandoshan phase as well, depending on your group composition.
Looking for more in-depth strategies and mechanics for Warlord Kephess and his Walker? Merlyn’s Explosive Conflict GuideFeedback on Kephess:
– For the positioning, you might mention that the purple fire has a pattern where it sweeps across the room then sweeps back. Often the safest place to stand is where it was just attacked since it never repeats the same section consecutively.
– For the Siege Droids, their Calibrating Shot cast does not place a debuff on the player. It places a buff on the droids themselves. In Story mode it increase their damage, in vet it increases their damage and damage reduction (the buff to damage is roughly x2 the buff to DR) and in master it buffs damage and damage reduction equally. Interrupts are not a big deal at all in story mode and are semi-important in veteran mode. In master mode interrupts are pretty important. Most teams adopt a strategy where all DPS focus down one droid at a time while tanks and healers handle as many interrupts as possible on the other two.
– An advanced trick for the Siege Droids is that if you taunt them and then LoS them in the little alcove of the bunker next to the Walker, they will move towards you. It’s pretty easy to stack the far left Siege droid on top of the right Siege droid. Since most teams kill the droid in front of the walker first, this is handy to stack the other two for efficient DPS to clear the phase faster.
– Another advanced trick is that a Guardian/Juggernaut tank can handle all interrupts on one droid solo. They need to take the utility where damage taken reduces the cooldown on Force Leap/Charge. They then alternate between Force Leap/Charge interrupt and their hard interrupt. Really handy on Master Mode for Guardian/Jugg tanks (was what I handled when my team cleared EC NiM).
– For the Bomber, in Vet and Master mode the bomber can expire. The way this works is he has a debuff that counts down before the bomb explodes and kills the bomber, so if the team doesn’t kill him during this timer then they cannot get the bomb. Highly skilled players can extend this timer by stunning the bomber right before the debuff expires. The timer isn’t super difficult in Veteran as long as folks pay attention but can be tricky in master mode for some teams early on.
– Might want to mention that outside of the player with the Bomb, no one should EVER stand under the Walker when it’s standing upright. You take significant damage. It used to be the case that you could deal damage via reflect abilities during this time but that was patched out.
– For trandoshans, might mention that players with reflects that actually mitigate damage (Guardian/Jugg, Commando/Merc) can use AoEs safely while their reflect is active. This can help significantly in clearing adds in Vet and Master mode.
– In Veteran mode most teams can safely focus down the Trando Warrior and don’t need to worry about separating the adds. In Master Mode the teams will need to separate them since it is unlikely that they have enough time to burn down two Warriors and AoE the adds before the next wave spawns. My team found that having one tank guard the other tank helped a lot, where the adds would auto-aggro to the tank that was not guarded and made it easy for the guarded tank to grab the two Warriors with a single taunt and a regular attack.
– For the Power Droids, it’s kind of confusing how their mechanics work. The simplest way I can describe it is that the droids will place an invisible debuff on players standing >8m away, then will cycle through those players to target them with a ranged attack. So if everyone but a tank stands <8m then only the tank should be targeted. The damage is easy to heal through for tanks in story mode, is a bit tougher in veteran mode, and is fairly tough in Master mode. If the tank gets unlucky shield rolls then they may need to burn a defensive cooldown. Defensives that mitigate ranged attacks are most effective (Saber Ward, oil slick, Deflection, etc.)
– There is a weird url link to my website right before the Kephess vet mode mechanics that is broken somehow.
– The discussion on Kephess’ grapple/pull isn’t quite right. I don’t believe he uses that ability unless someone is pretty far away. I don’t recall any pulls when running this fight on Vet/Master mode, though in those cases usually the tank taking the big hit/DoT is relatively close by that point.
– It is possible to kite Kephess around if the damage is too high. It’s usually not too difficult to heal through in Veteran Mode but in Master Mode the damage is very high if a defensive cooldown is not active. He will periodically leap to the player if they get too far away and root them in place.
Sneaky Tricks
When it comes to Operations, most experienced players are more interested in fighting the bosses who often have interesting mechanics. In-between these bosses are what is known as trash – less powerful enemies that are simply meant to keep you from getting to the next boss too quickly. Players have developed tactics for skipping the trash or dealing with it quickly, depending on what classes they have available in their groups.
Landing on Denova Enemies: Explosive Conflict can be quite a long Operation due to its difficulty and its terrain, and players often like to skip the first set of enemies all together. To do this, players enter the Operation, but stay near the landing zone. A single player who is a stealther of any kind will run forward all the way along the path, ignoring any enemies they find, and continue running until they reach a ledge that opens up to a large clearing at the end of the path. They will jump down the ledge, and run straight to the two large drouk enemies, attacking them, and eventually dieing. As they are running, they’ll get caught by enemies, and your team members will be engaged in combat, but they just need to wait and stand still near the landing zone. Once your stealthy team mate reaches the Drouks and attacks them then dies, all players will automatically exit combat, and a speeder will appear, and all team members will be able to right-click the glowing blue speeder at the landing platform and be taxi’d straight to the first set of bosses.
Caves: While there’s no way to skip the enemies in the caves, many of them can be avoided. In the caves directly behind Toth and Zorn, stick to the cave’s right-hand walls to entirely avoid fighting two different groups, though one of them is protecting a codex entry your team may want to get, on the left-hand side, it’s a glowing blue Baradium Cart. You can also skip a group of enemies in a building tunnel after you ight the tanks, simply by keeping to the right as you exit the tunnel.
Ruins: Outside the caves you’ll find various enemies, which in general, groups like to group together to kill quicker. You’ll first kill a big group out on the grass. Then you’ll fight a lone Drouk that really wants to push you off the cliff, so put your back to the tree stump nearby to prevent that from happening. You’ll then cross the log across the waterfall, and fight a group there in some ruins… but avoid the ruins on the right, as there’s a hidden group of enemies there, so just have your entire team stick to the left wall when moving forward.
Trenches: Once you enter the trenches, there will be a large group of enemies to fight [[I know there is a trick to these but I forget what… Bombers.. snipers.. etc]]. Your group will reach a fork – take the left side, as the right side does not lead anywhere useful. Follow the main path, and don’t go exploring any side rooms as they’re just full of enemies. You also won’t want to go exploring above the trenches, as you’ll be targeted and annihilated if you try and jump up there.
Coastline: After the mining caves, you’ll reach a very pretty area with waterfalls. You’ll fight two large groups, and after the group with a ton of turrets, there will be a grassy ramp leading up towards Kephess’s bunker… you only need to fight the group protecting the door, not the one to the right, so hug the rock wall on the left when going up the grassy ramp.
Magic Shield Trick: While this is not a recommended strategy as it cane take some time if you do not have any good jumpers in your group, when you walk under the pretty rock area with a waterfall going over you, there’s an opportunity to jump up the rocks surrounding the waterfall and if you take just the right route, your team can actually jump on top of the shield that protects the entire area, and walk over it to skip this entire section of enemies. Have fun if you wind up with a group that knows how to do this, or you can learn the trick by checking out Merlyn’s channel, in a video called ‘Kephess Shortcut’!
 Questions or comments? Feel free to send me a message on Twitter


 Discord
  Email swtorista@gmail.com
 Bluesky @swtorista.com
 Reddit /u/swtorista
 Twitch Swtorista
 Youtube
 Patreon
 Twitter @swtorista