


 How to Craft
 Choose a Crew Skill
 Armormech
 Armstech
 Artifice
 Biochem
 Cybertech
 Synthweaving

 Gathering Guide
 Rare Materials Guide
 White Materials Guide
 Jawa Junk
 Augments
 Medpacs, Stims and Adrenals
 Synthweaving Crafting Tree


 Crafted Decorations
 Crafted Mounts
 Crafted Dyes
 Crafted Crystals
 Events Calendar
 Galactic Seasons
 PvP Seasons
 Bounty Event
 Double XP Event
 Feast of Prosperity
 Gree Event
 Life Day
 Nightlife Event
 Pirate Incursion Event
 Rakghoul Event
 Spring Abundance Festival
 Swoop Event

 Jedi Knight
 Jedi Consular
 Trooper
 Smuggler
 Sith Warrior
 Sith Inquisitor
 Bounty Hunter
 Imperial Agent
 Bounty Hunter
 Imperial Agent
 Jedi Consular
 Jedi Knight
 Sith Inquisitor
 Sith Warrior
 Smuggler
 Trooper
 Legacy Gear
 Lightsabers
 Double-Bladed Lightsabers
 Vibroswords
 Double-Bladed Vibroswords
 Blaster Pistols
 Blaster Rifles
 Sniper Rifles
 Blaster Cannons

The Dantooine Dynamic Encounters are a set of quests in the Crashed Ship Zone landing point on Dantooine for level 80 characters. Players will run these Dynamic Encounters will working on the Wreckage on Dantooine quest, or when working on Reputation for the Galactic Sustainability Institute. This guide covers how to do the individual encounters if you get stuck – if you want to learn about the area in general, visit the Dantooine Biome Dynamic Encounters Guide.

Contents
- What are the Dantooine Biomes?
- Tips
- Map
- Dynamic Encounters List
- Geothermal Dynamic Encounters
- Glacial Dynamic Encounters
- Sporefall Dynamic Encounters
- Lost Bormu
- Dr. Spears, I Presume?
- They Call Me Doctor Spores (Transition Stage 1 → 2)
- Return of Doctor Spores! (Transition Stage 2 → 3)
- No Spies Allowed!
- Fascinating!
- Sample Collection: Ginx
- Sample Collection: Makrin
- Sample Collection: Pterathki
- Sample Collection: Yaracats
- Ginx Of Unusual Size
- The Watchers
- Spore Subject: Ginx
- Spore Subject: Makrin
- Spore Subject: Pterathki
- Spore Subject: Yaracats
- Bigger Trouble
- Taking Care of Caretakers
- Crossovers
What are the Dantooine Biomes?
Dantooine Biomes are a set of three special areas in the Crashed Ship Zone area of Dantooine, where the Dantooine Dynamic Encounters take place. This area also has its own Reputation track and set of rewards and achievements, and the Wreckage on Dantooine quest teaches you how the area works. You can learn more about the rewards and Reputation track on the Dantooine Biome Dynamic Encounters Guide.
Tips

- Start by working on the Wreckage on Dantooine quest – it will lead you through the area!
- Most of the Dynamic Encounters are fairly simple, but others are more complicated – you may only need this guide for a few of them if you get stuck.
- Once you have completed the Transition Step of Wreckage on Dantooine, use the glowing blue terminal at base camp to get a 30-minute buff that protects you in a biome of your choice, which can make questing a lot easier
- As you rank up your Reputation, you start unlocking things that make the area easier like longer protection, taxis, and tunnel access. The big unlocks kick in at Friend rank. Dantooine Buff Guide
- Use the quicktravel point in the center to get between far away areas faster
- Being aware of where the ship access is can help a lot in navigating faster. You can go into the ship in one biome and pop out in another.
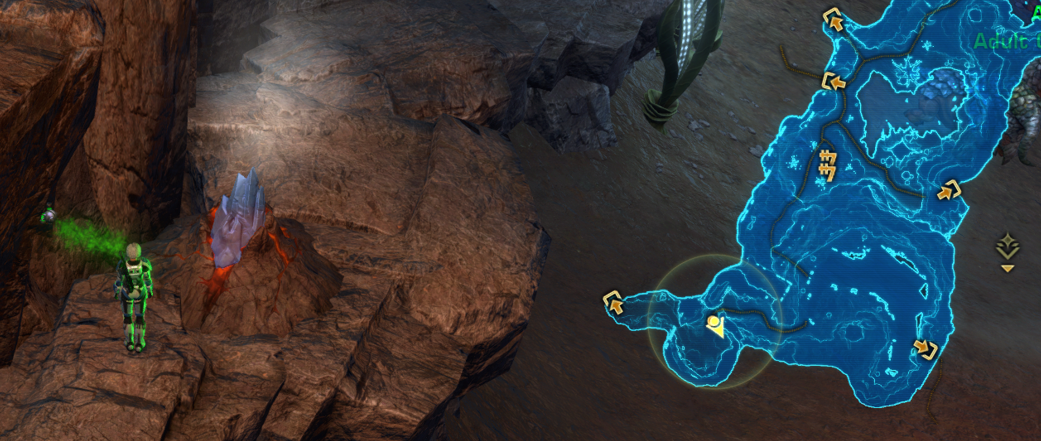
Map
This map shows you how the areas connect and where the camps, ship access and quick travel are.
Detailed Map
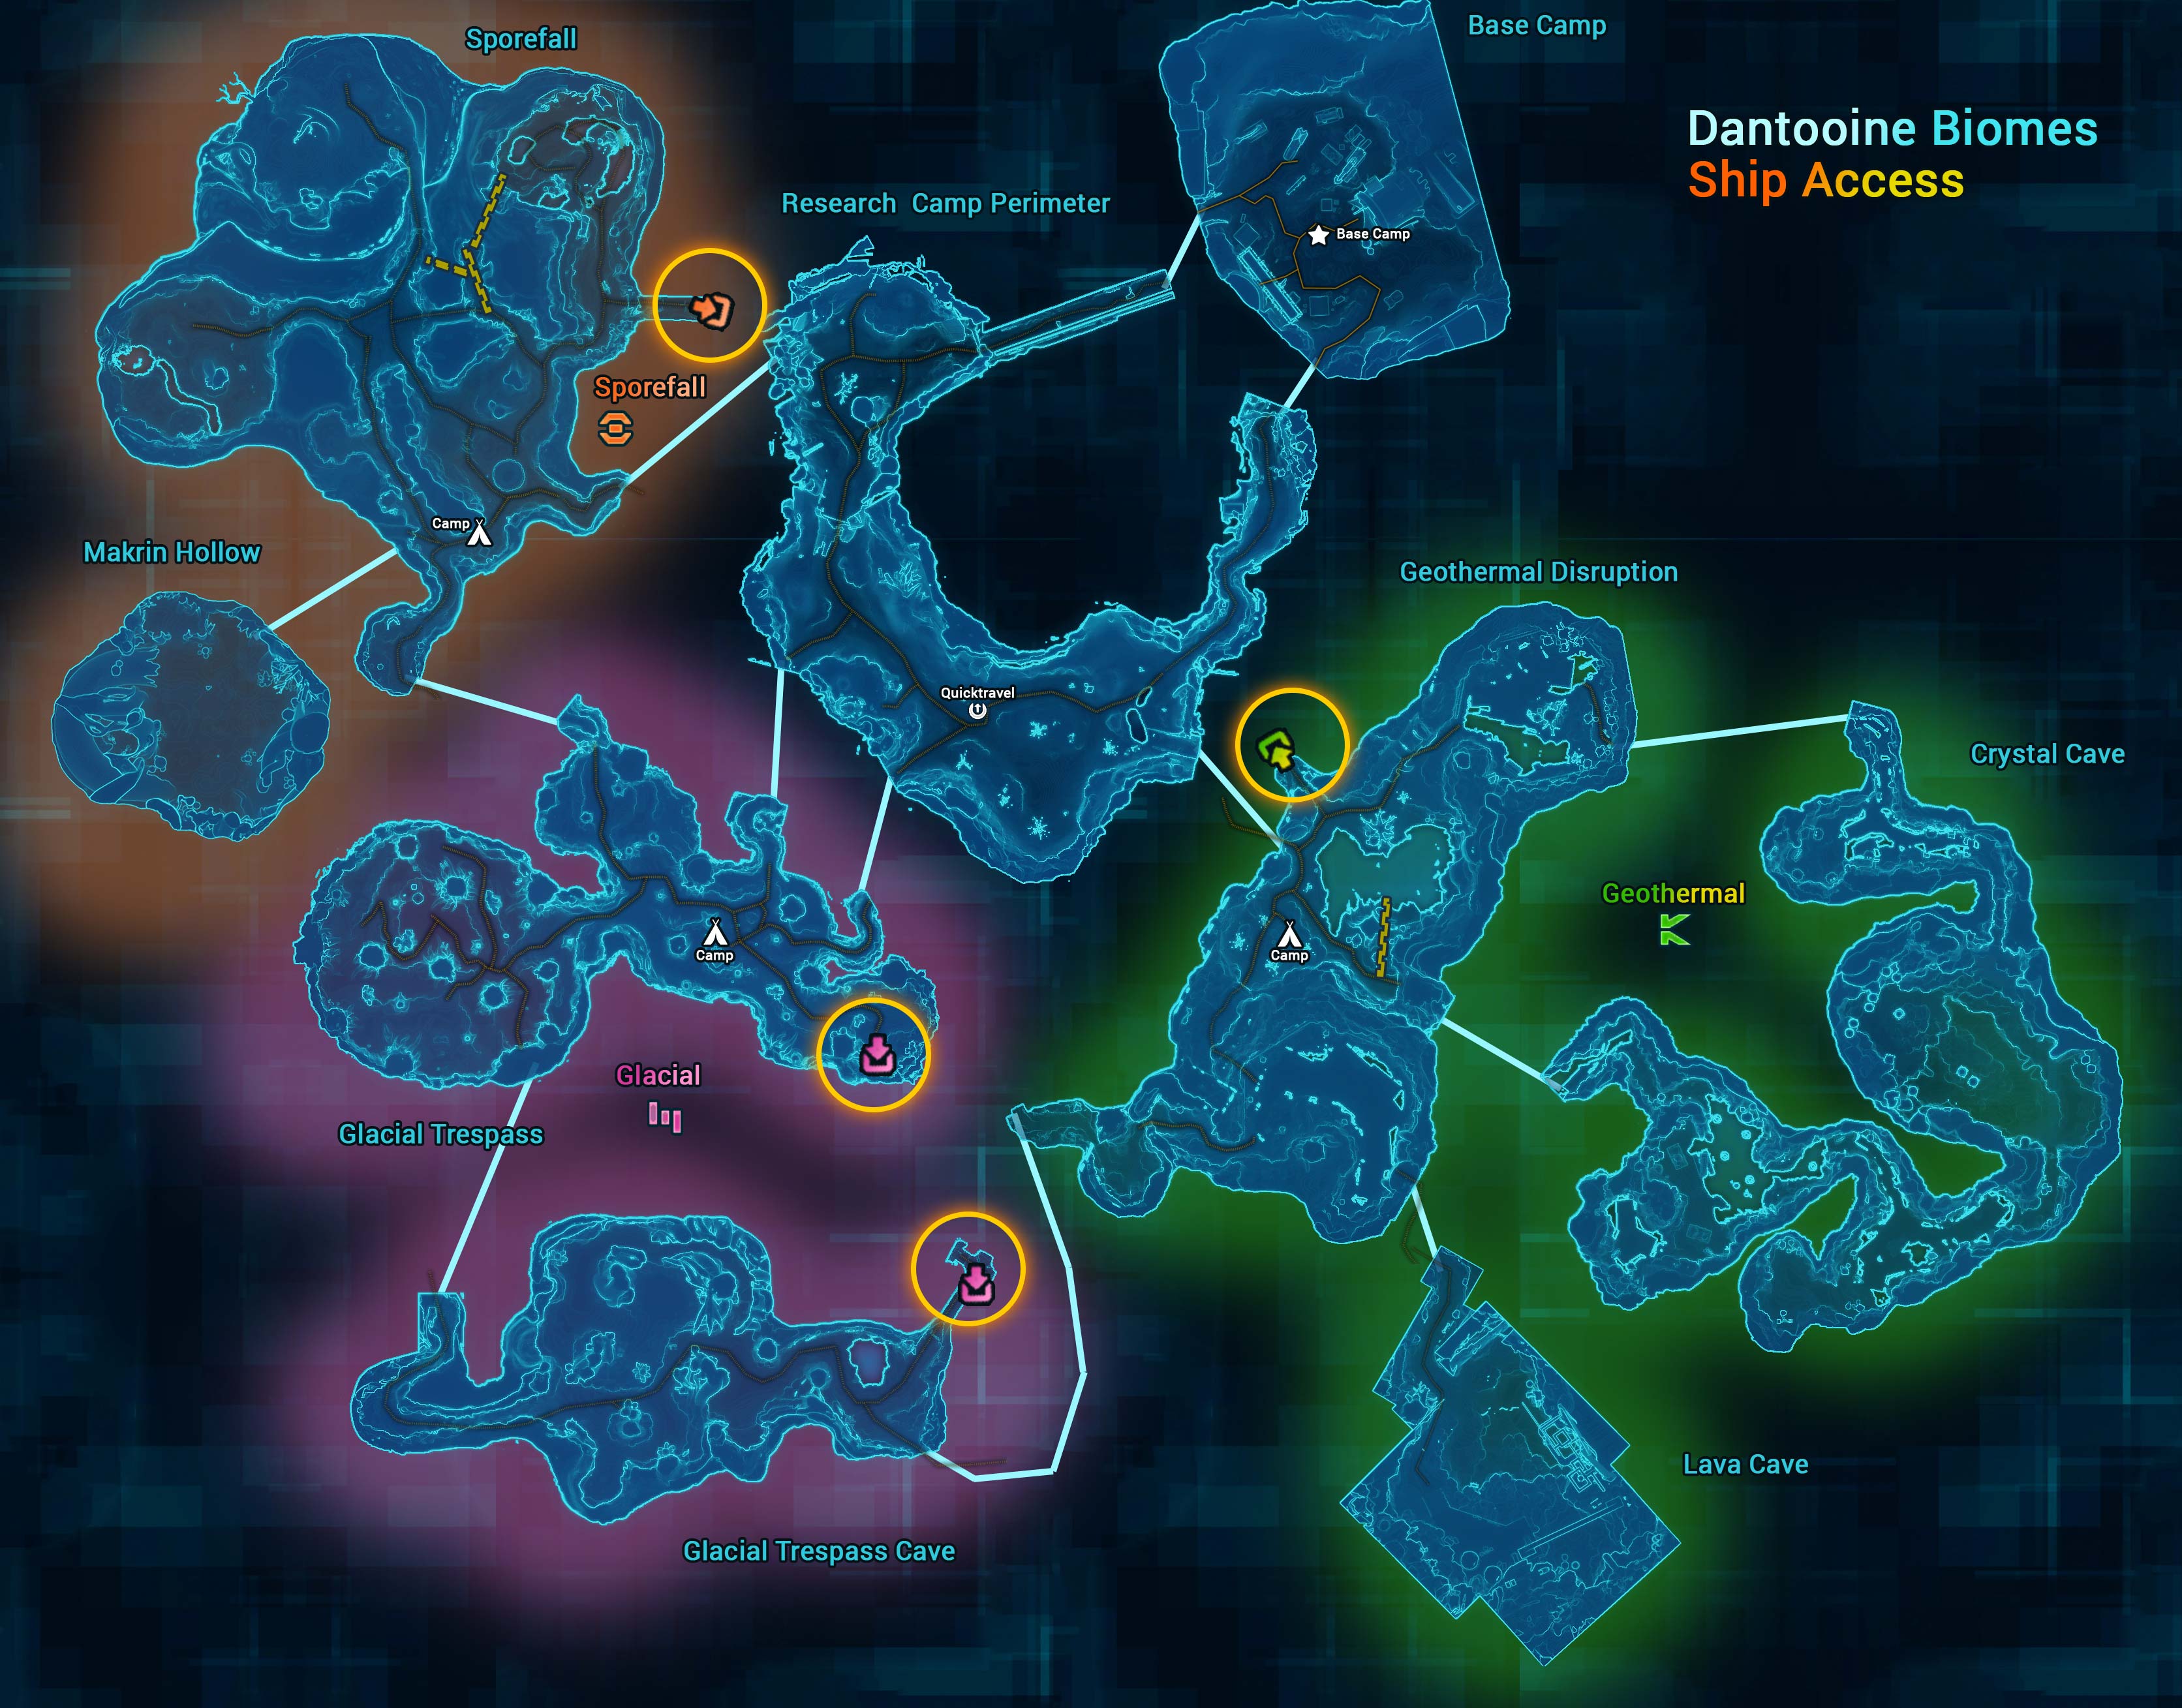
Overview map

Dynamic Encounters List

 Geothermal Dynamic Encounters

Geothermal Encounters take place in the south east section of the map.
Data Appropriation

Geothermal: General
Heavily-shielded Czerka personnel infiltrated the ship. Find a way to defeat them and steal their data.
- 0/25 Defeat Shielded Czerka Enemies
- 0/15 Appropriate Data
How-to: You need to drag or walk the droids into the acid pits to remove their shield so you can fight them.


[[xxx Appropriate Data info. what are the blue things too?]]
Fungal Protection

Geothermal: General
An endangered fungus is flourishing in the area. Help protect it from new predators and spread its spores.
- Part 1:
- 0/35 Defeat Hungry Geo Beast Larvae
- 0/20 Harvest Delicate Spore Sacs
- Part 2:
- 0/10 Sow Spores Near Vents
- Part 3:
- Defend Nascent Fungi from the Geo Beast
How-to: Stay out of the acid when possible. To Harvest spores, right-click the small glowing purple and yellow mushrooms on the floor. [[xxx How sow spores?]]


Brood Basin

Geothermal: Level 1
The vault ship’s habitat regulators are sustaining non-native bioengineered insects that rely on geothermal runoff to incubate.
Clear out the invasive swarms before they overrun any more of the native wildlife!
- Part 1:
- 0/15 Clear Out Vault-Grown Embercrawlers
- 0/5 Clear Out the Vault-Grown Emberstriders
- Part 2:
- Defeat the Emberqueen
How-to: Stay out of the lava! When possible, stay out of the toxic water too. If you are fighting the Emberqueen, walk her over to the land, so other players can fight her safely too.

Caustic Cascade
Geothermal: Level 1
Toxic runoff from broken habitat tanks is seeping into the area and drawing skar’kla from deeper in the ship to the mineral-rich waste and spreading corrosive damage.
Shut down those tanks before they poison the reservoir!
- Part 1:
- 0/20 Clear Out the Skar-kla
- 0/5 Repair Processing Tanks
- Part 2:
- Defeat the Skar-kla Pack Leader
How-to: Repair the tanks by right-clicking the glowing blue wheel on the side of the bright green tanks – you’ll need to dip in and out of the acid water quickly. When fighting the Skar-kla Pack Leader, walk it over to the land, so other players can fight it safely too.


Graul Graveyard
Geothermal: Level 1

A territorial Graul has wandered too close to the crashed vault’s infrastructure and its instincts have led it to disrupt the area.
Now the Vault Ship’s subroutines have flagged the Graul as a hostile threat. Don’t let them kill it!
- Part 1:
- 0/30 Destroy the Vault Droids
- 0/10 Destroy the Vault Droid Enforcers
- Part 2:
- Destroy the Vault Droid Battlemaster
How-to: Stay out of the toxic water when possible. When fighting the Vault Droid Battelmaster, walk it over to the land by getting its attention then hiding behind or in a pipe to make it run towards you, so other players can fight it safely too.
Vent Sync Failure

Geothermal: Level 1
The vault’s atmospheric regulators are causing these thermal vents to cycle the cavern with bursts of noxious gas.
Shut them down before the native Kath Hounds succumb.
- Part 1:
- 0/15 Destroy Vault Droids
- 0/7 Deactivate Toxic Vents
- Part 2:
- Defeat the Vault Droid Overseer
How-to: Stay out of the toxic water when possible. Right-click the glowing blue panels on the big green-gas machines to deactivate the vents.


Acid Trip

Geothermal: Level 2
The ship has sent recon droids to monitor the toxic pools in the area. Slice into those droids, and use them to safely collect samples for our research!
- 0/4 Take Control of Reconnaissance Droids
- 0/15 Collect Acid Samples
- 0/4 Send Acid Samples to Camp
- 0/20 Defeat Frenzied Skar’kla
How-to: This one is really confusing and feels like it isn’t working half the time, but it does work.
Take Control of Reconnaissance Droids: Walk up to a normal Reconnaissance Droid up close. A temporary ability should show up to capture it. Make sure to step out of the water to reduce your stacks if you need to after.
Deploy Droid: Take the droid that is following you into a nasty green patch in the water. You should see a temporary ability pop up to deploy the droid. Once deployed, the droid will wander around the acid on its own. The droid will then disappear and stop existing.

Collect Acid Samples: Find an Overburdened Reconnaissance Droid. These will only exist if someone did the previous step to deploy the droid. Right-click it to pick it up. [[xxx picture of oveburened droid]]
Send Acid Samples to Camp: Once you’ve right-clicked an Overburdened Reconnaissance Droid, you’ll be able to then right-click the glowing blue boxes at camp.


Hot Spots

Geothermal: Level 2
We’ve been seeing some unusual geologic activity in the area. Could you take some readings? We have concerns about this development, Dantooine is not normally geologically unstable!
- 0/6 Take Magma Readings
- 0/18 Defeat Geo Beast Larva
How-to: To take the reading, you must find an active lava vent. Once all the nearby geo beasts are dead, if you are very close, you can use the temporary ability which will light up to take the reading. Then you need to wait until a new vent spawns. It’s kinda slow.

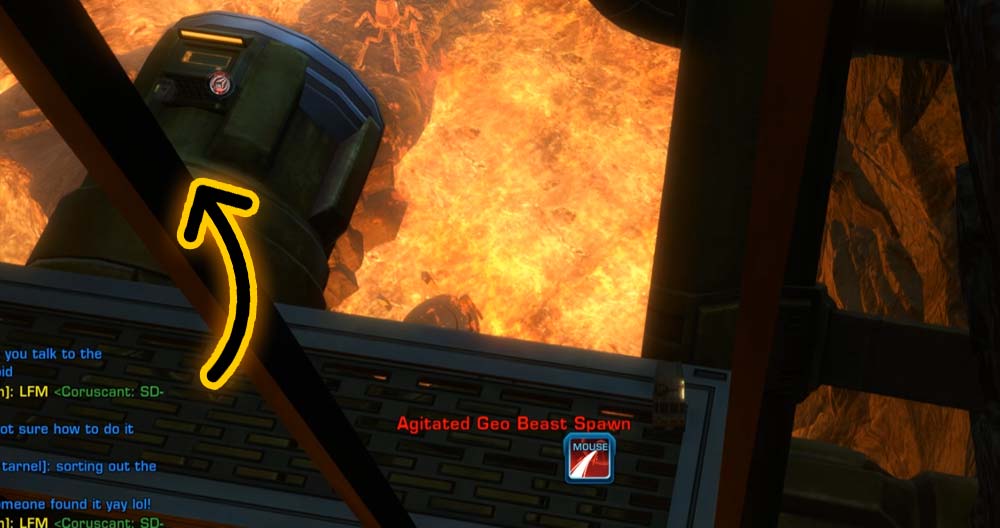
Under Pressure

Geothermal: Level 3
The ship has been re-routing magma for some unknown purpose, it doesn’t seem related to geothermal harvesting. Whatever the reason, there’s a new geyser threatening the stability of the area.
- Take Control of a Mouse Droid
- Scavenge Materials for a Geyser Cap as a Mouse Droid:
- Mouse Droid Location 1
- Mouse Droid Location 2
- Mouse Droid Location 3
- Take Control of a Construction Droid
- Construct the Geyser Cap
- 0/10 Defeat Agitated Geo Beast Spawn
- Construct the Geyser Cap
- 0/10 Defeat Agitated Geo Beast Spawn
- Construct the Geyser Cap
- 0/10 Defeat Agitated Geo Beast Spawn
- Defeat Agitated Geo Beast
How-to: This one is difficult but fun! It may not be obvious how it works when you arrive.
Scavenge as a Mouse Droid: If it is on the Scavenge step, there are three glowing blue panel and pipe locations hidden around the room that need to be scavenged. The problem is they are very hard to get to, so you’ll need to become a mouse droid to get to them. You start by going to the three terminals that are side-by-side up on the little platform – at least one of them should be glowing blue. If it is not, it likely means someone else is already a mouse droid so just wait for it to respawn.

Find the Scavenge Spots as a Mouse Droid: Actually being the mouse droid is super cute. Use your arrow keys and mouse to move around. You will be very up high on a very small walkway. Your goal is to find the two glowing pipes to right-click as a mouse droid, and the very hidden glowing blue panel down below. You will need to scoot around the walkways and fall between them – the mouse droid does not take fall damage, but does die in lava.

First Jump: The first jump / fall is carefully down from one walkway to another.

First Scavenge: The first hidden object is another fall down onto a bended pipe, where there is a glowing blue pipe cover to steal and right-click. From there, you are trapped, so feel free to jump into the lava to reset.
Diagonal Pipe: To get to the second and third Scavenging item, after the first jump, you will climb up onto a diagonal pipe.
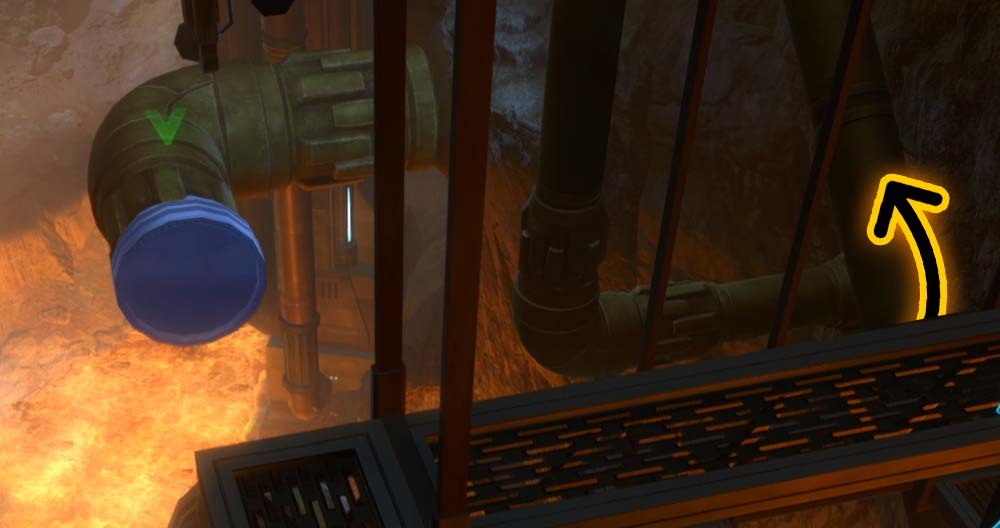
Second Scavenge: After the diagonal pipe, you can then fall again down to the little rock outcropping and drive onto the second bended pipe to get the glowing blue object, a pipe cap.

Third Scavenge: The third and final scavenging point is tricky. After the diagonal pipe, you can then fall again down to the little rock outcropping. From the rock outcropping is a scary, far fall down onto a mechanical platform – your goal is to land on the ledge, then carefully scoot around it until you get to the glowing blue panel. Good luck!

Scooching:

Me reaching the blue panel but falling in the lava and dying:


Take Control of a Construction Droid: After the mosue droid step is done, you can right-click a broken Construction Droid on the platform near where the mouse droid terminals are, pushed away in a corner.

This will make you become a Construction Droid who is safe in the lava.

Go into the lava and look for glowing blue objects to click for Construct the Geyser Cap.
Or fight the Geo bests. Your abilities are: Attack, Heal, Stomp Attack, and Eject (leave).

When you are fighting the big Geo Beast, walk it over to the shore so players who are not in a construction droid can help!

Thermal Investigation

Geothermal: General
- Part 1:
- Scan Superheated Crystals 0/35
- Defeat Thermophilic Scurriers 0/30
- Part 2:
- Defeat the Lurker
How-to: The crystals are glowing blue and can be right-clicked. Stay out of the laval! The Thermophilic Lurker has a push back ability, so face your back towards the island not the lava. Stay out of the lava!

Come Up, Fish
Geothermal: Level 3
The ship has been re-routing magma to care for Hothian Geo Beasts! Normally this would be a fascinating thing to study, but it presents a clear danger to our team.
- Defeat the Gargantuan Geo Beast
This is the only encounter I haven’t seen yet! I have been told it does indeed exist and others have seen it.
Core Overload (Geothermal Transition Stage 1 → 2)

Geothermal: Transition Event 1
The ship has misinterpreted recent stabilization efforts as sabotage and it preparing to redirect a superheated purge through the areas above. Shut down the Biothermal Regulator before Dantooine suffers catastrophic overheating!
- 0/4 Use Coolant to Access and Activate Thermal Regulators
- 0/10 Defeat Reinforcing Purge Protocol Droids
- Defeat Warden Unit K-8
- Shut Down the Biothermal Regulator
How-to: This takes place inside the ship and it may not be obvious how to get there on the map. Use any of the ship entrances to get there.
Use Coolant to Access and Activate Thermal Regulators: The glowing blue contains, right-click.


Shut Down the Biothermal Regulator: Glowing blue terminal, right-click.

Caretaker Unit K-6 (Geothermal Transition Stage 2 → 3)
Geothermal: Transition Event 2
The control chamber has activated some kind of Caretaker Unit. If we’re going to make any more progress here, it will need to be dealt with!
- Defeat Caretaker Unit K-6
How-to: This fight can be really nasty because it takes place in the toxic water. Try and lead the droid to the patch of land at the back of the room. If you die, respawn and quickly run back unless he is at a very low health point.

 Glacial Dynamic Encounters

Glacial Encounters take place in the south west section of the map.
Gelid Tendrils

Glacial: General
- Squish Fragile Tendrils 0/50
- Defeat Massive Tendrils 0/3
How-to: Walk over the tendrils to squish them.
Fixed Bug: This was bugged for a while, but is now fixed – before you had to attack the tendrils from a distance, now you can just walk on them.
We did have a minor issue with the Massive Tendrils step – they were grey when we got there, and we did not get credit for helping attack them.

Probe-lems

Glacial: General
Czerka is illicitly attempting to gather data inside the wreckage. Foil their plans.
- 0/20 Scramble Czerka Datastreams
- 0/25 Slice Spy Probes
How-to: The Datastreams are small glowing blue objects on the ground with a beam of light coming out of them.
Right-click the glowing blue tower on a box marked on the map near the entrance to give yourself probe-slicing powers.

If a probe is mobile, select it and use the middle temporary ability.

If a probe is shielded, select it and use the right temporary ability.

Then you can use the left-hand ability to slice the probe!

Unruly Nesters
Glacial: General
- 0/25 Wrangle Cryo-Nesters
- 0/15 Repair Containment Fence
How-to: This encounter is often misunderstood by players. To start, walk up the hill, and right-click the glowing blue box on the table. This will give you a net to catch cryo-nesters.

Then, find an Unruly Cryo-Nester. Fight it a bit. It will not die.

Use the temporary ability once it has gotten hurt enough to catch it. You must have it selected, and it must be lit up to use it.

Then walk your new buddy over to the cage and right-click the cage to deposit the cryo-nester.

You can also help by right-clicking any of the glowing blue fences that may be available to Repair Containment Fence. This includes the fence posts.

Frigid Swarm

Glacial: Level 1
These creatures have been bio-engineered to aerate frozen soil and spread frost flora spores. Stop their seeding of invasive plant life across the snow shelf!
- 0/20 Clear Out the Cryo-Nesters
- 0/10 Destroy Cryo-Nest Eggs
How-to: Look for the glowing blue eggs and right-click them.

Frostbloom Sweep

Glacial: Level 1
The Vault Ship’s cryo-flora is plummeting local temperature.
Cull the frostblooms before they spread even more!
- 0/10 Cull the Frostblooms
- 0/10 Clear Out Iceclaws
How-to: Look for the glowing blue frostblooms and right-click them.

Iceweeds

Glacial: Level 1
Our forward base has been overrun. Get it back online if you can!
- Part 1:
- 0/7 Reactivate Heat Lamps
- 0/15 Defeat Cryo Droids
- Part 2:
- Defeat the Cryo-Dominator
How-to: The heat lamps are around and behind up top of the camp. They look like glowing blue vines you can right-click.


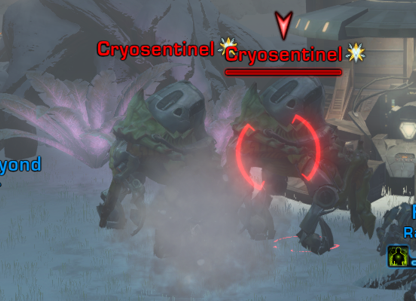
Frostcaller

Glacial: Level 2
Reactivate the Interference Spikes to shut down this Cryogenic Seeder Node before it repopulates the frost flora across the shelf!
- Part 1:
- 0/3 Activate the Interference Spikes
- Part 2:
- 0/8 Protect the Interference Spikes from Frostkeepers
- Part 3:
- Upload the Interference Spike Data
- Part 4:
- Defeat the Cryosentinel
How-to: I found this one a bit tricky due to the terrain. The first step is the Interference Spikes – they are are glowing blue terminals under the solar panel lights. To protect them, just fight anything that comes nearby. Then there will be a blue terminal in the center of a circular machine. Lastly, fight the big Crysentinel.
Interference Spikes:

Upload the Interference Spike Data:

Hollow Frost

Glacial: Level 2
These Resonating Frostbulbs are plummeting the local temperatures and preventing exploration further into the shelf. Clear them out so we can try to find their source.
- 0/15 Defeat the Gladiopods
- 0/7 Cull the Frostbulbs
How-to: Look for the glowing blue frostbulbs – they take about ten seconds to set on fire, so you have to sit there while you do it. Ideally, other people are clearing the enemies while you look for the frostbulbs to click.

Outpost Defense

Glacial: Level 2
The forward outpost is now online but it’s under attack. Stabilize the area before we lose it completely!
- Part 1:
- 0/7 Repair Turrets
- 0/15 Fend Off Hostile Creatures
- Part 2:
- Defeat the Cryosentinel
How-to: To repair the turrets, they are glowing blue platforms on the floor you can right-click, they are often hidden in the scenery or bushes near Cryotenders. You will need to go up and around the back to the camp to find all of them.

Root Cause
Glacial: Level 3

We’ve traced the source of the freezing to a massive Rootmass deep in this cavern. Thermal charges were staged near key subroot structures but the vault’s predators forced our retreat. Recover the charges, destroy the supports, and put an end to the Rootmass before the entire zone locks in ice!
- Part 1:
- 0/4 Find the Thermal Charges
- 0/3 Activate Heat Lamps
- Part 2:
- 0/3 Locate and Destroy the Frostveins
- Part 3:
- 0/2 Defeat the Frosthide Bolraida
- Defeat the Rootbound Bolraida
- Part 4:
- Destroy the Rootmass
How-to: I found this quest really hard and almost impossible to do alone. I had to ask for help in general chat to complete it! The Rootbound Bolraida boss at the end was too strong for me especially with the Frosthides respawning.
Thermal Charges: Glowing blue boxes.

Activate Heat Lamps: These are the heat lamps they are marked on the map.

Locate and Destroy the Frostveins: They are large glowing blue vines. They are incorrectly marked on the map.


Destroy the Rootmass:

Glacial Reclamation

Glacial: Phase 2
The Seeder Ship’s tertiary protocols have activated and a final recovery effort has been launched. Don’t let them reboot the Cryogenic Seeder Node!
- Step 1:
- Deactivate the Reboot Sequence
- Step 2:
- 0/16 Clear Out the Cryo-Nesters
- 0/12 Clear Out the Cryo-Sterilizer Droids
- Step 3:
- 0/10 Clear Out the Cryo-Nester Broodguards
- 0/12 Clear Out the Cryo-Reclaimation Droids
- Step 4:
- 0/2 Clear Out the Cryosentinels
- 0/2 Clear Out the Cryo-Dominator Droid
How-to: This is a long multi-step quest that is a lot easier if more people are around. For the final phase, with the very strong Crysentinels and Cryo-Dominators, keep an eye one which ones actually need killing and only focus on them, as they keep respawning which is frustrating.
The Cryonest Matron (Transition Stage 1 → 2)
Glacial: Transition Event 1
The cryo-fauna outbreak leads back to this sealed incubation chamber. It appears to have been reawakened by the recent drop in temperature. Destroy the nest and stop the swarm at its source!
- 0/35 Clear Out the Swarm
- 0/10 Defeat Broodguards
- 0/10 Destroy Eggs
- Defeat the Cryonest Matron
Cryocore Override (Transition Stage 2 → 3)

Glacial: Transition Event 2
The snow shelf control core has finally opened. Shut down the Ship’s climate controls before it’s too late!
- Part 1:
- Initiate the Cryo-Core Override
- Part 2:
- 0/4 Deactivate Cryo-Containment Consoles
- 0/15 Defeat Cryo-Sterilizer Droids
- Part 3:
- Defeat the Cyro-Core Guardian
- Part 4:
- 0/4 Deactivate the Emergency Containment Response Consoles
- 0/10 Defeat Cryo-Reclaimation Droids
How-to: This is a multi-step quest that’s a lot easier with multiple people.
Initiate the Cryo-Core Override: A glowing blue panel in the middle of a circular machine to right-click.

Deactivate Cryo-Containment Consoles: A glowing blue terminal to right-click.

Defeat the Cyro-Core Guardian: A giant robot to fight!

Deactivate the Emergency Containment Response Consoles: These are four terminals that all need to be clicked, and take a long time to channel. Ideally, you have four different people clicking fou different terminals, and everyone else fighting enemies.


 Sporefall Dynamic Encounters

Sporefall Dynamic Encounters take place in the north west area of the map.
Lost Bormu

- Defeat the Shyrack Swarm
- Defeat the Shyrack Screecher

Dr. Spears, I Presume?
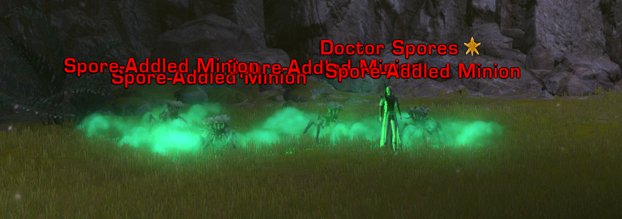
Sporefall: Level 1
Doctor Spears has disappeared from camp, and was behaving strangely. Somebody should check on him to make sure he’s okay!
- Examine Doctor Spears
- Defeat Doctor SPORES!
- Cure Doctor Spores
Examine Doctor Spears by selecting him and using the temporary ability that should show up.


They Call Me Doctor Spores (Transition Stage 1 → 2)

Sporefall: Level Transition 1
Doctor Spears has been behaving strangely, and we can’t find him in his usual spots. We’re afraid he’s made his way into the crashed ship, who knows what kind of trouble he’s in?
- Confront Doctor Spears
How long has Doctor Spears been coming down here? Defeat his spore-altered creatures and see if you can administer treatment before someone gets hurt!
- Confront Doctor Spears
- Defeat Doctor SPORES
- Subdue Doctor Hoppington
- Subdue Professor Whiskers
- 0/4 Defeat Makrin Assistants
- Tend to Doctor Spores

((xxx I’m a little confused, why are They Call Me Doctor Spores and Return of Doctor Spores the same?))
Return of Doctor Spores! (Transition Stage 2 → 3)
Sporefall: Level 2 Transition
Doctor Spears is missing… again. He kept muttering about the ship, could you retrieve him? Again? We’re so sorry.
- Confront Doctor SPORES!
Doctor SPORES has found a way to override the ship systems? This can’t be good. Please be gentle with him, we need his research.
- Part 1:
- Defeat Doctor Spores!
- Subdue Doctor Hoppington
- Subdue Professor Whiskers
- 0/4 Defeat Makrin Assistants
- 0/2 Defeat Caretaker Droids
- Part 2:
- Tend to Doctor Spears


No Spies Allowed!
Sporefall: General
Czerka frequencies have been detected in the ship’s interior. Stop their spies!
- 0/30 Destroy Surveillance Devices
- 0/20 Aid or Defeat Czerka Spies
- 0/2 Defeat Czerka Droids
How-to: This is a multi-part quest in multiple rooms.
Aid or Defeat Czerka Spies: Start by picking up medpacs if you want to heal them instead of killing them.

Then when you walk up to a yellow-named Czerka Spy you can use the temporary ability to heal them.

Destroy Surveillance Devices: Use the temporary ability to reveal the hidden cameras.

Then right-click the glowing blue cameras to disable them.

Defeat Czerka Droids: There is one Battledroid in each room.

Fascinating!

Sporefall: General
Help the researchers get set up to observe a unique biological interaction before the opportunity passes.
- Part 1:
- 0/25 Defeat Opportunistic Yaracats
- 0/15 Deploy Ginx Pheromones
- Part 2:
- 0/15 Collect Data on Symbiotic Relationship
How-to: To Deploy Ginx Pheromones, right-click the ground under where a glowing green arrow is pointing.

To collect data, walk up and select either a Kath Hound or Spore-Devouring Ginx, and use the temporary ability that should show up.

If the temporary ability is greyed out, the creature has already been scanned recently. The creature will also have a debuff of the same icon.

Sample Collection: Ginx

Sporefall: Level 1
Our researcher could use assistance collecting samples from the local Ginx population. Studying the effects of the Sporefall on these creatures could lead to incredible insights!
- 0/30 Collect Spore Samples from Ginx
- 0/10 Pick Up Spore Collection Kits
How-to: You can pick up the Spore Collection kits from the glowing blue boxes with a green arrow over them by right-clicking a blue box.

Each Spore Collection Kit lets you take 3 samples, and you can’t pick up another kit until you use all three on the creatures – you can see how many sample kits you have with the green dust buff.
![]()
To use a sample kit, left-click a creature with smoke coming out of them, and when you are physically close, left-click the temporary green ability called Collect Sample. Not showing up? Temporary abilities tend to be a bit finicky – if it doesn’t show up, walk in and out of the area where it is supposed to appear, and make sure you picked up a glowing blue sample kit first.

If the creature has already been sample recently, it will not have stinky smoke, your sample ability will be greyed out, and it will have a green injection icon near its portrait saying you’ll have to wait to sample it again.
DANGER: Stay away from the Spore-Tending Unit as it float around! If you are closer to it than 30 meters you will start getting stacks of a pink debuff called Heavy Sporefall. This is deadly quickly – run away and stay away as he moves around!


Sample Collection: Makrin

Sporefall: Level 1
Our researcher could use assistance collecting samples from the local Makrin population. Studying the effects of the Sporefall on these creatures could lead to incredible insights!
- Pick Up Spore Collection Kits 0/10
- Collect Verdant Spores from Makrin 0/10
- Collect Luminous Spores from Makrin 0/10
- Collect Vibrant Spores from Makrin 0/10
How-to: You can pick up the Spore Collection kits from the glowing blue boxes with a green arrow over them by right-clicking a blue box.
Each Spore Collection Kit lets you take 3 samples, and you can’t pick up another kit until you use all three on the creatures – you can see how many sample kits you have with the green dust buff.
![]()
To use a sample kit, left-click a creature with smoke coming out of them, and when you are physically close, left-click the temporary green ability called Collect Sample. Not showing up? Temporary abilities tend to be a bit finicky – if it doesn’t show up, walk in and out of the area where it is supposed to appear, and make sure you picked up a glowing blue sample kit first.

If the creature has already been sample recently, it will not have stinky smoke, your sample ability will be greyed out, and it will have a green injection icon near its portrait saying you’ll have to wait to sample it again.

Your second ability lets you ‘mutate’ the Makrin’s spores, changing it to a different color, so you can find the spores still missing for the quest.


Each Makrin will have three different types of spores – blue, green or pink. You can see which one they have on their debuffs, and they’ll have stinky gas coming off them of that color too.
Blue = Unstable Luminous Spores


Green = Unstable Verdant Spores


Green = Unstable Vibrant Spores


Sample Collection: Pterathki
Sporefall: Level 1
Our researcher could use assistance collecting samples from the local Pterathki population. Studying the effects of the Sporefall on these creatures could lead to incredible insights!
- 0/30 Collect Spore Samples from Pterathki
- 0/10 Pick Up Spore Collection Kits
- 0/25 Scan Spore-Generating Fungus
How-to: You can pick up the Spore Collection kits from the glowing blue boxes with a green arrow over them by right-clicking a blue box.

Each Spore Collection Kit lets you take 3 samples, and you can’t pick up another kit utill you use all three on the creatures – you can see how many sample kits you have with the green dust buff.
![]()
To use a sample kit, left-click a creature with stinky green smoke coming out of them, and when you are physically close, left-click the temporary green ability called Collect Sample. Not showing up? Temporary abilities tend to be a bit finicky – if it doesn’t show up, walk in and out of the area where it is supposed to appear, and make sure you picked up a glowing blue sample kit first.

If the creature has already been sampled recently, it will not have stinky green smoke, your sample ability will be greyed out, and it will have a green injection icon near its portrait saying you’ll have to wait to sample it again.

To Scan Spore-Generating Fungus, you need to use the macrobinculars temporary ability that pops up.

It will allow you to use the binoculars to scan the area, and scan the glowing blue mushrooms by moving the camera with your mouse and right click to zoom in when the center circle turns orange. The hard part about this is if you do not have any sporefall protection, you will constantly be knocked out of the binoculars every few seconds as you get the sporefall debuff.

These Spore Pods are for something but I forget what.

Sample Collection: Yaracats
Sporefall: Level 1
Our researcher could use assistance collecting samples from the local Yaracat population. Studying the effects of the Sporefall on these creatures could lead to incredible insights!
- 0/30 Collect Spore Samples from Yaracats
- 0/10 Pick Up Spore Collection Kits
- 0/30 Feed Hungry Yaracats
How-to: You can pick up the Spore Collection kits from the glowing blue boxes with a green arrow over them by right-clicking a blue box.

Each Spore Collection Kit lets you take 3 samples, and you can’t pick up another kit utill you use all three on the creatures – you can see how many sample kits you have with the green dust buff.
![]()
To use a sample kit, left-click a creature with stinky green smoke coming out of them, and when you are physically close, left-click the temporary green ability called Collect Sample. Not showing up? Temporary abilities tend to be a bit finicky – if it doesn’t show up, walk in and out of the area where it is supposed to appear, and make sure you picked up a glowing blue sample kit first.

If the creature has already been sampled recently, it will not have stinky green smoke, your sample ability will be greyed out, and it will have a green injection icon near its portrait saying you’ll have to wait to sample it again.

To feed the yaracats, you first need to pick up food for them… by right-clicking the small Snack-Sized Ginx around the area.


Once you have picked up a snack, you can select a yaracat and choose the feed temporary ability.

If a yaracat is hungry, it will have an angry orange debuff icon. If it’s been fed recently, it won’t.

Ginx Of Unusual Size
Sporefall: Level 1
An unusually large Ginx has taken up residence in the area, threatening our research. The larger the Ginx, the more hostile. Be careful!
- Defeat the Unusually Large Ginx

The Watchers

Sporefall: Level 2
It appears the ship is pushing back against our research efforts. We could use some help dealing with these droids!
- 0/25 or 0/20 Defeat Eco-Defense Droids
How-to: There is actually four different instances of The Watchers Dynamic Encounter – they are all roughly the same, but take place in different locations in the map and all count towards the same achievement.
Spore Subject: Ginx

Sporefall: Level 2
Our research into the Sporefall has yielded some interesting results! Could you assist in field-testing the new batch of modifications?
- 0/15 Test Spore Samples
[[[xxx I haven’t seen this quest on live yet, just on the PTS.]]

Spore Subject: Makrin
Sporefall: Level 2
Our research into the Sporefall has yielded some interesting results! Could you assist in field-testing the new batch of modifications?
- 0/15 Test Spore Samples
[[[xxx I haven’t seen this quest on live yet, just on the PTS.]]
Spore Subject: Pterathki
Sporefall: Level 2
Our research into the Sporefall has yielded some interesting results! Could you assist in field-testing the new batch of modifications?
- 0/15 Test Spore Samples
[[[xxx I haven’t seen this quest on live yet, just on the PTS.]]
Spore Subject: Yaracats

Sporefall: Level 2
Our research into the Sporefall has yielded some interesting results! Could you assist in field-testing the new batch of modifications?
- 0/15 Test Spore Samples
[[[xxx I haven’t seen this quest on live yet, just on the PTS.]]

Bigger Trouble

Sporefall: Level 3
Well. Now we know what the Caretaker Droids were taking care of. It’s not great. We could really use some help dealing with this mess.
- Defeat the Alien Megafauna
- Defeat the Caretaker Droid
How-to: I think there is actually three different instances of the Bigger Trouble Dynamic Encounter – they are all roughly the same, but take place in different locations in the map and all count towards the same achievement.
Taking Care of Caretakers

Sporefall: Level 3
The ship has activated one of it’s Caretaker Droids. To what purpose, we don’t know. But it’s incredibly hostile, and beyond our researchers to deal with.
- Defeat the Caretaker Droid
How-to: I think there is actually three different instances of the Taking Care of the Caretakers Encounter – they are all roughly the same, but take place in different locations in the map and all count towards the same achievement. He’s a pretty strong large floating droid enemy.
Crossovers
I believe these three special Dynamic Encounters become available when one biome progresses higher than the others – for example if the biomes are at stages 1, 1, and the third flips to 2, after the transition encounter finishes, or if the biomes become 2-2,-3, and once someone completes them a special clickable buff becomes available for everyone on the map and sticks around until the next full reset of the map back to 0%. More Info About Buffs

These do not have achievements tied to them, so you don’t need to worry about being the one to complete them – they are often very fast and are ended quickly after they pop up if someone is nearby to do them.
Unlike all the other encounters in the area, they do have a timer – they are only available for 30 minutes after the transition encounter completes. I think they may also not count towards any of the Wreckage on Dantooine quests as they are between two biomes, and are considered ‘Shared’ encounters with a different icon.

Natural Coolant
Crossover: Snow Into Geothermal
- Collect Geologic Samples x10
The Natural Coolant encounter has a chance of appearing when a transition event for the Snow or Geothermal biomes occurs. This encounter is time-limited and only stays around for 30 minutes and can be completed quickly. Clicking the vents gives a buff, and the clickable vents stick around until the entire map cycles back to stage 1 at 0%.
 Volcanic Residue (30 minute buff): Empowered by the frozen volcanic vents in the Glacial/Geothermic Ecotone. (Combat buff, removed on death) Buff Info
Frozen Spores

Crossover: Snow Into Sporefall
- Recover Dormant Spores x10
The Frozen Spores encounter has a chance of appearing when a transition event for the Snow or Spores biomes occurs. This encounter is time-limited and only stays around for 30 minutes and can be completed quickly. Click the spores gives a buff, and the clickable vents stick around until the entire map cycles back to stage 1 at 0%. These spores are BLUE with BLUE sparkles.
 Benign Spores (30 minute buff): Empowered by the frozen spores in the Glacial/Sporefall Ecotone. (Combat buff, removed on death) Buff Info
Petals in the Snow

Crossover: Sporefall Into Snow
- Recover Dormant Spores x10
The Petals in the Snow encounter has a chance of appearing when a transition event for the Snow or Spores biomes occurs. This encounter is time-limited and only stays around for 15 minutes and can be completed quickly. Clicking the spores gives a buff, and the clickable vents stick around until the entire map cycles back to stage 1 at 0%. These spores are BLUE with PINK sparkles.
 Altered Flora (30 minute buff): Empowered by the altered flora in the Glacial/Sporefall Ecotone. (Combat buff, removed on death) Buff Info
Toxin Trouble
Crossover: Geothermal Into Snow
- Collect Crystallized Toxins x10
(I haven’t seen this one yet! I’m unsure if it exists. I think the Toxin Trouble encounter has a chance of appearing when a transition event for the Snow or Geothermal biomes occurs. This encounter is time-limited and only stays around for 15 minutes and can be completed quickly. Clicking the vents gives a buff, and the clickable vents stick around until the entire map cycles back to stage 1 at 0%.)
 Crystallized Energy (30 minute buff): Empowered by the crystallized toxins in the Glacial/Geothermic Ecotone. (Combat buff, removed on death) Buff Info
[MASTER 4] Orbital Core
This quest is only completable when the cores are ‘aligned’ – all three biomes are at 100% at rank 3. It is actually a quest, not a Dynamic Encounter. Guide
- Shuttle to the Core
- Select a Route
- Defeat the Battledroid (Glacial Preserver) or
- Defeat the Mining Droid or
- Defeat the Probe Assault
- Proceed to the Core
- Battle the Core’s Defenses
- Escape the Core
 Questions or comments? Feel free to send me a message on Twitter


 Discord
  Email swtorista@gmail.com
 Bluesky @swtorista.com
 Reddit /u/swtorista
 Twitch Swtorista
 Youtube
 Patreon
 Twitter @swtorista