


 How to Craft
 Choose a Crew Skill
 Armormech
 Armstech
 Artifice
 Biochem
 Cybertech
 Synthweaving

 Gathering Guide
 Rare Materials Guide
 White Materials Guide
 Jawa Junk
 Augments
 Medpacs, Stims and Adrenals
 Synthweaving Crafting Tree


 Crafted Decorations
 Crafted Mounts
 Crafted Dyes
 Crafted Crystals
 Events Calendar
 Galactic Seasons
 PvP Seasons
 Bounty Event
 Double XP Event
 Feast of Prosperity
 Gree Event
 Life Day
 Nightlife Event
 Pirate Incursion Event
 Rakghoul Event
 Spring Abundance Festival
 Swoop Event


 Jedi Knight
 Jedi Consular
 Trooper
 Smuggler
 Sith Warrior
 Sith Inquisitor
 Bounty Hunter
 Imperial Agent
 Bounty Hunter
 Imperial Agent
 Jedi Consular
 Jedi Knight
 Sith Inquisitor
 Sith Warrior
 Smuggler
 Trooper
 Legacy Gear
 Lightsabers
 Double-Bladed Lightsabers
 Vibroswords
 Double-Bladed Vibroswords
 Blaster Pistols
 Blaster Rifles
 Sniper Rifles
 Blaster Cannons

Star Wars: The Old Republic has many settings you may want to take advantage of to make playing easier and more accessible. This guide covers every single option in the Settings menu and how it can be used, to help you understand what options you have available in the settings so you can choose which ones will be useful to you while playing.

Contents
- Settings
- Controls
- FlyText
- Combat Logging
- Sound
- Chat
- User Interface
- General
- Conversation
- Map
- Exterior Map Defaults to World Map
- Enable Magnifying Glass on World Map
- Map Fades while Moving
- Map Flashes Red while being Attacked
- Fade World Map Sides Completely
- Show Mapnotes for untracked Missions
- Reverse Y and Z coordinates on coordinate displays
- Allow multiple filters to be enabled simultaneously on the World Map
- Group Mission Map Notes
- Map Fade Value
- Map Gutter Max Icon Count
- Tooltip
- Social Center
- Operations Frames
- Cooldown Settings
- Cooldown Text Settings
- Mission Reward Window
- Cartel Market
- Character Customization
- Planetary Conquest
- Combat Proficiencies
- Buffs and Debuffs
- Outfitter
- Missions
- Renown
- Inventory
- Guild
- Amplifiers
- Graphics
- Starfighter
- Social
- Nameplates
- Nameplate on Self
- Nameplate on My Companion
- Nameplate on Friendly NPCs
- Nameplate on Enemy NPCs
- Nameplate on Friendly Players
- Nameplate on Friendly Player’s Companions
- Nameplate on Enemy Players
- Nameplate on Enemy Player’s Companions
- Scale Nameplates with Distance
- Always Show Health Bar
- Always Show Resolve Bar
- Always Show Class Symbol
- Show Guild Names
- Show Guild Heraldry
Settings
How to Access the Settings in SWTOR
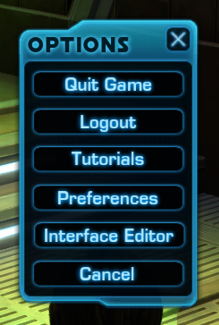
To open the Settings while logged in to Star Wars: The Old Republic, press your ESC key on your keyboard, then choose “Preferences” from the menu.
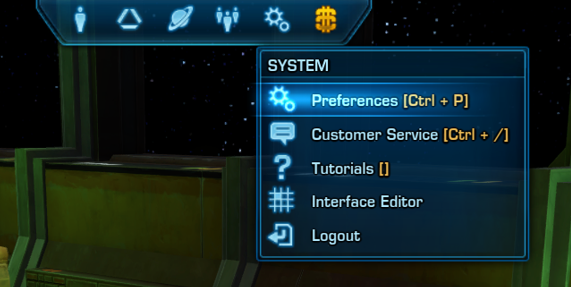
You can also access the settings panel by rolling over the icon of a cog wheel on the main menu, and choosing “Preferences” from the drop down menu there.
How to Save Settings
Each setting is divided into categories and sub-categories. You can use the guide below to find out what each setting does.
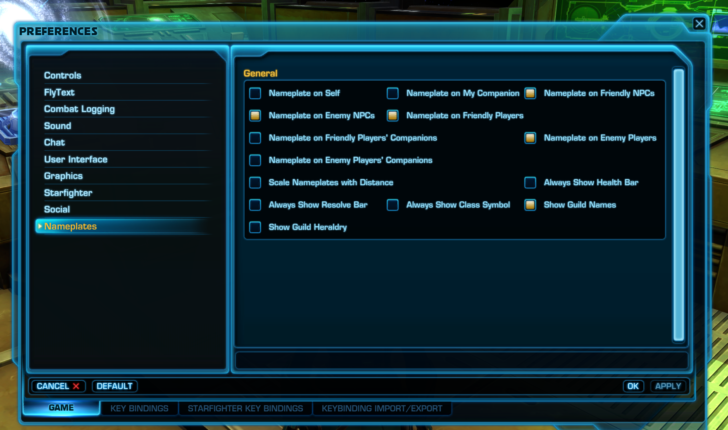
Press the OK button on the bottom right to save your settings.

Your settings in the Preferences panel are saved and shared across all your characters on your account.
Interface Editor
The Interface Editor allows you to control where the difference parts of the user interface show up on your screen.
The Interface Editor is in a separate area from the rest of the settings for the game. To open the Interface Editor, press your ESC key on your keyboard, then choose “Interface Editor” from the menu.
You can also access the Interface Editor by rolling over the icon of a cog wheel on the main menu, and choosing “Interface Editor” from the drop down menu there.

You can move things like your ability bars here, and also adjust the size of most screen items in the User Interface Editor.
- SWTOR User Interface Tips and Tricks
- How to Make SWTOR’s Interface Bigger Guide
- How to Make Subtitles in SWTOR Bigger
Your User Interface settings are saved to your computer, so if you play on a different computer they will not be automatically available. However they are saved as a file, so if you need to copy or transfer them, you can.
Controls
The Control section allows you to change the way the game is played.
General

 Auto-loot on Right-click
When you defeat enemies they will have rewards on their bodies you need to pick up. There is no way to have that reward picked up automatically, but you can make the act of picking up the reward easier. “Auto-loot on Right-click” makes it so when you right-click an enemy, all items on that enemy go into your inventory.
 Enable Area Loot
“Enable Area Loot” makes it so when you right-click one enemy’s body, you get all the rewards from other un-looted enemies in the nearby area as well. The range is quite generous and saves a lot of time so it is recommended you enable this.
 Deselect Target upon Clicking on Terrain
This is an interesting one. The “Deselect Target upon Clicking on Terrain” setting makes it so if you have an enemy selected, then click on the ground, the enemy will become unselected. I find this very useful if I accidentally target an enemy, but want to un-target them so if I accidentally press any of my attack abilities, I will not accidentally attack them.
 Auto Target Closest Enemy
The “Auto Target Closest Enemy” can be a blessing and a curse. The way it works, is if there are two enemies, and you are currently fighting one, when that one dies, you will automatically have your target transferred to the next nearest enemy. This is very useful if you just like to shoot things and appreciate not having to target a new enemy each time. This however can be a bad thing if you are fighting one enemy but there is another enemy nearby who is not in combat with you – sometimes the auto-target will choose them next and you might wind up fighting an enemy you were trying to sneak around. This can be especially detrimental if you are in group content, where it is often considered impolite to fight enemies that your team could instead skip past, and it can be frustrating when you accidentally auto-target multiple enemies you didn’t want to fight. If you’re struggling with that, turn this setting off, otherwise, keep it on to save time and inertia while fighting.
 Enable Focus Target
Focus Target is mainly used for high-end group content. Press ALT+F while you have an enemy or other player targeted, and their portrait and health will be permanently visible on the screen, separately from your current target, which is useful if you have to keep track of a certain buff or amount of health while targeting something else, but does not matter much for regular play.
 Use Quickslots On Key Press
“Use Quickslots On Key Press” makes it so when you activate an ability using your keyboard, the ability activates when you press the keyboard button down, not when the keyboard button goes back up. Abilities activating on key press is default for most keyboard users, so if this is unchecked, you may want to check it so it feels like when you press a keyboard button the ability is activated immediately and not when you remove your finger from the key. This could possibly be useful for older players who may be used to more of a delay from older computers, or players who are used to playing non-standard devices that normally activate on key up.
 Request Companion to Gather
Once you pick up a gathering crafting skill, you’ll be able to pick up crafting materials out in the open world by right clicking them. “Request Companion to Gather” is a setting that allows your companion character to do the gathering of those materials instead of your main character, so you are free to continue moving and fighting or looting regular loot while they do so. Note that this setting does not make companions loot regular enemy loot, only crafting material nodes. This final option in the general grouping of the Control settings is a dropdown, not a checkbox. Your options in the dropdown are either Right-Click (the companion will gather the crafting materials as soon as you right click the node), SHIFT + Right-click (the companion will only gather the node for you if you hold shift as you right-click, otherwise a regular right click will make your own character do it), and Disabled (your companion will not gather).
Camera

Enable Camera Pivot
This is a fairly niche but interesting setting especially for taking screenshots. When your camera hits terrain, it detaches from your character. You can test what that means and what you may prefer by zooming out and aiming your camera down towards the floor; with this option enabled once the camera hits the floor, it will “detach” from looking at your character and continue to look upwards from where it hit the floor. With it disabled, it will not detach from your character, and will instead slide closer to you, keeping your character in focus.
Smart Camera
“Smart Camera” is a very useful tool that you should probably keep enabled during gameplay unless you are trying to view a specific thing from a certain angle. Smart camera will automatically rotate the direction the camera is facing when you move or rotate your own character. With it enabled, if you stay still and drag your camera to face the front of your character, then start running, the camera will flip back around to behind your character, so you can see what is ahead of you as you run towards it. With it disabled, you can hold a specific angle with the camera and then move or attack and the camera will stay fixed in that position, which may be useful for taking screenshots.
Camera Max Distance
The “Camera Max Distance” Slider controls how far back you are able to zoom out with your camera. More camera range is usually always more useful for when you want to see more of your surroundings at once, because you can still zoom in and stay closer to your character until you need to zoom out, so this setting should probably stay at 100%. This is probably enough distance for any regular gameplay, but for those that want to zoom out even more, you can check out this guide by Vulkk.
Camera Rotation Speed
The “Camera Rotation Speed” Slider does pretty much what it says – controls how fast the camera will rotate around your character. Some players report a common issue when playing the game for the first time in which manually moving the camera around with their mouse feels way too fast, even if their mouse sensitivity is down and they don’t have any kind of acceleration enabled. A common fix for this issue is to come to this slider, set your rotation speed to 0%, then hit apply in the bottom right corner of the window, then set it to 100%, then hit apply again, then back to 0%, hitting apply. This should change the value of your rotation speed around enough to get it back to normal.
Global Camera Shake
“Global Camera Shake” is a slider that changes the severity of the shaky camera effect used throughout the game – usually after explosions or earthquakes. Some players report nausea or headaches from this kind of effect so turning it right down to 0% should completely disable it if needed. This slider is specifically for effects experienced during regular gameplay in the open (or global) part of the game.
GSF Camera Shake
“GSF Camera Shake” is precisely the same kind of slider as Global Camera Shake, but specifically for shake effects during Galactic Star Fighter matches. If nausea or headaches occur while experiencing these effects during GSF, or if they’re simply annoying, turning this down to 0% will completely disable them. Note that neither GSF Camera Shake or Global Camera Shake disable most cutscene-specific shaking effects.
Mouse

Invert Mouse Vertical
“Invert Mouse Vertical” will reverse the directions needed to move your camera up and down manually. With it disabled, holding right click and pulling your mouse down will raise your camera over your character to look down on them. Pushing your mouse up will make the camera look up. With it enabled, you will have to pull down to look up, and push up to look down.
Invert Mouse Horizontal
“Invert Mouse Horizontal” is much the same kind of checkbox as Vertical, only for rotating the camera around your character. With it disabled, moving your mouse left will spin the camera right (to look at your characters right-hand side), and moving it right will spin the camera left (to look at your characters left hand side.) Once enabled, inverted mouse controls will spin the camera in opposite directions.
Combat

Ability Action Queue Window
This dropdown is a very useful setting for those that want to play at a higher level. It is not possible to queue a long chain of abilities at once in SWTOR, but your inputs can be recognized early enough to queue 1 ability at a time. For example, if you use an instant ability, there is still a standard cooldown of 1.5 seconds you must wait before using another ability, even if that one is also instant. With the Ability Action Queue Window set to its lowest setting, 0.0, there is nothing to do about this. You must wait until the 1.5 seconds pass, and then you can press your next ability. At the highest setting, 1.0, you now have a “Queue Window” of 1 second. after the first .5 seconds of the global cooldown passes, you may now attempt to press the next ability. This will not instantly activate the ability, but add it to the Action Queue. Once the Global Cooldown is finished, your character will instantly attempt to use the ability you pressed during the cooldown. This is highly recommended for those that know a rotation and don’t want to waste any time between abilities, but isn’t super important for story-mode gameplay.
Show next target in cycle
The “Show next target in cycle” checkbox is a setting that can help an alert player know what will be targeted next in a combat scenario. When regularly targeting an enemy, a downward-pointing red and white caret will point at the enemies name to show they are currently selected. “Show next target in cycle” will also display a hollower, black and red looking caret pointing down to the next character that would be targeted if you were to press your “Target Next Enemy” key (default TAB) or the closest enemy you’ll attack if “auto target closest enemy” was enabled. This can be useful if you want to quickly cycle targets to the correct one with more of a chance to not accidentally skip over them.
Cycle in screen space
“Cycle in screen space” is a good checkbox for those that want a more predictable experience cycling between targets but has some drawbacks as well. Normally with this option disabled, targeting the next enemy usually prioritizes the one closest to the middle of your view, or the one closest to your character. This doesn’t always work perfectly and can lead to you targeting someone way in the back of the group that you weren’t really trying to focus on. “Cycle in screen space” will change the cycle to go left-to-right across the screen, predictably from the enemy furthest to the left, all the way to the enemy furthest to the right. The drawback of this, is sometimes it will not cycle to enemies further behind ones in the foreground, and if enemies are nearby but not directly on your screen, you will not be able to cycle to them.
Sticky Ground Target Reticule
“Sticky Ground Target Reticule” can help players ensure they properly cast ground-targeted abilities without accidentally skipping them with an invalid location error. Normally, when a ground-targeted area ability is selected to be cast in an invalid location, you will simply get an error message telling you as much, and then the cast will be cancelled. With sticky mode enabled, the reticule will stay active after receiving the error message, allowing you to quickly choose another location to try casting it in.
Quick Ground Target Activation
The “Quick Ground Target Activation” checkbox is another helpful setting that can make Ground-Targeted abilities easier. Normally, with this setting disabled, you need to click the location you want the ability to be cast in. With it enabled, you may also simply press the hotkey the ability is bound to a second time, which may save you some time in getting the ability out.
FlyText
The FlyText section of your preferences window is a list of checkboxes to enable or disable certain alerts that “fly” by your screen quickly as their specific subject matter (detailed below) changes or occurs.
General

Flytext Enabled
This checkbox will enable or disable the entire Flytext system at once. Enabled, you can pick and choose all other flytext checkboxes you want to see during gameplay, but disabled, no matter what you have the other checkboxes set to, even if they are all enabled, they will be greyed out and you will see no flytext at all. For most players that are only playing story-mode content, or players looking to take action-oriented screenshots, it may be more immersive for you to simply disable the whole system so that your screen isn’t cluttered with numbers and alerts during combat.
Miscellaneous
Miscellaneous flytext encompasses all kinds of flytext messages that don’t have a category in any of the other checkboxes below. This usually takes the form of non-combat flytext (updating roles, receiving alignment points, etc.)
Experience
Enabling Experience Flytext will briefly show a purple number of how much experience your character has just gained, as it happens.
Damage

Damage from Self
Enabling “Damage from Self” Flytext will show damage that your character specifically does in combat as raw numbers flying by the target you’ve hit. This is probably the most common Flytext users have enabled, displaying white numbers being regular damage, and the larger numbers that appear being critical hits. Note this does not include your ability damage: that is a different Flytext option below.
Damage from Companion
Enabling “Damage from Companion” Flytext will show the damage your companion does in combat. This may be useful to see which of your companions does the most damage if they are of comparable influence levels but maybe use a different weapon type.
Damage to Self
Enabling “Damage to Self” Flytext will display any damage enemies inflict on your character in raw damage numbers. Possibly useful to see how much damage you receive from a specific enemy you are having trouble with.
Damage to Companion
Enabling “Damage to Companion” Flytext will display any damage enemies inflict on your current companion in raw damage numbers. Possibly useful to see when the companion is standing in a hazardous spot and needs to be moved manually via setting them to passive/active again.
Mitigation

Mitigation Self
Enabling “Mitigation Self” Flytext is an interesting option that shows how much damage you did NOT receive, rather, how much was mitigated by some effect you have. This could be a block (if tanking, many hits will be blocked and depending on your shield rating, more and more damage is mitigated this way) or an absorb effect you gained with a defensive cooldown. This flytext could be very useful for tank players but is by no means necessary.
Mitigation Companion
Enabling “Mitigation Companion” Flytext will show you how much damage your companion is blocking or mitigating as they are hit. This could be useful to see which of your companions is best suited to tanking for you.
Mitigation Other
Enabling “Mitigation Other” Flytext will show you how much damage is being mitigated (blocked or absorbed) by players or companions not currently in your group. Note that there is no option to see how much damage enemies are mitigating, they do not fall under this “other” option.
Health

 Heal from Self
Enabling “Heal from Self” Flytext will show you how much healing you have personally caused. This will display green healing numbers both over yourself, or over targets that you have selected to heal. This setting could be useful to see how much healing you are doing between different gear set ups or abilities on your healing characters.
Heal from Companion
Enabling “Heal from Companion” Flytext will show you how much healing your companion has caused, both on themselves, you, and your party members, if any exist. This setting could be useful to compare which of your companions is capable of doing the most healing.
Heal from Group
Enabling “Heal from Group” Flytext will show you how much healing your teammates are doing, both group or operation members. It will appear much like the green numbers you or your companion make, with the addition of the group members name next to their numbers. A useful setting if you are wondering who is healing who (some operation groups may split responsibility for healing certain members evenly between healers).
Heal from Other
Enabling “Heal from Other” Flytext will show you how much healing is being done by companions or players outside of your groups. This will not show how much healing an enemy does, but enabling this would tell you if another player out in the open world is healing you (or telling their companion to do so).
Low Health Self
Enabling “Low Health Self” will flash a red “Health Low” warning across your character in Flytext whenever you drop below a certain critical health percentage. Very useful warning that comes highly recommended for most players. Tanks may see this and use a defensive ability, damage dealers may see this and move out of a ground targeted attack they are in, etc.
Low Health Companion
Enabling “Low Health Companion” will flash a red “Health Low – Companion Name” warning across your companion in Flytext whenever your companion drops below a certain critical health percentage. Useful if you are planning on healing them when needed, or manually moving them out of danger.
Effects

Effect Gained Positive
Enabling the “Effect Gained Positive” Flytext will alert you to any positive effects you receive, also known by players as “buffs”. This could be a buff with a passive effect like the Smuggler’s Lucky Shots or a buff with a more active role like a Sage’s Force Barrier/Empowerment. If you play a damage discipline with an expensive but highly damaging section of your rotation, you may choose to enable “Effect Gained Positive Flytext” so you know to start your high energy rotation at the same time you get a positive effect like Force Empowerment.
Effect Lost Positive
Enabling the “Effect Lost Positive” Flytext will alert you to any positive effects that have either been stripped from you or have run their full duration and have fallen off. This could be useful for something as simple as your Class Buffs running out and reminding you to re-apply them, or alerting you to something more pressing – like losing Force Barrier as a Sage – perhaps because too much damage was taken.
Effect Gained Negative
Enabling the “Effect Gained Negative” Flytext will alert you to any negative effects you receive, also known by players as “debuffs”. This could be an effect like Drained (simply telling you that you cannot benefit from Force Empowerment for 300 seconds) or a damage over time effect like an Enemy Agent’s Corrosive Dart, or most importantly, a cleansable debuff such as the corrosive slime in Terror from Beyond.
Effect Lost Negative
Enabling the “Effect Gained Negative” Flytext will alert you to any debuffs that have either been cleansed or ran their full duration and have fallen off. This could be useful for tank players who need to swap the attention of an enemy after receiving a certain debuff that makes them unable to continue tanking, waiting for the debuff to go away before they can safely taunt the enemies again.
Ability Damage

Ability Damage from Self
Enabling “Ability Damage from Self” Flytext will display the yellow damage numbers of your offensive abilities you use. This is where a majority of your damage will come from so if you want to see the biggest numbers on your screen while you fight, make sure to enable this.
Ability Damage from Companion
Enabling “Ability Damage from Companion” Flytext will display the damage numbers of your companions offensive abilities. Companions have very few abilities compared to players and so this will be less frequently flying on your screen compared to their regular damage numbers if enabled.
Ability Damage to Self
Enabling “Ability Damage to Self” Flytext will display the damage you are taking from specific abilities cast by an enemy you are fighting. This could be useful to see specifically what attacks are killing you in real time without having to look at the combat log.
Ability Damage to Companion
Enabling “Ability Damage to Companion” Flytext will display the damage your companion is taking from specific abilities cast by an enemy you are fighting, similar to damage cast on you, if your companion is tanking for you this could be a useful way to see what is most threatening to them.
Combat Misses

Combat Miss from Self
Enabling “Combat Miss from Self” Flytext will display a “miss” text in a similar manner to your damage numbers whenever an attack or ability that you use fails to hit your target. Accuracy is a very important thing at later levels of gameplay because an ability that misses does no damage, and your whole rotation may break down if certain attacks fail to land. This flytext is very useful in diagnosing such an issue if you suspect you are missing.
Combat Miss from Companion
Enabling “Combat Miss from Companion” will display a “miss” text just like it does for yourself, whenever a companion fails to hit their target with an ability. Companions scale with you and tend to have enough accuracy on their own now that their stats are not determined by their gear anymore, but you can always use this flytext to double check that they aren’t missing.
Combat Miss from Other
Enabling “Combat Miss from Other” will display a “miss” text for people not in your group when their abilities or attacks fail to hit. Just like diagnosing yourself with a lack of accuracy, you can use this to see if a friendly player is having trouble hitting a target thats either too high level for them, or due to their gear being insufficient in accuracy rating.
Combat Logging
Combat Logging has two very simple chat settings that will be quickly explained below and one more in-depth setting that may not be necessary for most players, but will also be explained.

Show Victory Messages in Chat
Enabling “Show Victory Messages in Chat” will allow you to see who you defeated and how much damage your final attack did. In order to see the message, right-click your chat tab and go into it’s settings, and make sure “combat information” is checked under “system channels”, this is the type of chat message it falls under. The structure of the message is “Defeated [Name of Enemy] with [Name of ability] (x damage)”, so it would look like “Defeated Separatist Roughneck with Charged Bolts (224 damage)”. This can be very useful for PvP especially. Did you have a damage over time effect on a stealth character you attacked? You can watch for the Victory Message in chat to know if they died somewhere or are still sneaking around.
Show Defeat Messages in Chat
Enabling “Show Defeat Messages in Chat” will allow you to see who defeated you and how they did so. In order to see the message, right-click your chat tab and go into it’s settings, and make sure “combat information” is checked under “system channels”, this is the type of chat message it falls under. The structure of the message is “Defeated by [Name of Enemy] with [Name of ability] (x damage)”, so it would look like “Defeated by Separatist Scout with Ranged Attack (10 damage)”. This can be very useful for knowing what you need to avoid in a fight.
Enable combat logging to file
Enabling “Combat Logging to File” is a slightly more advanced setting to have enabled and is absolutely not necessary for the average player. Every time any action is taken in a fight, it is recorded in a combat-log for review later. This setting saves copies of this log to readable text files in your Documents folder on your PC, under Documents/Star Wars – The Old Republic/CombatLogs. It covers every minor detail about every action, down to the millisecond it happened, and is generally filled with so much information it’s basically unreadable unless you really know what event you’re looking for. It’s main purpose is to be read and used by other programs for “parsing”, which is the act of recording your combat actions and reviewing your performance (typically your Damage Per Second, and how to improve it). To see your DPS, or to learn how to Parse, enable this setting and check out Ixale’s StarParse at ixparse.com. Keep in mind the CombatLogs folder can fill up pretty quick – you are free to safely delete old logs whenever you notice it getting big.
Sound
Sound settings cover every option regarding the audio in Star Wars – The Old Republic. Note that there is no dropdown setting for which audio device you want SWTOR to use – to avoid issues, switch your audio devices while the game is off and pick your output device through your own operating system’s sound settings.

Enable Sound
The “Enable Sound” Checkbox is an on/off switch for all of the sound SWTOR has. Useful if you need to mute the game. Note that by default there is a keybind (ctrl – S) for this checkbox to be toggled without even entering your preferences window, so if you notice your game does not currently have sound for some reason, try checking here and making sure it was not unchecked first.
Background Audio
The “Background Audio” Checkbox will continue to play SWTOR’s sounds even if the game is minimized, if enabled. If you are momentarily busy doing something else, the game audio may interfere or simply be annoying so it’s a good idea to leave this unchecked, however it can be very useful for people who are waiting for a Groupfinder Queue to find them a group (you will not hear the alert that a group has been found if this is unchecked and you aren’t currently looking at the game) or you may hear the sounds of combat and save yourself from dying while temporarily not playing.
Master Volume
The Master Volume slider controls the overall magnitude of SWTOR’s audio. The rest of the sliders covered below will control specific things but if everything is too loud or too quiet, messing with this slider first is recommended. The miscellaneous tab of the Keybindings window will allow you to bind two keys to raising or lowering the Master Volume slider in 10% increments.
Music Volume
The Music Volume slider controls only the songs and themes that play during SWTOR’s gameplay. If you like to listen to your own music while playing or simply had enough of a certain theme that’s been playing, turning this down to 0% will fully disable music. Note that there is no keybinding to toggle music specifically like there is for sound in general.
Sound FX Volume
The Sound FX Volume slider controls the volume of things like lightsabers clashing and blasters firing. Every enemy or player action that isn’t a voice is probably found under Sound FX. If things like explosions or earthquakes or combat in general is too loud and drowning out everything else, you can lower this setting to even it out again.
Ambient Volume
The Ambient Volume slider controls the volume of “white noise” sorts of sounds. This could be the hum of a spaceship engine, or a spaceship flying by you, or maybe the wind blowing by on a planet. They are usually non-obtrusive miscellaneous background noises meant to set a certain atmosphere and break up silences. They shouldn’t be super loud though, and you may want to keep it lower than things like voices or music.
Voice Volume
The Voice Volume slider controls the volume of all spoken voice lines in the game, whether its random NPCs talking as you walk by, a companion’s speech during combat, voiced emotes, or any talking during a cutscene both in basic or huttese for that matter. Useful to crank up when in cutscenes and maybe set lower when your companion gets too talkative in combat.
Chat
The Chat preferences tab contains a few helpful settings regarding all text that comes in through your chat panel in SWTOR. Note that a few of these settings are similar to settings you can find by right-clicking your chat panel in-game and opening your chat panel settings, although there are also a few different settings to be played with in there (such as font size, which is not listed here).

Chat Timestamp
Enabling the “Chat Timestamp” checkbox will add a timestamp to every line that appears in the chat panel, for example [6:33:30 AM] [General – 1] [Swtorista]: Hello! As far as I know there is no way to set your timestamp to 24-hour time, it is always in the h:mm:ss AM/PM format. It can be useful to players who want to see how old a message in their chat is, one that may not be relevant anymore if very old. Note the timestamp function is not retroactive: it does not appear for old messages said before the checkbox was enabled, but will start as of any new messages.
Chat Panel Fade
The “Chat Panel Fade” checkbox once enabled will fade out the opacity on your chat panel right down to zero so that it is completely hidden if no new messages appear in it for a few minutes. This can free up lots of visual space on your screen if you are not actively chatting at the moment. Moving your cursor over where you keep your chat panel will make it come back.
Filter Profanity
The “Filter Profanity” checkbox comes enabled by default, and will replace any swears or slurs used in chat with a string of ******s. Note that this setting is not retroactive – messages already sent will stay the way they are when enabling/disabling this setting after. Some players may try to get around this filter by using special characters on a swear (use of profanity in this way is a reportable offense), and with it enabled, it can sometimes block mundane words with certain flagged terms inside them (E.g. “Grapes”), so ultimately it is up to you if you want to keep this enabled or not.
PVP Chat
The “PVP Chat” checkbox comes enabled by default, and provides access to a global (across the whole planet you are on) chat channel labelled PVP. Note that disabling this in the preferences will completely take away the option to selectively enable/disable PVP chat in your chat panel settings for each tab you have – all tabs will not be able to select it anymore.
General Chat
The “General Chat” checkbox comes enabled by default, and provides access to a global (across the whole planet you are on) chat channel labelled General. Note that disabling this in the preferences will completely take away the option to selectively enable/disable General chat in your chat panel settings for each tab you have – all tabs will not be able to select it anymore.
Trade Chat
The “Trade Chat” checkbox comes enabled by default, and provides access to a global (across the whole planet you are on) chat channel labelled Trade. Note that disabling this in the preferences will completely take away the option to selectively enable/disable Trade chat in your chat panel settings for each tab you have – all tabs will not be able to select it anymore.
Chat Awareness Ping
The “Chat Awareness Ping” Checkbox will play an audible tone when your name is said in Tells, Guild Chat, or Ops chat once enabled. Very useful to bring your attention back to chat when someone needs to talk to you. The ping noise has an internal cooldown of 30 seconds, so enabling this will not allow people to spam noises at you.
 Group Awareness Ping
The “Group Awareness Ping” Checkbox will play a different audible tone from “Chat Awareness” whenever a friend, group member, or guild member logs into the game. This one does not have the same internal cooldown of 30 seconds as “Chat Awareness” so if you have lots of friends added in-game or maybe a group/guild member that disconnects and reconnects a lot, you may want this disabled to stop the alert noises.
 Auto-Swap to Group Channel
The “Auto-Swap to Group Channel” checkbox comes enabled by default and will automatically switch the channel you are speaking in, to “Group” whenever one is joined. If you like to greet your groups as soon as you join them this can be a convenient setting, but can also be awkward if you have conversations in other channels frequently and accidentally send the wrong message to the wrong channel as a result – disabling auto-swap can avoid this.
 Chat Panel Alpha
The “Chat Panel Alpha” slider effects how transparent or opaque the chat panel is when not in focus. When in focus, (actively typing in it or clicking on it) the opacity is always at it’s highest. Keeping this slider at 100% will keep it equally opaque even when not in focus (Chat Panel Fade will still fade it out eventually, if enabled). Keeping this slider at 0% will make most of the chat panel completely transparent when not in focus, leaving only the most recent chat messages on screen.
 Click-Through Chat
The “Click-Through Chat” checkbox will enable you to mouse-click objects and targets directly behind the chat panel. This is especially useful if you find your chat panel takes up a lot of space on your screen and gets in the way during combat or while trying to gather things.
 Click-Through Chat Input
The “Click-Through Chat Input” checkbox will enable you to mouse-click objects and targets directly behind the chat panels input box (the area where your text shows up as you type it). If this is enabled along with Click-Through Chat, you will be able to click through the whole chat box to target/gather/interact with things, but keep in mind you cannot click the input box to start a message anymore: you will have to press the Enter key to begin typing text.
User Interface
The User Interface tab under preferences contains many useful settings to customize both the UI in general and how certain UI elements work specifically. This includes things like enabling/disabling entire systems like the Cover bar or Subtitles, or just skipping confirmation windows when authorizing an action in certain windows.
General

Show Phase Indicator
Enabling the “Show Phase Indicator” checkbox will keep the small yellow or red ui element that appears by default just underneath your menu bar at the top of the screen – Usually containing the name of the player who currently owns the phase you are in and if you are currently inside of a phase at all. Recommended to keep this enabled if you run lots of content in groups to know who has to reset their phase if something goes wrong.
Show Tutorial Alerts
“Show Tutorial Alerts” when enabled, will display the glowing question mark UI element that can be clicked to bring up new tutorials as they are encountered during gameplay. Note that even when this is disabled, tutorials can still be accessed by hitting the escape key and selecting it from the menu.
Tutorial Frame-By-Frame Mode
By default, tutorials are shown 1 frame at a time, requiring you to click to slowly unveil more of the tutorial to read as you go. This is designed to help each individual step in the tutorial to sink in better. If you find the clicking to be hassle or just like to read the tutorials faster, you can disable “Tutorial Frame-By-Frame Mode” and all 3 panels will display simultaneously when accessing a tutorial.
Auto Skip Movies
The “Auto Skip Movies” checkbox will automatically skip intro Cinematics and Character Creation movies in the future instead of constantly replaying them when you start the game. Sometimes, the intro movies will be updated or a new cinematic will come out for the log-in screen. Typically this setting will be disabled again when such an update happens, and you will need to re-enable this to continue skipping them in the future.
Display Item Modification Warning
When upgrading a piece of gear with a new modification, the game will warn players that the old modification in the item will be overwritten and destroyed if not removed first, and ask you to confirm the overwrite action before continuing. This stays enabled by default, but can be disabled here (or re-enabled after selecting “don’t warn me again” on the warning window itself) to skip the warning and overwrite modifications faster.
Display Item Purchase Warning
When purchasing an item with a secondary currency (not credits or cartel coins), the game will warn players that they are making a specific purchase for a specific amount of currency and that the used currency will not be refundable once completed, and ask you to confirm the transaction before continuing. This stays enabled by default, but can be disabled here (or re-enabled after selecting “don’t warn me again” on the warning window itself) to skip the warning and make purchases faster.
Enable Cover Bar
The “Cover Bar” is a gunslinger/sniper specific UI element that replaces their main action bar for a cover-specific action bar whenever cover is entered. This can be useful for snipers and gunslingers that keep their abilities that can only be used while in cover on the same bar, as they will be neatly hidden away until you are in cover and able to use them. For those that have a specific keybinding setup or ability bar layout that mixes some cover-only abilities with other non-cover specific ones, you may wish to disable the Cover Bar with this checkbox (cover-only abilities will stay darkened and dim while out of cover, and light up once usable in-cover, so even without the bar it is clear when they are usable).
Conversation

Display Subtitles for Conversations
With this disabled, when a character in a cutscene finishes speaking and it comes time for you to choose a response with the speech wheel, the subtitles for what they said last will appear. With “Display Subtitles for Conversations” checked, subtitles will appear throughout the entire conversation, for both your character and any NPCs speaking in it. Note this has no effect on speech outside of conversations, for ambient voice lines (and conversation subtitles) to be recorded in your chat panel, make sure the “Conversation” system channel is enabled in your chat panel’s filter.
Show Conversation Alignment Gain on Mouseover
“Show Conversation Alignment Gain on Mouseover” once enabled, will allow you to see if the speech option you are about to select gives Light or Dark Alignment points for choosing it by putting the corresponding symbol in the middle of the choice wheel. Players who wish to make decisions without knowing the alignment changes before hand can leave this disabled.
Show Conversation Alignment Gain
“Show Conversation Alignment Gain” will also enable Alignment symbols for Light and Dark to appear on your speech option wheel, but instead of only flashing the symbol in the middle on mouse over, this option will plainly show how many points will be gained directly next to the text of the speech option constantly, without the need to mouse over. Another option to leave disabled if you wish to make your own choices without worrying about how many light or dark points you’ll get.
Map

Exterior Map Defaults to World Map
Enabling the “Exterior Map Defaults to World Map” checkbox will change the map that is seen by default when you press (default M) or open the world map through the minimap button. By default, being outside in a specific area will show you a zoomed in, more detailed map of that specific area, but with this checkbox enabled any time you open the world map in the outdoors, it will show you the entire planet first. For example if I make a new trooper and walk into Drelliad Village on Ord Mantell, opening the map would normally show me a zoomed in detailed map of Drelliad Village, but with “Exterior Map Defaults to World Map”, opening my map takes me to the full map of Ord Mantell right away, with Drelliad Village openable in the bottom right.
Enable Magnifying Glass on World Map
Enabling Magnifying Glass on World Map will create a large circle around your cursor when mousing over the world map. This circle zooms in very close to wherever you are pointing to on the map, and can be useful to get a clearer picture of some noisier parts of your map, such as a spot with many intersecting paths or a hub with lots of mission symbols cluttering the area.
Map Fades while Moving
Enabling the option to make the map fade while moving will make it so the entire world map window loses opacity (to a percent specified in a later slider) and becomes transparent enough to see behind as you move. This is very useful for when you are trying to get somewhere new and need both the maps direction but also to see where you are going. Note that is option does disable directly interacting with the map: you can still hover over objectives and read what mission they are for etc. but cannot click on the expanded/detailed map in the bottom right or interact with the dropdown for instance switching while the map is faded.
Map Flashes Red while being Attacked
The “Map Flashes Red while being Attacked” checkbox will alert you whenever you enter combat with the large World Map interface open. This is extremely useful if you are standing around in a place where enemies may respawn and help you to not die while you are busy reading the map. It can also let you know if you have entered combat while moving and reading the map but the flashing is a little harder to see with a faded map – although you should be able to see the enemies then too.
Fade World Map Sides Completely
The “Fade World Map Sides Completely” checkbox will ignore any opacity settings you have applied to the world map’s side bars (the legend and mission log/world tabs) and make them completely invisible if you also have “Map Fades While Moving” enabled. Once you start moving, both the main map and the sides will start to fade, with the map itself stopping at your selected opacity and the sides continuing on to be completely invisible. Makes the screen much less cluttered when moving and reading the map at the same time.
Show Mapnotes for untracked Missions
The “Show Mapnotes for untracked Missions” checkbox will continue to show you where on the map your missions objectives are even if you have them untracked. Useful for if you want to reduce clutter on your screen from actual mission descriptions but still want to see where to go on the map or minimap. Note that having this disabled will also remove untracked missions from your minimap and larger map; useful to reduce map clutter for stuff you won’t get to soon.
Reverse Y and Z coordinates on coordinate displays
The “Reverse Y and Z coordinates on coordinate displays” checkbox only effects the coordinates shown when you hover over the minimap, as the world map legend does not display z coordinates at all. This setting simply switches the values of the Y and Z coordinates on this mouse over, so if my coordinates on Ord Mantell were X: 39 Y:-200 Z: 23, enabling this checkbox would make my minimap instead say X:39 Y:23 Z:-200. This may make sense to some 3d programming users that are used to Y being “up” and Z being “forward” in most instances.
Allow multiple filters to be enabled simultaneously on the World Map
Normally, when selecting a filter checkbox on your World Maps legend, you can only select one filter to display on your map at a time, between things like Galactic Market Kiosks and Taxi locations. With this option enabled, you can now select multiple or all of the filters to appear on the map. This can look cluttered, so is disabled by default.
Group Mission Map Notes
The “Group Mission Map Notes” dropdown list is a way to specify which kinds of mission objectives from your group members you want to see on your map, if any. “All missions” will display all missions your group members have on your map, which can be confusing to tell apart from your own sometimes. You can also select “bonus missions only” and “No group missions” to reduce the amount of clutter being in a group may make on your map.
Map Fade Value
The “Map Fade Value” slider effects how transparent or opaque the world map panel is when you start to move with the relevant checkbox enabled. The default Opacity is about 30%. 100% will not fade the map at all, where 0% will render the map completely invisible while you are moving, coming back when you stop. Note that “Fade World Map Sides Completely” will ignore this slider if enabled, and set them to 0% no matter what.
Map Gutter Max Icon Count
When a mission objective is out of range of your minimap, typically they will display on the very edge (or gutter) of the minimap to show you what direction to head in to get closer. Raising the “Map Gutter Max Icon Count” slider value will enable more objectives and icons to display on the edge of the minimap.
Tooltip

Show Detailed Item Tooltips
Enabling the “Show Detailed Item Tooltips” checkbox will change your item tooltips (the window that appears when you mouse over an item) to show an expanded view of item modifications placed inside. Normally an item tooltip will show you the quality and item rating of a modification, and a combined total of all stats the item gives. With detailed tooltips enabled, each modification will also list the stats they give individually. Useful if you are still trying to balance the right stats on a high level character, but not necessary for most gameplay.
Enable Comparative Tooltips
Enabling this option will show two different item tooltips when you mouse over a new piece of gear, the new piece, and the piece of gear in the corresponding slot that you currently have equipped. This comparative tooltip now displayed next to new pieces will have your characters name displayed above it to let you know which is new and which is currently equipped. Useful to see if one is an upgrade over the other.
Enable Companion Comparative Tooltips
Enabling this checkbox will compare the stats on your companions gear with new pieces of gear just like comparative tooltips does for you. Having both enabled will display three tooltips when new gear is moused over: the new piece, your equipped piece, with your name on it, and your current companions equipped piece, with their name on it. This is sort of a vestigial tooltip option, as companion stats aren’t actually decided by the stats on their gear anymore – this can safely be left disabled as gear on your companions is purely for cosmetic purposes now.
Enable Stat Summarization in Item Tooltips
When “Enable Stat summarization in Item Tooltips” is enabled, new pieces of gear will come with some extra info in their tooltips to help make it easier to see what may be an upgrade. The stats on your new piece of gear will be compared to the same stats on your current piece of gear, with either a red negative number next to the stat to reflect you will have that much less of the stat when equipping the item, or a green positive number to reflect an increase. So a piece of gear with 30 critical rating and 56 accuracy may be compared to something with 45 critical rating (+15) and 42 accuracy (-14). Extremely useful for gearing up at level cap with the most important stats for your combat style and role.
Show Personal Mission Progress
The “Show Personal Mission Progress” will add your mission objective to the tooltip provided whenever something relevant is hovered over. If you have a mission to kill 6 Big Wampas, the tooltip when hovering over a Big Wampa will say something like “Wampa Hunting Mission: 3/6 Big Wampas” to remind you what mission they count towards. This can help when similar enemies are in an area: mousing over a Small Wampa will not display this objective in it’s tooltip, as its not the right kind of Wampa that would count for your mission, so you could learn to safely skip some enemies or objects this way.
Show Group Mission Progress
The “Show Group Mission Progress” will add your group members mission objectives to the tooltip provided when their relevant mission objectives are hovered over. Useful if you are helping a friend complete a mission you don’t have, and want to know what you can do to help. If both of you have the same mission, it is also useful because all group members progress are tracked via this tooltip, so if credit has been shared unevenly so far, you can see how many of something everyone has left to acquire or kill before you are all done.
Social Center

Show Invites as Social Messages
The “Show Invites as Social Messages” checkbox simply removes the window that normally pops up when receiving any kind of group invite and instead pushes the invite through the social message system: This is the gold text that appears in the upper left that you receive when being summoned by a player’s guild summon or stronghold summon. There is still a decline and accept option to the left of the gold text – it changes nothing about receiving invites except what the invite looks like. Up to personal taste.
Who List Chat Results
The “Who List Chat Results” simply changes how many results are pushed into your chat box when using the /who command to find players that meet your specifications. The /who command can find a list of players on a certain planet, at a certain level, playing a certain class, or using a certain string of letters in their name. There is a dedicated window to showing a full list of results, but you can also use the chat command to get a list in your chat box, and with the slider it can show anywhere from 0-10 results, with a default of 4.
Operations Frames

Lock Operations Frame
Enabling “Lock Operations Frame” will make it so that you cannot accidentally move around the Operations frame while in an Ops group. This is especially useful for healers, who may do a lot of click-targeting to select who to heal next, and may find themselves accidentally dragging the frame around.
Use Operations Frames as Group Frames
When in an Operations group, the usual group frames that encompass your teammates portraits, health, and resources will be replaced with a frame of smaller portrait-less health bars, this is done to accommodate a much larger amount of frames than a regular group: if you are more used to the operation frames or simply like how little space they take up, you can make the party frames default to the same compact style with this checkbox.
Operation Frame Visible
With the “Operation Frame Visible” Checkbox enabled, the window surrounding your operation frames will have full opacity, with buttons to lock and hide the frame visible on the side. With it disabled you will only see the individual health bars and names, which will take up less space.
Cooldown Settings
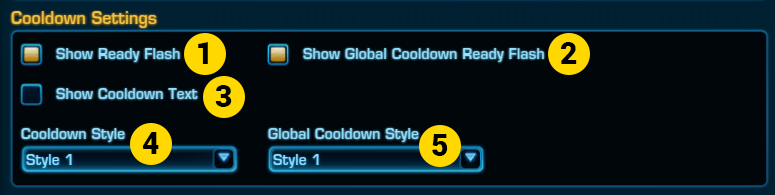
Show Ready Flash
The “Show Ready Flash” checkbox will simply add a very brief flash effect on an ability once it’s cooldown has finished. It is not very noticeable or distracting at all, enabling or disabling will not change how fast a cooldown is.
Show Global Cooldown Ready Flash
The “Show Ready Flash” checkbox will add a very brief flash effect on all abilities that are tied to the Global Cooldown as they come off of it. It is the same flash effect as “Show Ready Flash” and not super important, but if you like to have a reminder that your abilities are ready, this could be a helpful animation.
Show Cooldown Text
The “Show Cooldown Text” checkbox will enable a small amount of text on any ability that is on cooldown longer than the global cooldown, showing how much longer is left before it comes back. This could be say something like “5m” for 5 minutes, or 1.2s for 1.2 seconds. Below is a whole section of options for Cooldown Text that can be customized once this is enabled.
Cooldown Style
The “Cooldown Style” Dropdown changes the way an ability on cooldown looks, with 5 different options to choose from: A bright cooldown with a dark overlay, bright cooldown with no overlay, a dark cooldown with a dark overlay, a dark cooldown with no overlay, or no cooldown graphic at all. I would recommend most players have at least some kind of cooldown animation to watch for their abilities.
Global Cooldown Style
The “Global Cooldown Style” dropdown will provide the same options as the previous dropdown listed above, but for Global Cooldowns. It may be preferred to use a different cooldown animation between a global cooldown and a regular one to differentiate between them on your bars.
Cooldown Text Settings

Text Size
The “Text Size” slider will change the size of the text during a cooldown on an ability, measured in typography points. Note that depending on the size of your UI scaling the text may overlap or get cluttered looking, but the option to make it bigger is there for those who may not be able to read the default 16pt font size.
Show Tenths of a Second
The “Show Tenths of a Second” slider will change how many seconds will display each tenth of a second during the countdown for your cooldowns. At the default of 5 seconds, your cooldown text will display 8 seconds remaining, then 7s, 6s, 5s, and once it hits 5 seconds, you will then see 4.9s, 4.8s, etc. This option can be set as low as zero (so no tenths of a second will ever be shown) or as high as 10 seconds.
Mission Reward Window

Suppress Crew Mission Rewards in a Warzone
The only option under the Mission Reward Window grouping is to Suppress Crew Mission Rewards in a Warzone. This checkbox is helpful if you’re in the middle of a PvP match and your companions come back from doing Crew Skill Missions. The popup may distract you and get you killed, so this is enabled by default. But if you are confident in your ability to multitask you could always disable this and send them out again while in the warzone.
Cartel Market

Item Claim Confirmation Dialog
The “Item Claim Confirmation Dialog” checkbox will stop you before claiming an item from your pool of purchased but Unclaimed Items. This window will warn you that while unclaimed, items can still be returned for a refund, but once moved to your inventory, no refunds are available. In addition to unchecking it here in preferences, you may also select “don’t warn me again” in the warning window itself to turn off this confirmation.
Purchase Confirmation Dialog
The “Purchase Confirmation Dialog” checkbox will stop you before purchasing an item from that costs cartel coins. Note that most cartel coin purchases will go into your unclaimed items stash on the right hand side of the cartel market window, and these can still be returned for a full cartel market refund before they are claimed. If you are making multiple purchases and this dialog annoys you, you may uncheck it, but keep in mind cartel unlocks of things like stronghold expansions will be used instantly with no warning in this case.
Pack Opening Confirmation Dialog
The “Pack Opening Confirmation Dialog” checkbox will stop you before opening any sort of cartel pack, such as hypercrates or decoration bundles. Note that packs, once claimed from the cartel market, can still be sold after a cooldown period where it will unbind and become list-able on the GTN, so this warning is useful to have incase you are planning on selling them instead of opening them yourself.
Use Pack Explorer
The “Use Pack Explorer” checkbox decides if you use the custom UI and animation style of the Pack Explorer to see what’s inside your pack one by one. The Pack Explorer can be dramatic and flashy but also takes awhile longer than simply opening your pack and having it all fall into your inventory right away. For speedier pack opening, this can be disabled.
Character Customization

Appearance Change Confirmation Dialog
The “Appearance Change Confirmation Dialog” checkbox will stop you before finalizing your appearance changes at any Appearance Modification Station (either found on the Fleet’s main deck, the cartel bazaar, or as a usable decoration in strongholds). There are no refunds on an appearance modification, so it may be good to leave this enabled and to carefully make changes.
Planetary Conquest

Flagship Command Console Confirmation Dialogs
The “Flagship Command Console Confirmation Dialogs” checkbox will stop you before finalizing where you are moving your guild flagship for things like conquest orbital support. Moving the flagship costs credits from your guild’s credit pool, so make doubly sure you should be moving it around with your guild before doing so! Having a confirmation dialogue can save you some money if you select the wrong planet.
Combat Proficiencies

Commit Confirmation Dialog
The “Commit Confirmation Dialog” checkbox will stop you before committing to a specific combat discipline (like gunnery or assault or medic for a commando). You will receive a dialogue box like “Are you sure you wish to confirm GUNNERY as your discipline?” with the option of yes or no. This can be useful if you do not yet have the Field Respecialization legacy perk and switching back from a mistaken discipline may not be very easy to re-do.
Reset Confirmation Dialog
The “Reset Confirmation Dialog” checkbox will stop you before you can reset your current discipline on your character. Resetting your discipline is required in order to switch to a new one, so if you don’t mean to do it, it can be frustrating to figure out where all your discipline specific-abilities went and need to go again after the reset. This confirmation should help prevent this.
Uncommitted Confirmation Dialog
The “Uncommitted Confirmation Dialog” checkbox will stop you before closing your discipline selection screen without selecting one of your three disciplines. A character without any of their three disciplines is probably still usable in story-mode content, but you will have a much easier time with one selected, so it’s important one is decided on before the window is closed.
Unspent Confirmation Dialog
The “Unspent Confirmation Dialog” checkbox will stop you before closing your discipline window without spending available utility points. Utility points can do a lot of different things to make playing your chosen discipline easier and more enjoyable (not to mention the conquest objective for assigning one gives quite a bit) so it can be useful to leave this confirmation dialog enabled to ensure you’ve finalized your choices.
Buffs and Debuffs

Highlight Triggered Abilities
The “Highlight Triggered Abilities” checkbox will highlight certain abilities that have been modified by a buff that you have with a shining, golden border. A common gaming term to describe this effect is called a “Proc”. Originally short for “Special Process”, a “Proc’d” ability is one that does something different now that a certain specific requirement has been met. For example, when a Focus Guardian Jedi generates the Singularity Buff by using Force Exhaustion or Combat Focus, the abilities Focused Burst and Force Sweep will both become free to cast and do more damage than normal. To reflect this, they will both proc and glow with the shining gold border. Even if you are a beginner player that doesn’t care much about playing their class perfectly, it can be very useful to leave this checkbox enabled and simply hit your procced abilities whenever they glow, as it’s usually purely beneficial to do so.
Outfitter

The “Activate Outfit on Modification” checkbox will simply change your outfit to the new one you just made when enabled. You have the option to make adjustments without switching by keeping it enabled, and the option to check or uncheck this option is provided every time you finish modifying an existing outfit.
Missions

Display Chapter Warning
The “Display Chapter Warning” checkbox will stop you before starting a new chapter of Knights of the Eternal Throne or Fallen Empire expansions to warn you it will replace any previous chapter missions you currently have. Useful if you have been bouncing between chapters trying to get certain achievements but while doing them all in order this may be redundant and can be disabled.
Display Set Difficulty Confirmation Dialog
The “Display Set Difficulty Confirmation Dialog” checkbox will stop you before changing the difficulty of the Knights of the Eternal Throne/Fallen Empire chapters from story to veteran or master. It can be rather easy to accidentally click on the veteran button next to the story button in the chapters window, so this may be recommended for players only looking to complete the story difficulty.
Set Mission Difficulty Preference
The “Set Mission Difficulty Preference” checkbox will ask you if you’d like to change your default mission difficulty to the same difficulty you have just selected to play a chapter in. For example, if my default mission difficulty is set to Story because I was running story-mode flashpoints earlier, but selected to continue Knights of the Eternal Throne on veteran, this dialog box would ask if I wanted to set my future flashpoints to Veteran as well.
Launch Mission Confirmation Dialog
The “Launch Mission Confirmation Dialog” checkbox will warn you that the Knights of the Eternal Throne or Fallen Empire chapter you have selected to do will instantly travel to the mission location. Can be redundant if you are doing the chapters one after the other, and can be disabled once you understand chapters move you around quite a bit upon accepting them.
Renown

Renown Cache Opening Confirmation Dialog
The “Renown Cache Opening Confirmation Dialog” checkbox will stop you before opening one of your renown caches, explaining that the items within will go into the renown stash to either be transferred to your inventory or disintegrated depending on what you choose there. Once you understand how renown loot works, this can be safely disabled to facilitate faster renown crate opening.
Renown Disintegration Confirmation Dialog
The “Renown Disintegration Confirmation Dialog” checkbox will stop you before disintegrating renown gear into more renown/credits. Most would recommend that you simply loot the renown gear even if it is no longer an upgrade or useful, as dismantling it from your inventory will reward you with tech fragments. But if generating more renown is your primary concern, disabling this warning will facilitate faster renown gear disintegration.
Inventory

Automatically close Inventory when using the Cargo Hold or Legacy Storage
The “Automatically close Inventory when using the Cargo Hold or Legacy Storage” checkbox will not, as its name suggests, close the inventory when the cargo hold or legacy storage is used (which would be very inconvenient) but close the inventory when the cargo hold or legacy storage is also being closed. This can be convenient to get all the inventories off your screen together at once so you can move on to do something else.
Automatically close Inventory when using Vendors
The “Automatically close Inventory when using Vendors” checkbox will close your inventory as soon as you are done talking to a vendor, so when their inventory closes, yours does too. This can help clean up your UI faster when done selling things, but can be disabled if you want to move things around in your inventory after buying things too, and would benefit from the inventory staying open.
Guild

Show Guild Heraldry Update Cost Dialog
The “Show Guild Heraldry Update Cost Dialog” checkbox will stop you before you change your guild’s heraldry to a new picture or symbol. This change costs 1 million credits and this money must be in your guild bank when the change is made, so this dialog can be useful to remind you that 1 million credits will be taken from the guild for the change.
Amplifiers

Assign Amplifier Confirmation
The “Assign Amplifier Confirmation” checkbox will warn you that you are choosing a specific amplifier to add to your gear, and makes sure that you have chosen the one you really want to use before confirming. Very useful if you are locking-in gold amplifiers that cost a lot of credits and want to make sure.
Close Recalibration Confirmation
The “Close Recalibration Confirmation” checkbox will warn you when you try to close the recalibration window after not selecting a new amplifier. The credits for the re-roll will still be deducted, but you will keep the initial amplifier.
Recalibrate Cost Comfirmation[sic]
The “Recalibrate Cost Comfirmation” checkbox (is spelled incorrectly) will warn you when recalibrating an amplifier with how many credits the re-roll will cost. This is especially useful when recalibrating gold amplifiers, as it can cost a lot of credits very quickly to get the ones you want, so it’s good to keep in mind how much you are spending.
Graphics
The graphics page under preferences is a list of different adjustments you can make to balance the visuals of the game and the performance you experience while playing. Most options are dropdowns between low, medium, and high. All will be described below!
General

Vertical Sync
Enabling Vertical Sync (also known as V-Sync in some games) will match the games frame rate to your monitor’s refresh rate. Certain monitors or GPUs may experience a graphical glitch known as screen tearing (where you may see a horizontal duplication of the screen, or strange “tearing”) when vertical sync is disabled, so it’s recommended this is enabled when running fullscreen.
Full Screen Exclusive mode
The Full Screen Exclusive dropdown menu is the one you will use to change between fullscreen mode, windowed mode, or borderless fullscreen. If you use more than one monitor, or tend to tab between different windows, its recommended that you do not use exclusive fullscreen and instead use borderless or windowed.
Graphics Quality Preset
The Graphics Quality Preset dropdown menu has 7 presets to choose from to quickly change all of your graphics settings at once. These range from Very Low, Low, Medium, High, Very High, Ultra, and Custom. It’s recommended you start at Ultra quality, and lower the graphics by one preset until your game runs at a smooth rate for the best experience. By changing any of the options under the Advanced Tab covered further below, your Quality Preset will set itself to Custom automatically.
Resolution
The Resolution dropdown menu will set what size and overall level of detail your game screen will hold. This can be set as low as 800 x 600, all the way up to the maximum resolution your monitor is capable of, such as 3840 x 2160 (standard 4k resolution). The most common monitor these days is likely 1920 x 1080, but you should most likely set your resolution to the highest number available in the dropdown for best image quality, only lowering it as a last resort for help with performance as the game will look quite strange on a lower than maximum resolution.
Refresh Rate
A refresh rate is the number of times your monitor updates with new images each second. Like resolution, it’s recommended you keep this to the maximum it allows you to pick, lowering other settings if you need a performance boost.
Frame Rate
If the refresh rate is how often your monitor updates with new images, the frame rate is how often the game sends individual frames to be shown. This can be set higher than your refresh rate but without Vertical Sync enabled this will lead to the aforementioned “tearing” effect, as your GPU sends more frames to be shown on a monitor that was not finished “drawing” the last frame it was sent. To limit strain on your GPU, it’s recommended you cap your Frame Rate at the same number as your Refresh rate.
Full Screen Gamma
Gamma can be simply explained as a sort of “brightness” setting, the main difference being that a brightness setting will change the brightness of anything, even black and white on the screen, where gamma only adjusts the color curve. This slider will only work while the game is in fullscreen; for borderless and windowed, the game’s gamma will be decided by your monitor’s own gamma settings.
Advanced

Bloom
Bloom is a shader effect that tries its best to replicate a real artifact (imperfection) of a real world camera by extending the edges of bright areas in any given frame to simulate an “overwhelming” amount of light. When done right it can add a certain amount of realism to the lighting in games but the graphical effect has been quickly falling out of style in favor of newer effects. Many gamers even on older games that used bloom describe it as a gimmick that mostly just irritates them now. If at any time while playing SWTOR you find certain lights too bright or irritating, consider disabling bloom.
Enhanced Shadows
The enhanced shadows checkbox does two things: first, when enabled, it smooths the look of all the shadows in the game – without enhanced shadows, many of them can look blocky and more like the rough shape of an object instead of accurately reflecting the edges and borders of a shadow. Interestingly, enhanced shadows also adds better “ambient occlusion” to the shadows in the game – which means the interior of most shadows will be darker than the outer edges of the shadow, to properly reflect how much light would be reaching each point of the surface. This can be fairly performance draining for some PCs, so disabling it might help your game run smoother.
Conversation Depth of Field
The conversation depth of field checkbox once enabled will slightly defocus the background and foreground of conversation cutscene camera angles, leaving the characters within looking sharper and more cinematic. This can help make conversations more visually appealing and doesn’t effect performance too much. If you’d like your cutscene surroundings to look just as focused as they always do in regular gameplay this can be disabled.
Texture Quality
The texture quality dropdown menu has two options: low and high. Low texture quality will slightly improve performance in areas with a lot of different objects by lowering the resolution on the textures of visible objects. This will make things a lot fuzzier and less detailed looking, so only set it to low if you need the performance boost.
Shader Complexity
The shader complexity dropdown menu has three options: Very low, low, and high. When adding a layer of complexity to a shader, it changes how many different instructions the game receives when rendering each pixel you see. For better performance, set this lower. For better visuals, keep this high.
Anti Aliasing
The anti aliasing dropdown menu has four options: Off, medium, high, and very high. Anti aliasing reduces how jagged certain objects look in-game by blurring the very edges of it very finely to appear smooth. The higher the setting, the more finely blurred the edges will be, making it less obvious and much cleaner. Anti aliasing can be a big performance hog however, and turning it off can improve your PCs ability to run the game dramatically in some cases.
Character Level of Detail
The character level of detail dropdown menu has two options: low and high. Character level of detail deals directly with how many polygons a character model has. More will make it looks less blocky and strange, while less will save on rendering resources for your PC. You may find that in densely packed areas of the game such as the fleet your game may slow down – lowering the level of detail of each character could help lessen the strain of loading so many polygons at once.
Texture Anisotropy
The texture anisotropy dropdown menu has four option: off, low, medium, and high. Texture anisotropy is the practice of filtering certain images of textures being presented in-game and basically making multiple tries at displaying it with the least amount of aliasing or jaggedness possible. Anisotropic texture filtering in particular is very good at making a texture that’s far away from looking worse than it does close up. It is also fairly easy on your PCs performance compared to most texture options, so keeping it high will only slow down the most barebones of computers.
Character Texture Atlasing
The character texture atlasing dropdown menu has two options: low or high. A texture atlas is simply an image file that has multiple different textures on it, and when the game needs to pull a texture out to apply to an object, it will quickly come snip a sub-image off the atlas, and apply that as it draws the object. By selecting the High option, the texture atlas that contains your character’s appearance data will be a higher quality image, so your character will look better. To improve performance, the game can instead draw from a smaller atlas of lower quality.
Visible Character Limit
The visible character limit dropdown menu has four options: low, medium, high, or very high. The visible character limit simply chooses how many characters near your own are visible. Very high will display as many as possible, while the lower options will limit how many are shown so that if a large crowd of players tends to slow you down, it will cap how many it bothers to display to save time. Priority is given to group members and characters closest to you.
Shadow Quality
The shadow quality limit dropdown menu has three options: off, low, or high. The shadow quality is pretty specifically defined as: no shadows at all (Best performance), blobby shadows that are just vague circles or blobs of objects, or on the high setting, a “full environment” shadow which looks pretty much like a real shadow. Shadows can double the amount of things the game is trying to load, so turning them completely off is a common method to help your performance.
Shadow Map Cascades
The shadow map cascades dropdown menu has three options: medium, high, and very high. A shadow map is essentially a projection of an object seen from the angle the light is coming from – more shadow maps produce a more accurate looking shadow. Very high will use lots of shadow mapping to make a realistically shaped shadow, and medium will just use a few for better performance.
 Grass Render Distance
The grass render distance dropdown menu has four options: medium, high, very high, and ultra. “Grass” is the general term for most of the little 2d objects that litter the ground to make terrain look less flat and lifeless, this could literally be grass or small rocks etc. The higher you set this dropdown, the further away from you the game will load-in more grass. Loading lots of grass far off in the distance can definitely slow down a weaker PC, so keeping this lower can definitely boost performance.
 Shadow Map Resolution
The shadow map resolution slider will directly effect the quality and detail of the shadow maps used to project the shape of a shadow from an object. The slider moves in strange looking increments, being the actual resolution size of the maps used. Keeping this high will increase quality, while lowering it will improve performance.
 Tree Quality
The tree quality slider will change how well the trees in game look. Unlike the shadow map resolution slider, this one is moved in percentage increments, not resolution. It’s not clear what exactly is being improved to make the trees look better, but the foliage does get less and less blurry the higher you set the slider. Lower to increase performance.
 Grass Quality
The grass quality slider will change how well the grass objects in game look. Unlike the shadow map resolution slider, this one is moved in percentage increments, not resolution. It’s not clear what exactly is being improved to make the grass look better, but the foliage does get less and less blurry the higher you set the slider. Lower to increase performance.
Starfighter
The starfighter preferences tab has a few checkboxes in it to customize your Galactic Starfighter (GSF) experience. Note that this is a specific kind of player versus player game mode, and does not effect anything outside of GSF and it’s relevant vendors.
General

Display Starfighter Fleet Requisition Spending Warning
With this checkbox enabled, you will receive a warning dialog box before spending any of your fleet requisition on upgrades or new ships. Useful to make sure you’re buying the right thing, as fleet requisition can be hard to come by for newer pilots.
Display Starfighter Cartel Coin Spending Warning
With this checkbox enabled, you will receive a warning dialog box before spending any cartel coins on new ships, or paint jobs. Cartel Coins are a premium currency, so it’s recommended you leave a way to double check your purchase with this enabled. Refunds are very unlikely.
Toggle numlock on when GSF starts
By default, a keyboards numpad numbers are bound to quick looking with your camera during GSF battles. If numlock is off, these keybinds won’t work. Leaving this enabled will make sure you can quick look in your matches.
Controls

Invert Mouse Vertical
Invert mouse vertical is a checkbox that simply reverses which direction your starfighter will turn when pulling down and pushing up with your mouse. This is also an option for the regular camera controls but this checkbox ONLY effects GSF. Some players of plane/space fighting games are used to an inverted Y axis, so if that’s you, this option should be enabled. It is disabled by default.
Tooltips

Show Detailed Star Fighter Weapon Tooltips
By default, the only stats you will see on your GSF weapon tooltip is the Max range, its damage vs. shields and hulls, the average accuracy, and it’s power draw. Enabling this checkbox will instead display the damage and accuracy at close, mid, and max range (and tells you how far each of those ranges are in meters), the rate of fire, critical chance and damage, it’s bonus piercing percentage, and firing arc.
Social
The social tab of your preferences contains exclusively checkbox settings pertaining to player-to-player interactions that don’t directly involve just chatting – mostly invites of some kind.
General

Display Phase Help Tips
The “Display Phase Help Tips” checkbox, if enabled, simply provides pop-ups that explain certain rules about how phases work as you enter them. For example, if a new trooper walks through the first phased area they will receive a pop-up that says “This is a Trooper phase. Your groupmates can help you if they are not a Trooper, or if they selecct “Allow access to same-class story areas” in the preference window.”
Allow Access to Same Class/Personal Phases
With this checkbox enabled, you will be able to enter the phases of a friend who is doing a personal mission, or a mission for the same class as you, and likewise if a friend enables this they can join you in your personal phases. Mandatory for playing through the story together with a buddy.
Ignore

Auto-Ignore Trade Invites
When a player wishes to trade items or credits with you, a trade window will automatically open on your screen between your two characters, with an accept button on it to finalize a deal. If someone follows you around spamming the trade option it can be very disruptive and get in the way of playing the game, so to avoid people who do this, enabling this checkbox automatically blocks requests from getting to you, and allows you to play in peace. Note that if you really do need to trade with someone, you will either have to disable this or initiate the trade yourself.
Auto-Ignore Group Invites
When a player invites you to a group, an invite window will automatically open on your screen asking if you’d like to join. If someone is spamming the invite option it can be very disruptive and get in the way of playing the game, so to avoid people who do this, enabling this checkbox automatically blocks invites from getting to you, and allows you to play in peace. Note that if you really do need to group up with someone, you will either have to disable this or start the group yourself.
Auto-Ignore Guild Invites
When a player invites you to a guild, a big window will automatically open on your screen asking if you’d like to join. If someone is spamming the invite option it can be very disruptive and get in the way of playing the game, so to avoid people who do this, enabling this checkbox automatically blocks invites from getting to you, and allows you to play in peace. Note that if you really do want to join a guild, you will have to disable this.
Auto-Ignore Duel Requests
When a player wishes to duel you, a window will automatically open on your screen asking if you’d like to fight them. If someone follows you around spamming the duel option it can be very disruptive and get in the way of playing the game, so to avoid people who do this, enabling this checkbox automatically blocks requests from getting to you, and allows you to play in peace. Note that if you really do want to duel someone, you will either have to disable this or initiate the duel request yourself.
Ignore Guild Import Offer
A long long time ago, before SWTOR officially launched, members of the forums could pre-create their own guild on the website. Upon logging in during launch, characters made on the correct server for your accounts guild were offered an immediate guild-invite for their newly imported guild. In order to receive automatic invites again after accidentally selecting “no, do not ask me again”, players could disable this option and get invites on new characters again. This checkbox seems entirely vestigial now.
Automatically Decline Stronghold Key Offers
When a player wishes to give you the keys to their stronghold (allowing you to invite yourself in whenever they are there (bronze) or whenever you want (silver)), a window will automatically open on your screen asking if you’d like to receive the keys. If someone follows you around spamming the keys option it can be very disruptive and get in the way of playing the game, so to avoid people who do this, enabling this checkbox automatically blocks requests from getting to you, and allows you to play in peace. Note that if you really do want someone’s keys, you will have to disable this.
Hide Adding Friends from Mission Rewards
When you complete a mission in a group with others, a small attachment to the bottom of the reward window will appear with the portraits of your teammates on it. By clicking these, you can quickly and easily send a friend request to individual members that you enjoyed playing with. If you’d prefer not to add people this way you can simply remove this part of the reward window by enabling this checkbox.
Group

Allow Suggested Group Invites
When leading a group, this checkbox, when enabled, will allow your other group members to suggest other people for you to invite to the group. This will appear as a dialog box similar to a regular group invite, that simply says “[group member] suggests you invite [person]. Do you accept?” and then accepting will send that person an invite. Useful for if your friends have other friends they can bring to do some content, but can be disabled if you want to build a group entirely yourself.
Allow Group PvP Challenges
PvP Challenges allow two groups to create their own skirmish or record a Guild vs. Guild Challenge. The group leader can choose any available warzone, arena, or Starfighter map for the challenge. With this checkbox enabled, a group you lead will be allowed to accept or decline PvP challenges from the leader of another group. With this disabled, all group challenges will be automatically declined.

Suppress Unsafe Recipient Warning
When sending mail with items or credits in them to another character, this checkbox, when enabled, will issue a warning whenever your recipient is not a friend, guild member, or one of your own legacy characters, and will ask you to confirm if you want to send the message anyway. This is extremely useful to make sure you are sending valuables to the right place, but can be disabled if you regularly send mail to non-friends.
Suppress Guild Mail Warning
When sending mail with items or credits in them to another character, this checkbox, when enabled, will issue a warning whenever your recipient is a guild member but not a friend or your own legacy character and ask you to confirm if the guildmate in question is the correct person to send it to. This can be useful because the recipient part of the mail will try to autofill with friend and guildmate names as you type, and may autofill the wrong person. It can be disabled if you mail to guildmates often and find the warning annoying.
Nameplates
The Nameplates section of your preferences is filled with checkboxes that enable different identifying text to display over the heads of many different players and NPCs in-game. Having none of these enabled may look nice but ultimately make the game a little hard to play with so little information of who is who, where enabling all may be a cluttered overload in some cases, so mix and match these checkboxes so you always see what is relevant to you.

Nameplate on Self
The nameplate on self is your own characters nameplate. This will show your own name and any other enabled information above your head, which may not be necessary unless you like to look at your own titles.
Nameplate on My Companion
The nameplate on your companion will display the name of the current summoned companion you have out. This can be useful if you have certain ones you prefer for healing or tanking or damage dealing and know them best by name.
Nameplate on Friendly NPCs
The nameplate on friendly NPCs will display a green nameplate for NPCs that are not enemies to you. This can be very useful in towns to differentiate a player (blue name) from an NPC (green name) very quickly.
Nameplate on Enemy NPCs
Nameplate on Enemy NPCs will display a red nameplate for NPCs that are hostile to you. This is super useful as some enemies don’t really stand out amongst their surroundings so they can be accidentally ran into when you don’t want to fight. With their big red names displayed, you can keep an eye out for them easier.
Nameplate on Friendly Players
Nameplate on friendly players will enable names above the heads of all players on your faction in the open world or any player on your team in a warzone. This name is blue, and stands out from the green of a friendly NPC or the red of an enemy.
Nameplate on Friendly Player’s Companions
A nameplate on a friendly player’s companion will be the same blue as the player themselves but shouldn’t be too confusing as companions nameplates will also say “[so and so]’s companion”. Useful for if you see some unique looking companions and want to know more via the name.
Nameplate on Enemy Players
The Nameplate on Enemy Players is red just like a hostile NPC, and is very useful way to know if you are either in a PvP instance of a planet, or where the enemy team is during a warzone. A nameplate comes with a health bar – so in warzones you may want to switch to an Enemy Player with a lower bar of HP.
Nameplate on Enemy Player’s Companions
The Nameplate on Enemy Players is red as well, and will say [so and so]’s companion to let you know they are not also a player. Useful in open world PvP to find a possible NPC healer keeping your opponent alive.
Scale Nameplates with Distance
With the Scale Nameplates with Distance checkbox enabled, all nameplates will stay roughly the same size constantly as if it is a physical object like the character. So as a character starts next to you, their name will be big, and as they run down a road, you’ll see the nameplate get smaller and smaller with distance, just like the character itself is. With this disabled, all nameplates will be a single big size no matter how far away they are, which can clutter the screen but also be easier to read names with.
Always Show Health Bar
The “Always Show Health Bar” option will simply keep the health bar directly underneath a name on a nameplate around no matter what. Disabling this option will make it so that just the names float by themselves with nothing below, unless that person is injured and missing health, at which point the health bar re-appears to reflect the damage. Fully healed characters will go back to a bar-less nameplate.
Always Show Resolve Bar
The Resolve bar is a bar that reflects how much resolve a character has, and resolve is a resource that is only generated once the character has been struck by a crowd-control effect like a stun. When a resolve bar on a character fills up completely they will be completely immune to stuns until the bar resets again. “Always show resolve bar” will always show this white bar underneath a targets health even if no resolve is currently in it.
Always Show Class Symbol
A class symbol is a small colorful icon that displays above a players name to show what advanced class they are, for example the Jedi knight’s lightsaber icon or a Vanguard Troopers green split arrow pointing upward. By default these are always showing on every player, but if knowing what everyone’s class is isn’t important information to you, or you are content to simply mouse over them and read their tooltip, this can be safely disabled and you will only see the class symbol on the scoreboard UI of a warzone.
Show Guild Names
Showing Guild Names, when enabled, will simply add the name of a player’s joined guild underneath their character name but above their health bar (if applicable). The guild name is in smaller text and surrounded <Like This>.
Show Guild Heraldry
Every guild has the option of choosing a special design to represent their guild visually. This is a guild heraldry, and like the guild name, can be enabled onto player’s nameplates so you can tell by the symbol which guild a player is in. It will appear as a small circular picture to the left of the nameplate. If so many small pictures floating around seems cluttered, “Show Guild Heraldry” can be safely disabled.

Thank you so much to player Zahk who went through over 200 settings to discover exactly what they did, catalog them, and writing down how you might find them useful! This was a project I had started as part of a wish for more accessibility related guides, but was unable to finish, and I was so happy Zahk was able to pick it up go through each setting so thoroughly.
 Questions or comments? Feel free to send me a message on Twitter

 Discord
  Email swtorista@gmail.com
 Bluesky @swtorista.com
 Reddit /u/swtorista
 Twitch Swtorista
 Youtube
 Patreon
 Twitter @swtorista