


 How to Craft
 Choose a Crew Skill
 Armormech
 Armstech
 Artifice
 Biochem
 Cybertech
 Synthweaving

 Gathering Guide
 Rare Materials Guide
 White Materials Guide
 Jawa Junk
 Augments
 Medpacs, Stims and Adrenals
 Synthweaving Crafting Tree


 Crafted Decorations
 Crafted Mounts
 Crafted Dyes
 Crafted Crystals
 Events Calendar
 Galactic Seasons
 PvP Seasons
 Bounty Event
 Double XP Event
 Feast of Prosperity
 Gree Event
 Life Day
 Nightlife Event
 Pirate Incursion Event
 Rakghoul Event
 Spring Abundance Festival
 Swoop Event

 Jedi Knight
 Jedi Consular
 Trooper
 Smuggler
 Sith Warrior
 Sith Inquisitor
 Bounty Hunter
 Imperial Agent
 Bounty Hunter
 Imperial Agent
 Jedi Consular
 Jedi Knight
 Sith Inquisitor
 Sith Warrior
 Smuggler
 Trooper
 Legacy Gear
 Lightsabers
 Double-Bladed Lightsabers
 Vibroswords
 Double-Bladed Vibroswords
 Blaster Pistols
 Blaster Rifles
 Sniper Rifles
 Blaster Cannons
Have you finally obtained your full set of 306 gear in Star Wars: The Old Republic? It’s time to start digging in to the harder part of upgrading your gear in Star Wars: The Old Republic – min-maxing! In this video we’ll go over how to optimize the stats of your gear, including how to find out what stats you should be aiming for at level 75, and how to get your character on the path to getting those stats.
UPDATE: This is a very old guide! See this guide for level 80:
THIS IS NOT COMPLETE! IT IS A DRAFT!
Contents
What are stats?
Stats are the numbers attached to your equipment and each stat affects what you can do in combat in a different way.
- Endurance – Raises your health.
- Power – Raises your damage.
- Crit – Raises your chance of getting a “critical hit”.
- Mastery – Raises both your damage and crit.
- Accuracy – Raises your chance to hit your target and not “miss”.
- Alacrity – Speeds up your abilities, so you can cast more of them in a shorter period of time.
- Defense – Reduces incoming damage.
- Shield – Raises your chance of being able to absorb incoming damage with your shield.
- Absorb – Raises how much damage can be absorbed through shield.
If you’re a newer player, you may see those stats and think you need a bunch of everything, for example many players think getting some Defense for their Gunslinger is going to keep them alive longer. This is a common misconception, and instead you will be focusing on the stats most important to your role in combat. You can see your role by pressing “k” on your your keyboard, “k” for kombat.
- Damage-dealers, or DPS, do not need ANY Defense, Shield, or Absorb. Instead, they will rely on their healer and tank to keep them alive, and put all their focus in to doing the most damage they can. They also want to shoot for a specific amount of accuracy, so they’ll rarely miss their target. If they have to pick between more Endurance or more Power, they should always pick Power so they can hit even harder.
- Healers do not need ANY accuracy, as their heals never miss! Healers also don’t need any Defense, Shield, or Absorb stats, as they’ll be able to heal themselves and rely on their tank to take the big damage hits. If healers have to pick between more Endurance or more Power, healers should also always pick power to heal even more.
- Tanks are… strange right now. In the past, they focused mainly on the defensive stats including Endurance, Defense, Shield and Absorb. However, due to the current way the game is set up, tanks can often benefit more from grabbing some of the same stats as DPS. Tanks never need to get more Accuracy though – they naturally get enough simply through their class abilities.
Now that you have a basic idea of what each stats are for, and which ones you need, let’s talk about how these stats show up in gear.
Gear
Once you’ve reached item-rating 306, you’ll want to start working on making sure all of your armor, your weapon, and your off-hand are moddable. This means instead of having static built-in stats, you can customize their stats using modifications. Your other pieces, including your earpiece, implants, and relics, can never be moddable.

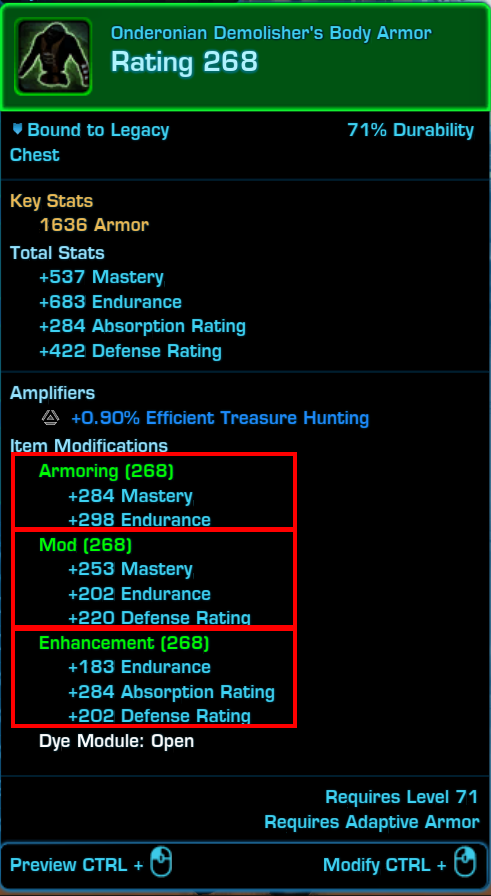
The stats of moddable pieces of gear are made up by the modification items in the gear. Modifications are individual parts that make up each piece of armor – most pieces of armor have an Armoring, a Mod, and an Enhancement, except for belts and bracers which only have and Armoring and Mod (no Enhancement). You can mix and match these modifications to create an ideal mix of stats.
Pieces of armor that can be filled up with modifications


Modifications


For a normal piece of modifiable gear, you’ll be able to choose one Armoring, one Mod, and one Enhancement. When it comes to stats, it’s important to know that each type of modification follows a pattern.
Armoring – Primary Stats
All armorings have Endurance and Mastery attached to them.
Red armorings have more Mastery, and healers and DPS should always choose red armorings
Blue armorings have more Endurance, and are meant for tanks only


 Hilts and barrels work exactly the same as armorings.
Mods – Secondary Stats
All mods have Endurance and Mastery attached to them, as well as a secondary stat.
Red mods also have Power attached to them, and healers and DPS should always choose red mods.
Blue mods have Defense attached to them instead of Power, and are meant for tanks only
Enhancement – Tertiary Stats
While choosing the type of armoring and mod for your piece of gear is usually pretty easy, choosing your enhancements is where your real optimization begins. Depending on your class and role, you’ll be looking for a certain mix of tertiary stats.
Yellow Enhancements have Accuracy (ehich is useless for healers and tanks, but important for DPS to get but only up to a certain point to get 110% accuracy / 1,590 accuracy points)
Green Enhancements have Alacrity (Alacrity is useless for tanks, but great for healers and DPS, the goal is to meet certain useful thresholds of alacrity to speed your abilities up)
Red Enhancements have Crit (which is kinda useful for everyone, but not meant for tanks)
Dark blue Enhancements have Absorb (which is for tanks only! healers and DPS do not use these!)
Light blue aqua Enhancements have Shield (which is also for tanks only! healers and DPS do not use these!)
What’s interesting is that your implants and earpiece will follow the exact same color and stat pattern – when mixing and matching pieces for your tertiary stats including your accuracy, alacrity and crit, you’ll be looking at your enhancements and your earpieces and your two implants as all part of the same pool of stats to work with.
Earpieces


Implants


Augments wind up being very similar as well, and allow you to add tertiary stats or secondary stats to your gear, but in smaller amounts than normal pieces of gear do. They don’t follow the color scheme though, and instead are simply blue for tanking augments or red for non-tanking augments.


Relics
Relics are a bit strange. There’s 11 different kinds total, with five blue ones being only for tanks and two green ones being healer-only focused. For the most part, they all have the same stats, so you mostly just need to look in to what special boosts they provide.
The ones shapes like a spikey ball provide you a passive boost, you just need to equip them and their special ability will occur naturally.


The relics shaped kind of like two cones with a doughnut in the middle are on-use relics, which means you need to click them during combat to get their special ability to activate.


Set Bonus
[[SET BONUS]]Tactical
[[tacticla]]What is syncing down or stat caps?
Where things start getting especially complicated when it comes to deciding your stats is the fact that the current max-level in the game is level 75, but much of the content in the game was designed and balanced for lower levels. To help balance gameplay, your character will have their stats and level temporarily shifted down when fighting enemies that are designed for lower level characters. You’ll easily see this effect if you travel to any low level planet – a little down arrow will appear near your level, and your new temporary level will appear beside your normal level. This temporary shift will also reduce your Mastery, Endurance and Power stats, and you can see their new temporary amount in your character sheet, in yellow glowing text. If you roll over the yellow text, you can see what your stats will be like in level 75 content, where they’ll be at maximum capacity without any limits.
While this effect is most visible on low level planets, it’s also very important to know about if you are gearing up for endgame content. Most of the end-game content in the game, including all but the most recent Operation called Dxun and the two most recent Flashpoints on Corellia and Dantooine, are balanced for the previous expansion at level 70. To make it so players wearing the newer gear don’t accidentally overpower the older content with their level 75 gear, your character will be synced down to level 70 stats when it comes to Mastery, Endurance, and Power. If you are currently level 75 and you walk into level 70 content, which would be almost any Flashpoint or Operation, your Power stat will be cut off at 3,661 Power, and any points you have in Power in your gear over that cap just go into the garbage, and are wasted. This is pretty significant because if you decided to dump a lot of points into Power for your level 75 gear, you could have over 7,000 points in Power, many of which might be completely wasted in most content.
It gets even more interesting – to allow players to jump into high-level content without having to worry about gear, your stats can also be boosted UP to reach the cap. So for most level 70 content, it doesn’t even matter if you choose a red or blue armoring, as your endurance or power will be bolstered up to the cap if you are short, or shifted down if you have more than the cap. [[check veteran ops and master ops]] [[When it comes to gearing, Theorycrafters have taken these wasted stats in mind, so when you see recommended stats for your class, the writer has shuffled around those ‘wasted stats’ so they go in to something more useful, especially Power for DPS and Healers, and Endurance for Tanks. It also means that if you are looking to gear up specifically for the Nature of Progress Dxun operation, you’ll be able to put points into Power that you wouldn’t be able to normally.]]
Which stats do I need?
What exact mix of stats you need is first determined by your class, then discipline, as well as your role. We’ve gone over some generalizations for tanks, healers, and dps, and we now know what all the different stats are for, but how can you know which combination of them is best for your character? The answer to this question is called Theorycrafting – the act of figuring out the formulas that determine what happens in battle when you change certain stats, and combining that knowledge with the limits the game imposes on stats in the game, to figure out what combination of which stats will get you the most bang for your buck without wasting any. Luckily you won’t have to theorycraft to gear up, as many dedicated veteran players have already done the math and figured out what stat goals and percentages you should be shooting for to be able to get the most out of your class.
DPS
- Red armorings for Mastery [[at what point is mastery wasted and should get endurance? if at all?]]
- Red mods for Power [[want the ones with more power?]]
- Reach 110% accuracy / 1,590 accuracy points or slightly above, any extra is wasted
- Reach the alacrity value recommended for you class, that will help you sync your abilities up better – if you have extra, it’s not necessarily wasted, but it would serve you better in your crit stat
- And anything left over in to crit as it is not capped!
- NO ABSORB
- NO SHIELD
Healer
- Red armorings for Mastery
- Red mods for Power [[want the ones with more power?]]
- Reach the alacrity value recommended for you class, that will help you sync your heals up better – if you have extra, it’s not necessarily wasted, but it would serve you better in your crit stat
- And anything left over in to crit as it is not capped!
- NO ACCURACY (heals never miss)
- NO ABSORB
- NO SHIELD
Tank
- Blue armorings for more Endurance and health
- Blue mods for Defense, ideally ones with low Defense and higher Endurance
- And the rest in a mix of Absorb and Shield stats
- NO ACCURACY (already have 110% as a tank)
- NO ALACRITY (don’t need to hit things quickly)
- NO CRIT (don’t need to hit things hard)
Stats
So now that we’ve looked in to the basic ideas of what types of stats and modifications you need, let’s start talking specifics.
Accuracy
Accuracy is probably the easiest stat to understand. If you don’t have any accuracy, when you hit enemies, you’re a lot more likely to miss. The perfect amount to have is 110%, so that you won’t miss even against really strong enemies. Any additional points in to accuracy just kinda get wasted – you can only hit or miss, there’s no in-between. You can still miss with your offhand however, as your left hand is a lot less accurate – for example, if you have a second blaster pistol or lightsaber, you’ll still occasionally see your attacks ‘miss’, but you don’t need to worry about it.
An important thing to know is that Accuracy is a bit different in PvP content than say solo content, Flashpoints, or Operations. Some players advocate zero accuracy, some advocate a few percentage points in it, and some recommend the full 110% even in PvP. In short, you’re searching for your preferred balancing between occasionally missing attacks from lower accuracy and when you don’t miss, critically hitting from higher crit. Adding in that some classes have accuracy debuffs, and that different classes have different types of attacks, an exact answer gets complicated. If you’re looking to gear for PvP, keep watching this video so you can understand all your available gearing options, then go see if you can find a PvP-focused guide for your class and skip to the gearing section.
Alacrity
For both DPS and Healers, Alacrity is the stat you will need to “find out” what number you should be shooting for. Alacrity is a very interesting stat – the biggest thing it affects is what is called the Global Cool Down. When you click an ability, you’ll notice you won’t be able to click most of your other abilities for about a second afterwards, and you can see the timer for the counting down visually as your abilities fade in. This default wait-time between abilities is 1.5 seconds, and with alacrity, you can lower it to 1.4 or 1.3 seconds, which means you’ll be able to squeeze in more abilities, and more damage in to a shorter amount of time. On top of that, it also means you might be able to use your buffs more effectively, as buffs only last a certain amount of time, and so you can only use a certain number of abilities in the timespan that they’re active. Because SWTOR rounds the timer for your Global Cooldown, for example you’ll have 1.5 seconds, 1.4 seconds, or 1.3 seconds, but you’ll never get 1.4522145 seconds, it makes sense to only bring your Alacrity up just enough to meet one of those rounded global cool down thresholds, usually called ‘break points’, as any additional Alacrity points are wasted unless you go all the way to the next threshold. Alacrity also affects how much time your casted abilities take to cast – for example, when casting Force Lightning, you’ll be able to complete it much faster and move on to your next ability if you’ve put alacrity in to your gear – so although additional Alacrity points may be wasted for your Global Cooldown, if you’re still working on min-maxing your gear, if you’re playing a class with casted abilities, you still get a nice perk from Alacrity.
To find out what numbers you should shoot for when it comes to Alacrity, check a guide specifically for your class at level 75. I’ve linked my favorite set of guides by Merlyn below, skip to the Gearing section and look for the alacrity bullet point.
[[ask merlyn about guidl alascrity]] [[ask merlin about alacrity guild buff numbers“The Zeal set bonus increases alacrity by 5% and on each time damage is taken, has a 1% chance to grant +25% alacrity for 30 seconds. This bonus can only occur once every 30 minutes. In addition, it grants your companion +25% alacrity for 15 seconds whenever you use an adrenal. This effect is not applied in PvP or Master Mode Operations. The Zeal set bonus means players in a guild with the Zeal set bonus will have a permanent +5% alacrity. This dramatically reduces the number of alacrity gear points to reach the level of alacrity for a GCD breakpoint. Why does the Guild Perk not always apply? As noted above, the Zeal set bonus does not apply in PvP or Master Mode Operations. It also is temporarily removed when a player uses a modification device on a parsing dummy, and restored when they change instances.”
so it doesn’t matter if you are doing master modes? but does matter for normal content?
Crit
If you’re a DPS player and have taken care of your Accuracy and your Alacrity, you can put the rest of your stats in to Crit. Unlike Alacrity and Accuracy, you can get near infinite improvements the more Crit you have, and even a few points in Crit difference can have an actual effect.
Class Stat Guides by Merlyn
Merlyn’s Class Guides
Optimizing the Stats in Your Gear
So now that you know the overall stats you are shooting for, how does this translate in to your gear?
Instead of equipping a certain number of this modification, and a certain numbers of those augments, you’ll be looking at all your pieces of gear as a whole, to mix-and-match whatever you’ve got on hand to try and reach your main goals.
If you haven’t already, make sure to get a full set of modifiable gear to fill up, including your chest, hands, legs, boots, bracers, headpiece, belt, mainhand and offhand. Don’t forget you can CTRL+RIGHT CLICK your armor to modify it and drag modifications in and out.
What gear is there in a full set of moddifiable level 75 gear?
- 9 Primary Stat Pieces: 7 Armor Armorings / Hilts / Barrels / Offhand Armorings / Two Relics
- 9 Secondary Stat Pieces: Mods
- 10 Tertiary Stat Pieces: Seven Enhancements, Two Implants, One Earpiece
- and 14 optional Augments, which cover all three types of stats
DPS Gearing Up Basics
If you’re a DPS player, you can start off easy, by making sure all your primary stat pieces are red – make sure you don’t have any blue armorings, hilts, barrels or relics, and replace them if you do find any.
The next step is to do the same thing with your mods – you don’t need any blue mods!
The last basic step of gearing is to look at your Enhancements, Implants, and Earpiece. Once again, you won’t want any blue or purple-blue ones, as those are for tanks, but these are the pieces where you want to try and distribute your stats between Accuracy, Alacrity, and Crit.
Start by checking your Accuracy – what percentage is it at? If it’s below 110% or 1,590 accuracy points, try replacing a red Crit enhancement, earpiece or implant with a yellow accuracy one, and see what percentage you’re at, and keep doing that until you’re as close to 110% as you can get. If you happen to have any blue or purple-blue enhancements for tanks make sure to replace and get rid of those first before the red crit ones.
Next step is to check your Alacrity. Take a look at a guide for what break point in Alacrity you should shoot for, and if you are short, replace red crit enhancements, implants or earpiece with green Alacrity ones until you are just above your needed alacrity threshold. Same thing, if you still had any blue or blue-purple enhancements, replace those first.
Lastly, the rest of your enhancements, earpiece and implants should be red crit ones. Double-check your accuracy is as close to 1,590 accuracy points as you can get it, and your alacrity is not wasted – if you have say 3,000 alacrity you prooobbabbblyy need to replace some of those with crit enhancements.
Once your Accuracy is at 110% or above, and your Alacrity threshold has been met, congratulations! You now have a DPS character that can do some serious damage without having to go crazy when it comes to gearing. You’re more than ready for almost anything except Master Mode Operations. If your stats were way off before, you may even see an immediately difference the next time you go in to a longer fight.
Healer Gearing Up Basics
If you’re a Healer player, you can start off easy, by making sure all your primary stat pieces are red – make sure you don’t have any blue armorings, hilts, barrels or relics, and replace them if you do find any.
The next step is to do the same thing with your mods – you don’t need any blue mods!
The last basic step of gearing is to look at your Enhancements, Implants, and Earpiece. You won’t want any blue or purple-blue ones, as those are for tanks, and you also won’t need any yellow Accuracy ones, as your heals will never miss.
Next step is to check your Alacrity. Take a look at a guide for what break point in Alacrity you should shoot for, and if you are short, replace red crit enhancements, implants or earpiece with green Alacrity ones until you are just above your needed alacrity threshold. If you have any yellow accuracy or blue and blue-purple tank enhancements, make sure to replace those first before your crit enhancements.
Once your Alacrity threshold has been met and the rest of your enhancements are crit, congratulations! You now have a healer character that can heal real fast.
Tank Gearing Up Basics
xxxx
Augments
Augments are an additional item you can add to your gear for some extra stats, are a fantastic way to perfect your stats. For example, when you’re trying to get to your Alacrity threshold as a DPS, you may have noticed that to get past the threshold at all by equipping another enhancement, you wind up shooting a couple hundred points past it, wasting those additional points. Augments, unlike enhancements, can give you a smaller boost, so you can use them to fine-tune your accuracy percentage and your alacrity threshold and waste less stats. For example, if you noticed you were 100 points behind what you needed to reach your Alacrity threshold, you’d normally need to equip an Alacrity enhancement, which would give you somewhere between three and four hundred Alacrity, most of which would get wasted. With augments, you could equip just one alacrity augment, and then place a crit enhancement that you can take full advantage of in that spot you would have had to waste on the alacrity enhancement. Augmenting goals as a DPS follows the same rules – 110% accuracy or 1,590 accuracy points, meet your alacrity threshold, then the rest in crit.
Unlike normal gearing, Augments can’t directly be earned – instead you must buy them from the GTN or craft them yourself, though the materials can be earned through different types of content. Augments range from extremely expensive for the ones with the most additional stats, to pretty cheap for a nice boost.
- Critical Augment (Crit)
- Alacrity Augment (Alacrity)
- Versatile Augment (Master)
- Accuracy Augment (Accuracy)
- Absorb augment (Absorb)
- Shield Augment (Shield)
- Redoubt Augment (Defense)


To see what you might be able to afford, a quick trick is to search on the GTN with these filters: Item Modification -> Augment, then sort highest price to lowest price. You’ll notice that the best augments, the gold and purple-bordered augments for level 75, are ridiculously expensive.


While players who are truly trying to the best gear possible in the game will look for those gold augments, you can give your equipment a pretty nice upgrade by purchasing and equipping the level 73 blue-bordered augments that go for a fraction of the price, as they do not require the same rare materials as the level 75 ones, but still give your stats a boost.
[[augments page for comparison]]Important note, don’t waste money augmenting your gear until you have your set bonus.
Min-Maxing
Min-maxing is the act of not only meeting those basic thresholds of steps, but chasing after the absolute best pieces of get in terms of stat distribution, to fine-tune your stats in a way that will give them the absolutely best potential results in combat.
There are many different variations of the modifications in the game.
Armorings – DPS & Healers
For example, the most basic 306 damage armoring is called the Superior Versatile Armoring 80, and has Power and Endurance stats like all armorings.
At the very beginning of this video, we talked about how DPS players should focus on doing the most damage possible, and should not worry about defensive stats. They also shouldn’t be worrying about their endurance, as it doesn’t contribute to their damage at all. While all armorings, even the red lethal armorings, have some endurance, some versions of the red armoring have a focus on distributing more points in to endurance than others. There’s actually 21 different variations of red armorings, and if you are seeking out the better optimized ones that have more points in power, you can get up to a +20 boost in your power stat when it comes to switching out your low-power red armoring with a high-powered red armoring.
Mods – DPS & Healers
Mods build on this concept of minor min-maxing for stats, but get even more complicated.
The most basic 306 damage mod is called the Superior Lethal Mod 80. It has Endurance, Power, and Mastery stats.
But did you know there is a total of 63 different variations of this red mod? Each one has a slightly different distribution of Endurance, Power, and Mastery. Each different combination has a slightly different name – for example, you may have seen the Superior Lethal Mod 80A and Superior Lethal Mod 80B. There’s also a ton of other ones that are less common, that you might find by random chance in the different types of level 75 gear boxes in the game.
Red lethal mods with “B” in their name trend towards having too much Endurance compared to their other stats, so once you’ve got more mods, you’ll want to replace your “B” mods with [[xxx]].
[[what exactly are unlettered lethal mods? is that the R ones and original flavor one?]] [[R Power vs AR Mastery? which is better?]] RRRRRRRRRRRRRRRRRRRRR [[talk about how even with R and AR there are better stat distributinons, idk which are good]]| Lethal Superior Mod 80R-2 | 313 | 359 | 369 | 728 |
| Lethal Superior Mod 80R-3 | 313 | 357 | 371 | 728 |
| Lethal Superior Mod 80R-4 | 313 | 354 | 373 | 727 |
| Lethal Superior Mod 80R-5 | 313 | 352 | 376 | 728 |
Enhancements – DPS & Healers
Min-maxing your enhancements gets even more complicated, because you need to keep in mind your other stat needs too, including your 110% accuracy as a DPS, or your alacrity thresholds as a DPS or Healer.
There’s 63 different 306 accuracy enhancements, 63 accuracy enhancements, and 63 crit enhancements to choose from.
For example, the red enhancement, for crit, has three different types: The Superior Efficient Enhancement, which puts most of its points in endurance and crit, the Discipline Superior Enhancements, which lean towards endurance our DPS doesn’t need, and the Adept Superior Enhancement, which puts of its points in power and crit making it the most useful for our DPS and Healer characters. There are also 21 different types of Adept Superior Enhancements, that have different distributions of Power and Crit,
Alacrity enhancements are very similar, and the best Alacrity enhancements are the Superior Nimble Enhancements, which do not put any focus on Endurance. While you won’t change your global cooldown with a few extra points of alacrity, you do reduce your cast time which is great for classes with casted abilities.
Accuracy enhancements are pretty much the same deal with Initiative Superior Enhancements being the ones with less of a focus on Endurance, however, anything over 110% accuracy is wasted, so you’d be min-maxing to get as close to 110% accuracy as possible and leveraging those minor stat differences so you can maybe pop a few more points in to other stats rather than trying to get your accuracy as high as possible.
Very Best DPS / Healer Armorings / Mods / Enhancements
Beyond even just getting the best type of modification, you can go even further and try searching for the very best specific model in the game. This is something only players intensely interested in gearing their character do, as getting the true ‘best modifications in the game’ is quite a task, and involves a lot of randomization. Players searching for these will meticulously check the name of each modification they get, and disintegrate anything that doesn’t fit the exact requirements. These players will also often spend Tech Fragments to get randomized modifications in the hopes of getting the perfect ones.
Armoring
Superior Versatile Armoring 80 / 409 / 471 / (880 pool)
vs
Versatile Superior Armoring 80R-10 / 429 / 453 / (882 pool)
Versatile Superior Armoring 80R-11 / 431 / 451 / (882 pool)
Versatile Superior Armoring 80R-12 / 429 / 453 / (882 pool)
Versatile Superior Armoring 80R-13 / 427 / 455 / (882 pool)
If you’re wondering if that 20 points difference matters much, the answers is no, and here’s why: the mathematic formula for how much damage (known as bonus damage) your power stat translates to is “Power x Times 0.23”. That means you need five points of power to create one more point of damage – so getting the best damage armoring would only give you 4 more points of damage compared to the least-optimized damage armoring.
TANKS – with the endurance cap, should you equip all blue mods or equip some red ones? same question for B letter mods
Mod
Lethal Superior Mod 80R-2: Power 359, Mastery 369
Lethal Superior Mod 80R-3: Power 357, Mastery 371
Lethal Superior Mod 80R-4: Power 354, Mastery 373
TANKS :
Superior Warding Mod 80A is the most garbage piece of garbage
Superior Warding Mod 80 [[this one has way less endurance, does it matter for 70?]] for level 70 content
B mods good for level 75 content
Enhancement
Adept Superior Enhancement 80R-18: Power 357, Crit 394 (751 pool)
Adept Superior Enhancement 80R-19: Power 359, Crit 392 (751 pool)
vs
Superior Adept Enhancement 80: Power 313, Crit 431 (Pool 744)
Adept Superior Enhancement 80R-1: Power 313, Crit 431 (Pool 744)
(((for 70, tertiary stat so crit, for 75 stat pool)))
TANKS:
Balancing Shield & Absorb [[depends on which tank a bit]]
[[so you want more defense and tertiary in level 70 content?]] Immunity Superior Enhancements (Shield) + Superior Sturdiness Enhancement (Absorb)
[[garbage for level 70 Superior Steadfast Enhancement (Shield) + Superior Vigilant Enhancement (Absorb)]]
 Questions or comments? Feel free to send me a message on Twitter


 Discord
  Email swtorista@gmail.com
 Bluesky @swtorista.com
 Reddit /u/swtorista
 Twitch Swtorista
 Youtube
 Patreon
 Twitter @swtorista