


 How to Craft
 Choose a Crew Skill
 Armormech
 Armstech
 Artifice
 Biochem
 Cybertech
 Synthweaving

 Gathering Guide
 Rare Materials Guide
 White Materials Guide
 Jawa Junk
 Augments
 Medpacs, Stims and Adrenals
 Synthweaving Crafting Tree


 Crafted Decorations
 Crafted Mounts
 Crafted Dyes
 Crafted Crystals
 Events Calendar
 Galactic Seasons
 PvP Seasons
 Bounty Event
 Double XP Event
 Feast of Prosperity
 Gree Event
 Life Day
 Nightlife Event
 Pirate Incursion Event
 Rakghoul Event
 Spring Abundance Festival
 Swoop Event

 Jedi Knight
 Jedi Consular
 Trooper
 Smuggler
 Sith Warrior
 Sith Inquisitor
 Bounty Hunter
 Imperial Agent
 Bounty Hunter
 Imperial Agent
 Jedi Consular
 Jedi Knight
 Sith Inquisitor
 Sith Warrior
 Smuggler
 Trooper
 Legacy Gear
 Lightsabers
 Double-Bladed Lightsabers
 Vibroswords
 Double-Bladed Vibroswords
 Blaster Pistols
 Blaster Rifles
 Sniper Rifles
 Blaster Cannons

Although Star Wars: The Old Republic does not support controllers by default, many clever players have figured out that there are ways to set up the game to be playable on a controller. In this video, we’ll be going over how to map your controls for The Old Republic to a Playstation 4 controller, if you are not playing on Steam, and are instead using the original method to play the game by downloading it on SWTOR.com.
Let’s start with talking about how many abilities and keybinds you have in Star Wars: The Old Republic. If you take a look at your abilities bar on a level 75 character, it’s pretty clear that combat was designed for a keyboard rather than a controller, which is why a controller is not usually recommended for this game. However, playing with a controller is a great way to work around different disabilities that make using a keyboard difficult or even impossible, and on top of that, some players will simply enjoy playing games with a controller more, especially if they are transitioning over from a Playstation or other console to more traditional computer gaming.
One misconception players have is that due to the number of abilities in the game, it’s impossible to play Star Wars: The Old Republic on a controller, and this is far from true. Player Nicolai contacted me and helped write this indepth guide about setting up your controller, and with this guide, you’ll be able to set up over 55 different keybinds, which should cover every single one of your abilities and anything else you want to keybind in the game. Now let’s jump into the guide!
Contents
1. Open Steam in Big Picture
When you have Steam open, on your computer, open it up in Big Picture mode by clicking the small symbol of a box with two expanding arrows arrows, located on the top right.

2. Enable Controller
Sometimes Steam has controllers turned off by default, so we need to make sure Playstation controllers are turned on.

- In Steam Big Picture, click the Gear Icon for settings on the top right.
- Choose Controller Settings from the menu.
- Make sure “Playstation Configuration Support” is checked.
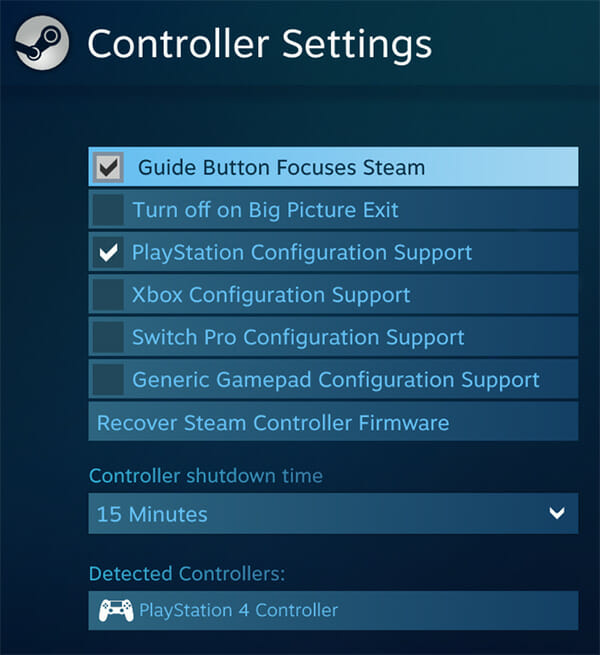
If you don’t have this checked, you will get an error message that says “Configuration Support Disabled” later on.
If you are a weirdo playing on a Mac, you may need to choose “Xbox Configuration Support” instead I have heard.
3. Connect Your Controller
Plug your Xbox controller into your computer.
Bluetooth – Bluetooth Guide.
Using a micro usb cord – it has a USB plug in on one end and a tiny micro plug on the other, it will rumble once plugged in.
[[Need to update these instructions for PS4 not XBOX]]To add your PS4 Controller to your computer wirelessly with Bluetooth, you will need to follow these steps:

- Plug in the bluetooth dongle into your computer
- Turn on your computer
- Turn on the controller
- There should be a pop up called “Add a Device” that shows up on the bottom right of your computer
- Click it and a new pop up should show up that asks if you want to “Pair Device”, say yes
- You kind of need to be quick about it as the controller will turn off quickly if it’s not paired to save battery. If the PS4’s controller light is not on just turn the controller back on and start over.
If that didn’t pop up…
- In your computer, left-click the tiny taskbar arrow near your clock on the bottom right of your screen
- Left-click the Bluetooth Devices icon which is a little blue oval with a white squiggle in it and choose Show Bluetooth Devices
- If your PS4 controller is not on there, choose “Add Bluetooth or other devices” at the top
- From the next window choose “Bluetooth”
- If your PS4 controller shows up, choose it and you’re good to go. If it doesn’t show up, it’s not being detected and you’ll need to troubleshoot.
- If you take too long, and your PS4’s controller’s light is not on, you’ll need to turn it back on.
4. Register Controller
This is not a necessary step but may save you some frustration down the road when it comes to saving your configurations.
In the same Controller Settings section, look for your controller in the “Detected Controllers” section at the bottom, select it, then click “Register” on the right.
Don’t worry, this isn’t like registering a product, this is just attaching your steam controller to your settings so they’re properly saved to your controller.
5. Set Up Your Controller
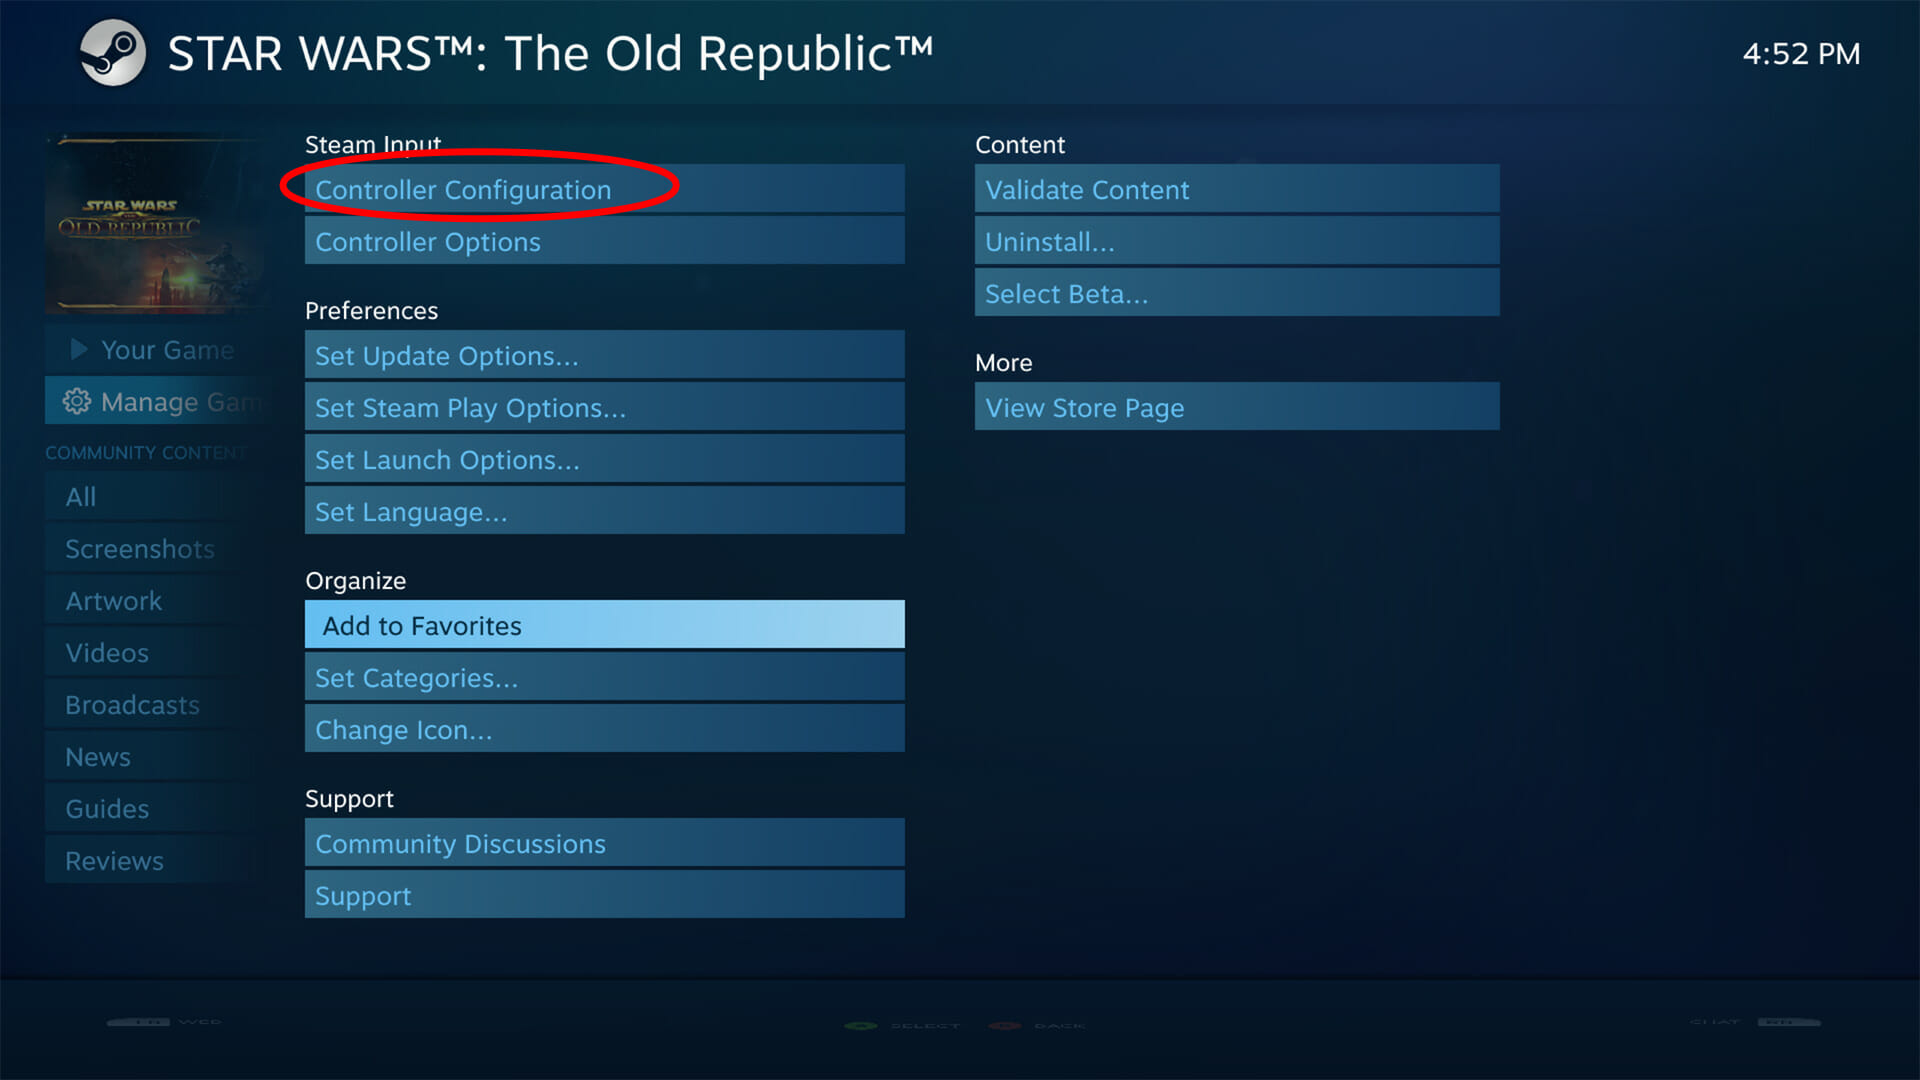
In Steam Big Picture, click Library, then find Star Wars: The Old Republic.
Once there, choose Manage Game on the left, then choose Controller Configuration from the menu.
6. Create a Configuration for your Playstation Controller
Once your controller is plugged in, you can create a layout for your controller. Steam will start you off with a default configuration.
On this menu, you can select a section, then select a button, and assign it a key on your keyboard to map it too.
This is the layout recommended to me by player Nicolai that seems to work really well.
LINL: steam://controllerconfig/1286830/2560003873
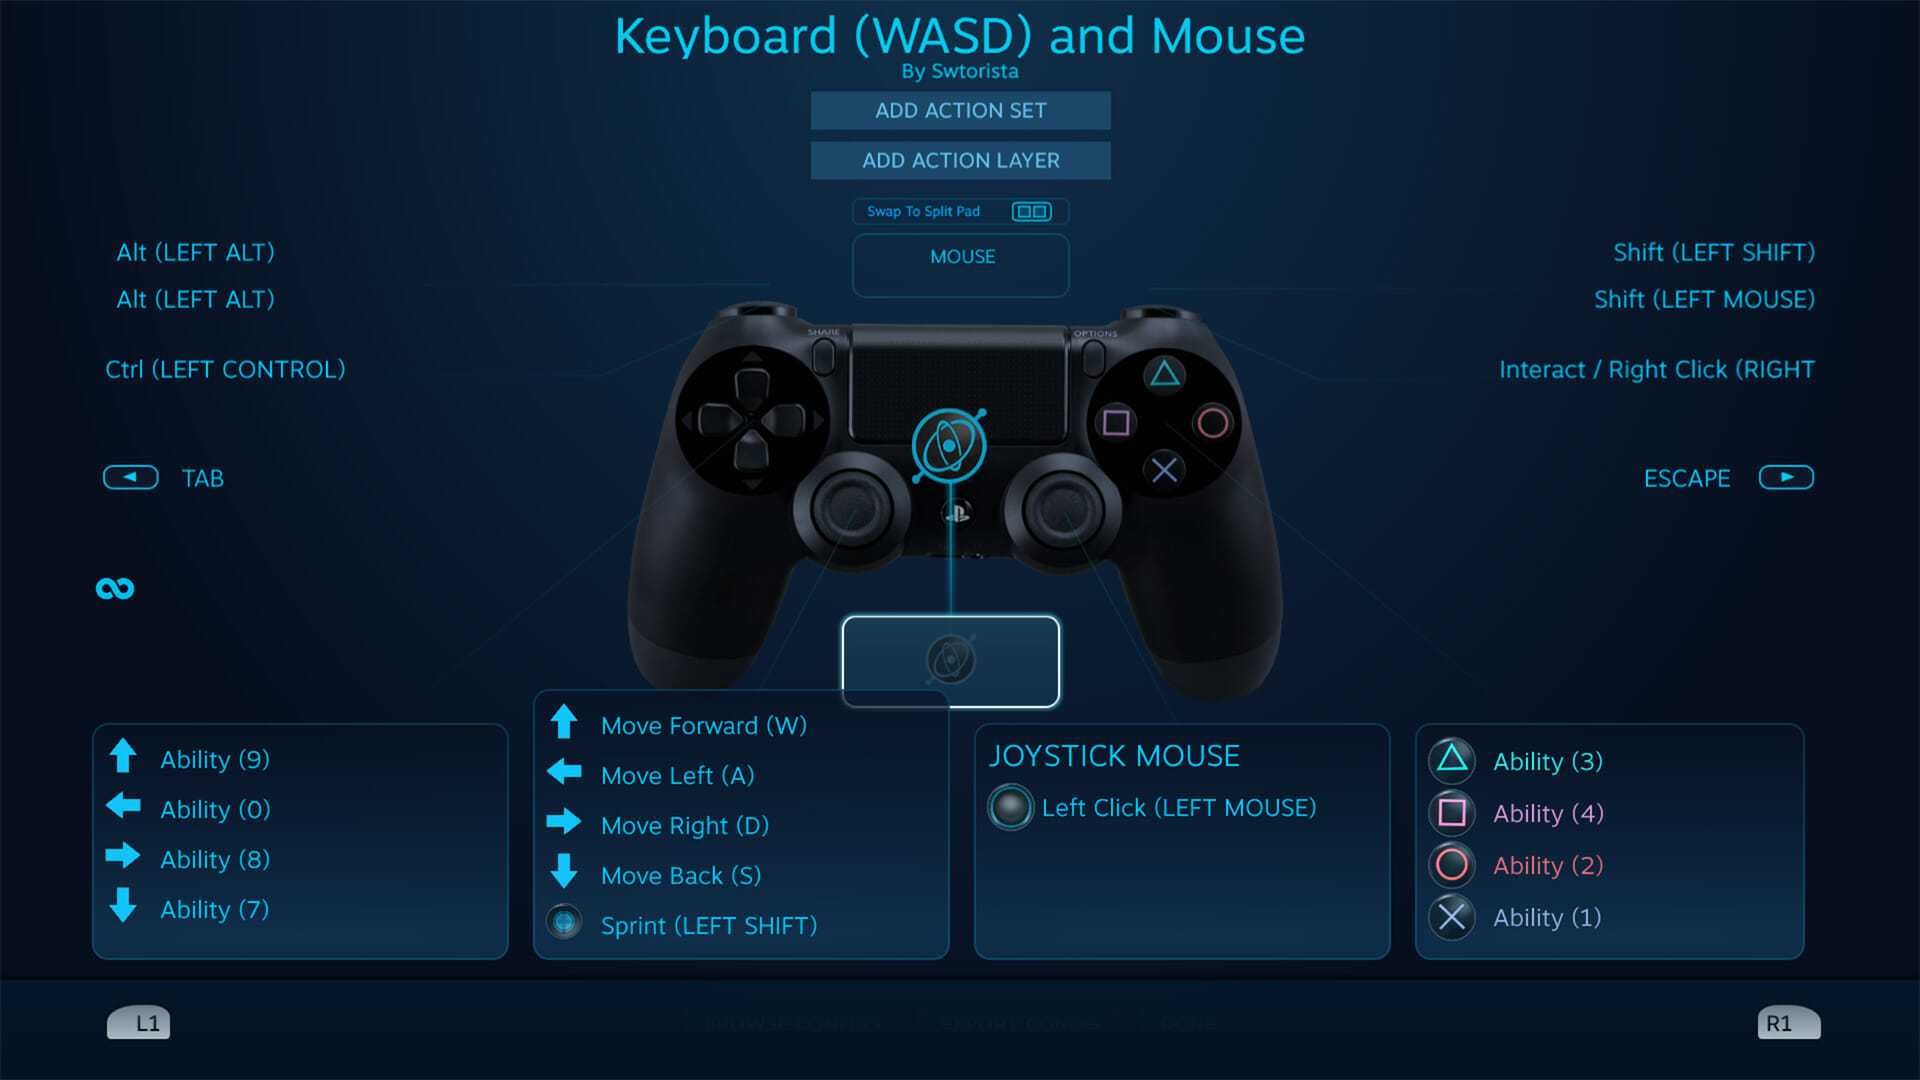
Make sure to add these additional settings as well:
- D-pad, set it to “4 Way (no overlap)”
- Left analog stick, set it to “Directional Pad” though it should be by default
- Right analog stick, set it to Joystick Mouse, and turn down the Mouse sensitivity (see below)
- Left and Right trigger, set the “soft pull” and “hard pull” to the same key on the keyboard

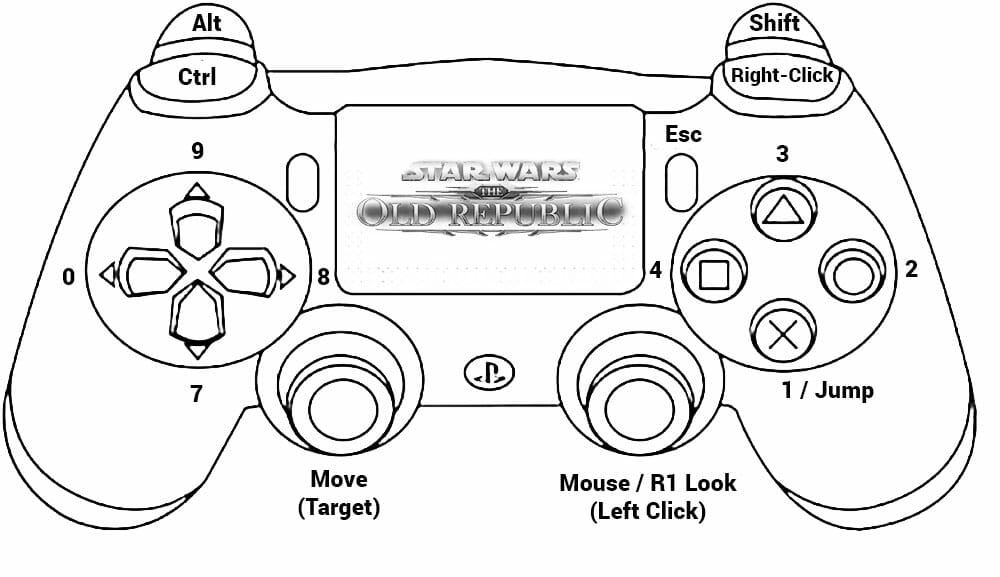
Here’s what it will look like on your controller.
Nicolai has the right click at “R1” due to the camera movement in this game, you need to hold right click to turn your camera, and to make it as easy as possible Nicolai assigned it to the button where you normally “rest” your finger on the top right of the controller on R1, so it will be feel fairly natural for most people. The other three top buttons, So R2, L2 and L1, Nicolai assigned to Shift, Alt, and Ctrl, which will allow you to use the Shift alt and Ctrl buttons combined with another button to get combination keybinds very similar to what experienced players use on a mouse and keyboard. Nicolai next keybound the D-pad on the left and the shapes on the right to the number keys, which are used for both conversation choices and for combining with the Shift, Alt, and Ctrl keys for ability keybinding. For getting around, Nicolai uses the left analog stick for movement and tapping it for tab targetting, and uses his right analog stick for moving the mouse cursor and tapping it for what would be left clicking on the mouse. Lastly, Nicolai also keybound the Options button on the right to be the Escape key on the keyboard.
In addition, you can use the touchpad as another way to move the mouse cursor around if you’re doing this through Steam.
*** This is the point where I ran into a lot of trouble / bugs, when I went to then launch the game through Big Picture. Big Picture was recognizing my controller just fine, but the game was not, even though I had followed all the steps. One of these fixed it, but I’m not sure which: Exit game, go back to Steam Big Picture’s homepage, and go back to the Controller support, and try this:
- Uncheck everything, check XBOX support, un check it then check PS4 support
- Double click your PS4 controller in the devices list
- Click identify to make your controller buzz
- Click calibrate then save
- Try restarted the game
- Another tip I saw was make sure you controller is on before you start Steam (that didn’t help me)
5. Keybinds
Once you have decided what you want each of your controller keys to correspond with on a normal keyboard, you can set your keybinds ingame.
To save you a ton of trouble, I’ve set up a keybinds file you can download and add to your SWTOR files.
- Go to this website page: https://swtorista.com/media/controllers/PS4%20and%20XBOX%20Controller%20Keybinds.xml
- Right click the page and choose “Save As”
- You will need to save it in your SWTOR Keybindings folder. This can sometimes be hard to find. Mine is located in…
C:\Users\Swtorista\AppData\Local\SWTOR\swtor\settings\Keybindings
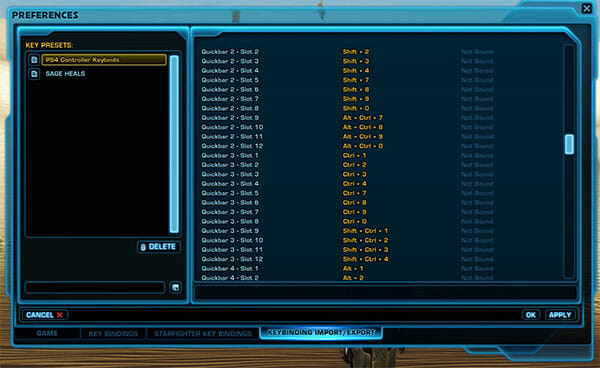
With Swtorista being my username for my computer. - Go ingame. Press ESCAPE -> PREFERENCES -> and go to the tab at the bottom called Keybinding Import/Export. You should now see the “PS4 and XBOX Controller Keybinds” option on the list on the left, then click OK on the bottom right.
This keybind files includes the 1 key, or in our case the cross or X key to be jump, strafing for left and right, and a quick rekeybind for backwards and rebinding tab so we don’t accidentally tab out of the game.
6. User Interface
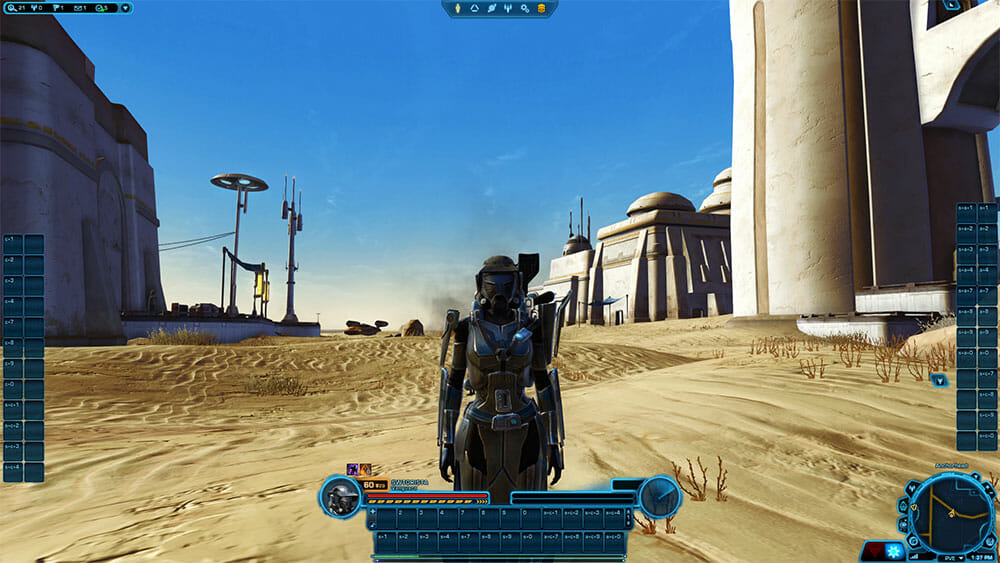
If you are using the full power of keybinds, you’ll likely want to have all your quickbars showing now that you have all the keybinds ready to go. You have two options. The first is to use a preset user interface, which is the quickest. To make all your quickbars show, which is 3 for free to play, 5 for preferred players and 6 for subscribers, press ESCAPE, then choose Interface Editor. From there, look for a dropdown at the top, and choose “Extended Quickbars”, then click the very small load icon beside the dropdown.
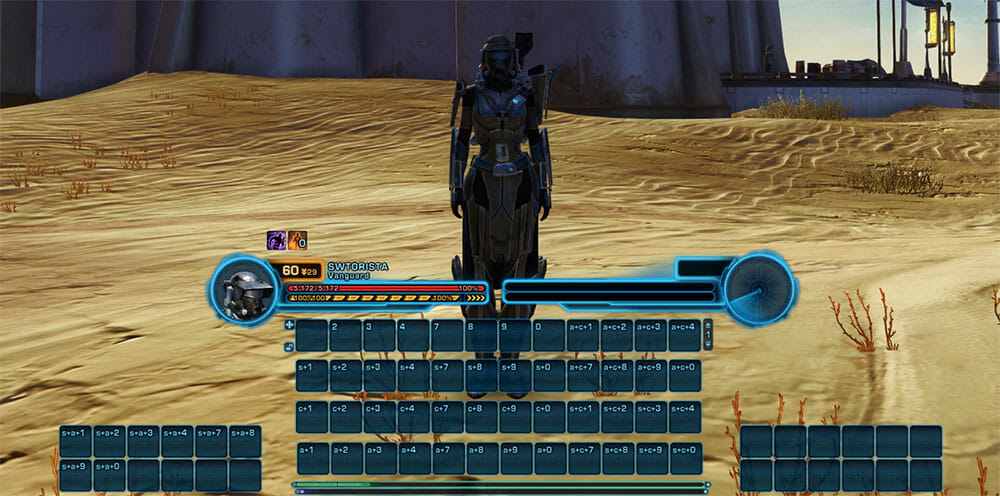
If you want something a little more condensed, I’ve created a User Interface with all keybinds for the PS4 together. If you want to use mine instead, you’ll need to download my XML file:
- Go to this website page: https://swtorista.com/media/controllers/PS4%20and%20XBOX%20Controller%20UI.xml
- Right click the page and choose “Save As”
- You will need to save it in your SWTOR GUIProfiles folder. This can sometimes be hard to find. Mine is located in…
C:\Users\Swtorista\AppData\Local\SWTOR\swtor\settings\GUIProfiles
With Swtorista being my username for my computer. - Go ingame. Press ESCAPE -> INTERFACE EDITOR -> and then my interface called “PS4 and XBOX Controller UI” should be on the dropdown list, so you can select it and then click the load button on the right of the dropdown.
7. Abilities
The last step is to add your abilities to your quickbars. Which keybinds you want to associate with which abilities is completely up to you. Players tend to put their most used abilities on on the 2, 3, 4, 7, 8, 9 and 0 keys, and then go from there for the keybinds that require combinations, with the three0keybind combinations for very obscure abilities or fun abilities like mounts or pets, as no matter what class you are playing you will not need all 55 keybinds available for combat.
To add abilities, you can either press P on your keyboard or choose abilities from the main menu under the icon of a person. From there you can left click drag your abilities into the slots on the quickbar.
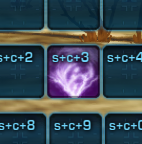
So if I put my ability on the slot that says s+c+3, that’s Shift + Control + 3 keys on the keyboard, which will translate to L1 + R2 + Triangle on our PS4 controller! It will take a bit of time to memorize where on the controller Shift, Alt and Ctrl are, but once you have that, you don’t need to memorize your abilities right away, as you can consult your keybinds on your quickbars if you forget which ability is on which keybind.
8. Movement
Once you’ve got everything set up, you can jump in game and start playing.
Start by using the left analog stick to move left and right, forward and back, with your left thumb. You’ll notice you won’t be able to look around, just move. To look around and add more nuance to your movement, try holding down R1 and at the same time wiggle your right analog stick around so you can do things like look at the sky. Combining all three of these so you can look around while moving is what will give you almost as much versatility when it comes to movement as a player who has a mouse and keyboard. To click things, use just the right analog stick to move the mouse around, to left click things push the right analog stick, and to right click things tap R1 with your right index finger – most things in the game are activated by right clicking them. Once you find some enemies, push your left analog stick to “tab target” them, which means you can click it again to cycle between multiple enemies. You can then use the d-pad on the left and the shape keys on the right to use your attacks, and once you feel comfortable moving around, attacking and targetting you can start using those combination keys for your other attacks too.
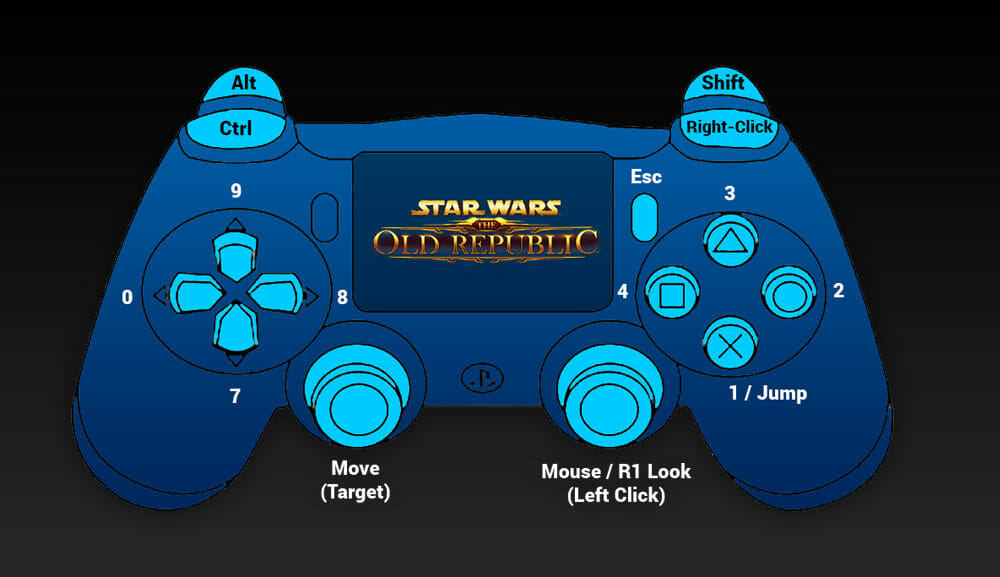
If you’re struggling to remember, I’ve made a PDF you can print out that you can tape to the wall or keep beside you as you play that has each of the controller keybinds on it. Open and Print PDF
As someone who primarily uses a mouse and keyboard and has never owned a console, I was surprised how easy gaming with the controller and these keybinds was, especially as I struggle with the types of keybinds that skilled Old Republic gamers use for combat – they use those same key combinations with Alt, Shift and Ctrl and the numbers 0 though 9, but because they are so much further spread across they keyboard I found it a lot easier to combine keybinds on the PS4 controller than I ever have been able to on a traditional keyboard. Nicolai, who is slightly handicapped and who showed me how to set this up, says he has been able to tank some of the most difficult content in the game using this setup, including Nightmare mode operations, and I’m not surprised that a skilled player could use this setup for difficult content based on my testing. While someone who is used to a mouse and keyboard may take a while to get used to it, players who are already comfortable using a PS4 or other console controller should be able to pick SWTOR up very quickly once it’s all set up, and using a controller where the controls are more condensed and portable definitely gives a lot more options when it comes to accessibility!
Livestreaming
If you happen to livestream SWTOR, did you know there is something you can add to OBS that will show your PS4 buttons as you play? Game Pad Viewer shows what you press as you press it with a graphic of your PS4 controller on the bottom left of the screen, as shown in the video below!

 Questions or comments? Feel free to send me a message on Twitter


 Discord
  Email swtorista@gmail.com
 Bluesky @swtorista.com
 Reddit /u/swtorista
 Twitch Swtorista
 Youtube
 Patreon
 Twitter @swtorista