


 How to Craft
 Choose a Crew Skill
 Armormech
 Armstech
 Artifice
 Biochem
 Cybertech
 Synthweaving

 Gathering Guide
 Rare Materials Guide
 White Materials Guide
 Jawa Junk
 Augments
 Medpacs, Stims and Adrenals
 Synthweaving Crafting Tree


 Crafted Decorations
 Crafted Mounts
 Crafted Dyes
 Crafted Crystals
 Events Calendar
 Galactic Seasons
 PvP Seasons
 Bounty Event
 Double XP Event
 Feast of Prosperity
 Gree Event
 Life Day
 Nightlife Event
 Pirate Incursion Event
 Rakghoul Event
 Spring Abundance Festival
 Swoop Event

 Jedi Knight
 Jedi Consular
 Trooper
 Smuggler
 Sith Warrior
 Sith Inquisitor
 Bounty Hunter
 Imperial Agent
 Bounty Hunter
 Imperial Agent
 Jedi Consular
 Jedi Knight
 Sith Inquisitor
 Sith Warrior
 Smuggler
 Trooper
 Legacy Gear
 Lightsabers
 Double-Bladed Lightsabers
 Vibroswords
 Double-Bladed Vibroswords
 Blaster Pistols
 Blaster Rifles
 Sniper Rifles
 Blaster Cannons

Contents
- Where do you get endgame gear in SWTOR?
- How do you know what gear to use?
- What is the easiest way to gear up for endgame in SWTOR?
- Do I even need gear?
- Free-to-Play Gearing
- Preferred Player Gearing at Level 70
- Ossus & Masterwork Gear
- Galactic Command
- PvP
- Galactic Starfighter (GSF)
- Operations
- Crafting
- How to Modify Gear
- Set Bonus
- Stats
- Augments
- Summary
Where do you get endgame gear in SWTOR?
While you are leveling and playing through the story, gear comes fairly naturally at the end of almost every quest. Once you reach level 70, high-end gear comes from completing various types of content in the game. These activities include:
-
- Ossus Quests, the new way to get the best gear in the game
- Galactic Command System, from all solo and group activities
- Operations, difficult group content
- Warzones, player vs player content
- Crafting, or buying crafted gear from other players
PvP Gear and PvE gear are now the same as of update 5.0. Gear that you earn through Operations (Ops) can be used in Warzones, and gear you earned through PvP (Player vs Player) can be worn in Operations, Flashpoints and Uprisings.
How do you know what gear to use?
If you aren’t already familiar with gearing your character, there’s a lot you’ll need to learn before you can effectively gear up. Here are some of the things all players need to know:
- How to Modify Gear
- Stats including Crit, Alacrity, Accuracy, and more
- Set Bonus for your class
- Augments and how to add augments you gear
What is the easiest way to gear up for endgame in SWTOR?
 Ossus quests are currently the fastest and only way to get the best gear in the game – most players recommend not ever worrying about the other methods listed below (item rating 252 and 258)
 Understand what type of gear you need, including what stats, modifications, set bonuses, and make sure you have chosen the right combat proficiency (gear you get from Galactic Command is determined by your combat proficiency)
 Augment your gear to give it a boost beyond what normal gear provides.
 Use a Command Boost for extra command experience points (CXP) as often as possible
 Buy all five tiers of the Command Experience Legacy Character Perk
 If you have lots of credits, find a crafter who will craft you a full set of 258 crafted gear – it’s the second best tier of gear available in the game, it’s just expensive and doesn’t have a set bonus
 Open any Command Crates you have. If you have no gear yet, claim all gear with stats you get. Pull out the mods from duplicate gear pieces and place them in your other pieces of gear. If you are already wearing some item rating 230 or higher gear, compare new Command Crate armor with what items you have, including the mods and set bonuses. Claim any CXP Boosts, Bonus CXP Consumables, and Command Tokens, and disintegrate the rest for more CXP, Unassembled Components, and Masterwork Data Crystals.
 Use Command Tokens that you get from Command Crates to buy item rating 230 gear.
 Run Operations to gain gear. Operations drop tier 2 gear and higher (item rating 236).
 Play PvP or Galactic Starfighter to gain gear and upgrade your current gear using Unassembled Components, to get tier 2 gear and higher (item rating 236).
 Play any other content in the game that earns you CXP. Operations and PvP will earn you gear fastest, but you will continue to gain gear from other content through the Galactic Command system. One of the other high-CXP-earning activities is doing the daily repeatable quests (CZ-198, Oricon, Section X, Black Hole, Yavin IV, Ziost and Iokath).
Do I even need gear?
If gaining gear feels like a chore rather than a journey, the good news is that most players do not need the best gear in the game, and can get by on some basic level 65-70 gear in most activities.
Most solo story quests = No
You do not need great gear to play most story content. Most planets, quests, enemies and solo/story flashpoints are tuned so that regular players can defeat them with whatever gear they have on hand. This includes Heroics, planetary quests, and story chapters.
Bolstered Story/Veteran Group Content = No
You do not need great gear for bolstered group content. Veteran Mode Flashpoints, Story mode Operations, and regular PvP Warzones all offer a mechanic called “bolster”, which will boost your gear temporarily to the correct level – all you need is a piece of gear in every slot to get bolstered.
Just make sure you have the right kind of gear for your role, for example don’t be wearing tanking gear as a DPS, and if you are a DPS make sure to have 110% accuracy for Flashpoints/Operations.
Difficult Group Content = Yes
You should strive for great gear if you plan on playing these types of activities:
- Group content in general. Although Veteran Mode Flashpoints, Story mode Operations, and regular PvP Warzones have bolster, having better gear can help make up some of the “numbers” if you are less skilled, or if you are a veteran player, can help cover gaps if you are sponsoring less skilled players in your group. For example, if you are fighting a boss that must receive a certain amount of damage in a short amount of time, having extra Mastery, Power and Crit might help make up for the low damage your newest raid member is doing. If you enjoy running group content fast, extra damage can help you fly through enemies quicker.
- Master mode Flashpoints and Veteran/Master mode Operations. Veteran and Master mode operation do not have bolster. Master mode Flashpoints do have bolster, but some are extremely difficult, and each one has a different “minimum suggest gear” rating. Most players suggest you should have item rating 230 gear or higher before jumping in to the more difficult group Flashpoints & Operations.
- Competitive PvP. If you plan on playing warzones competitively, rather than casually, you should strive to get the best gear in the game, so you can live longer and dish out more damage. The current gear bolster for 5.10 and beyond is to item rating 252 gear – so if you can get better gear than that, you will have an advantage over many players.
- Veteran Mode and Master Mode Story Chapters. The Eternal Expansions offered an interesting new challenge to solo players – they can be played in a higher difficulty, and these higher difficulties will require you gear up a bit before heading in. The suggest item rating for Veteran Mode is somewhere around 220-230, and suggestions for Master Mode Chapters is somewhere around item rating 236 gear.
Free-to-Play Gearing
Players who are free-to-play, meaning they have not invested any money in to the game, are unable to level past level 50, and will not be able to earn any of the gear mentioned in this guide. Free to players can click here to read about gearing for level 50.
- The Galactic Command System and Operations are only available to subscribed players.
- Warzones are available to free to play players, either 5 warzone matches per week or an unlimited amount if you queue up with a friend who is subscribed, but you will never be able to gain gear though PvP as a free to play player because you will be missing half of the required currency to buy gear through PvP.
Preferred Player Gearing at Level 70
Preferred players are unable to earn most of the gear in this guide.
- The Galactic Command System and Operations are only available to subscribed players.
- Warzones are available to preferred players, either 5 warzone matches per week or an unlimited amount if you queue up with a friend who is subscribed. You can buy the first round of item-rating 236 gear from the PvP with unassembled components earned through PvP matches. The 3rd and 4th tier require unassembled tokens plus command tokens, which are only available via the Galactic Command system. That means that players who were subscribed in the past and earned command tokens in the past can play as a preferred player and continue upgrading their gear via PvP until they run out of command tokens.
- Crafting, or buying crafted gear from other players is difficult, buy doable as a preferred player. Here are some tips about making big purchases as a preferred player (note the credit cap for preferred players is 350,000).
- The best gear level 70 preferred players can get seems to be item rating 220 blue gear though crafting or bought form another crafter on the GTN. These are craftable at about level 590 of their respetive crew skill, depending on the piece. None of the materials are incredibly expensive, but you may need to work on buying a full set over time. Here’s the 220 cybertech enhancements, 220 cybertech mods, 220 damage armoring, 220 tank armoring, 220 hilts, 220 barrels.
- An easy way to get some gear is to buy the modifications from a vendor in the Supplies section of the fleet, though the highest you can buy is for level 65.
Ossus & Masterwork Gear
Masterwork gear is currently the best gear in the game as of update 5.10. Masterwork gear can be earned in a variety of ways, and has an item-rating of 252 or 258 and is considered Tier 5 gear.
Full Ossus Gearing 252 & 258 Guide
Weekly Ossus Daily Area
The quest [Weekly] Daily Area Ossus will allow you to choose one of the 3 Artifact Lockboxes which will contain item-rating 252 gear:
- Artifact Lockbox (Lower Body): Waist, Legs, Feet, or Relic
- Artifact Lockbox (Tech): Main Hand, Offhand, Head, or Ear
- Artifact Lockbox (Upper Body): Chest, Wrists, Hands, or Implant
Masterwork Data Crystals

Masterwork Data Crystals are a new type of currency that can be earned and used to purchase Masterwork Tier 5 gear-rating 252 and 258 gear. Masterwork Data Crystals can be earned mainly through weekly quests and disintegration.
- 1 Crystal – [Weekly] Masterwork Data Crystal – This Mission is to defeat both world bosses -or- earn 50 Group Ranked Arena Points
- 1 Crystal – New rotating Weekly Mission (50% chance of being a PvP objective)
- Rare chance of Masterwork Data Crystals dropping out of Command Crates at Tier 3 and up
- 1-2 Crystals – Turning in Unassembled Components
Masterwork Gear Costs
- Lord Fural / Major Pucenisco on Ossus – 252 Gear
- Requires Ossus Reputation rank between Outsider and Hero, depending on gear piece
- Each piece costs 2 Masterwork Data Crystals
- Lord Bay’lor / Captain Anfel on Ossus – 258 Gear
- Requires Ossus Reputation rank of Champion or Legend, depending on gear piece
- Each piece costs 3-4 Masterwork Data Crystals and a matching piece of 252 gear
Crafted Masterwork Gear

View XamXam’s Guide About 5.10 Masterwork Craftings, Schematics and Materials
The materials required for Masterwork crafting are earned through the Gods from the Machine operation, Ranked PvP, Conquest, and Ossus dailies. Click the guide above to learn more.
Galactic Command
The Galactic Command System is an alternative way of gaining gear that’s accessible to all level 70 subscribed players. For every piece of content you complete, whether in a group or as a solo player, you’ll gain CXP. As you earn CXP, you’ll increase your Command Level. For every Command Level you earn, you’ll receive a loot crate filled with random gear and items, along with a chance to earn Command Tokens which can also be used to buy gear.

Solo CXP Activites
- Story Chapters (Guides)
- Heroics
- Dailies (CZ-197, Oricon, Section X, Black Hole, Yavin IV, Ziost, Iokath, Ossus – Daily Guides)
- Solo or Story Flashpoints
- Star Fortress
- Space Missions
- Conquest (Guide)
- Defeating any enemies or bosses
- Completing almost any quest

Group CXP Activities
- Uprisings
- Flashpoints
- Operations
- Warzones
- Galactic Starfighter
Command Crates
For each Command Level you gain, you’ll get a command crate you can open that has a random assortment of items in it – these items can be anything, including pets, mounts, cosmetic gear with no stats, companion gifts or, most importantly, gear with stats. Command crates can have the following items in them…
Command Crate Items
- Armor with stats (based on your current combat proficiency)
- Cosmetic armor with no stats
- Crafting schematics
- Command Tokens
- CXP Boosts
- CXP Consumable
- Companion Gifts
- Reputation Items
- Pets
- Mounts
- Crafting Materials

Command Stash
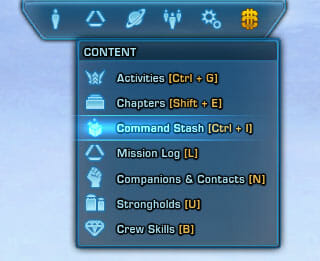
These items do not automatically get added to your inventory when you open a Command Crate. Instead they are added to your Command Stash where you can decide to either claim them or disintegrate them. To view your command stash, press CTRL+ I on your keyboard, or find it under the icon of a triangle on the main menu.
Disintegrate
You can disintegrate any item you do not want to claim to your inventory. Disintegrating an item will either earn you some CXP or give you Unassembled Components, which can be used to buy gear from the fleet vendors. You can preview how much CXP or Unassembled Components you will get be selecting the item in the Command Stash and looking in the bottom left corner of the window.

IMPORTANT NOTE: There seems to be a bug where items will show you as getting more or less CXP than the number displayed, if you have already disintegrated or claimed an item while the Command Stash window is open. To reset the preview counter on the bottom left to know how much disintegrating CXP you should get, close and re-open the window.
What to keep, what to disintegrate?
The most important items in command crates are the armor with stats and command tokens. You should automatically claim any command tokens you get, and compare any new gear to your current gear before claiming it. If you are playing on an alternate (alt) character, make sure to claim any Bonus CXP Consumables to send over to your main character. Keeping or disintegrating any other items, including the cosmetic gear, pets, mounts, schematics, and companion gifts is up to you. Many of the pets, mounts and cosmetic items are listed on the GTN at reasonable prices, so I recommend disintegrating the cosmetic items you receive in crates to gain more CXP and buy the ones you like for credits from the GTN.
| Item | Disintegration at Levels 1-99 |
|---|---|
 Armor with stats Armor with stats |
2 to 4 Unassembled Components |
| Command Tokens |
1 CXP each (don’t disintegrate) |
 Schematic Schematic |
150 CXP |
 Cosmetic armor with no stats Cosmetic armor with no stats |
100 CXP |
 Purple Companion Gift Purple Companion Gift |
20 CXP |
 Gold Companion Gift Gold Companion Gift |
30 CXP |
 Scrap: Jawa Junk (purple) Scrap: Jawa Junk (purple) |
10 CXP |
 Scrap: Assorted Droid Parts Scrap: Assorted Droid Parts |
10 CXP each |
 Scrap: Scavenged Scrap (green) Scrap: Scavenged Scrap (green) |
10 CXP each |
 Crafting Materials: Encrypted Memory Core Crafting Materials: Encrypted Memory Core |
0 CXP (don’t disintegrate) |
| 0 CXP (don’t disintegrate) | |
 Reputation Item (blue) Reputation Item (blue) |
5 CXP |
 Bonus CXP Consumable Bonus CXP Consumable |
(don’t disintegrate) |
Disintegrating pieces of gear with stats will give you Unassembled Components, which can be saved up and used to buy or upgrade gear.
| Gear Rarity | Tier 1 | Tier 2 | Tier 3 | Tier 4 | Tier 5 |
|---|---|---|---|---|---|
| Premium (Green) |
2 |
4 |
6 |
N/A | 252 gear will disintegrate into 175 Unassembled Components in 5.10 (up from 9 to 45). |
| Prototype (Blue) |
3 |
5 |
7 |
8 |
(Coming Soon) |
| Artifact (Purple) |
4 |
6 |
8 |
9 |
(Coming Soon) |
| Legendary (Gold) |
N/A | 7 |
9 |
10 |
(Coming Soon) |
Gear disintegration table provided by XamXam, from her MMOBits blog post SWTOR PvP Gearing Guide
Command Tokens
Command Tokens are a type of currency that can be used to buy pieces of level 70 starter gear. Each gear piece costs between 49 and 84 Command Tokens, and each piece is item rating 230 with a set bonus. Command Tokens are legacy bound, and you can check how many you have in the Currency tab of your inventory.

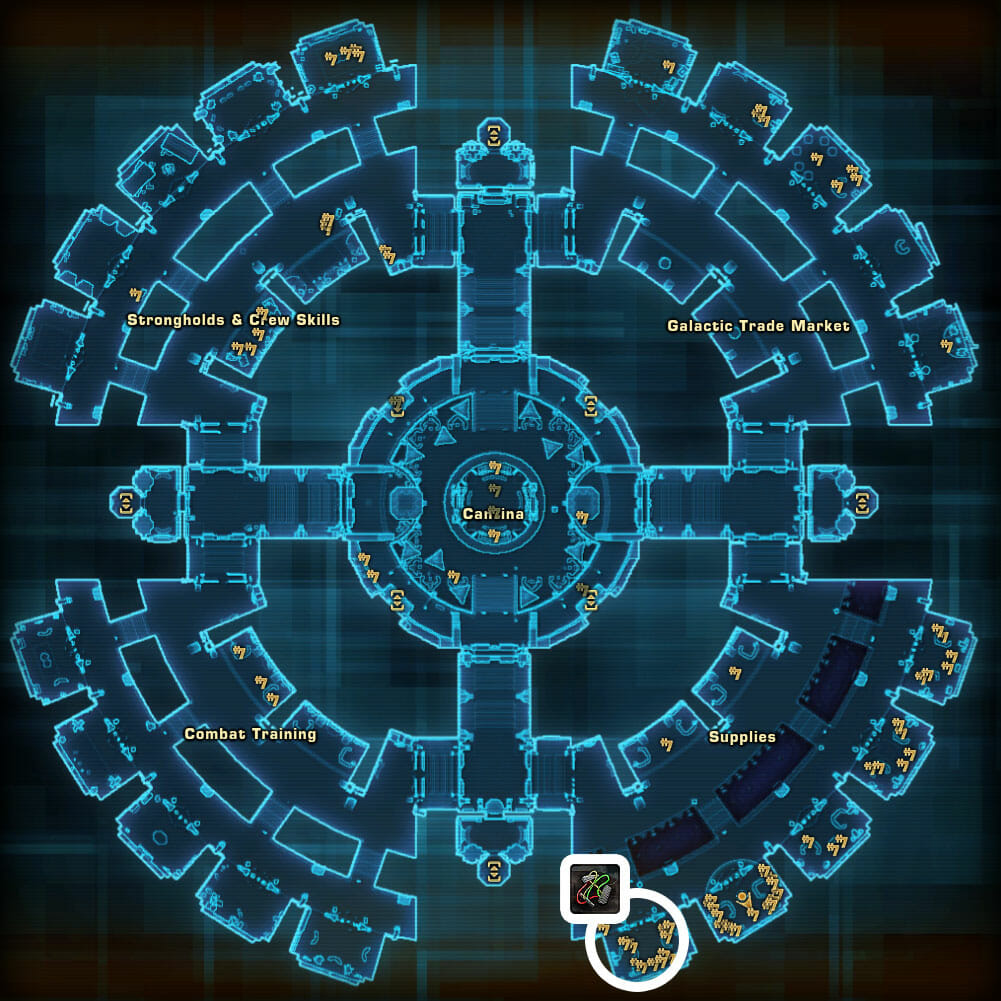
You can spend Command Tokens at a vendor called <Tier 1 Class Equipment>, in a room full of vendors on the outer edge of the Supplies section of the fleet.

Republic Fleet Command Token Vendors

Imperial Fleet Command Token Vendors
| Piece | Command Tokens |
|---|---|
| Head | 70 |
| Chest | 70 |
| Hands | 70 |
| Legs | 70 |
| Boots | 70 |
| Waist | 49 |
| Wrist | 49 |
| Mainhand | 84 |
| Offhand | 84 |
| Implant | 56 |
| Earpiece | 56 |
| Relic | 56 |
Command CXP Boosts
You can use a CXP boost to increase the amount of CXP you earn when completing quests and activities. CXP Boosts can be found in Command Crates, bought with Command Tokens from a vendor in the Supplies section named “Command Token Vendor”, purchased on the Cartel Market or obtained on the GTN from other players. You can only use one of these boosts at a time, and each one will increase the % of CXP you earn for 2 hours for every activity except disintegration.
Once you get to Command Rank level 180 or higher, be careful about buying boosts from the GTN. There are two items called the exact same name, “Superior Command Boost”, but one of them only works for level 179 and lower.
| Item Name | Source | Cost | Boost | Duration |
|---|---|---|---|---|
 Command Boost Command Boost |
Fleet Vendor | 44 Command Tokens + 10,000 Credits | 25% Boost | 2 Hours |
| Superior Command Boost |
Fleet Vendor | 190 Command Tokens + 50,000 Credits | 100% Boost | 2 Hours |
| Superior Command Boost |
Command Crate | Luck | 100% Boost | 2 Hours |
| Superior Command Boost |
Cartel Market | 300 Cartel Coins each or 5 for 1,050 Cartel Coins | 100% Boost | 3 Hours |
| Superior Command Boost |
GTN | around 2 Million Credits | 100% Boost for Command Levels 1-179 ONLY | 3 Hours |
| Superior Command Boost |
GTN | around 2 Million Credits | 100% Boost | 3 Hours |
Command Experience Legacy Character Perk
You can purchase a permanent increase to your CXP through the Legacy System. The perk is available for each of your characters, and is not legacy-wide. It will increase the CXP you earn from all activities or boosts except for disintegration.

| Perk | Legacy Level | % | Credits Cost | CC Cost |
|---|---|---|---|---|
| Legacy Level 2 | +2% | 100,000 Credits | 250 CC | |
| Legacy Level 6 | +2% | 300,000 Credits | 300 CC | |
| Legacy Level 11 | +2% | 600,000 Credits | 350 CC | |
| Legacy Level 18 | +2% | 1,000,000 Credits | 400 CC | |
| Legacy Level 25 | +2% | 1,500,000 Credits | 450 CC |
To access these perks, open the Legacy Panel which is located under the icon of a person on the menu. The perk is under the “Character Perks” section, about halfway down on the left.
Commanding Legacy Unlock

This Legacy-wide unlock increases Command Experience gained by 25% for characters under Command Rank 300. This effect stacks up to 4 times for a 100% bonus. You gain a stack for each mirrored Class at Command Rank 300 (Example: a Knight and Warrior at 300 only counts once).
+25% Sith Warrior / Jedi Knight
+25% Sith Inquisitor / Jedi Consular
+25% Imperial Agent / Smuggler
+25% Bounty Hunter / Trooper
Requires Command Rank 300. Costs either 2 million credits with a Legacy Level of 10 or higher, or can be bought with Cartel Coins. To purchase this unlock, open the legacy panel, it is located in the “Other” section under “Global Unlocks” in the menu.
Old Unassembled Pieces from pre- 5.0
If you are a returning player, there is a vendor you can visit who will accept your old unassembled gear and give you tokens in return. The vendor is located in the supplies section, outside the rooms with the token vendors, and is called Unassembled Piece Reclaimer vendor.

PvP
Players who PvP gain a special alternative way to gear. For every PvP match or quest you complete, you receive Unassembled Components. You can turn the components in for gear in the Supplies section of the fleet. When buying pieces from the vendor, make sure to select the correct set bonus for your class and the combat proficiency.
Republic Fleet PvP Gear Vendors

Imperial Fleet PvP Vendors
Unassembled Components
Unassembled components are tokens earned mainly through PvP that you can spend to buy level 70 gear. Unassembled components can also be earned from Master Mode Operations, Daily Rewards for Flashpoints, Uprisings and Operations, Galactic Starfighter, and from disintegrating gear with stats from Command Crates in the Galactic Command system.
PvP Repeatable Quests
| Repeatable Quest | Quest Name | # of Matches | Unassembled Components | Lockbox Reward | Additional Rewards |
|---|---|---|---|---|---|
| Warzone Daily | No Quarter | 4 | 25 |
Daily Warzone Command Crafting Lockbox | |
| Warzone Weekly | Conspicuous Valor | 20 | 135 |
Weekly Warzone Command Crafting Lockbox | |
| Solo Ranked Daily | My Kind of Scum | 4 | 40 |
Daily Ranked Warzone Solo Command Crafting Lockbox | 150 Ranked Season 9 Tokens |
| Solo Ranked Weekly | Time for Pain! | 20 | 250 |
Weekly Ranked Warzone Group Command Crafting Lockbox | 1000 Ranked Season 9 Tokens, 3 Charged Matter Transubstantiators |
| Group Ranked Daily | Arena of Death! | 4 | 75 |
Daily Ranked Warzone Group Command Crafting Lockbox | 300 Ranked Season 9 Tokens, Charged Matter Transubstantiator |
| Group Ranked Weekly | Go Berserk! | 20 | 500 |
Weekly Ranked Warzone Solo Command Crafting Lockbox | 2000 Ranked Season 9 Tokens, 5 Charged Matter Transubstantiators |
PvP Match Rewards
| Match Results | Reward |
|---|---|
| Regular Warzone Win | 20 Unassembled Components |
| Regular Warzone Loss | 8 Unassembled Components |
| Regular Arena Win | 20 Unassembled Components |
| Regular Arena Loss | 5 Unassembled Components |
| Solo Ranked Win | 20 Unassembled Components |
| Solo Ranked Loss | 10 Unassembled Components |
| Group Ranked Win | 25 Unassembled Components |
| Group Ranked Loss | 10 Unassembled Components |
Match reward table provided by XamXam, from her MMOBits blog post SWTOR PvP Gearing Guide
PvP Gear Tiers
- Tier 1 Gear (230): There’s no Tier 1 gear available directly through PvP, but you will earn Command CXP by playing matches. Gear and Command Tokens drop from Command crates earned through Command CXP.
- Tier 2 Gear (236): Tier 2 gear costs 288 to 450 Unassembled Components per piece, and can be bought directly with the Unassembled Components you earned through playing warzones.
- Tier 3 & 4 Gear (242 & 248): Things get interesting in Tier 3 and 4 – to get a Tier 3 piece of gear through PvP, you need to have Unassembled Components AND a piece of the previous tier of gear to turn in. So if you wanted to get a Tier 3 Belt through PvP, you’d first need to acquire a Tier 2 belt, either by purchasing it with Unassembled Components, by getting it through a drop in an operation, or by getting lucky through a command crate. Players who play both PvP and PvE can take advantage of this by turning in their Tier 3 pieces of gear to get the rare Tier 4 pieces without having to rely on the luck of operations or command crates. When you are turning in pieces of Tier 2 and Tier 3 gear, keep in mind that you only need to turn in the “shell” of the gear – not the modifications inside. Make sure to remove any armorings, mods, enhancements and augments you want to keep before turning it in, and save them to put in legacy gear for your alternate characters.
Tier 2 PvP Gear Costs (Commander MK-15 Gear)
Tier 2 PvP Gear is the starter PvP gear and can be bought with Unassembled Components earned from PvP and a small amount earned by disintegrating gear in the Galactic Command system. You can turn in your unassembled components to a vendor in the Supplies section of the fleet named <Tier 2 Class Unassembled Tokens>, who can be found in a room full of vendors in a corner on the outer ring of the Supplies section.
| Piece | Unassembled Components |
|---|---|
  Helm Helm |
375 |
| Chestpiece |
375 |
  Gloves Gloves |
375 |
  Pants Pants |
375 |
  Boots Boots |
375 |
  Belt Belt |
288 |
  Bracers Bracers |
288 |
  Mainhand Mainhand |
450 |
  Offhand Offhand |
450 |
  Implant Implant |
300 |
  Earpiece Earpiece |
300 |
  Relic Relic |
300 |
Tier 3 PvP Gear Costs (Iokath MK-5 Gear)
Tier 3 PvP Gear is the mid-level PvP gear. In order to purchase a piece of this gear, you must turn in the corresponding piece of gear from the previous tier along with Unassembled Components. The piece of gear turned in does not have to have been earned through PvP, it can also be earned through Operations or Command Crates.
| Piece | Unassembled Components | Requires |
|---|---|---|
| Helm |
563 |
Commander MK-15 Helm |
| Chestpiece |
563 |
Commander MK-15 Chestpiece |
| Gloves |
563 |
Commander MK-15 Gloves |
| Pants |
563 |
Commander MK-15 Pants |
| Boots |
563 |
Commander MK-15 Boots |
| Belt |
438 |
Commander MK-15 Belt |
| Bracers |
438 |
Commander MK-15 Bracers |
| Mainhand |
675 |
Commander MK-15 Mainhand |
| Offhand |
675 |
Commander MK-15 Offhand |
| Implant |
450 |
Commander MK-15 Implant |
| Earpiece |
450 |
Commander MK-15 |
| Relic |
450 |
Commander MK-15 |
Tier 4 PvP Gear Costs (GEMINI MK-5 Gear)
In order to purchase a piece of this gear, you must turn in the corresponding piece of gear from the previous tier (Commander gear) along with Unassembled Components. The piece of gear turned in does not have to have been earned through PvP, it can also be earned through Operations or Command Crates.
| Piece | Unassembled Components | Requires |
|---|---|---|
| Helm |
675 |
Iokath MK-5 Helm |
| Chestpiece |
675 |
Iokath MK-5 Chestpiece |
| Gloves |
675 |
Iokath MK-5 Gloves |
| Pants |
675 |
Iokath MK-5 Pants |
| Boots |
675 |
Iokath MK-5 Boots |
| Belt |
525 |
Iokath MK-5 Belt |
| Bracers |
525 |
Iokath MK-5 Bracers |
| Mainhand |
810 |
Iokath MK-5 Mainhand |
| Offhand |
810 |
Iokath MK-5 Offhand |
| Implant |
540 |
Iokath MK-5 Implant |
| Earpiece |
540 |
Iokath MK-5 Earpiece |
| Relic |
540 |
Iokath MK-5 Relic |
Tier 5 PvP Gear Costs
Tier 5 gear can be earned through certain PvP-based quests, which reward a Masterwork Data Crystal which can be used to purchase Tier 5 gear.
- 1 Crystal: [Weekly] Masterwork Data Crystal – This Mission is to defeat both world bosses -or- earn 50 Group Ranked Arena Points
- 1 Crystal: New rotating Weekly Mission (50% chance of being a PvP objective)
There is a rare chance of MW Data Crystals dropping out of Command Crates at Tier 3 and up, and you can earn 1-2 Crystals from turning in Unassembled Components.
Players can spend Masterwork Data Crystals to buy 252 and 258 gear on Ossus.
- Lord Fural / Major Pucenisco on Ossus – 252 Gear
- Requires Ossus Reputation rank between Outsider and Hero, depending on gear piece
- Each piece costs 2 Masterwork Data Crystals
- Lord Bay’lor / Captain Anfel on Ossus – 258 Gear
- Requires Ossus Reputation rank of Champion or Legend, depending on gear piece
- Each piece costs 3-4 Masterwork Data Crystals and a matching piece of 252 gear
To help PvPers get the required Reputation for the MW Data Crystal vendors, the developers have added Reputation rewards to Ranked PvP Missions:
- [DAILY] Arena of Death!: 2 Geonosian Power Cell (Reptuation Item)
- [DAILY] My Kind of Scum: 1 Geonosian Power Cell (Reptuation Item)
- [WEEKLY] Go Berserk!: 4 Encrypted Data Disks (Reptuation Item)
- [WEEKLY] Time for Pain!: 2 Encrypted Data Disks (Reptuation Item)
Tier 5 gear is also earned through crafting, but some of the crafting material Charged Matter Transubstantiator can be gained through Ranked PvP (but it can also be bought and sold on the GTN).
Galactic Starfighter (GSF)
Players who play Galactic Starfighter (Space PvP) gain a special alternative way to gear. For every GSF match or quest you complete, you receive Unassembled Components. You can turn the components in for gear in the Supplies section of the fleet. When buying pieces from the vendor, make sure to select the correct set bonus for your class and the combat proficiency. See the PvP section of this guide for the costs of gear.
Republic Fleet GSF Gear Vendors
Imperial Fleet GSF Vendors
Unassembled Components
Unassembled components are tokens earned mainly through GSF and PvP that you can spend to buy level 70 gear. Unassembled components can also be earned from Master Mode Operations, Daily Rewards for Flashpoints, Uprisings and Operations, and from disintegrating gear with stats from Command Crates in the Galactic Command system.
GSF Repeatable Quests
| Repeatable Quest | # of Matches | Unassembled Components | Additional Rewards |
|---|---|---|---|
| GSF Daily | 2 | 25 |
1200 Ship Requisition, 40 Fleet Commendations |
| GSF Weekly | 7 | 135 |
4000 ship requisition, 800 fleet requisition, 90 Fleet Commendations |
Operations
As you run Operations, which are the 8 to 16-man group content in the game, you may get lucky and win a piece of gear after fighting a boss. The harder the operation, the better the gear that drops. If you win an unassembled piece from a boss, you may notice it has no stats and cannot be equipped. This is an Unassembled Piece– it’s a token that you can turn in for a piece of set-bonus gear of your choice. You can take this unassembled component and turn it in to the appropriate vendor on the fleet in the Supplies section.
Operation Gear Tiers
- Tier 1 Gear
- Item Rating 230 Gear
- There is no Tier 1 starter gear from Operations, but playing Operations will get you CXP which will eventually get you Command Tokens you can use to buy Tier 1 Gear
- Tier 2 Gear
- Item Rating 236 Gear
- “Eternal Commander MK-15” in the item name
- Gold border around item
- Drops as an unassembled piece from Story Mode operations
- Can also be bought with Unassembled Components earned from Master Mode operations, PvP, or disintegration
- Tier 3 Gear
- Item Rating 242 Gear
- “Iokath MK-5” in the item name
- Gold border around item
- Drops as an unassembled piece from Veteran Mode operations
- Can also be bought with a Tier 2 Piece + Unassembled Components earned fgsfrom Master Mode operations, PvP, or disintegration
- Tier 4 Gear
- Item Rating 248
- “GEMINI MK-5” in the item name
- Gold border around item
- Drops as an unassembled piece from the last boss of Master Mode operations
- Also drops from all bosses of Veteran Mode Gods from the Machine, a good source of gear if you have a steady group to run it with
- Can also be bought with a Tier 2 Piece + Unassembled Components earned from Master Mode operations, PvP, or disintegration
Unassembled Components from Master Mode Operations
Apart from a chance at a piece of gear, CXP consumables, and CXP, you also can win Unassembled Components from Master Mode Operation bosses. Unassembled Components are another form of currency you can use to buy more gear, or upgrade your current gear pieces. View the Unassembled Components section (in the PVP section of this guide) to learn how to turn them in.
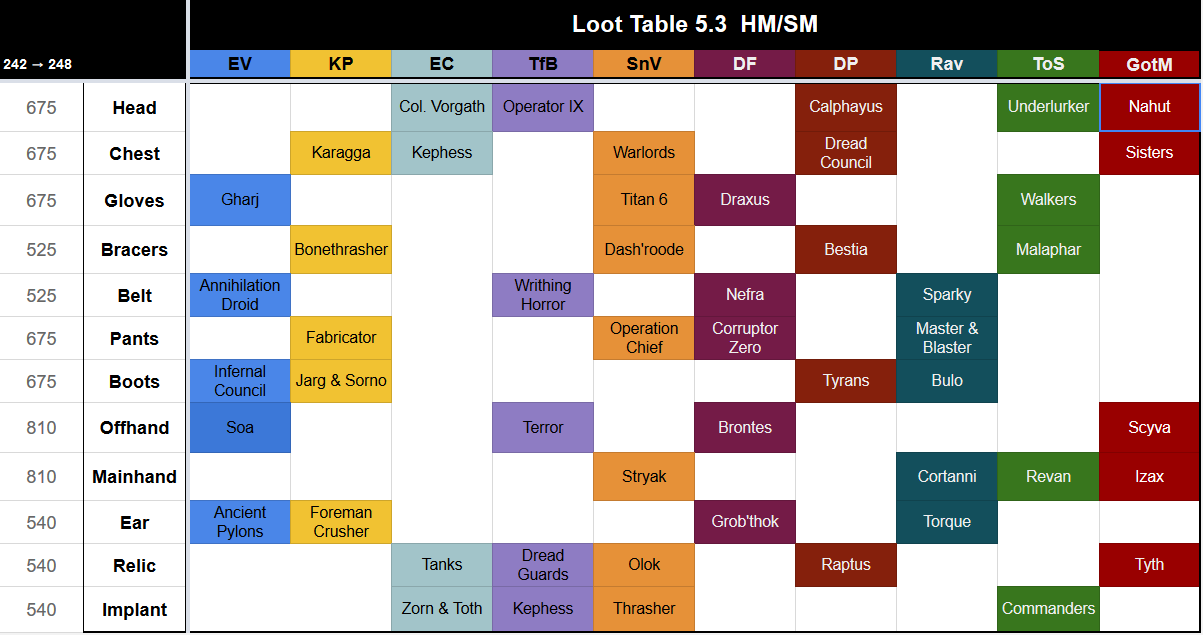
Operation Gear Sources
If you’re looking to fill a specific gap in your gear, it might be useful to participate in operations that contain bosses that drop the specific pieces you need.
SM = Story Mode, VM = Veteran Mode, MM = Master Mode
Helm
| Boss | Operation |
|---|---|
| Colonel Vorgath | Explosive Conflict (SM & VM) |
| Operator IX | Terror From Beyond (SM & VM) |
| Calphayus | Dread Palace (SM & VM) |
| Underlurker | Temple of Sacrifice (SM & VM) |
Chestpiece
| Boss | Operation |
|---|---|
| Karagga | Karagga’s Palace (SM & VM) |
| Kephess | Explosive Conflict (SM, VM) |
| Warlords | Scum and Villainy (SM & VM) |
| The Dread Council | Dread Palace (SM & VM) |
| Esne and Aivela | Gods from the Machine (SM & VM) |
Gloves
| Boss | Operation |
|---|---|
| Gharj | Eternity Vault (SM & VM) |
| TITAN 6 | Scum and Villainy (SM & VM) |
| Draxus | Dread Palace (SM & VM) |
| Sword Squadron | Temple of Sacrifice (SM & VM) |
| Brontes | Dread Fortress (MM only) |
Pants
| Boss | Operation |
|---|---|
| Fabricator | Karagga’s Palace (SM & VM) |
| Operation Chief | Scum and Villainy (SM & VM) |
| Corruptor Zero | Dread Fortress (SM & VM) |
| Master & Blaster | Ravagers (SM & VM) |
| Terror from Beyond | Terror from Beyond (MM only) |
Boots
| Boss | Operation |
|---|---|
| Jarg & Sorno | Karagga’s Palace (SM & VM) |
| Infernal Council | Eternity Vault (SM & VM) |
| Tyrans | Dread Palace (SM & VM) |
| Bulo | Ravagers (SM & VM) |
| Styrak | Scum and Villany (MM only) |
Belt
| Boss | Operation |
|---|---|
| Annihilation Droid | Eternity Vault (SM & VM) |
| Writhing Horror | Terror From Beyond (SM & VM) |
| Nefra | Dread Fortress (SM & VM) |
| Sparky | Ravagers (SM & VM) |
Bracers
| Boss | Operation |
|---|---|
| Bonethrasher | Karagga’s Palace (SM & VM) |
| Dash’roode | Scum and Villainy (SM & VM) |
| Bestia | Dread Palace (SM & VM) |
| Malaphar | Temple of Sacrifice (SM & VM) |
Relics
| Boss | Operation |
|---|---|
| The Dread Guard | Terror From Beyond (SM & VM) |
| Firebrand & Stormcaller | Explosive Conflict (SM & VM) |
| Olok | Scum and Villainy (SM & VM) |
| Raptus | Dread Palace (SM & VM) |
| Tyth | Gods from the Machine |
Mainhand
| Boss | Operation |
|---|---|
| Revan | Temple of Sacrifice (SM & VM) |
| Styrak | Scum and Villainy (SM & VM) |
| Coratanni | Ravagers (SM & VM) |
Offhand
| Boss | Operation |
|---|---|
| Terror From Beyond | Terror From Beyond (SM & VM) |
| Brontes | Dread Fortress (SM & VM) |
| Soa | Eternity Vault (SM & VM) |
Earpiece
| Boss | Operation |
|---|---|
| Ancient Pylons | Eternity Vault (SM & VM) |
| Foreman Crusher | Karagga’s Palace (SM & VM) |
| Dread Fortress (SM & VM) | Grob’thok |
| Torque | Ravagers (SM & VM) |
| Dread Council | Dread Palace (MM only) |
Implant
| Boss | Operation |
|---|---|
| Zorn & Toth | Explosive Conflict (SM & VM) |
| Kephess | Terror From Beyond (SM & VM) |
| Thrasher | Scum and Villainy (SM & VM) |
| Revanite Commanders | Temple of Sacrifice (SM & VM) |
| Kephess | Explosive Conflict (MM only) |
All tokens
| Single-Boss Operation | |
|---|---|
| Golden Fury | |
| Colossal Monolith | |
| Eyeless (Rakghoul Event Boss) | |
| Xenoanalyst (Gree Event boss) | |
What Gear Drops in Each Operation
Each operation boss is guaranteed to drop a certain piece of gear. If you’re looking for just a few more pieces of gear and are limited in time, you might want to try to focus on operations that have the pieces of gear you need.
Eternity Vault
| Boss | Story Mode | Veteran Mode |
|---|---|---|
| Annihilation Droid XRR-3 | Belt |
Belt |
| Gharj | Gloves |
Gloves |
| Ancient Pylons | Earpiece |
Earpiece |
| Infernal Council | Boots |
Boots |
| Soa | Offhand |
Offhand |
Karagga’s Palace
| Boss | Story Mode | Veteran Mode |
|---|---|---|
| Bonethrasher | Bracers |
Bracers |
| Jarg and Sorno | Boots |
Boots |
| Foreman Crusher | Earpiece |
Earpiece |
| G4-B3 Heavy Fabricator | Pants |
Pants |
| Karagga the Unyielding | Chestpiece |
Chestpiece |
Explosive Conflict
| Boss | Story Mode | Veteran Mode | Master Mode |
|---|---|---|---|
| Zorn and Toth | Implant |
Implant |
105 Unassembled Components |
| Firebrand and Stormcaller | Relic |
Relic |
105 Unassembled Components |
| Colonel Vorgath | Helm |
Helm |
105 Unassembled Components |
| Warlord Kephess | Chestpiece |
Chestpiece |
Implant |
Terror From Beyond
| Boss | Story Mode | Veteran Mode | Master Mode |
|---|---|---|---|
| The Writhing Horror | Belt |
Belt |
105 Unassembled Components |
| Dread Guards | Relic |
Relic |
105 Unassembled Components |
| Operator IX | Helm |
Helm |
105 Unassembled Components |
| Kephess | Implant |
Implant |
105 Unassembled Components |
| TFB | Offhand |
Offhand |
Pants |
Scum and Villany
| Boss | Story Mode | Veteran Mode | Master Mode |
|---|---|---|---|
| Dash’roode | Bracers |
Bracers |
105 Unassembled Components |
| Titan 6 | Gloves |
Gloves |
105 Unassembled Components |
| Thrasher | Implant |
Implant |
105 Unassembled Components |
| Operations Chief | Pants |
Pants |
105 Unassembled Components |
| Olok the Shadow | Relic |
Relic |
105 Unassembled Components |
| Cartel Warlords | Chestpiece |
Chestpiece |
105 Unassembled Components |
| Dread Master Styrak | Mainhand |
Mainhand |
Boots |
Dread Fortress
| Boss | Story Mode | Veteran Mode | Master Mode |
|---|---|---|---|
| Nefra | Belt |
Belt |
105 Unassembled Components |
| Draxus | Gloves |
Gloves |
105 Unassembled Components |
| Grob’thok | Earpiece |
Earpiece |
105 Unassembled Components |
| Corruptor Zero | Pants |
Pants |
105 Unassembled Components |
| Brontes | Offhand |
Offhand |
Gloves |
Dread Palace
| Boss | Story Mode | Veteran Mode | Master Mode |
|---|---|---|---|
| Bestia | Bracers |
Bracers |
105 Unassembled Components |
| Tyrans | Boots |
Boots |
105 Unassembled Components |
| Calphayus | Helm |
Helm |
105 Unassembled Components |
| Raptus | Relic |
Relic |
105 Unassembled Components |
| Dread Council | Chestpiece |
Chestpiece |
Earpiece |
The Ravagers
| Boss | Story Mode | Veteran Mode |
|---|---|---|
| Sparky | Belt |
Belt |
| Quartermaster Bulo | Boots |
Boots |
| Torque | Earpiece |
Earpiece |
| Master and Blaster | Pants |
Pants |
| Coratanni | Mainhand |
Mainhand |
Temple of Sacrifice
| Boss | Story Mode | Veteran Mode |
|---|---|---|
| Malaphar the Savage | Bracers |
Bracers |
| Sword Squadron | Gloves |
Gloves |
| The Underlurker | Helm |
Helm |
| Revanite Commanders | Implant |
Implant |
| Revan the Returned | Mainhand |
Mainhand |
Gods from the Machine
| Boss | Story Mode (242) | Veteran Mode (248) |
|---|---|---|
| Tyth | Relic |
Relic |
| Esne and Aivela | Chestpiece |
Chestpiece |
| Nahut | Helm |
Helm |
| Scyva | Offhand |
Offhand |
| Izax | Mainhand |
Mainhand |
Crafting
Crafting your own end game armor in SWTOR is not meant to be a primary way of gearing – instead, it primarily acts as a way to buy gear from other players, or to craft gear for your alts after your first character is geared up. This is because the primary ways to get schematics are by completing content, which will naturally gain you gear through the Galactic Command system.
Crafting Schematics from Galactic Command
Schematics that come from Galactic Command crates are highly random, and you aren’t guaranteed a schematic in any given crate. You can find a schematic for any type of gear in Command Crates, from mods and enhancements, to unmoddable purple gear with stats. If you happen to get a schematic in a Command Crate, it will be in the same tier of gear as your current Command Level tier.
- Tier 1 (Command Rank 1-90), 230 Schematics
- Tier 2 (Command Rank 91 – 180), 234 Schematics
- Tier 3 (Command Rank 181-300), 240 Schematics
- Tier 4 (Command Rank 300), 246 Schematics
- 248 Schematics do not exist
Crafting Schematics from PvP
Turning in the weekly PvP quests for both ranked and unranked PvP matches can net you up to 2 random schematics per weekly. The schematic from a PvP weekly reward will be in the same tier of gear as your Command Level. The PvP Schematics are only modifications, not finished pieces of gear, including Armorings, Mods, Enhancements, Hilts, or Barrels. On the rare occasion you can also receive a schematic from completing a daily PvP quest.
- Tier 1 (Command Rank 1-90), 230 Schematics
- Tier 2 (Command Rank 91 – 180), 234 Schematics
- Tier 3 (Command Rank 181-300), 240 Schematics
- Tier 4 (Command Rank 300), 246 Schematics
- 248 Schematics do not exist
Crafting Schematics from Operations
Crafting schematics drop from operation bosses.
Crafting Schematics from Crafting Trainers
| Icon | Item Rating | Modification | Crafter | Reverse Engineer |
|---|---|---|---|---|
 |
Blue-bordered | DPS/Healer Armorings | Armormech | |
 |
Blue-bordered | Tank Armorings | Synthweaving | |
  |
Blue-bordered | Mods | Cybertech | |
     |
Blue-bordered | Earpieces | Cybertech | |
     |
Blue-bordered | Enhancements | Cybertech | |
  |
Blue-bordered | Barrels | Armstech | |
  |
Blue-bordered | Hilts | Artifice | |
         |
Blue-bordered | Relics | Artifice | |
     |
Blue-bordered | Implants | Biochem | |
Crafting Schematics from Reverse Engineering
Reverse Engineering is the act of breaking down a piece of gear or modification down, to receive crafting materials back and to hopefully learn how to craft it.
To see if reverse engineering will give you a chance to get a schematic, press the Reverse Engineering button in your inventory and then hover your mouse over the item. If it is a schematic you can learn, it will say “Chance to Research Schematic: X%”. If it does not say this, but is still lit up in your inventory, it means you can Reverse Engineer it but it will only give you crafting materials and has no chance to be learned. The highest tier of gear that can be Reverse Engineered is purple-bordered Tier 3 gear, with an item rating of 246.
You can only Reverse Engineer for Schematics these types of items from Command Crates:
| Icon | Rarity | Modification | Crafter who can RE |
|---|---|---|---|
|
Purple-bordered | DPS/Healer Armorings | Armormech |
|
Purple-bordered | Tank Armorings | Synthweaving |
| |
Purple-bordered | Mods | Cybertech |
| |
Purple-bordered | Enhancements | Cybertech |
| |
Purple-bordered | Hilts | Artifice |
| |
Purple-bordered | Barrels | Armstech |
For endgame level 70 gear, only PURPLE item modifications including Armorings, Mods, Enhancements, Hilts and Barrels can be reverse engineered for schematics. Green, Blue, and Gold items CANNOT BE reverse engineered for schematics if they came from vendors, command crates, or quest rewards. The only exception to this rule for endgame gear is blue crafting schematics from the crafting trainers – these can be reverse engineered to gain new purple schematics.
If you do not have the right crafting skill on the character you received the item you want to Reverse Engineer, remove the modification(s) you want to Reverse Engineer and place them in to a piece of Legacy Gear or into a Legacy Weapon. Cheap Legacy Armor can be bought on the Fleet, in the Supplies section, from a vendor called <Adaptive Gear Vendor> in the low-level section of the Supplies area (the opposite end of where you can turn in Command Tokens ad Unassembled Pieces.)
Bug: There seems to be a bug that sometimes appears when Reverse Engineering multiple items. After you have Reverse Engineered the first item, all items in your inventory may become “greyed out”, as if you can not RE them. To reset this visual bug, click on the Reverse Engineer button twice and all items wil return to normal.
Reverse Engineer % Chance Rules
- You can only Reverse Engineer purple gear modifications that you have earned – you cannot Reverse Engineer a crafted modification you bought from the GTN.
- Reverse Engineering purple modifications from Command Tokens (230 modifications) will give you a 100% chance to learn the schematic.
- Reverse Engineering blue gear and modifications from the Crafting Trainers will give you a 60% chance to learn the schematic.
Crafting Schematics for Masterwork Gear
View XamXam’s Guide About 5.10 Masterwork Craftings, Schematics and Materials
“In order to be able to craft 258 gear, you’re going to have to do a variety of content. However, the primary source of mats and schematics for crafting 258 gear comes from NIM Gods of the Machine. The Ossus Dailies will also be a source of gear and mats.
All the crafted gear is moddable and has set bonuses. However, all mods and enhancements are now bound to the type of armour (like armourings have been for a long time). This means, if you crafted some boots, you can only put the mods and enhancements in boots, you can not put them into Legs, for example.
Once you craft yourself a set of the new gear, you can reverse engineer the mod and enhancements for a 60% chance to get their schematics.”
How to Modify Gear
There are two types of gear in the game – moddable, and unmoddable. Moddable gear is gear you can change the stats of, while unmoddable gear is static gear with the stats attached directly to the piece of armor. For endgame gearing, you will want to have 9 pieces of moddable armor:

Moddable pieces of gear
Moddable Gear
- Chestpiece
- Helm
- Gloves
- Belt
- Pants
- Boots
- Bracers
- Mainhand
- Offhand
Your other pieces of gear, including your earpiece, implant and relics, can never be modded.
The stats of moddable pieces of gear are made up by the modifications in the gear. Modifications are individual parts that make up each piece of armor – most pieces of armor have an Armoring, a Mod, and an Enhancement. You can mix and match these modifications to either upgrade your stats, or to create a different combination of stats.

To see the stats of the individual modifications in a piece of gear when you roll over it with your mouse, you can activate this setting: press the ESC key > Preferences > User Interface > Show Detailed Item Tooltips. When you hover your mouse over a piece of armor, it will show the individual stats of the Armoring, Mod and Enhancement.

To modify a gear piece, CTRL+ RIGHT CLICK on it. This will open the Modification window. To add a mod to a piece of armor, right click on it from your inventory while the modification window is up, and click apply. To remove a mod in a piece of armor, right click on it in the modification window. You can accept or reject the removal in case you clicked something by accident.
You can also use this same window to add cosmetic items to your gear including non-reusable dyes, weapon tunings, and color crystals.
Mix and Match Armorings, Mods and Enhancements
Being able to move modifications to other pieces becomes helpful as you build up your set of gear. If you receive a second pair of gloves, it might not be as good as the pair you have on… but the individual modifications and enhancements in the second pair of gloves still might be better than the mods you have in your helm or boots. The Armoring in a specific piece of armor can only be used in that type of armor – for example, a boot armoring can only go into another pair of boots, but the mod and the enhancements can be taken from any piece of armor and put into any other.

Comparing two pieces of armor. The piece I have equipped is on the left. The new piece I got is on the right. The green Stat Changes on the left show that this will be a big upgrade for me!
When switching mods, make sure not to accidentally delete any armorings with a set bonus – set bonuses are tied to the armoring in a piece of armor, so you might want to keep a lower level armoring with a set bonus in your gear and just upgrade the mod and enhancement.
Set Bonus
A set bonus is a special type of gear bonus that gives you a boost in battle, like making some of your abilities stronger or making them usable more often. The more pieces of set bonus gear you collect, the more bonuses you will get. For example, you get the first bonus by having 2 matching pieces of a set, the next at 4 matching pieces, and the final bonus at having all 6 pieces of a matching set. Set bonuses only exist on the pieces of armor that you can “wear” – Head, Chest, Hands, Legs, Boots, Belt and Bracers. There’s no set bonus on earpieces, implants, relics or weapons. Due to its special boost, set bonus gear is the best type of gear in the game.
A Set Bonus will trump stats 99% of the time, even if the rating is lower. For example, a Tier 2 crate may have dropped a grade 234 armoring, but if it’s going to destroy a grade 230 set bonus, you do not want to replace the set bonus armoring.
Set Bonus is tied to the Armoring modification in a piece of gear, and that Armoring is restricted to that type of slot. So you can remove a 230 Set Bonus Foot Armoring and put it in another pair of boots and the Set Bonus will carry over. You can also replace the modification and the enhancement in a Set Bonus piece of gear without losing the Set Bonus.

This is the tooltip for my character’s chestpiece. In the highlighted area, it’s showing that I have 4 of 7 possible set bonus pieces – I’ve obtained the Robe, Lower Robe, Belt and Cuffs, and I am still missing the Boots, Gloves and Headgear. Because I’ve met the requirements for the 2-piece set bonus and the 4-piece set bonus, I will get a boost to my abilities. My goal will be to try and get two more of the set bonus pieces I’m missing to reach that 6-piece set bonus which is grayed out. Once I do that, I can use a non-set-bonus piece of gear for the 7th slot since I will have already reached the threshold for the 6-piece set bonus.
BUG ALERT: There is a bug that occurs if you transfer armor through the legacy bank, where the set bonus tooltip breaks and doesn’t show the set bonus until you change instances.
Where to get a moddable piece of gear?
As you gain CXP, Command Levels and Command Crates, you’ll receive plenty of moddable armor you can mix and match, but you can also pick up an entire set in the Supplies section of the Fleet from a vendor with the label of <Adaptive Gear Vendor>. Each piece only costs 600 – 2,500 Credits.
Legacy Gear
Many players choose to place their armorings, mods and enhancements in Legacy Gear. Legacy gear is a special type of gear that can be sent between characters within an account on the same server. All legacy gear has a symbol of a shield on the top right, and the words “Binds to Legacy” or “Bound to Legacy” in its tooltip. Creating your gear set in a Legacy Set allows you to share gear between your characters. Players often also use Legacy Gear to save money on Augments, and they will only add augment kits to Legacy Gear.
Cheap Legacy Armor can be bought on the Fleet, in the Supplies section, from a vendor called <Adaptive Gear Vendor> in the low-level section of the Supplies area (the opposite end of where you can turn in Command Tokens ad Unassembled Pieces.) Don’t forget that with the Outfit Designer, it doesn’t matter what your gear with stats looks like, because you can wear a costume over top of your choice. This vendor does not have legacy weapons and offhands though, which can only be obtained through more difficult methods.
- The easiest way to get a set of Legacy Gear is simply by buying it from the Adaptive Gear Vendor on the fleet. There are other options out there, including the reputation system, and currency gained through various flashpoints.
- Most players receive a free set of Legacy gear in the mail for each of their characters, including Free-to-play level 1 players
- The easiest way to get a mainhand is through the Eternal Championship – one run through all the rounds will give you enough currency to buy a Legacy Mainhand.
- One of the most common ways of getting a legacy offhand is through the Gree reoccurring event.
I have placed my Trooper Tank’s gear in to a Legacy set, and when I want to tank on my Sith Inquisitor, I simply mail my armor over to that character or put it in my Legacy Bank. My Inquisitor still needs to find her own earpiece, implant and relics since they can’t be transferred, and she can’t use my trooper’s blaster rifle or set bonus, but at least my Trooper’s tanking set has roughly the same stats as my Inquisitor needs, and it’s better than sending my Inquisitor into a raid with barely any gear! I wouldn’t want to share this set with my Sith Warrior Marauder though, as Marauders can only DPS and my tanking set would have the wrong type of stats for that.
Stats
In general, player looking to gear up should be striving to eventually get the highest gear-rating of 248 with a full set bonus, but each class should be working towards a specific combination of stats to optimize their damage, healing, or defensive stats. If you’re not interested in min-maxing your statistics, simply upgrade your gear when you get a piece that has higher stats until you can get the upgraded version with the set bonus armoring later on.
Whether you are playing casually or min-maxing your stats, you do need to know the basics of what each role needs for stats, to allow your character to be effective in battle at level 70.
Tanks, Healers, DPS
- Tanks are players that focus on keeping the boss’s attention and shielding the rest of the group from damage in group fights. Tanks need to focus on absorption, shields, and endurance because they’ll always have more defense than they need.
- Bounty Hunter Powertech (Shield Tech)
- Sith Inquisitor Assassin (Darkness)
- Sith Warrior Juggernaut (Immortal)
- Trooper Vanguard (Shield Specialist)
- Jedi Consular Shadow (Kinetic)
- Jedi Knight Guardian (Defense)
- Healers are players that focus on healing other players in their group during a fight. Healers need to invest in a variety of stats including Mastery, Power, Critical, and Alacrity but not Accuracy.
- Bounty Hunter Mercenary (Bodyguard)
- Imperial Agent Operative (Medic)
- Sith Inquisitor Sorcerer (Corruption)
- Trooper Commando (Combat Medic)
- Smuggler Scoundrel (Sawbones)
- Jedi Consular Sage (Seer)
- DPS players are players who focus on doing damage to enemies during a fight. DPS stands for “damage per second”. DPS players need to make sure they have enough Accuracy, Crit and a surprising amount of alacrity.
- DPS classes are all classes and combat proficiences not listed above in the Tank and Healer categories. If you aren’t sure what you are, you’re probably a DPS.
Optimal Stats for All Classes
How do you know exactly which combination of stats you want to aim for? There’s nothing in game that will tell you exactly how much alacrity or accuracy you need. Luckily, other players in the game have calculated what the ideal statistics for each class might look like. Some theory crafters looked at the different statistics in the game and developed mathematical models to determine the optimal numbers for each stat at each level of gear for each class – from your starter 230 gear all the way to the best gear in the game.
The most well-known and easiest to understand guide about these ideal stats was originally written by Bant. His work was continued by Vicadin for the higher tiers of gear that were released. Later, some players figured out a way to maximize DPS even more by using the Alacrity “trick”, which is shown in a spreadsheet by a player named Smarty.
Optimal DPS Stats
- The stats DPS players should focus on are: Mastery, Power, Crit, Alacrity and Accuracy.
- DPS characters do NOT need any: Defense, Absorption, or Shield stats. Adding these stats will not make your character “die less”, instead the game ignores them because your character is not a tank. This is a common misconception for new players! If you are DPS, focus on your DPS stats. You also do not need to focus on Endurance for more health – let the healers heal you, and focus on doing the most amount of damage as possible. The faster you can defeat your enemies, the less damage they can do to you.
- Mastery boosts your damage and Crit improves your chance to make a critical hit with your abilities more often to do a bonus burst of damage. Alacrity allows you to cast your abilities faster and Accuracy allows you to hit your enemies and not miss them.
- All DPS Characters aim for a specific number of Accuracy to reach 110% Accuracy. This number is the minimum amount you need to always “hit” your enemy and never miss. You want to be as close to that number as possible – having “extra” Accuracy above 110% does not add to that chance. Those extra points could instead go towards one of the more useful stats. Many players think they only need 100% Accuracy, however, in order to hit bosses, DPS players must have 110% Accuracy to overcome the 10% Defense Chance that all bosses have. The item-rating 230 Accuracy number all DPS characters need is 737, or 110% accuracy. (Note: if you have an offensive offhand lightsaber or blaster, you can still miss with it!)
- All DPS should be using the Accuracy Stim as it is how you arrive at 110% Accuracy without any “wasted points” – The magic formula is 1 E (E being an Enhancement/Implant/Earpiece) + 3 A (Augments) + 1 Stim. The E will need to be grade 240 or higher, otherwise an additional Augment will need to be used
- Gearing up priorities for DPS in PvE should be:
- 1 – Accuracy to 737, as close as you can without going over.
- 2 – Alacrity to Tier 1 until you’re regularly getting 242+ gear, then move to Tier 2.
- 3 – Rest in Critical, with 1-2 Mastery Augments for classes with Alacrity boosts (Carnage Marauder, Lightning Sorc, Arsenal Merc)
- In PvP (warzones), DPS need a slightly different amount of Accuracy. PvE DPS should be shooting for 110% Accuracy to match the 10% defense all bosses have, but in PvP DPS only need around 101-105% Accuracy, depending on their class, to match other player’s defense percentages. Read More About Accuracy in PvP Here
- You can work towards getting your optimal DPS stats by switching around your modifications, enhancements, and augments to get the right amount of Crit, Alacrity and Accuracy.
- Stats in modification items have primary, secondary and tertiary stats. As a general rule, you will only have to make a serious choice about what tertiary stat you want to have. (An enhancement will have you choose between Crit, Accuracy and Alacrity, but Power and Defense won’t be part of that pool as they aren’t tertiary). Your primary and secondary stats should come naturally if you choose the right types of tertiary stats for your role (DPS).
- Primary (Mastery and Endurance) – DPS choose Mastery
- Secondary (Defense and Power) – DPS choose Power
- Tertiary (Alacrity, Crit, Accuracy, Shield, Absorb) – DPS choose Alacrity, Crit or Accuracy depending on what stats they need to adjust
- DPS should only be using Lethal Mods (ones without letters, so no 54A or 54B mods). Enhancements come in many flavors, but there are only 3 that DPS and Healers should be using – Initiative (Accuracy), Quick Savant (Alacrity) and Adept (Critical). There are other versions with the same stats, but are not optimized – a Discipline Enhancement, for example, has Critical on it, but is much higher in Endurance than it is in Critical.
- DPS players should check out the “Alacrity Trick” section of this guide to optimize their stats even further with some new formulas to boost their DPS.

To find out what stats you should use as a DPS with Smarty’s spreadsheet,
- Go to Smarty’s Spreadsheet (note: this is German guild’s resource, and is less of a public resource like Bant/Vicadin’s guide, and may be made private in the future)
- Find your Combat Proficiency in the left column, the Imperial/ Republic versions mirror each other and use the same stats.
- Beside your class’s combat proficiency will be the suggested ideal stats
- You can compare these to your own stats by opening your character equipment panel. (Press C on your keyboard)
- The guide also has suggestions of what gear to use in the columns to the right of the suggested stats – what type of Enhancements/Earpieces, Implants, Augments, Crystals and Stim are included.
- Switch around any current modifications, enhancements, and augments to get as close as you can to the suggested stats.
Optimal Tank Stats
- The stats tanks should focus on are: Endurance, Shield and Absorb
- Endurance gives you more health, and Shield+Absorption helps you take less damage. Some fights it is better to have more endurance, in others it is better to have more mitigation of damage with Shield+Absorption.
- Tank gear always has defense in it. Tanks will always have more defense than they need due to the stats that are built in to all tanking modifications. It is better to get more Shield, Endurance or Absorption than to get more defense.
- You can work towards getting your optimal tank stats by switching around your modifications, enhancements, and augments to get the right amount of Shield, Absorb and Endurance.
- Stats in modification items have primary, secondary and tertiary stats. As a general rule, you will only have to make a serious choice about what tertiary stat you want to have. (An enhancement will have you choose between Shield and Absorb, but Power and Defense won’t be part of that pool as they aren’t tertiary). Your primary and secondary stats should come naturally if you choose the right types of tertiary stats for your role (Tank).
- Primary (Mastery and Endurance) – Tanks choose Endurance
- Secondary (Defense and Power) – Tanks choose Defense
- Tertiary (Alacrity, Crit, Accuracy, Shield, Absorb) – Tanks choose Shield or Absorb depending on what stats they need to adjust
- There is a bit more variety for tanks when it comes to Mods especially in PvP, but for PvE sake there are a few mod options:
- Warding Mod: The standard optimized mod, high Defense, Medium Endurance
- Warding Mod B – High Endurance, medium Defense
- Lethal B – High Endurance, medium Power
- For tanking Enhancements these are the tank options:
- Immunity/Sturdiness – Standard “optimized”, high Tertiary stat, mid level Endurance and Defense
- Bulwark/Bastion – Lower Defense but a higher amount of HP – with diminishing returns on Defense, the additional HP is often more useful.
- Less theorycrafting and math has been done for tanks in recent years compared to DPS. Unlike DPS who should definitely use the newer stats, tanks may still use Bant and Vicadin’s guides for gearing.
Tank Stats
- Tier 1 Gear, Item Rating 230 – Bant’s Stat Guide item rating 230 (starter gear)
- Tier 2 Gear, Item Rating 236 – Bant’s Stat Guide item rating 236
- Tier 3 Gear, Item Rating 242 – Bant’s Stat Guide item rating 242
- Tier 4 Gear, Item Rating 248 – Vicadin’s Stat Guide item rating 248
- Tier 4 Gear, Item Rating 248 – Smarty’s Spreadsheet (most up to date)

To find out what stats you should use with Bant/Vicadin’s guide for tanking,
- Click the link above for the tier of gear you are working on earning.
- Click the “Show Spoiler” button under the Optimal Stats header.
- Find your Class & Combat Proficiency in the long list (use CTRL+F to search the page), the Imperial – Republic versions mirror each other and use the same stats.
- Below your class’s combat proficiency will be the suggested ideal stats
- You can compare these to your own stats by opening your character equipment panel. (Press C on your keyboard)
- The guide also has suggestions of what to use in parentheses beside each stat. (C = Color Crystal, E = Enhancement/Implant/Earpiece, A = Augment) If there are no suggestions, this is not a stat you need to focus on, or a stat that you will get naturally by focusing on the other stats with suggestions
- Switch around any current modifications, enhancements, and augments to get as close as you can to the suggested stats.

The example above shows my Vanguard Trooper tank’s suggestions for gear rating 230 on Bant’s guide:
- 6,382 Endurance (the guide suggests using 2 Endurance Crystals and an Endurance Stim)
- 5830 Mastery and 910 Power (tanks don’t focus on these stats)
- 3,183 Defense (tanks always have more defense than they need and don’t need to focus on this)
- 2,015 Shield (the guide suggests using 9 Shield Enhancements/Earpiece/Implants, and 3 Shield Augments)
- 1,237 Absorb (the guide suggests using 1 Absorb Enhancement/Earpiece/Implant, and 11 Absorb Augments)
Optimal Healing Stats
- The stats Healers should focus on are mainly: Mastery, Power, Crit and Alacrity
- Crit makes your crit with your healing abilities more often along with adding a bonus burst of healing, Alacrity allows you to cast your healing abilities faster
- Healers do NOT need any Accuracy. They will never miss with their heals due to low accuracy. They also do not need any Absorption, Shield, or Defense.
- You can work towards getting your optimal healing stats by switching around your modifications, enhancements, and augments to get the right amount of Crit and Alacrity
- Stats in modification items have primary, secondary and tertiary stats. As a general rule, you will only have to make a serious choice about what tertiary stat you want to have. (An enhancement will have you choose between Crit, Accuracy and Alacrity, but Power and Defense won’t be part of that pool as they aren’t tertiary). Your primary and secondary stats should come naturally if you choose the right types of tertiary stats for your role (Healer).
- Primary (Mastery and Endurance) – Healers choose Mastery
- Secondary (Defense and Power) – Healers choose Power
- Tertiary (Alacrity, Crit, Accuracy, Shield, Absorb) – Healers choose Alacrity, or Crit depending on what stats they need to adjust
- Healers should only be using Lethal Mods (ones without letters, so no 54A or 54B mods). Enhancements come in many flavors, but there are only 3 that DPS and Healers should be using – Initiative (Accuracy), Quick Savant (Alacrity) and Adept (Critical). There are other versions with the same stats, but are not optimized – a Discipline Enhancement, for example, has Critical on it, but is much higher in Endurance than it is in Critical.
To find out what stats you should use as a Healer with Smarty’s spreadsheet,
- Go to Smarty’s Spreadsheet (note: this is German guild’s resource, and is less of a public resource like Bant/Vicadin’s guide, and may be made private in the future)
- Find your Combat Proficiency in the left column, the Imperial/ Republic versions mirror each other and use the same stats.
- Beside your healing class’s combat proficiency will be the suggested ideal stats
- You can compare these to your own stats by opening your character equipment panel. (Press C on your keyboard)
- The guide also has suggestions of what gear to use in the columns to the right of the suggested stats – what type of Enhancements/Earpieces, Implants, Augments, Crystals and Stim are included.
- Switch around any current modifications, enhancements, and augments to get as close as you can to the suggested stats.
“Alacrity Trick” for DPS and Healers
There has however been some updates to the calculations by other players for DPS classes based around an Alacrity “trick” and the global cool down timing and its rounding. This method’s math means that if you pile on the alacrity to a certain amount, it will allow you to use your abilities faster, and get in more damage in a shorter amount of time. It’s not really a trick, instead it’s using the in-game math that determines how much damage you do in the most efficient way.
For a better understanding of how Alacrity works see Rambol and Hottie’s Stat Guide.
Alacrity Advice by Nuzguz
Alacrity allows you to cast your abilities faster. There are two different ways of dealing with it:
- ~1881 High Alacrity: the most effective number to make your casts faster
- ~726/759 Low Alacrity: the point where it starts getting faster
Having your alacrity between those two numbers is not using your stats as effectively as you could be.
- Playing with both numbers will be nearly the same DPS but I still would recommend using more alacrity [most advanced players recommend gearing via high the alacrity method]
- If you always have a bad ping ingame, you should use less alacrity to get the best out of your class.
- Low Alacrity is also nice if you’re not full 248 and just need like some enchantments to get there.
- Only for Skilltrees who are not getting permanent boosts of Alacrity while you’re in combat.
- Alacrity will also make your DoTs tick faster.
More Info about the “Alacrity Trick”
- Tier 4 Gear, Item Rating 248 – Smarty’s Spreadsheet
- Some Alacrity Numbers
- Low Alacrity Alternative List by Nuzguz
- Alacrity Effect on GCD (especially for classes with instant attacks)
- Alacrity Bug Presented Visually
- Sith Warrior – Marauder – Fury || Jedi Knight – Sentinel – Concentration
- Juggernaut – Vengeance || Guardian – Vigilance
- Juggernaut – Rage || Guardian – Focus
- Trooper DPS / Bounty Hunter DPS
- Operative DPS / Scoundrel DPS
- Sorcerer Lighting / Sage Telekinetics
Augments
Players who are serious about gearing can upgrade their gear with augments, which gives you additional stats on top of the armor’s original stats. You can add an augment to each of your pieces of gear, for a total of 14 augments. Much like modifications, there are different types of augments, each one with a different set of stats.
Augments & Augmentation Kits
To place an augment into a piece of gear, you first need to give it an augment slot, by adding an Augment Kit. Augment kits can be bought on the GTN from other players or crafted by Synthweavers, Armstechs and Armormechs. These augment kits are single-use, which means when you install them on a piece of armor, you cannot take them out and place them in a different piece of armor – for example, if you get a better implant but your old one has an augment slot in it, you’ll need to buy or craft a brand new augment slot for your new earpiece. The augments themselves are re-useable, and you can pull them out of old gear just like you can an armoring or an enhancement. To fully augment your current gear, you’ll need a total of 14 augments and 14 Augmentation Kit MK-10s.
If you can’t afford the steep price of the “best in game” augments, you can choose to either skip augmenting your gear all together, or grab a lower tier of augments. If you’re just looking to run story mode raids or veteran mode flashpoints, you really don’t need to worry about augmenting at all – augmenting is designed for players who want to do the most difficult content in the game like Master Mode operations and Ranked PvP, or for players who simply want to have the most powerful gear available in the game. However, augmenting your gear will give you an even bigger boost than upgrading your gear rating for Story Mode Operation and Story/Veteran Flashpoints, because you will not receive a bolster if you lack augments, compared to if you are lacking gear.

How to Augment a Piece of Gear
- Buy or craft an augment and an Augmentation Kit MK-10, have them in your inventory
- Find a modification station. There is one located in the Galactic Trade Market and Crafting sections of the fleet. Right click it.
- Choose your gear piece from the drop down or drag it over rom your inventory
- Click the “Add Augment Slot” button near the bottom
- Make sure the correct augment kit is selected, click “Buy Augment Slot”. By default, it will select the highest level Augmentation Kit that you have in your inventory. (costs about 40,000 credits)
- Right click the augment you want to add from your inventory to add it to your gear. You can do this even if you are not at a modification station.

To save money on augment kits, many players only augment legacy gear pieces, so they can have a powerful piece of gear to switch between characters, even if it isn’t exactly the right stats. Another way players save money is by waiting to augment their gear until it’s at a higher level – for example, you may choose to not augment the start level 230 gear, and only augment your gear at the 242 level, especially your earpieces, implants, and relics which are not moddable.
Augment Crafting Trades
In addition to purchasing your augments from the GTN, you may opt to trade for them. Many crafters will gladly trade you an augment for the rare materials needed to craft them, which can be cheaper than buying an augment on the GTN. Crafters will essentially craft “for free” as there is a chance of “Critting” when crafting, which gives us 2 for the price of 1. you would give your crafter the materials, once the augment is crafted they will send it to you, and if they “crit” and get an extra one they keep it as their reward! Keep in mind this type of trading comes with a risk – if your crafter decides to take the items and run, you will likely not be able to get them back, so reserve trading to friends and well known community crafters.
Augment Options
| Advanced Augment 45 | Advanced Augment 46 | Superior Augment 46 | Superior Augment 48 | |
|---|---|---|---|---|
| item rating 228 | item rating 230 | item rating 236 | item rating 240 | |
| Augment | Inexpensive | Dropped in Veteran/Master mode ATAtC Flashpoint (Copero) | Expensive, schematics from Crafting Trainer | Very Expensive, schematics from Nathema Flashpoint |
| Accuracy |
+65 Endurance +96 Accuracy Rating Armstech |
+67 Endurance (+2) +97 Accuracy Rating (+1) +19 Power (+19) Copero Flashpoint |
+76 Endurance (+9) +98 Accuracy Rating (+1) +33 Power (+14) Armstech |
+80 Endurance (+4) +99 Accuracy Rating (+1) +39 Power (+6) Armstech |
| Alacrity |
+65 Endurance +96 Alacrity Rating Synthweaving |
+67 Endurance (+2) +19 Power (+19) +97 Alacrity Rating (+1) Copero Flashpoint |
+76 Endurance (+9) +33 Power (+14) +98 Alacrity Rating (+1) Armormech |
+80 Endurance (+4) +39 Power (+6) +99 Alacrity Rating (+1) Armormech |
| Critical |
+65 Endurance +96 Critical Rating Synthweaving |
+67 Endurance (+2) +19 Power (+19) +97 Critical Rating (+1) Copero Flashpoint |
+76 Endurance (+9) +33 Power (+14) +98 Critical Rating (+1) Synthweaving |
+80 Endurance (+4) +39 Power (+6) +99 Critical Rating (+1) Synthweaving |
| Versatile (Mastery) |
+65 Endurance +96 Mastery Armormech |
+67 Endurance (+2) +19 Power (+19) +97 Mastery (+1) Copero Flashpoint |
+76 Endurance (+9) +33 Power (+14) +98 Mastery (+1) Armstech |
+80 Endurance (+4) +39 Power (+6) +99 Mastery (+1) Armstech |
 Absorb Absorb |
+65 Power +96 Absorption Rating Armormech |
+19 Endurance (+19) +67 Power (+2) +97 Absorption Rating (+1) Copero Flashpoint |
+33 Endurance (+14) +76 Power (+9) +98 Absorption Rating (+1) Armormech |
+39 Endurance (+6) +80 Power (+4) +99 Absorption Rating (+1) Armormech |
| Redoubt (Defense) |
+65 Power +96 Defense Rating Armstech |
+19 Endurance (+19) +67 Power (+2) +97 Defense Rating (+1) Copero Flashpoint |
+33 Endurance (+14) +76 Power (+9) +98 Defense Rating (+1) Synthweaving |
+39 Endurance (+6) +80 Power (+4) +99 Defense Rating (+1) Synthweaving |
| Shield |
+96 Shield Rating +65 Power Armormech |
+19 Endurance (+19) +97 Shield Rating (+1) +67 Power (+2) Copero Flashpoint |
+33 Endurance (+14) +98 Shield Rating (+1) +76 Power (+9) Armstech |
+39 Endurance (+6) +99 Shield Rating (+1) +80 Power (+4) Armstech |
Advanced Augments 45 (item rating 228)
The augments with “Advanced” at the beginning and “45” at the end have a purple border and are for level 68+, and are a great alternative to the more expensive augments available. They can be bought on the GTN for someone between 50,000 and 150,000 credits each, versus the more powerful augments which can easily cost well over a million credits each. To craft these yourself, you can pick up the blue version of the schematic for these from the appropriate crafting trainer. Craft the blue versions, then Reverse Engineer them to learn the Advanced purple schematic. You’ll have a 60% chance to learning the purple schematics when you Reverse Engineer the blue versions.
| Materials | Rarity | Source |
|---|---|---|
2x  Signal Disruptor Signal Disruptor |
Purple |
|
2x  Code Recombinator Code Recombinator |
Blue |
|
2x    Hadrium/Sedrellium/Romex Hadrium/Sedrellium/Romex |
Blue |
|
2x   Crafted Components Crafted Components |
Blue |
|
Advanced Augments 46 (item rating 230)
The augments with “Advanced” at the beginning and “46” at the end have a purple border and are only dropped from the “A Traitor Among the Chiss” Flashpoint in Veteran/Master mode. These augments are not bound, so players who get them in the Flashpoint can sell them on the GTN. On my server, these augments have gone out of style and due to their source there are not many available to buy on the GTN.
Tip from Nuzguz: Buying or crafting 230 Augments is just not really worth it. If you want to get better ones then 228 just take the 236 Augments.

Superior Augments 46 (item rating 236)
The augments with “Superior” at the beginning and “46” at the end have a gold border are the second best augments in the game, and the schematic can be learned directly from the appropriate crafting trainer at crafting level 600. These require a variety of expensive crafting materials to make. On my server, at the time of making this guide, they cost anywhere between 3 million to 7 million credits each on the GTN. This high price is mainly due to the cost of the materials to make them, as all players with the appropriate crafting skill can obtain the schematic for these. If the price tag is too high, consider getting the purple augments with an item rating of 228 for a much cheaper cost.
Tip from Nuzguz: Buying or crafting 236 Augments is a good thing if you run harder Veteran Mode or even Master Mode Operations because of the extra points of power you gain.
| Materials | Rarity | Source |
|---|---|---|
2x  Charged Matter Transubstantiator Charged Matter Transubstantiator |
Purple |
|
| 2x Signal Disruptor |
Purple |
|
1x  Encrypted Memory Core Encrypted Memory Core |
Purple |
|
| 2x Code Recombinator |
Blue |
|
| 5x Crafted Components |
Gold |
|
Superior Augments 48 (item rating 240)
The augments with “Superior” at the beginning and “48” at the end have a gold border are the best augments in the game, and are aimed towards players doing the most difficult content in the game, or by those who enjoy min-maxing their stats. The schematic is a fairly common drop from the Nathema Conspiracy Flashpoint, but the material cost is doubled compared to the 236 augments.
Tip from Nuzguz: I would not recommend buying or crafting 240 Augments! They’re way to expensive (credits and materials) and just make a way to low difference to the 236 ones.
| Materials | Rarity | Source |
|---|---|---|
| 4x Charged Matter Transubstantiator |
Purple |
|
| 3x Signal Disruptor |
Purple |
|
| 3x Encrypted Memory Core |
Purple |
|
| 5x Code Recombinator |
Blue |
|
| 9x Crafted Components |
Gold |
|
Advice from Neo on Augments: I suggest never augmenting gear that is not bound to legacy or gear that is not 248 (unless you have a lot of money). It’s a waste of credits to pull 248 mods and slap them into 230 gear if you augment them so just augment a bound to legacy sets. Don’t use blue augments. 228 purple augments are super cheap and affordable at the moment if you can’t afford the gold augments.
Summary
Due to its numerous changes and revisions, the gearing system for level 70 players in Star Wars: The Old Republic is fairly complex, but in return players have many different ways to gear available. You can get gear from the Galactic Command system by completing almost any quest in the game, buy gear with Command Tokens received from Command Crates, win gear in Operations by defeating bosses, and buy gear with Unassembled Components earned from warzones.
Gearing up your character with the right stats can be a daunting process, but luckily we have other players who have made great math-based guides with the optimal stats for each class we can follow.
Between getting starter gear from Galactic Command, modifying and augmenting our armor, working on getting a set bonus, and knowing about all the different ways to gear, you’ll be on the right track to getting your ideal set of gear!
 Questions or comments? Feel free to send me a message on Twitter


 Discord
  Email swtorista@gmail.com
 Bluesky @swtorista.com
 Reddit /u/swtorista
 Twitch Swtorista
 Youtube
 Patreon
 Twitter @swtorista